nodejs抓取动态网页
一文彻底搞懂 React 服务端渲染
网站优化 • 优采云 发表了文章 • 0 个评论 • 74 次浏览 • 2022-09-16 08:11
1、前言
在前端项目需要首屏渲染速度优化或SEO的场景下,大家或多或少都听过到过服务端渲染( SSR ),但大多数人对服务端渲染具体实现和底层原理还是比较陌生的。本文基于公司官网开发时做了服务端渲染改造基础上,系统理解和梳理这套体系的模式和逻辑,并写了一些笔记和Demo(文后链接)便于深入理解。这次我们来以React为例,把服务端渲染彻底讲弄明白。本文主要有以下内容:
1.1 什么是服务端渲染?
服务端渲染, SSR (Server-side Rendering) ,顾名思义,就是在浏览器发起页面请求后由服务端完成页面的HTML结构拼接,返回给浏览器解析后能直接构建出有内容的页面。
用 node 实现一个简单的 SSR
我们使用Koa框架来创建node服务:
// demo1<br />var Koa = require("koa");<br />var app = new Koa();<br /><br />// 对于任何请求,app将调用该函数处理请求:<br />app.use(async (ctx) => {<br /> // 将HTML字符串直接返回 <br /> ctx.body = `<br /> <br /> <br /> ssr<br /> <br /> <br /> <br /> hello server<br /> <p>word<br /> <br /> <br /> `;<br />});<br />//监听<br />app.listen(3001, () => {<br /> console.log("listen on 3001 port!");<br />});<br /></p>
启动服务后访问页面,查看网页源代码是这样:
npx create-react-app my-app<br />
上面的例子就是一个简单的服务端渲染,其服务侧直接输出了有内容的HTML,浏览器解析之后就能渲染出页面。与服务端渲染对应的是客户端渲染 ,CSR(Client Side Rendering),通俗的讲就是由客户端完成页面的渲染。其大致渲染流程是这样:在浏览器请求页面时,服务端先返回一个无具体内容的HTML,浏览器还需要再加载并执行JS,动态地将内容和数据渲染到页面中,才能完成页面具体内容的显示。目前主流的React ,Vue, Angular 等SPA页面未经特殊处理均采用客户端渲染。最常见脚手架create-react-app 生成的项目就是客户端渲染:
上面采用客户端渲染的HTML页面中中无内容,需在浏览器端加载并执行bundle.js后才能构建出有内容页面。
1.2 为什么用服务端渲染?1.2.1 服务端渲染的优势
相比于客户端渲染,服务端渲染有什么优势?我们可以从下图对比一下这两种不同的渲染模式。
首屏时间更短
采用客户端渲染的页面,要进行JS文件拉取和JS代码执行,动态创建 DOM 结构,客户端逻辑越重,初始化需要执行的 JS 越多,首屏性能就越慢;客户端渲染前置的第三方类库/框架、polyfill 等都会在一定程度上拖慢首屏性能。Code splitting、lazy-load等优化措施能够缓解一部分,但优化空间相对有限。相比而言,服务端渲染的页面直接拉取HTMl就能显示内容,更短的首屏时间创造更多的可能性。
利于SEO
在别人使用搜索引擎搜索相关的内容时,你的网页排行能靠得更前,这样你的流量就有越高,这就是SEO的意义所在。那为什么服务端渲染更利于爬虫爬你的页面呢?因为对于很多搜索引擎爬虫(非google)HTML返回是什么内容就爬什么内容,而不会动态执行JS代码内容。对客户端渲染的页面来说,简直无能为力,因为返回的HTML是一个空壳。而服务端渲染返回的HTML是有内容的。
SSR的出现,就是为了解决这些CSR的弊端。
1.2.2 权衡使用服务端渲染
并不是所有的WEB应用都必须使用SSR,这需要开发者来权衡,因为服务端渲染会带来以下问题:
代码复杂度增加。为了实现服务端渲染,应用代码中需要兼容服务端和客户端两种运行情况,部分代码只能在客户端运行,需要对其进行特殊处理,才能在服务器渲染应用程序中运行。
需要更多的服务器资源。由于服务器增加了渲染HTML的需求,使得原本只需要输出静态资源文件的nodejs服务,新增了数据获取的IO和渲染HTML的CPU占用,如果流量突然暴增,有可能导致服务器宕机,因此需要使用响应的缓存策略和准备相应的服务器负载。
涉及构建设置和部署的更多要求。与可以部署在任何静态文件服务器上的完全静态单页面应用程序 (SPA) 不同,服务器渲染应用程序,需要处于 Node.js server 运行环境。
因此,在使用服务端渲染SSR之前,需要考虑投入产出比:是否真的需要SEO,是否需要将首屏时间提升到极致。如果都没有,使用SSR反而小题大做了。
1.3 服务端渲染的发展史
其实服务端渲染并不是什么新奇的概念,前后端分层之前很长的一段时间里都是以服务端渲染为主(JSP、PHP),那时后端一把梭哈,在服务端生成完整的 HTML 页面。但那时的服务端渲染和现在还是有本质的区别,存在比较多的弊端,每一个请求都要动态生成HTML,存在大量的重复,服务器机器成本也相对比较高,前后端代码完全掺杂在一起,开发维护难。
随着业务不断发展变化,后端要写的JS逻辑也越发复杂,而且JS有很多潜在的坑使后端越发觉得这是块烫手山芋,于是逐渐出现了前后端分层。伴随AJAX的兴起,浏览器可以做到了不再重现请求页面就可更新局部视图。还可以利用客户端免费的计算资源,后端侧逐渐演变成了提供数据支持。jquery的兴起,良好的客户端兼容性使JS不再受困于各种版本浏览器兼容问题,一统了前端天下。
此后伴随node的兴起,前后端分离越演越烈。前端能摆脱后端的依赖单独起服务,三大框架vue,react,angular也迅势崛起,以操作数据就能更新视图,前端开发人员逐渐摆脱了与烦人的Dom操作打交道,能够专心的关注业务和数据逻辑。前端同时探索出了功能插件,UI库,组件等多种代码复用方案,形成了繁荣的前端生态。
但是三大框架采用客户端渲染模式,随着代码逻辑的加重,首屏时间成了一个很大的问题,同时开发人员也发现SEO也出了问题,大多搜索引擎根本不会去执行JS代码。但是也不可能再回头走老路,于是前端又探索出了一套服务端渲染的框架来解决掉这些问题。此时的服务端渲染是建立在成熟的组组件,模块生态之上,基于Node.js的同构方案成为最佳实践。
2、React服务端渲染的原理
2.1基本思路
React服务端渲染流程
React服务端渲染的基本思路,简单理解就是将组件或页面通过服务器生成html字符串,再发送到浏览器,最后将静态标记"混合"为客户端上完全交互的应用程序。因为要考虑React在服务端的运行情况,故相比之前讲的多了在浏览器端绑定状态与事件的过程。
我们可以结合下面的流程图来一览完整的 React服务端渲染的全貌:当浏览器去请求一个页面,前端服务器端接收到请求并执行 React组件代码,此时React代码中可能包含向后端服务器发起请求,待请求完成返回的数据后,前端服务器组装好有内容的HTML里返给浏览器,浏览器解析HTML后已具备展示内容,但页面并不具备交互能力。
下一阶段,在返回的HTMl中还有script链接,浏览器再拉取JS并执行其包含的React 代码,其能在浏览器端执行完整的生命周期,并通过相关API实现复用此前返回 HTML节点并添加事件的绑定,此时页面才就具备完全交互能力。总的来说,react服务端渲染包含有两个过程:服务端渲染 + 客户端 hydrate 渲染。服务端渲染在服务端渲染出了首屏内容;客户端 hydrate 渲染复用服务端返回的节点,进行一次类似于 render 的 hydrate 渲染过程,把交互事件绑上去(此时页面可交互),并接管页面。
服务端处理后返回的
客户端“浸泡”还原后的
核心思想(同构)
从上面的流程中可以看到,客户端和服务端都要执行React代码完成渲染,那是不是就要写两份代码,供双端使用? 当然不需要,也完全不合理。所谓同构,就是让一份React代码,既可以在服务端中执行,也可以在客户端中执行。
SSR技术栈
我们这里简单理了一下服务端渲染涉及到的技术栈:
知道了服务端渲染、同构的大概思路之后,下面从头开始,一步一步完成具体实践,深入理解其原理。
2.2 服务端如何渲染React组件?
按照之前流程的大概思路,我们首先需要将React组件在服务端转换成HTML字符串,那怎么做呢?React 提供的面向服务端的API(react-dom/server),提供了相关方法能够将 React 组件渲染成静态的(HTML)标签。下面我们简单了解下react-dom/server。
react-dom/server
react-dom/server有renderToString、renderToStaticMarkup,renderToNodeStream、renderToStaticNodeStream四个方法能够将 React 组件渲染成静态的(HTML)标签,前两者能在客户端和服务端运行,后两者只能在服务端运行。
renderToStaticMarkup VS renderToString:renderToString 方法会在 React 内部创建的额外 DOM 属性,例如 data-reactroot, 在相邻文本节点之间生成,这些属性是客户端执行hydrate复用节点的关键所在,data-reactroot属性是服务端渲染的标志之一。如果你希望把 React 当作静态页面生成器来使用,renderToStaticMarkup方法会非常有用,因为去除额外的属性可以节省一些字节。
// Home.jsx<br style="white-space:pre-wrap;margin: 0px;padding: 0px;max-width: 100%;overflow-wrap: break-word !important;box-sizing: border-box !important;color: rgb(171, 178, 191);font-family: 'Operator Mono', Consolas, Monaco, Menlo, monospace;font-size: 12px;font-style: normal;font-variant-ligatures: normal;font-variant-caps: normal;font-weight: 400;letter-spacing: normal;orphans: 2;text-align: left;text-indent: 0px;text-transform: none;widows: 2;word-spacing: 0px;-webkit-text-stroke-width: 0px;text-decoration-thickness: initial;text-decoration-style: initial;text-decoration-color: initial;" />import React from "react";<br style="white-space:pre-wrap;margin: 0px;padding: 0px;max-width: 100%;overflow-wrap: break-word !important;box-sizing: border-box !important;color: rgb(171, 178, 191);font-family: 'Operator Mono', Consolas, Monaco, Menlo, monospace;font-size: 12px;font-style: normal;font-variant-ligatures: normal;font-variant-caps: normal;font-weight: 400;letter-spacing: normal;orphans: 2;text-align: left;text-indent: 0px;text-transform: none;widows: 2;word-spacing: 0px;-webkit-text-stroke-width: 0px;text-decoration-thickness: initial;text-decoration-style: initial;text-decoration-color: initial;" />const Home = () => {<br style="white-space:pre-wrap;margin: 0px;padding: 0px;max-width: 100%;overflow-wrap: break-word !important;box-sizing: border-box !important;color: rgb(171, 178, 191);font-family: 'Operator Mono', Consolas, Monaco, Menlo, monospace;font-size: 12px;font-style: normal;font-variant-ligatures: normal;font-variant-caps: normal;font-weight: 400;letter-spacing: normal;orphans: 2;text-align: left;text-indent: 0px;text-transform: none;widows: 2;word-spacing: 0px;-webkit-text-stroke-width: 0px;text-decoration-thickness: initial;text-decoration-style: initial;text-decoration-color: initial;" /> return (<br style="white-space:pre-wrap;margin: 0px;padding: 0px;max-width: 100%;overflow-wrap: break-word !important;box-sizing: border-box !important;color: rgb(171, 178, 191);font-family: 'Operator Mono', Consolas, Monaco, Menlo, monospace;font-size: 12px;font-style: normal;font-variant-ligatures: normal;font-variant-caps: normal;font-weight: 400;letter-spacing: normal;orphans: 2;text-align: left;text-indent: 0px;text-transform: none;widows: 2;word-spacing: 0px;-webkit-text-stroke-width: 0px;text-decoration-thickness: initial;text-decoration-style: initial;text-decoration-color: initial;" /> <br style="white-space:pre-wrap;margin: 0px;padding: 0px;max-width: 100%;overflow-wrap: break-word !important;box-sizing: border-box !important;color: rgb(171, 178, 191);font-family: 'Operator Mono', Consolas, Monaco, Menlo, monospace;font-size: 12px;font-style: normal;font-variant-ligatures: normal;font-variant-caps: normal;font-weight: 400;letter-spacing: normal;orphans: 2;text-align: left;text-indent: 0px;text-transform: none;widows: 2;word-spacing: 0px;-webkit-text-stroke-width: 0px;text-decoration-thickness: initial;text-decoration-style: initial;text-decoration-color: initial;" /> console.log("hello")}>This is Home Page<br style="white-space:pre-wrap;margin: 0px;padding: 0px;max-width: 100%;overflow-wrap: break-word !important;box-sizing: border-box !important;color: rgb(171, 178, 191);font-family: 'Operator Mono', Consolas, Monaco, Menlo, monospace;font-size: 12px;font-style: normal;font-variant-ligatures: normal;font-variant-caps: normal;font-weight: 400;letter-spacing: normal;orphans: 2;text-align: left;text-indent: 0px;text-transform: none;widows: 2;word-spacing: 0px;-webkit-text-stroke-width: 0px;text-decoration-thickness: initial;text-decoration-style: initial;text-decoration-color: initial;" /> <p>Home is the page ..... more discribe<br style="white-space:pre-wrap;margin: 0px;padding: 0px;max-width: 100%;overflow-wrap: break-word !important;box-sizing: border-box !important;color: rgb(171, 178, 191);font-family: 'Operator Mono', Consolas, Monaco, Menlo, monospace;font-size: 12px;font-style: normal;font-variant-ligatures: normal;font-variant-caps: normal;font-weight: 400;letter-spacing: normal;orphans: 2;text-align: left;text-indent: 0px;text-transform: none;widows: 2;word-spacing: 0px;-webkit-text-stroke-width: 0px;text-decoration-thickness: initial;text-decoration-style: initial;text-decoration-color: initial;" /> <br style="white-space:pre-wrap;margin: 0px;padding: 0px;max-width: 100%;overflow-wrap: break-word !important;box-sizing: border-box !important;color: rgb(171, 178, 191);font-family: 'Operator Mono', Consolas, Monaco, Menlo, monospace;font-size: 12px;font-style: normal;font-variant-ligatures: normal;font-variant-caps: normal;font-weight: 400;letter-spacing: normal;orphans: 2;text-align: left;text-indent: 0px;text-transform: none;widows: 2;word-spacing: 0px;-webkit-text-stroke-width: 0px;text-decoration-thickness: initial;text-decoration-style: initial;text-decoration-color: initial;" /> );<br style="white-space:pre-wrap;margin: 0px;padding: 0px;max-width: 100%;overflow-wrap: break-word !important;box-sizing: border-box !important;color: rgb(171, 178, 191);font-family: 'Operator Mono', Consolas, Monaco, Menlo, monospace;font-size: 12px;font-style: normal;font-variant-ligatures: normal;font-variant-caps: normal;font-weight: 400;letter-spacing: normal;orphans: 2;text-align: left;text-indent: 0px;text-transform: none;widows: 2;word-spacing: 0px;-webkit-text-stroke-width: 0px;text-decoration-thickness: initial;text-decoration-style: initial;text-decoration-color: initial;" />};<br style="white-space:pre-wrap;margin: 0px;padding: 0px;max-width: 100%;overflow-wrap: break-word !important;box-sizing: border-box !important;color: rgb(171, 178, 191);font-family: 'Operator Mono', Consolas, Monaco, Menlo, monospace;font-size: 12px;font-style: normal;font-variant-ligatures: normal;font-variant-caps: normal;font-weight: 400;letter-spacing: normal;orphans: 2;text-align: left;text-indent: 0px;text-transform: none;widows: 2;word-spacing: 0px;-webkit-text-stroke-width: 0px;text-decoration-thickness: initial;text-decoration-style: initial;text-decoration-color: initial;" />export default Home;</p>
我们使用React-dom/server下提供的renderToString方法,在服务端将其转换为html字符串:
// server.js<br />import Koa from "koa";<br />import React from "react";<br />import { renderToString } from "react-dom/server";<br />import Home from "./containers/Home";<br /><br />const app = new Koa();<br />app.use(async (ctx) => {<br /> // 核心api renderToString 将react组件转化成html字符串<br /> const content = renderToString();<br /> ctx.body = `<br /> <br /> <br /> ssr<br /> <br /> <br /> ${content}<br /> <br /> <br /> `;<br />});<br />app.listen(3002, () => {<br /> console.log("listen:3002");<br />});<br />
可以看到上面代码里有ES6的import 和jsx语法,不能直接运行在node环境,需要借助webpack打包, 构建目标是commonjs。新建webpack.server.js具体配置如下:
// webpack.server.js<br style="white-space:pre-wrap;margin: 0px;padding: 0px;max-width: 100%;overflow-wrap: break-word !important;box-sizing: border-box !important;color: rgb(171, 178, 191);font-family: 'Operator Mono', Consolas, Monaco, Menlo, monospace;font-size: 12px;font-style: normal;font-variant-ligatures: normal;font-variant-caps: normal;font-weight: 400;letter-spacing: normal;orphans: 2;text-align: left;text-indent: 0px;text-transform: none;widows: 2;word-spacing: 0px;-webkit-text-stroke-width: 0px;text-decoration-thickness: initial;text-decoration-style: initial;text-decoration-color: initial;" />const path = require("path");<br style="white-space:pre-wrap;margin: 0px;padding: 0px;max-width: 100%;overflow-wrap: break-word !important;box-sizing: border-box !important;color: rgb(171, 178, 191);font-family: 'Operator Mono', Consolas, Monaco, Menlo, monospace;font-size: 12px;font-style: normal;font-variant-ligatures: normal;font-variant-caps: normal;font-weight: 400;letter-spacing: normal;orphans: 2;text-align: left;text-indent: 0px;text-transform: none;widows: 2;word-spacing: 0px;-webkit-text-stroke-width: 0px;text-decoration-thickness: initial;text-decoration-style: initial;text-decoration-color: initial;" />const nodeExternals = require("webpack-node-externals");<br style="white-space:pre-wrap;margin: 0px;padding: 0px;max-width: 100%;overflow-wrap: break-word !important;box-sizing: border-box !important;color: rgb(171, 178, 191);font-family: 'Operator Mono', Consolas, Monaco, Menlo, monospace;font-size: 12px;font-style: normal;font-variant-ligatures: normal;font-variant-caps: normal;font-weight: 400;letter-spacing: normal;orphans: 2;text-align: left;text-indent: 0px;text-transform: none;widows: 2;word-spacing: 0px;-webkit-text-stroke-width: 0px;text-decoration-thickness: initial;text-decoration-style: initial;text-decoration-color: initial;" />module.exports = {<br style="white-space:pre-wrap;margin: 0px;padding: 0px;max-width: 100%;overflow-wrap: break-word !important;box-sizing: border-box !important;color: rgb(171, 178, 191);font-family: 'Operator Mono', Consolas, Monaco, Menlo, monospace;font-size: 12px;font-style: normal;font-variant-ligatures: normal;font-variant-caps: normal;font-weight: 400;letter-spacing: normal;orphans: 2;text-align: left;text-indent: 0px;text-transform: none;widows: 2;word-spacing: 0px;-webkit-text-stroke-width: 0px;text-decoration-thickness: initial;text-decoration-style: initial;text-decoration-color: initial;" /> mode: "development",<br style="white-space:pre-wrap;margin: 0px;padding: 0px;max-width: 100%;overflow-wrap: break-word !important;box-sizing: border-box !important;color: rgb(171, 178, 191);font-family: 'Operator Mono', Consolas, Monaco, Menlo, monospace;font-size: 12px;font-style: normal;font-variant-ligatures: normal;font-variant-caps: normal;font-weight: 400;letter-spacing: normal;orphans: 2;text-align: left;text-indent: 0px;text-transform: none;widows: 2;word-spacing: 0px;-webkit-text-stroke-width: 0px;text-decoration-thickness: initial;text-decoration-style: initial;text-decoration-color: initial;" /> target: "node",<br style="white-space:pre-wrap;margin: 0px;padding: 0px;max-width: 100%;overflow-wrap: break-word !important;box-sizing: border-box !important;color: rgb(171, 178, 191);font-family: 'Operator Mono', Consolas, Monaco, Menlo, monospace;font-size: 12px;font-style: normal;font-variant-ligatures: normal;font-variant-caps: normal;font-weight: 400;letter-spacing: normal;orphans: 2;text-align: left;text-indent: 0px;text-transform: none;widows: 2;word-spacing: 0px;-webkit-text-stroke-width: 0px;text-decoration-thickness: initial;text-decoration-style: initial;text-decoration-color: initial;" /> entry: "./server.js",<br style="white-space:pre-wrap;margin: 0px;padding: 0px;max-width: 100%;overflow-wrap: break-word !important;box-sizing: border-box !important;color: rgb(171, 178, 191);font-family: 'Operator Mono', Consolas, Monaco, Menlo, monospace;font-size: 12px;font-style: normal;font-variant-ligatures: normal;font-variant-caps: normal;font-weight: 400;letter-spacing: normal;orphans: 2;text-align: left;text-indent: 0px;text-transform: none;widows: 2;word-spacing: 0px;-webkit-text-stroke-width: 0px;text-decoration-thickness: initial;text-decoration-style: initial;text-decoration-color: initial;" /> resolve: {<br style="white-space:pre-wrap;margin: 0px;padding: 0px;max-width: 100%;overflow-wrap: break-word !important;box-sizing: border-box !important;color: rgb(171, 178, 191);font-family: 'Operator Mono', Consolas, Monaco, Menlo, monospace;font-size: 12px;font-style: normal;font-variant-ligatures: normal;font-variant-caps: normal;font-weight: 400;letter-spacing: normal;orphans: 2;text-align: left;text-indent: 0px;text-transform: none;widows: 2;word-spacing: 0px;-webkit-text-stroke-width: 0px;text-decoration-thickness: initial;text-decoration-style: initial;text-decoration-color: initial;" /> extensions: [".jsx", ".js", ".tsx", ".ts"],<br style="white-space:pre-wrap;margin: 0px;padding: 0px;max-width: 100%;overflow-wrap: break-word !important;box-sizing: border-box !important;color: rgb(171, 178, 191);font-family: 'Operator Mono', Consolas, Monaco, Menlo, monospace;font-size: 12px;font-style: normal;font-variant-ligatures: normal;font-variant-caps: normal;font-weight: 400;letter-spacing: normal;orphans: 2;text-align: left;text-indent: 0px;text-transform: none;widows: 2;word-spacing: 0px;-webkit-text-stroke-width: 0px;text-decoration-thickness: initial;text-decoration-style: initial;text-decoration-color: initial;" /> },<br style="white-space:pre-wrap;margin: 0px;padding: 0px;max-width: 100%;overflow-wrap: break-word !important;box-sizing: border-box !important;color: rgb(171, 178, 191);font-family: 'Operator Mono', Consolas, Monaco, Menlo, monospace;font-size: 12px;font-style: normal;font-variant-ligatures: normal;font-variant-caps: normal;font-weight: 400;letter-spacing: normal;orphans: 2;text-align: left;text-indent: 0px;text-transform: none;widows: 2;word-spacing: 0px;-webkit-text-stroke-width: 0px;text-decoration-thickness: initial;text-decoration-style: initial;text-decoration-color: initial;" /> module: {<br style="white-space:pre-wrap;margin: 0px;padding: 0px;max-width: 100%;overflow-wrap: break-word !important;box-sizing: border-box !important;color: rgb(171, 178, 191);font-family: 'Operator Mono', Consolas, Monaco, Menlo, monospace;font-size: 12px;font-style: normal;font-variant-ligatures: normal;font-variant-caps: normal;font-weight: 400;letter-spacing: normal;orphans: 2;text-align: left;text-indent: 0px;text-transform: none;widows: 2;word-spacing: 0px;-webkit-text-stroke-width: 0px;text-decoration-thickness: initial;text-decoration-style: initial;text-decoration-color: initial;" /> rules: [<br style="white-space:pre-wrap;margin: 0px;padding: 0px;max-width: 100%;overflow-wrap: break-word !important;box-sizing: border-box !important;color: rgb(171, 178, 191);font-family: 'Operator Mono', Consolas, Monaco, Menlo, monospace;font-size: 12px;font-style: normal;font-variant-ligatures: normal;font-variant-caps: normal;font-weight: 400;letter-spacing: normal;orphans: 2;text-align: left;text-indent: 0px;text-transform: none;widows: 2;word-spacing: 0px;-webkit-text-stroke-width: 0px;text-decoration-thickness: initial;text-decoration-style: initial;text-decoration-color: initial;" /> {<br style="white-space:pre-wrap;margin: 0px;padding: 0px;max-width: 100%;overflow-wrap: break-word !important;box-sizing: border-box !important;color: rgb(171, 178, 191);font-family: 'Operator Mono', Consolas, Monaco, Menlo, monospace;font-size: 12px;font-style: normal;font-variant-ligatures: normal;font-variant-caps: normal;font-weight: 400;letter-spacing: normal;orphans: 2;text-align: left;text-indent: 0px;text-transform: none;widows: 2;word-spacing: 0px;-webkit-text-stroke-width: 0px;text-decoration-thickness: initial;text-decoration-style: initial;text-decoration-color: initial;" /> test: /\.jsx?$/,<br style="white-space:pre-wrap;margin: 0px;padding: 0px;max-width: 100%;overflow-wrap: break-word !important;box-sizing: border-box !important;color: rgb(171, 178, 191);font-family: 'Operator Mono', Consolas, Monaco, Menlo, monospace;font-size: 12px;font-style: normal;font-variant-ligatures: normal;font-variant-caps: normal;font-weight: 400;letter-spacing: normal;orphans: 2;text-align: left;text-indent: 0px;text-transform: none;widows: 2;word-spacing: 0px;-webkit-text-stroke-width: 0px;text-decoration-thickness: initial;text-decoration-style: initial;text-decoration-color: initial;" /> loader: "babel-loader",<br style="white-space:pre-wrap;margin: 0px;padding: 0px;max-width: 100%;overflow-wrap: break-word !important;box-sizing: border-box !important;color: rgb(171, 178, 191);font-family: 'Operator Mono', Consolas, Monaco, Menlo, monospace;font-size: 12px;font-style: normal;font-variant-ligatures: normal;font-variant-caps: normal;font-weight: 400;letter-spacing: normal;orphans: 2;text-align: left;text-indent: 0px;text-transform: none;widows: 2;word-spacing: 0px;-webkit-text-stroke-width: 0px;text-decoration-thickness: initial;text-decoration-style: initial;text-decoration-color: initial;" /> exclude: /node_modules/,<br style="white-space:pre-wrap;margin: 0px;padding: 0px;max-width: 100%;overflow-wrap: break-word !important;box-sizing: border-box !important;color: rgb(171, 178, 191);font-family: 'Operator Mono', Consolas, Monaco, Menlo, monospace;font-size: 12px;font-style: normal;font-variant-ligatures: normal;font-variant-caps: normal;font-weight: 400;letter-spacing: normal;orphans: 2;text-align: left;text-indent: 0px;text-transform: none;widows: 2;word-spacing: 0px;-webkit-text-stroke-width: 0px;text-decoration-thickness: initial;text-decoration-style: initial;text-decoration-color: initial;" /> options: {<br style="white-space:pre-wrap;margin: 0px;padding: 0px;max-width: 100%;overflow-wrap: break-word !important;box-sizing: border-box !important;color: rgb(171, 178, 191);font-family: 'Operator Mono', Consolas, Monaco, Menlo, monospace;font-size: 12px;font-style: normal;font-variant-ligatures: normal;font-variant-caps: normal;font-weight: 400;letter-spacing: normal;orphans: 2;text-align: left;text-indent: 0px;text-transform: none;widows: 2;word-spacing: 0px;-webkit-text-stroke-width: 0px;text-decoration-thickness: initial;text-decoration-style: initial;text-decoration-color: initial;" /> presets: ["@babel/preset-react", "@babel/preset-env"],<br style="white-space:pre-wrap;margin: 0px;padding: 0px;max-width: 100%;overflow-wrap: break-word !important;box-sizing: border-box !important;color: rgb(171, 178, 191);font-family: 'Operator Mono', Consolas, Monaco, Menlo, monospace;font-size: 12px;font-style: normal;font-variant-ligatures: normal;font-variant-caps: normal;font-weight: 400;letter-spacing: normal;orphans: 2;text-align: left;text-indent: 0px;text-transform: none;widows: 2;word-spacing: 0px;-webkit-text-stroke-width: 0px;text-decoration-thickness: initial;text-decoration-style: initial;text-decoration-color: initial;" /> plugins: [<br style="white-space:pre-wrap;margin: 0px;padding: 0px;max-width: 100%;overflow-wrap: break-word !important;box-sizing: border-box !important;color: rgb(171, 178, 191);font-family: 'Operator Mono', Consolas, Monaco, Menlo, monospace;font-size: 12px;font-style: normal;font-variant-ligatures: normal;font-variant-caps: normal;font-weight: 400;letter-spacing: normal;orphans: 2;text-align: left;text-indent: 0px;text-transform: none;widows: 2;word-spacing: 0px;-webkit-text-stroke-width: 0px;text-decoration-thickness: initial;text-decoration-style: initial;text-decoration-color: initial;" /> [<br style="white-space:pre-wrap;margin: 0px;padding: 0px;max-width: 100%;overflow-wrap: break-word !important;box-sizing: border-box !important;color: rgb(171, 178, 191);font-family: 'Operator Mono', Consolas, Monaco, Menlo, monospace;font-size: 12px;font-style: normal;font-variant-ligatures: normal;font-variant-caps: normal;font-weight: 400;letter-spacing: normal;orphans: 2;text-align: left;text-indent: 0px;text-transform: none;widows: 2;word-spacing: 0px;-webkit-text-stroke-width: 0px;text-decoration-thickness: initial;text-decoration-style: initial;text-decoration-color: initial;" /> "@babel/plugin-transform-runtime",<br style="white-space:pre-wrap;margin: 0px;padding: 0px;max-width: 100%;overflow-wrap: break-word !important;box-sizing: border-box !important;color: rgb(171, 178, 191);font-family: 'Operator Mono', Consolas, Monaco, Menlo, monospace;font-size: 12px;font-style: normal;font-variant-ligatures: normal;font-variant-caps: normal;font-weight: 400;letter-spacing: normal;orphans: 2;text-align: left;text-indent: 0px;text-transform: none;widows: 2;word-spacing: 0px;-webkit-text-stroke-width: 0px;text-decoration-thickness: initial;text-decoration-style: initial;text-decoration-color: initial;" /> {<br style="white-space:pre-wrap;margin: 0px;padding: 0px;max-width: 100%;overflow-wrap: break-word !important;box-sizing: border-box !important;color: rgb(171, 178, 191);font-family: 'Operator Mono', Consolas, Monaco, Menlo, monospace;font-size: 12px;font-style: normal;font-variant-ligatures: normal;font-variant-caps: normal;font-weight: 400;letter-spacing: normal;orphans: 2;text-align: left;text-indent: 0px;text-transform: none;widows: 2;word-spacing: 0px;-webkit-text-stroke-width: 0px;text-decoration-thickness: initial;text-decoration-style: initial;text-decoration-color: initial;" /> absoluteRuntime: false,<br style="white-space:pre-wrap;margin: 0px;padding: 0px;max-width: 100%;overflow-wrap: break-word !important;box-sizing: border-box !important;color: rgb(171, 178, 191);font-family: 'Operator Mono', Consolas, Monaco, Menlo, monospace;font-size: 12px;font-style: normal;font-variant-ligatures: normal;font-variant-caps: normal;font-weight: 400;letter-spacing: normal;orphans: 2;text-align: left;text-indent: 0px;text-transform: none;widows: 2;word-spacing: 0px;-webkit-text-stroke-width: 0px;text-decoration-thickness: initial;text-decoration-style: initial;text-decoration-color: initial;" /> corejs: false,<br style="white-space:pre-wrap;margin: 0px;padding: 0px;max-width: 100%;overflow-wrap: break-word !important;box-sizing: border-box !important;color: rgb(171, 178, 191);font-family: 'Operator Mono', Consolas, Monaco, Menlo, monospace;font-size: 12px;font-style: normal;font-variant-ligatures: normal;font-variant-caps: normal;font-weight: 400;letter-spacing: normal;orphans: 2;text-align: left;text-indent: 0px;text-transform: none;widows: 2;word-spacing: 0px;-webkit-text-stroke-width: 0px;text-decoration-thickness: initial;text-decoration-style: initial;text-decoration-color: initial;" /> helpers: true,<br style="white-space:pre-wrap;margin: 0px;padding: 0px;max-width: 100%;overflow-wrap: break-word !important;box-sizing: border-box !important;color: rgb(171, 178, 191);font-family: 'Operator Mono', Consolas, Monaco, Menlo, monospace;font-size: 12px;font-style: normal;font-variant-ligatures: normal;font-variant-caps: normal;font-weight: 400;letter-spacing: normal;orphans: 2;text-align: left;text-indent: 0px;text-transform: none;widows: 2;word-spacing: 0px;-webkit-text-stroke-width: 0px;text-decoration-thickness: initial;text-decoration-style: initial;text-decoration-color: initial;" /> regenerator: true,<br style="white-space:pre-wrap;margin: 0px;padding: 0px;max-width: 100%;overflow-wrap: break-word !important;box-sizing: border-box !important;color: rgb(171, 178, 191);font-family: 'Operator Mono', Consolas, Monaco, Menlo, monospace;font-size: 12px;font-style: normal;font-variant-ligatures: normal;font-variant-caps: normal;font-weight: 400;letter-spacing: normal;orphans: 2;text-align: left;text-indent: 0px;text-transform: none;widows: 2;word-spacing: 0px;-webkit-text-stroke-width: 0px;text-decoration-thickness: initial;text-decoration-style: initial;text-decoration-color: initial;" /> version: "7.0.0-beta.0",<br style="white-space:pre-wrap;margin: 0px;padding: 0px;max-width: 100%;overflow-wrap: break-word !important;box-sizing: border-box !important;color: rgb(171, 178, 191);font-family: 'Operator Mono', Consolas, Monaco, Menlo, monospace;font-size: 12px;font-style: normal;font-variant-ligatures: normal;font-variant-caps: normal;font-weight: 400;letter-spacing: normal;orphans: 2;text-align: left;text-indent: 0px;text-transform: none;widows: 2;word-spacing: 0px;-webkit-text-stroke-width: 0px;text-decoration-thickness: initial;text-decoration-style: initial;text-decoration-color: initial;" /> },<br style="white-space:pre-wrap;margin: 0px;padding: 0px;max-width: 100%;overflow-wrap: break-word !important;box-sizing: border-box !important;color: rgb(171, 178, 191);font-family: 'Operator Mono', Consolas, Monaco, Menlo, monospace;font-size: 12px;font-style: normal;font-variant-ligatures: normal;font-variant-caps: normal;font-weight: 400;letter-spacing: normal;orphans: 2;text-align: left;text-indent: 0px;text-transform: none;widows: 2;word-spacing: 0px;-webkit-text-stroke-width: 0px;text-decoration-thickness: initial;text-decoration-style: initial;text-decoration-color: initial;" /> ],<br style="white-space:pre-wrap;margin: 0px;padding: 0px;max-width: 100%;overflow-wrap: break-word !important;box-sizing: border-box !important;color: rgb(171, 178, 191);font-family: 'Operator Mono', Consolas, Monaco, Menlo, monospace;font-size: 12px;font-style: normal;font-variant-ligatures: normal;font-variant-caps: normal;font-weight: 400;letter-spacing: normal;orphans: 2;text-align: left;text-indent: 0px;text-transform: none;widows: 2;word-spacing: 0px;-webkit-text-stroke-width: 0px;text-decoration-thickness: initial;text-decoration-style: initial;text-decoration-color: initial;" /> ],<br style="white-space:pre-wrap;margin: 0px;padding: 0px;max-width: 100%;overflow-wrap: break-word !important;box-sizing: border-box !important;color: rgb(171, 178, 191);font-family: 'Operator Mono', Consolas, Monaco, Menlo, monospace;font-size: 12px;font-style: normal;font-variant-ligatures: normal;font-variant-caps: normal;font-weight: 400;letter-spacing: normal;orphans: 2;text-align: left;text-indent: 0px;text-transform: none;widows: 2;word-spacing: 0px;-webkit-text-stroke-width: 0px;text-decoration-thickness: initial;text-decoration-style: initial;text-decoration-color: initial;" /> },<br style="white-space:pre-wrap;margin: 0px;padding: 0px;max-width: 100%;overflow-wrap: break-word !important;box-sizing: border-box !important;color: rgb(171, 178, 191);font-family: 'Operator Mono', Consolas, Monaco, Menlo, monospace;font-size: 12px;font-style: normal;font-variant-ligatures: normal;font-variant-caps: normal;font-weight: 400;letter-spacing: normal;orphans: 2;text-align: left;text-indent: 0px;text-transform: none;widows: 2;word-spacing: 0px;-webkit-text-stroke-width: 0px;text-decoration-thickness: initial;text-decoration-style: initial;text-decoration-color: initial;" /> },<br style="white-space:pre-wrap;margin: 0px;padding: 0px;max-width: 100%;overflow-wrap: break-word !important;box-sizing: border-box !important;color: rgb(171, 178, 191);font-family: 'Operator Mono', Consolas, Monaco, Menlo, monospace;font-size: 12px;font-style: normal;font-variant-ligatures: normal;font-variant-caps: normal;font-weight: 400;letter-spacing: normal;orphans: 2;text-align: left;text-indent: 0px;text-transform: none;widows: 2;word-spacing: 0px;-webkit-text-stroke-width: 0px;text-decoration-thickness: initial;text-decoration-style: initial;text-decoration-color: initial;" /> ],<br style="white-space:pre-wrap;margin: 0px;padding: 0px;max-width: 100%;overflow-wrap: break-word !important;box-sizing: border-box !important;color: rgb(171, 178, 191);font-family: 'Operator Mono', Consolas, Monaco, Menlo, monospace;font-size: 12px;font-style: normal;font-variant-ligatures: normal;font-variant-caps: normal;font-weight: 400;letter-spacing: normal;orphans: 2;text-align: left;text-indent: 0px;text-transform: none;widows: 2;word-spacing: 0px;-webkit-text-stroke-width: 0px;text-decoration-thickness: initial;text-decoration-style: initial;text-decoration-color: initial;" /> },<br style="white-space:pre-wrap;margin: 0px;padding: 0px;max-width: 100%;overflow-wrap: break-word !important;box-sizing: border-box !important;color: rgb(171, 178, 191);font-family: 'Operator Mono', Consolas, Monaco, Menlo, monospace;font-size: 12px;font-style: normal;font-variant-ligatures: normal;font-variant-caps: normal;font-weight: 400;letter-spacing: normal;orphans: 2;text-align: left;text-indent: 0px;text-transform: none;widows: 2;word-spacing: 0px;-webkit-text-stroke-width: 0px;text-decoration-thickness: initial;text-decoration-style: initial;text-decoration-color: initial;" /> output: {<br style="white-space:pre-wrap;margin: 0px;padding: 0px;max-width: 100%;overflow-wrap: break-word !important;box-sizing: border-box !important;color: rgb(171, 178, 191);font-family: 'Operator Mono', Consolas, Monaco, Menlo, monospace;font-size: 12px;font-style: normal;font-variant-ligatures: normal;font-variant-caps: normal;font-weight: 400;letter-spacing: normal;orphans: 2;text-align: left;text-indent: 0px;text-transform: none;widows: 2;word-spacing: 0px;-webkit-text-stroke-width: 0px;text-decoration-thickness: initial;text-decoration-style: initial;text-decoration-color: initial;" /> filename: "bundle.js",<br style="white-space:pre-wrap;margin: 0px;padding: 0px;max-width: 100%;overflow-wrap: break-word !important;box-sizing: border-box !important;color: rgb(171, 178, 191);font-family: 'Operator Mono', Consolas, Monaco, Menlo, monospace;font-size: 12px;font-style: normal;font-variant-ligatures: normal;font-variant-caps: normal;font-weight: 400;letter-spacing: normal;orphans: 2;text-align: left;text-indent: 0px;text-transform: none;widows: 2;word-spacing: 0px;-webkit-text-stroke-width: 0px;text-decoration-thickness: initial;text-decoration-style: initial;text-decoration-color: initial;" /> path: path.resolve(__dirname, "build"),<br style="white-space:pre-wrap;margin: 0px;padding: 0px;max-width: 100%;overflow-wrap: break-word !important;box-sizing: border-box !important;color: rgb(171, 178, 191);font-family: 'Operator Mono', Consolas, Monaco, Menlo, monospace;font-size: 12px;font-style: normal;font-variant-ligatures: normal;font-variant-caps: normal;font-weight: 400;letter-spacing: normal;orphans: 2;text-align: left;text-indent: 0px;text-transform: none;widows: 2;word-spacing: 0px;-webkit-text-stroke-width: 0px;text-decoration-thickness: initial;text-decoration-style: initial;text-decoration-color: initial;" /> },<br style="white-space:pre-wrap;margin: 0px;padding: 0px;max-width: 100%;overflow-wrap: break-word !important;box-sizing: border-box !important;color: rgb(171, 178, 191);font-family: 'Operator Mono', Consolas, Monaco, Menlo, monospace;font-size: 12px;font-style: normal;font-variant-ligatures: normal;font-variant-caps: normal;font-weight: 400;letter-spacing: normal;orphans: 2;text-align: left;text-indent: 0px;text-transform: none;widows: 2;word-spacing: 0px;-webkit-text-stroke-width: 0px;text-decoration-thickness: initial;text-decoration-style: initial;text-decoration-color: initial;" /> externals: [nodeExternals()],<br style="white-space:pre-wrap;margin: 0px;padding: 0px;max-width: 100%;overflow-wrap: break-word !important;box-sizing: border-box !important;color: rgb(171, 178, 191);font-family: 'Operator Mono', Consolas, Monaco, Menlo, monospace;font-size: 12px;font-style: normal;font-variant-ligatures: normal;font-variant-caps: normal;font-weight: 400;letter-spacing: normal;orphans: 2;text-align: left;text-indent: 0px;text-transform: none;widows: 2;word-spacing: 0px;-webkit-text-stroke-width: 0px;text-decoration-thickness: initial;text-decoration-style: initial;text-decoration-color: initial;" />};
在webpack构建完成后,可在Node环境运行build/bundle.js,访问页面后查看网页源代码,可以看到,React组件中的内容已经完整地包含在服务端返回到html里面。我们成功迈出了服务端渲染第一步。此时,我们也有必要再深入了解renderToString 到底做了什么,提前踩坑!
renderToString
除了将React组件转换成html字符串外,renderToString还有做了下面这些:
1. 会执行传入的React组件的代码,但是其只执行到React生命周期初始化过程的render及之前,即下面红框的部分,其余大部分生命周期函数在服务端都不执行;这也是服务端渲染的坑点之一。
2.renderToString 生成的产物中会包含一些额外生成特殊标记,代码体积会有所增大,其中属性data-reactroot是服务端渲染的标志,便于后续客户端通过hydrate复用HTML节点。在React16前后其产物也有差距:在React 16 之前,服务端渲染采用的是基于字符串校验和(string checksum)的 HTML 节点复用方式, 会额外生成生成data-reactid、data-react-checksum等属性;React 16 改用单节点校验来复用(服务端返回的)HTML 节点,不再生成data-reactid、data-react-checksum等体积占用大户,只在空白节点间多了 这样的标记。
renderToString react16前<br style="white-space:pre-wrap;margin: 0px;padding: 0px;max-width: 100%;overflow-wrap: break-word !important;box-sizing: border-box !important;color: rgb(171, 178, 191);font-family: 'Operator Mono', Consolas, Monaco, Menlo, monospace;font-size: 12px;font-style: normal;font-variant-ligatures: normal;font-variant-caps: normal;font-weight: 400;letter-spacing: normal;orphans: 2;text-align: left;text-indent: 0px;text-transform: none;widows: 2;word-spacing: 0px;-webkit-text-stroke-width: 0px;text-decoration-thickness: initial;text-decoration-style: initial;text-decoration-color: initial;" /><br style="white-space:pre-wrap;margin: 0px;padding: 0px;max-width: 100%;overflow-wrap: break-word !important;box-sizing: border-box !important;color: rgb(171, 178, 191);font-family: 'Operator Mono', Consolas, Monaco, Menlo, monospace;font-size: 12px;font-style: normal;font-variant-ligatures: normal;font-variant-caps: normal;font-weight: 400;letter-spacing: normal;orphans: 2;text-align: left;text-indent: 0px;text-transform: none;widows: 2;word-spacing: 0px;-webkit-text-stroke-width: 0px;text-decoration-thickness: initial;text-decoration-style: initial;text-decoration-color: initial;" /> Welcome to React SSR! <br style="white-space:pre-wrap;margin: 0px;padding: 0px;max-width: 100%;overflow-wrap: break-word !important;box-sizing: border-box !important;color: rgb(171, 178, 191);font-family: 'Operator Mono', Consolas, Monaco, Menlo, monospace;font-size: 12px;font-style: normal;font-variant-ligatures: normal;font-variant-caps: normal;font-weight: 400;letter-spacing: normal;orphans: 2;text-align: left;text-indent: 0px;text-transform: none;widows: 2;word-spacing: 0px;-webkit-text-stroke-width: 0px;text-decoration-thickness: initial;text-decoration-style: initial;text-decoration-color: initial;" /> Hello There! <br style="white-space:pre-wrap;margin: 0px;padding: 0px;max-width: 100%;overflow-wrap: break-word !important;box-sizing: border-box !important;color: rgb(171, 178, 191);font-family: 'Operator Mono', Consolas, Monaco, Menlo, monospace;font-size: 12px;font-style: normal;font-variant-ligatures: normal;font-variant-caps: normal;font-weight: 400;letter-spacing: normal;orphans: 2;text-align: left;text-indent: 0px;text-transform: none;widows: 2;word-spacing: 0px;-webkit-text-stroke-width: 0px;text-decoration-thickness: initial;text-decoration-style: initial;text-decoration-color: initial;" /><br style="white-space:pre-wrap;margin: 0px;padding: 0px;max-width: 100%;overflow-wrap: break-word !important;box-sizing: border-box !important;color: rgb(171, 178, 191);font-family: 'Operator Mono', Consolas, Monaco, Menlo, monospace;font-size: 12px;font-style: normal;font-variant-ligatures: normal;font-variant-caps: normal;font-weight: 400;letter-spacing: normal;orphans: 2;text-align: left;text-indent: 0px;text-transform: none;widows: 2;word-spacing: 0px;-webkit-text-stroke-width: 0px;text-decoration-thickness: initial;text-decoration-style: initial;text-decoration-color: initial;" /><br style="white-space:pre-wrap;margin: 0px;padding: 0px;max-width: 100%;overflow-wrap: break-word !important;box-sizing: border-box !important;color: rgb(171, 178, 191);font-family: 'Operator Mono', Consolas, Monaco, Menlo, monospace;font-size: 12px;font-style: normal;font-variant-ligatures: normal;font-variant-caps: normal;font-weight: 400;letter-spacing: normal;orphans: 2;text-align: left;text-indent: 0px;text-transform: none;widows: 2;word-spacing: 0px;-webkit-text-stroke-width: 0px;text-decoration-thickness: initial;text-decoration-style: initial;text-decoration-color: initial;" />// renderToString react16<br style="white-space:pre-wrap;margin: 0px;padding: 0px;max-width: 100%;overflow-wrap: break-word !important;box-sizing: border-box !important;color: rgb(171, 178, 191);font-family: 'Operator Mono', Consolas, Monaco, Menlo, monospace;font-size: 12px;font-style: normal;font-variant-ligatures: normal;font-variant-caps: normal;font-weight: 400;letter-spacing: normal;orphans: 2;text-align: left;text-indent: 0px;text-transform: none;widows: 2;word-spacing: 0px;-webkit-text-stroke-width: 0px;text-decoration-thickness: initial;text-decoration-style: initial;text-decoration-color: initial;" />Welcome to React SSR! Hello There!
3.会被故意忽略掉的on开头的的属性,也就忽略掉了react代码中事件处理,这是也是坑点之一。服务端返回的html里没有处理事件点击,需要靠后续客户端js执行绑定事件。
function shouldIgnoreAttribute(<br /> name: string,<br /> propertyInfo: PropertyInfo | null,<br /> isCustomComponentTag: boolean,<br />): boolean {<br /> if (propertyInfo !== null) {<br /> return propertyInfo.type === RESERVED;<br /> }<br /> if (isCustomComponentTag) {<br /> return false;<br /> }<br /> if (<br /> name.length > 2 &&<br /> (name[0] === 'o' || name[0] === 'O') &&<br /> (name[1] === 'n' || name[1] === 'N')<br /> ) {<br /> return true;<br /> }<br /> return false;<br />}<br />
上面的例子我们可以看到React的代码里有点击事件,但点击后没有反应。需要靠后续客户端js执行绑定事件。如何实现?这就需要同构了。
2.3 实现基础的同构
前文已经大概讲了同构的概念,那为什么需要同构?之前的服务端代码在处理点击事件时故意忽略掉了这类属性,在服务端执行的生命周期也是不完整的,此时的页面是不具备交互能力的。同构,正是解决这些问题的关键,React代码在服务器上执行一遍之后,浏览器再去加载JS后又运行了一遍React代码,完成事件绑定和完整生命周期的执行,从而才能成为完全可交互页面。
react-dom:hydrate
实现同构的另一个核心API是React-dom下的hydrate,该方法能在客户端初次渲染的时候去复用服务端返回的原本已经存在的 DOM 节点,于渲染过程中为其附加交互行为(事件监听等),而不是重新创建 DOM 节点。需要注意是,服务端返回的 HTML 与客户端渲染结果不一致时,出于性能考虑,hydrate可以弥补文本内容的差异,但并不能保证修补属性的差异,而是将错就错;只在development模式下对这些不一致的问题报 Warning,因此必须重视 SSR HydrationWarning,要当 Error 逐个解决。
那具体实现同构?
上面这里我们提供了一个基本的架构图,可以看到,服务端运行React生成html代码我们已经基本实现,目前需要做的就是生产出客户端执行的index.js,那么这个index.js我们如何生产出来呢?
具体实践
首先新建客户端代码client.js,引入React组件,通过ReactDom.hydrate处理挂载到Dom节点, hydrate是实现复用的关键。
// client.js<br style="white-space:pre-wrap;margin: 0px;padding: 0px;max-width: 100%;overflow-wrap: break-word !important;box-sizing: border-box !important;color: rgb(171, 178, 191);font-family: 'Operator Mono', Consolas, Monaco, Menlo, monospace;font-size: 12px;font-style: normal;font-variant-ligatures: normal;font-variant-caps: normal;font-weight: 400;letter-spacing: normal;orphans: 2;text-align: left;text-indent: 0px;text-transform: none;widows: 2;word-spacing: 0px;-webkit-text-stroke-width: 0px;text-decoration-thickness: initial;text-decoration-style: initial;text-decoration-color: initial;" />import React from "react";<br style="white-space:pre-wrap;margin: 0px;padding: 0px;max-width: 100%;overflow-wrap: break-word !important;box-sizing: border-box !important;color: rgb(171, 178, 191);font-family: 'Operator Mono', Consolas, Monaco, Menlo, monospace;font-size: 12px;font-style: normal;font-variant-ligatures: normal;font-variant-caps: normal;font-weight: 400;letter-spacing: normal;orphans: 2;text-align: left;text-indent: 0px;text-transform: none;widows: 2;word-spacing: 0px;-webkit-text-stroke-width: 0px;text-decoration-thickness: initial;text-decoration-style: initial;text-decoration-color: initial;" />import ReactDom from "react-dom";<br style="white-space:pre-wrap;margin: 0px;padding: 0px;max-width: 100%;overflow-wrap: break-word !important;box-sizing: border-box !important;color: rgb(171, 178, 191);font-family: 'Operator Mono', Consolas, Monaco, Menlo, monospace;font-size: 12px;font-style: normal;font-variant-ligatures: normal;font-variant-caps: normal;font-weight: 400;letter-spacing: normal;orphans: 2;text-align: left;text-indent: 0px;text-transform: none;widows: 2;word-spacing: 0px;-webkit-text-stroke-width: 0px;text-decoration-thickness: initial;text-decoration-style: initial;text-decoration-color: initial;" />import Home from "./containers/Home";<br style="white-space:pre-wrap;margin: 0px;padding: 0px;max-width: 100%;overflow-wrap: break-word !important;box-sizing: border-box !important;color: rgb(171, 178, 191);font-family: 'Operator Mono', Consolas, Monaco, Menlo, monospace;font-size: 12px;font-style: normal;font-variant-ligatures: normal;font-variant-caps: normal;font-weight: 400;letter-spacing: normal;orphans: 2;text-align: left;text-indent: 0px;text-transform: none;widows: 2;word-spacing: 0px;-webkit-text-stroke-width: 0px;text-decoration-thickness: initial;text-decoration-style: initial;text-decoration-color: initial;" /><br style="white-space:pre-wrap;margin: 0px;padding: 0px;max-width: 100%;overflow-wrap: break-word !important;box-sizing: border-box !important;color: rgb(171, 178, 191);font-family: 'Operator Mono', Consolas, Monaco, Menlo, monospace;font-size: 12px;font-style: normal;font-variant-ligatures: normal;font-variant-caps: normal;font-weight: 400;letter-spacing: normal;orphans: 2;text-align: left;text-indent: 0px;text-transform: none;widows: 2;word-spacing: 0px;-webkit-text-stroke-width: 0px;text-decoration-thickness: initial;text-decoration-style: initial;text-decoration-color: initial;" />const App = () => {<br style="white-space:pre-wrap;margin: 0px;padding: 0px;max-width: 100%;overflow-wrap: break-word !important;box-sizing: border-box !important;color: rgb(171, 178, 191);font-family: 'Operator Mono', Consolas, Monaco, Menlo, monospace;font-size: 12px;font-style: normal;font-variant-ligatures: normal;font-variant-caps: normal;font-weight: 400;letter-spacing: normal;orphans: 2;text-align: left;text-indent: 0px;text-transform: none;widows: 2;word-spacing: 0px;-webkit-text-stroke-width: 0px;text-decoration-thickness: initial;text-decoration-style: initial;text-decoration-color: initial;" /> return ;<br style="white-space:pre-wrap;margin: 0px;padding: 0px;max-width: 100%;overflow-wrap: break-word !important;box-sizing: border-box !important;color: rgb(171, 178, 191);font-family: 'Operator Mono', Consolas, Monaco, Menlo, monospace;font-size: 12px;font-style: normal;font-variant-ligatures: normal;font-variant-caps: normal;font-weight: 400;letter-spacing: normal;orphans: 2;text-align: left;text-indent: 0px;text-transform: none;widows: 2;word-spacing: 0px;-webkit-text-stroke-width: 0px;text-decoration-thickness: initial;text-decoration-style: initial;text-decoration-color: initial;" />};<br style="white-space:pre-wrap;margin: 0px;padding: 0px;max-width: 100%;overflow-wrap: break-word !important;box-sizing: border-box !important;color: rgb(171, 178, 191);font-family: 'Operator Mono', Consolas, Monaco, Menlo, monospace;font-size: 12px;font-style: normal;font-variant-ligatures: normal;font-variant-caps: normal;font-weight: 400;letter-spacing: normal;orphans: 2;text-align: left;text-indent: 0px;text-transform: none;widows: 2;word-spacing: 0px;-webkit-text-stroke-width: 0px;text-decoration-thickness: initial;text-decoration-style: initial;text-decoration-color: initial;" /><br style="white-space:pre-wrap;margin: 0px;padding: 0px;max-width: 100%;overflow-wrap: break-word !important;box-sizing: border-box !important;color: rgb(171, 178, 191);font-family: 'Operator Mono', Consolas, Monaco, Menlo, monospace;font-size: 12px;font-style: normal;font-variant-ligatures: normal;font-variant-caps: normal;font-weight: 400;letter-spacing: normal;orphans: 2;text-align: left;text-indent: 0px;text-transform: none;widows: 2;word-spacing: 0px;-webkit-text-stroke-width: 0px;text-decoration-thickness: initial;text-decoration-style: initial;text-decoration-color: initial;" />ReactDom.hydrate(, document.getElementById("root"));
客户端代码也需要webpack打包处理,新建webpack.client.js具体配置如下,需要注意打包输出在public目录下,后续的静态资源服务也起在了这个目录下。
// webpack.client.js<br style="white-space:pre-wrap;margin: 0px;padding: 0px;max-width: 100%;overflow-wrap: break-word !important;box-sizing: border-box !important;color: rgb(171, 178, 191);font-family: 'Operator Mono', Consolas, Monaco, Menlo, monospace;font-size: 12px;font-style: normal;font-variant-ligatures: normal;font-variant-caps: normal;font-weight: 400;letter-spacing: normal;orphans: 2;text-align: left;text-indent: 0px;text-transform: none;widows: 2;word-spacing: 0px;-webkit-text-stroke-width: 0px;text-decoration-thickness: initial;text-decoration-style: initial;text-decoration-color: initial;" />const path = require("path");<br style="white-space:pre-wrap;margin: 0px;padding: 0px;max-width: 100%;overflow-wrap: break-word !important;box-sizing: border-box !important;color: rgb(171, 178, 191);font-family: 'Operator Mono', Consolas, Monaco, Menlo, monospace;font-size: 12px;font-style: normal;font-variant-ligatures: normal;font-variant-caps: normal;font-weight: 400;letter-spacing: normal;orphans: 2;text-align: left;text-indent: 0px;text-transform: none;widows: 2;word-spacing: 0px;-webkit-text-stroke-width: 0px;text-decoration-thickness: initial;text-decoration-style: initial;text-decoration-color: initial;" />const resolve = (dir) => path.resolve(__dirname, "./src", dir);<br style="white-space:pre-wrap;margin: 0px;padding: 0px;max-width: 100%;overflow-wrap: break-word !important;box-sizing: border-box !important;color: rgb(171, 178, 191);font-family: 'Operator Mono', Consolas, Monaco, Menlo, monospace;font-size: 12px;font-style: normal;font-variant-ligatures: normal;font-variant-caps: normal;font-weight: 400;letter-spacing: normal;orphans: 2;text-align: left;text-indent: 0px;text-transform: none;widows: 2;word-spacing: 0px;-webkit-text-stroke-width: 0px;text-decoration-thickness: initial;text-decoration-style: initial;text-decoration-color: initial;" />module.exports = {<br style="white-space:pre-wrap;margin: 0px;padding: 0px;max-width: 100%;overflow-wrap: break-word !important;box-sizing: border-box !important;color: rgb(171, 178, 191);font-family: 'Operator Mono', Consolas, Monaco, Menlo, monospace;font-size: 12px;font-style: normal;font-variant-ligatures: normal;font-variant-caps: normal;font-weight: 400;letter-spacing: normal;orphans: 2;text-align: left;text-indent: 0px;text-transform: none;widows: 2;word-spacing: 0px;-webkit-text-stroke-width: 0px;text-decoration-thickness: initial;text-decoration-style: initial;text-decoration-color: initial;" /> mode: "development",<br style="white-space:pre-wrap;margin: 0px;padding: 0px;max-width: 100%;overflow-wrap: break-word !important;box-sizing: border-box !important;color: rgb(171, 178, 191);font-family: 'Operator Mono', Consolas, Monaco, Menlo, monospace;font-size: 12px;font-style: normal;font-variant-ligatures: normal;font-variant-caps: normal;font-weight: 400;letter-spacing: normal;orphans: 2;text-align: left;text-indent: 0px;text-transform: none;widows: 2;word-spacing: 0px;-webkit-text-stroke-width: 0px;text-decoration-thickness: initial;text-decoration-style: initial;text-decoration-color: initial;" /> entry: "./client.js",<br style="white-space:pre-wrap;margin: 0px;padding: 0px;max-width: 100%;overflow-wrap: break-word !important;box-sizing: border-box !important;color: rgb(171, 178, 191);font-family: 'Operator Mono', Consolas, Monaco, Menlo, monospace;font-size: 12px;font-style: normal;font-variant-ligatures: normal;font-variant-caps: normal;font-weight: 400;letter-spacing: normal;orphans: 2;text-align: left;text-indent: 0px;text-transform: none;widows: 2;word-spacing: 0px;-webkit-text-stroke-width: 0px;text-decoration-thickness: initial;text-decoration-style: initial;text-decoration-color: initial;" /> output: {<br style="white-space:pre-wrap;margin: 0px;padding: 0px;max-width: 100%;overflow-wrap: break-word !important;box-sizing: border-box !important;color: rgb(171, 178, 191);font-family: 'Operator Mono', Consolas, Monaco, Menlo, monospace;font-size: 12px;font-style: normal;font-variant-ligatures: normal;font-variant-caps: normal;font-weight: 400;letter-spacing: normal;orphans: 2;text-align: left;text-indent: 0px;text-transform: none;widows: 2;word-spacing: 0px;-webkit-text-stroke-width: 0px;text-decoration-thickness: initial;text-decoration-style: initial;text-decoration-color: initial;" /> filename: "index.js",<br style="white-space:pre-wrap;margin: 0px;padding: 0px;max-width: 100%;overflow-wrap: break-word !important;box-sizing: border-box !important;color: rgb(171, 178, 191);font-family: 'Operator Mono', Consolas, Monaco, Menlo, monospace;font-size: 12px;font-style: normal;font-variant-ligatures: normal;font-variant-caps: normal;font-weight: 400;letter-spacing: normal;orphans: 2;text-align: left;text-indent: 0px;text-transform: none;widows: 2;word-spacing: 0px;-webkit-text-stroke-width: 0px;text-decoration-thickness: initial;text-decoration-style: initial;text-decoration-color: initial;" /> path: path.resolve(__dirname, "public"),<br style="white-space:pre-wrap;margin: 0px;padding: 0px;max-width: 100%;overflow-wrap: break-word !important;box-sizing: border-box !important;color: rgb(171, 178, 191);font-family: 'Operator Mono', Consolas, Monaco, Menlo, monospace;font-size: 12px;font-style: normal;font-variant-ligatures: normal;font-variant-caps: normal;font-weight: 400;letter-spacing: normal;orphans: 2;text-align: left;text-indent: 0px;text-transform: none;widows: 2;word-spacing: 0px;-webkit-text-stroke-width: 0px;text-decoration-thickness: initial;text-decoration-style: initial;text-decoration-color: initial;" /> },<br style="white-space:pre-wrap;margin: 0px;padding: 0px;max-width: 100%;overflow-wrap: break-word !important;box-sizing: border-box !important;color: rgb(171, 178, 191);font-family: 'Operator Mono', Consolas, Monaco, Menlo, monospace;font-size: 12px;font-style: normal;font-variant-ligatures: normal;font-variant-caps: normal;font-weight: 400;letter-spacing: normal;orphans: 2;text-align: left;text-indent: 0px;text-transform: none;widows: 2;word-spacing: 0px;-webkit-text-stroke-width: 0px;text-decoration-thickness: initial;text-decoration-style: initial;text-decoration-color: initial;" /> module 查看全部
一文彻底搞懂 React 服务端渲染
1、前言
在前端项目需要首屏渲染速度优化或SEO的场景下,大家或多或少都听过到过服务端渲染( SSR ),但大多数人对服务端渲染具体实现和底层原理还是比较陌生的。本文基于公司官网开发时做了服务端渲染改造基础上,系统理解和梳理这套体系的模式和逻辑,并写了一些笔记和Demo(文后链接)便于深入理解。这次我们来以React为例,把服务端渲染彻底讲弄明白。本文主要有以下内容:
1.1 什么是服务端渲染?
服务端渲染, SSR (Server-side Rendering) ,顾名思义,就是在浏览器发起页面请求后由服务端完成页面的HTML结构拼接,返回给浏览器解析后能直接构建出有内容的页面。
用 node 实现一个简单的 SSR
我们使用Koa框架来创建node服务:
// demo1<br />var Koa = require("koa");<br />var app = new Koa();<br /><br />// 对于任何请求,app将调用该函数处理请求:<br />app.use(async (ctx) => {<br /> // 将HTML字符串直接返回 <br /> ctx.body = `<br /> <br /> <br /> ssr<br /> <br /> <br /> <br /> hello server<br /> <p>word<br /> <br /> <br /> `;<br />});<br />//监听<br />app.listen(3001, () => {<br /> console.log("listen on 3001 port!");<br />});<br /></p>
启动服务后访问页面,查看网页源代码是这样:
npx create-react-app my-app<br />
上面的例子就是一个简单的服务端渲染,其服务侧直接输出了有内容的HTML,浏览器解析之后就能渲染出页面。与服务端渲染对应的是客户端渲染 ,CSR(Client Side Rendering),通俗的讲就是由客户端完成页面的渲染。其大致渲染流程是这样:在浏览器请求页面时,服务端先返回一个无具体内容的HTML,浏览器还需要再加载并执行JS,动态地将内容和数据渲染到页面中,才能完成页面具体内容的显示。目前主流的React ,Vue, Angular 等SPA页面未经特殊处理均采用客户端渲染。最常见脚手架create-react-app 生成的项目就是客户端渲染:
上面采用客户端渲染的HTML页面中中无内容,需在浏览器端加载并执行bundle.js后才能构建出有内容页面。
1.2 为什么用服务端渲染?1.2.1 服务端渲染的优势
相比于客户端渲染,服务端渲染有什么优势?我们可以从下图对比一下这两种不同的渲染模式。
首屏时间更短
采用客户端渲染的页面,要进行JS文件拉取和JS代码执行,动态创建 DOM 结构,客户端逻辑越重,初始化需要执行的 JS 越多,首屏性能就越慢;客户端渲染前置的第三方类库/框架、polyfill 等都会在一定程度上拖慢首屏性能。Code splitting、lazy-load等优化措施能够缓解一部分,但优化空间相对有限。相比而言,服务端渲染的页面直接拉取HTMl就能显示内容,更短的首屏时间创造更多的可能性。
利于SEO
在别人使用搜索引擎搜索相关的内容时,你的网页排行能靠得更前,这样你的流量就有越高,这就是SEO的意义所在。那为什么服务端渲染更利于爬虫爬你的页面呢?因为对于很多搜索引擎爬虫(非google)HTML返回是什么内容就爬什么内容,而不会动态执行JS代码内容。对客户端渲染的页面来说,简直无能为力,因为返回的HTML是一个空壳。而服务端渲染返回的HTML是有内容的。
SSR的出现,就是为了解决这些CSR的弊端。
1.2.2 权衡使用服务端渲染
并不是所有的WEB应用都必须使用SSR,这需要开发者来权衡,因为服务端渲染会带来以下问题:
代码复杂度增加。为了实现服务端渲染,应用代码中需要兼容服务端和客户端两种运行情况,部分代码只能在客户端运行,需要对其进行特殊处理,才能在服务器渲染应用程序中运行。
需要更多的服务器资源。由于服务器增加了渲染HTML的需求,使得原本只需要输出静态资源文件的nodejs服务,新增了数据获取的IO和渲染HTML的CPU占用,如果流量突然暴增,有可能导致服务器宕机,因此需要使用响应的缓存策略和准备相应的服务器负载。
涉及构建设置和部署的更多要求。与可以部署在任何静态文件服务器上的完全静态单页面应用程序 (SPA) 不同,服务器渲染应用程序,需要处于 Node.js server 运行环境。
因此,在使用服务端渲染SSR之前,需要考虑投入产出比:是否真的需要SEO,是否需要将首屏时间提升到极致。如果都没有,使用SSR反而小题大做了。
1.3 服务端渲染的发展史
其实服务端渲染并不是什么新奇的概念,前后端分层之前很长的一段时间里都是以服务端渲染为主(JSP、PHP),那时后端一把梭哈,在服务端生成完整的 HTML 页面。但那时的服务端渲染和现在还是有本质的区别,存在比较多的弊端,每一个请求都要动态生成HTML,存在大量的重复,服务器机器成本也相对比较高,前后端代码完全掺杂在一起,开发维护难。
随着业务不断发展变化,后端要写的JS逻辑也越发复杂,而且JS有很多潜在的坑使后端越发觉得这是块烫手山芋,于是逐渐出现了前后端分层。伴随AJAX的兴起,浏览器可以做到了不再重现请求页面就可更新局部视图。还可以利用客户端免费的计算资源,后端侧逐渐演变成了提供数据支持。jquery的兴起,良好的客户端兼容性使JS不再受困于各种版本浏览器兼容问题,一统了前端天下。
此后伴随node的兴起,前后端分离越演越烈。前端能摆脱后端的依赖单独起服务,三大框架vue,react,angular也迅势崛起,以操作数据就能更新视图,前端开发人员逐渐摆脱了与烦人的Dom操作打交道,能够专心的关注业务和数据逻辑。前端同时探索出了功能插件,UI库,组件等多种代码复用方案,形成了繁荣的前端生态。
但是三大框架采用客户端渲染模式,随着代码逻辑的加重,首屏时间成了一个很大的问题,同时开发人员也发现SEO也出了问题,大多搜索引擎根本不会去执行JS代码。但是也不可能再回头走老路,于是前端又探索出了一套服务端渲染的框架来解决掉这些问题。此时的服务端渲染是建立在成熟的组组件,模块生态之上,基于Node.js的同构方案成为最佳实践。
2、React服务端渲染的原理
2.1基本思路
React服务端渲染流程
React服务端渲染的基本思路,简单理解就是将组件或页面通过服务器生成html字符串,再发送到浏览器,最后将静态标记"混合"为客户端上完全交互的应用程序。因为要考虑React在服务端的运行情况,故相比之前讲的多了在浏览器端绑定状态与事件的过程。
我们可以结合下面的流程图来一览完整的 React服务端渲染的全貌:当浏览器去请求一个页面,前端服务器端接收到请求并执行 React组件代码,此时React代码中可能包含向后端服务器发起请求,待请求完成返回的数据后,前端服务器组装好有内容的HTML里返给浏览器,浏览器解析HTML后已具备展示内容,但页面并不具备交互能力。
下一阶段,在返回的HTMl中还有script链接,浏览器再拉取JS并执行其包含的React 代码,其能在浏览器端执行完整的生命周期,并通过相关API实现复用此前返回 HTML节点并添加事件的绑定,此时页面才就具备完全交互能力。总的来说,react服务端渲染包含有两个过程:服务端渲染 + 客户端 hydrate 渲染。服务端渲染在服务端渲染出了首屏内容;客户端 hydrate 渲染复用服务端返回的节点,进行一次类似于 render 的 hydrate 渲染过程,把交互事件绑上去(此时页面可交互),并接管页面。
服务端处理后返回的
客户端“浸泡”还原后的
核心思想(同构)
从上面的流程中可以看到,客户端和服务端都要执行React代码完成渲染,那是不是就要写两份代码,供双端使用? 当然不需要,也完全不合理。所谓同构,就是让一份React代码,既可以在服务端中执行,也可以在客户端中执行。
SSR技术栈
我们这里简单理了一下服务端渲染涉及到的技术栈:
知道了服务端渲染、同构的大概思路之后,下面从头开始,一步一步完成具体实践,深入理解其原理。
2.2 服务端如何渲染React组件?
按照之前流程的大概思路,我们首先需要将React组件在服务端转换成HTML字符串,那怎么做呢?React 提供的面向服务端的API(react-dom/server),提供了相关方法能够将 React 组件渲染成静态的(HTML)标签。下面我们简单了解下react-dom/server。
react-dom/server
react-dom/server有renderToString、renderToStaticMarkup,renderToNodeStream、renderToStaticNodeStream四个方法能够将 React 组件渲染成静态的(HTML)标签,前两者能在客户端和服务端运行,后两者只能在服务端运行。
renderToStaticMarkup VS renderToString:renderToString 方法会在 React 内部创建的额外 DOM 属性,例如 data-reactroot, 在相邻文本节点之间生成,这些属性是客户端执行hydrate复用节点的关键所在,data-reactroot属性是服务端渲染的标志之一。如果你希望把 React 当作静态页面生成器来使用,renderToStaticMarkup方法会非常有用,因为去除额外的属性可以节省一些字节。
// Home.jsx<br style="white-space:pre-wrap;margin: 0px;padding: 0px;max-width: 100%;overflow-wrap: break-word !important;box-sizing: border-box !important;color: rgb(171, 178, 191);font-family: 'Operator Mono', Consolas, Monaco, Menlo, monospace;font-size: 12px;font-style: normal;font-variant-ligatures: normal;font-variant-caps: normal;font-weight: 400;letter-spacing: normal;orphans: 2;text-align: left;text-indent: 0px;text-transform: none;widows: 2;word-spacing: 0px;-webkit-text-stroke-width: 0px;text-decoration-thickness: initial;text-decoration-style: initial;text-decoration-color: initial;" />import React from "react";<br style="white-space:pre-wrap;margin: 0px;padding: 0px;max-width: 100%;overflow-wrap: break-word !important;box-sizing: border-box !important;color: rgb(171, 178, 191);font-family: 'Operator Mono', Consolas, Monaco, Menlo, monospace;font-size: 12px;font-style: normal;font-variant-ligatures: normal;font-variant-caps: normal;font-weight: 400;letter-spacing: normal;orphans: 2;text-align: left;text-indent: 0px;text-transform: none;widows: 2;word-spacing: 0px;-webkit-text-stroke-width: 0px;text-decoration-thickness: initial;text-decoration-style: initial;text-decoration-color: initial;" />const Home = () => {<br style="white-space:pre-wrap;margin: 0px;padding: 0px;max-width: 100%;overflow-wrap: break-word !important;box-sizing: border-box !important;color: rgb(171, 178, 191);font-family: 'Operator Mono', Consolas, Monaco, Menlo, monospace;font-size: 12px;font-style: normal;font-variant-ligatures: normal;font-variant-caps: normal;font-weight: 400;letter-spacing: normal;orphans: 2;text-align: left;text-indent: 0px;text-transform: none;widows: 2;word-spacing: 0px;-webkit-text-stroke-width: 0px;text-decoration-thickness: initial;text-decoration-style: initial;text-decoration-color: initial;" /> return (<br style="white-space:pre-wrap;margin: 0px;padding: 0px;max-width: 100%;overflow-wrap: break-word !important;box-sizing: border-box !important;color: rgb(171, 178, 191);font-family: 'Operator Mono', Consolas, Monaco, Menlo, monospace;font-size: 12px;font-style: normal;font-variant-ligatures: normal;font-variant-caps: normal;font-weight: 400;letter-spacing: normal;orphans: 2;text-align: left;text-indent: 0px;text-transform: none;widows: 2;word-spacing: 0px;-webkit-text-stroke-width: 0px;text-decoration-thickness: initial;text-decoration-style: initial;text-decoration-color: initial;" /> <br style="white-space:pre-wrap;margin: 0px;padding: 0px;max-width: 100%;overflow-wrap: break-word !important;box-sizing: border-box !important;color: rgb(171, 178, 191);font-family: 'Operator Mono', Consolas, Monaco, Menlo, monospace;font-size: 12px;font-style: normal;font-variant-ligatures: normal;font-variant-caps: normal;font-weight: 400;letter-spacing: normal;orphans: 2;text-align: left;text-indent: 0px;text-transform: none;widows: 2;word-spacing: 0px;-webkit-text-stroke-width: 0px;text-decoration-thickness: initial;text-decoration-style: initial;text-decoration-color: initial;" /> console.log("hello")}>This is Home Page<br style="white-space:pre-wrap;margin: 0px;padding: 0px;max-width: 100%;overflow-wrap: break-word !important;box-sizing: border-box !important;color: rgb(171, 178, 191);font-family: 'Operator Mono', Consolas, Monaco, Menlo, monospace;font-size: 12px;font-style: normal;font-variant-ligatures: normal;font-variant-caps: normal;font-weight: 400;letter-spacing: normal;orphans: 2;text-align: left;text-indent: 0px;text-transform: none;widows: 2;word-spacing: 0px;-webkit-text-stroke-width: 0px;text-decoration-thickness: initial;text-decoration-style: initial;text-decoration-color: initial;" /> <p>Home is the page ..... more discribe<br style="white-space:pre-wrap;margin: 0px;padding: 0px;max-width: 100%;overflow-wrap: break-word !important;box-sizing: border-box !important;color: rgb(171, 178, 191);font-family: 'Operator Mono', Consolas, Monaco, Menlo, monospace;font-size: 12px;font-style: normal;font-variant-ligatures: normal;font-variant-caps: normal;font-weight: 400;letter-spacing: normal;orphans: 2;text-align: left;text-indent: 0px;text-transform: none;widows: 2;word-spacing: 0px;-webkit-text-stroke-width: 0px;text-decoration-thickness: initial;text-decoration-style: initial;text-decoration-color: initial;" /> <br style="white-space:pre-wrap;margin: 0px;padding: 0px;max-width: 100%;overflow-wrap: break-word !important;box-sizing: border-box !important;color: rgb(171, 178, 191);font-family: 'Operator Mono', Consolas, Monaco, Menlo, monospace;font-size: 12px;font-style: normal;font-variant-ligatures: normal;font-variant-caps: normal;font-weight: 400;letter-spacing: normal;orphans: 2;text-align: left;text-indent: 0px;text-transform: none;widows: 2;word-spacing: 0px;-webkit-text-stroke-width: 0px;text-decoration-thickness: initial;text-decoration-style: initial;text-decoration-color: initial;" /> );<br style="white-space:pre-wrap;margin: 0px;padding: 0px;max-width: 100%;overflow-wrap: break-word !important;box-sizing: border-box !important;color: rgb(171, 178, 191);font-family: 'Operator Mono', Consolas, Monaco, Menlo, monospace;font-size: 12px;font-style: normal;font-variant-ligatures: normal;font-variant-caps: normal;font-weight: 400;letter-spacing: normal;orphans: 2;text-align: left;text-indent: 0px;text-transform: none;widows: 2;word-spacing: 0px;-webkit-text-stroke-width: 0px;text-decoration-thickness: initial;text-decoration-style: initial;text-decoration-color: initial;" />};<br style="white-space:pre-wrap;margin: 0px;padding: 0px;max-width: 100%;overflow-wrap: break-word !important;box-sizing: border-box !important;color: rgb(171, 178, 191);font-family: 'Operator Mono', Consolas, Monaco, Menlo, monospace;font-size: 12px;font-style: normal;font-variant-ligatures: normal;font-variant-caps: normal;font-weight: 400;letter-spacing: normal;orphans: 2;text-align: left;text-indent: 0px;text-transform: none;widows: 2;word-spacing: 0px;-webkit-text-stroke-width: 0px;text-decoration-thickness: initial;text-decoration-style: initial;text-decoration-color: initial;" />export default Home;</p>
我们使用React-dom/server下提供的renderToString方法,在服务端将其转换为html字符串:
// server.js<br />import Koa from "koa";<br />import React from "react";<br />import { renderToString } from "react-dom/server";<br />import Home from "./containers/Home";<br /><br />const app = new Koa();<br />app.use(async (ctx) => {<br /> // 核心api renderToString 将react组件转化成html字符串<br /> const content = renderToString();<br /> ctx.body = `<br /> <br /> <br /> ssr<br /> <br /> <br /> ${content}<br /> <br /> <br /> `;<br />});<br />app.listen(3002, () => {<br /> console.log("listen:3002");<br />});<br />
可以看到上面代码里有ES6的import 和jsx语法,不能直接运行在node环境,需要借助webpack打包, 构建目标是commonjs。新建webpack.server.js具体配置如下:
// webpack.server.js<br style="white-space:pre-wrap;margin: 0px;padding: 0px;max-width: 100%;overflow-wrap: break-word !important;box-sizing: border-box !important;color: rgb(171, 178, 191);font-family: 'Operator Mono', Consolas, Monaco, Menlo, monospace;font-size: 12px;font-style: normal;font-variant-ligatures: normal;font-variant-caps: normal;font-weight: 400;letter-spacing: normal;orphans: 2;text-align: left;text-indent: 0px;text-transform: none;widows: 2;word-spacing: 0px;-webkit-text-stroke-width: 0px;text-decoration-thickness: initial;text-decoration-style: initial;text-decoration-color: initial;" />const path = require("path");<br style="white-space:pre-wrap;margin: 0px;padding: 0px;max-width: 100%;overflow-wrap: break-word !important;box-sizing: border-box !important;color: rgb(171, 178, 191);font-family: 'Operator Mono', Consolas, Monaco, Menlo, monospace;font-size: 12px;font-style: normal;font-variant-ligatures: normal;font-variant-caps: normal;font-weight: 400;letter-spacing: normal;orphans: 2;text-align: left;text-indent: 0px;text-transform: none;widows: 2;word-spacing: 0px;-webkit-text-stroke-width: 0px;text-decoration-thickness: initial;text-decoration-style: initial;text-decoration-color: initial;" />const nodeExternals = require("webpack-node-externals");<br style="white-space:pre-wrap;margin: 0px;padding: 0px;max-width: 100%;overflow-wrap: break-word !important;box-sizing: border-box !important;color: rgb(171, 178, 191);font-family: 'Operator Mono', Consolas, Monaco, Menlo, monospace;font-size: 12px;font-style: normal;font-variant-ligatures: normal;font-variant-caps: normal;font-weight: 400;letter-spacing: normal;orphans: 2;text-align: left;text-indent: 0px;text-transform: none;widows: 2;word-spacing: 0px;-webkit-text-stroke-width: 0px;text-decoration-thickness: initial;text-decoration-style: initial;text-decoration-color: initial;" />module.exports = {<br style="white-space:pre-wrap;margin: 0px;padding: 0px;max-width: 100%;overflow-wrap: break-word !important;box-sizing: border-box !important;color: rgb(171, 178, 191);font-family: 'Operator Mono', Consolas, Monaco, Menlo, monospace;font-size: 12px;font-style: normal;font-variant-ligatures: normal;font-variant-caps: normal;font-weight: 400;letter-spacing: normal;orphans: 2;text-align: left;text-indent: 0px;text-transform: none;widows: 2;word-spacing: 0px;-webkit-text-stroke-width: 0px;text-decoration-thickness: initial;text-decoration-style: initial;text-decoration-color: initial;" /> mode: "development",<br style="white-space:pre-wrap;margin: 0px;padding: 0px;max-width: 100%;overflow-wrap: break-word !important;box-sizing: border-box !important;color: rgb(171, 178, 191);font-family: 'Operator Mono', Consolas, Monaco, Menlo, monospace;font-size: 12px;font-style: normal;font-variant-ligatures: normal;font-variant-caps: normal;font-weight: 400;letter-spacing: normal;orphans: 2;text-align: left;text-indent: 0px;text-transform: none;widows: 2;word-spacing: 0px;-webkit-text-stroke-width: 0px;text-decoration-thickness: initial;text-decoration-style: initial;text-decoration-color: initial;" /> target: "node",<br style="white-space:pre-wrap;margin: 0px;padding: 0px;max-width: 100%;overflow-wrap: break-word !important;box-sizing: border-box !important;color: rgb(171, 178, 191);font-family: 'Operator Mono', Consolas, Monaco, Menlo, monospace;font-size: 12px;font-style: normal;font-variant-ligatures: normal;font-variant-caps: normal;font-weight: 400;letter-spacing: normal;orphans: 2;text-align: left;text-indent: 0px;text-transform: none;widows: 2;word-spacing: 0px;-webkit-text-stroke-width: 0px;text-decoration-thickness: initial;text-decoration-style: initial;text-decoration-color: initial;" /> entry: "./server.js",<br style="white-space:pre-wrap;margin: 0px;padding: 0px;max-width: 100%;overflow-wrap: break-word !important;box-sizing: border-box !important;color: rgb(171, 178, 191);font-family: 'Operator Mono', Consolas, Monaco, Menlo, monospace;font-size: 12px;font-style: normal;font-variant-ligatures: normal;font-variant-caps: normal;font-weight: 400;letter-spacing: normal;orphans: 2;text-align: left;text-indent: 0px;text-transform: none;widows: 2;word-spacing: 0px;-webkit-text-stroke-width: 0px;text-decoration-thickness: initial;text-decoration-style: initial;text-decoration-color: initial;" /> resolve: {<br style="white-space:pre-wrap;margin: 0px;padding: 0px;max-width: 100%;overflow-wrap: break-word !important;box-sizing: border-box !important;color: rgb(171, 178, 191);font-family: 'Operator Mono', Consolas, Monaco, Menlo, monospace;font-size: 12px;font-style: normal;font-variant-ligatures: normal;font-variant-caps: normal;font-weight: 400;letter-spacing: normal;orphans: 2;text-align: left;text-indent: 0px;text-transform: none;widows: 2;word-spacing: 0px;-webkit-text-stroke-width: 0px;text-decoration-thickness: initial;text-decoration-style: initial;text-decoration-color: initial;" /> extensions: [".jsx", ".js", ".tsx", ".ts"],<br style="white-space:pre-wrap;margin: 0px;padding: 0px;max-width: 100%;overflow-wrap: break-word !important;box-sizing: border-box !important;color: rgb(171, 178, 191);font-family: 'Operator Mono', Consolas, Monaco, Menlo, monospace;font-size: 12px;font-style: normal;font-variant-ligatures: normal;font-variant-caps: normal;font-weight: 400;letter-spacing: normal;orphans: 2;text-align: left;text-indent: 0px;text-transform: none;widows: 2;word-spacing: 0px;-webkit-text-stroke-width: 0px;text-decoration-thickness: initial;text-decoration-style: initial;text-decoration-color: initial;" /> },<br style="white-space:pre-wrap;margin: 0px;padding: 0px;max-width: 100%;overflow-wrap: break-word !important;box-sizing: border-box !important;color: rgb(171, 178, 191);font-family: 'Operator Mono', Consolas, Monaco, Menlo, monospace;font-size: 12px;font-style: normal;font-variant-ligatures: normal;font-variant-caps: normal;font-weight: 400;letter-spacing: normal;orphans: 2;text-align: left;text-indent: 0px;text-transform: none;widows: 2;word-spacing: 0px;-webkit-text-stroke-width: 0px;text-decoration-thickness: initial;text-decoration-style: initial;text-decoration-color: initial;" /> module: {<br style="white-space:pre-wrap;margin: 0px;padding: 0px;max-width: 100%;overflow-wrap: break-word !important;box-sizing: border-box !important;color: rgb(171, 178, 191);font-family: 'Operator Mono', Consolas, Monaco, Menlo, monospace;font-size: 12px;font-style: normal;font-variant-ligatures: normal;font-variant-caps: normal;font-weight: 400;letter-spacing: normal;orphans: 2;text-align: left;text-indent: 0px;text-transform: none;widows: 2;word-spacing: 0px;-webkit-text-stroke-width: 0px;text-decoration-thickness: initial;text-decoration-style: initial;text-decoration-color: initial;" /> rules: [<br style="white-space:pre-wrap;margin: 0px;padding: 0px;max-width: 100%;overflow-wrap: break-word !important;box-sizing: border-box !important;color: rgb(171, 178, 191);font-family: 'Operator Mono', Consolas, Monaco, Menlo, monospace;font-size: 12px;font-style: normal;font-variant-ligatures: normal;font-variant-caps: normal;font-weight: 400;letter-spacing: normal;orphans: 2;text-align: left;text-indent: 0px;text-transform: none;widows: 2;word-spacing: 0px;-webkit-text-stroke-width: 0px;text-decoration-thickness: initial;text-decoration-style: initial;text-decoration-color: initial;" /> {<br style="white-space:pre-wrap;margin: 0px;padding: 0px;max-width: 100%;overflow-wrap: break-word !important;box-sizing: border-box !important;color: rgb(171, 178, 191);font-family: 'Operator Mono', Consolas, Monaco, Menlo, monospace;font-size: 12px;font-style: normal;font-variant-ligatures: normal;font-variant-caps: normal;font-weight: 400;letter-spacing: normal;orphans: 2;text-align: left;text-indent: 0px;text-transform: none;widows: 2;word-spacing: 0px;-webkit-text-stroke-width: 0px;text-decoration-thickness: initial;text-decoration-style: initial;text-decoration-color: initial;" /> test: /\.jsx?$/,<br style="white-space:pre-wrap;margin: 0px;padding: 0px;max-width: 100%;overflow-wrap: break-word !important;box-sizing: border-box !important;color: rgb(171, 178, 191);font-family: 'Operator Mono', Consolas, Monaco, Menlo, monospace;font-size: 12px;font-style: normal;font-variant-ligatures: normal;font-variant-caps: normal;font-weight: 400;letter-spacing: normal;orphans: 2;text-align: left;text-indent: 0px;text-transform: none;widows: 2;word-spacing: 0px;-webkit-text-stroke-width: 0px;text-decoration-thickness: initial;text-decoration-style: initial;text-decoration-color: initial;" /> loader: "babel-loader",<br style="white-space:pre-wrap;margin: 0px;padding: 0px;max-width: 100%;overflow-wrap: break-word !important;box-sizing: border-box !important;color: rgb(171, 178, 191);font-family: 'Operator Mono', Consolas, Monaco, Menlo, monospace;font-size: 12px;font-style: normal;font-variant-ligatures: normal;font-variant-caps: normal;font-weight: 400;letter-spacing: normal;orphans: 2;text-align: left;text-indent: 0px;text-transform: none;widows: 2;word-spacing: 0px;-webkit-text-stroke-width: 0px;text-decoration-thickness: initial;text-decoration-style: initial;text-decoration-color: initial;" /> exclude: /node_modules/,<br style="white-space:pre-wrap;margin: 0px;padding: 0px;max-width: 100%;overflow-wrap: break-word !important;box-sizing: border-box !important;color: rgb(171, 178, 191);font-family: 'Operator Mono', Consolas, Monaco, Menlo, monospace;font-size: 12px;font-style: normal;font-variant-ligatures: normal;font-variant-caps: normal;font-weight: 400;letter-spacing: normal;orphans: 2;text-align: left;text-indent: 0px;text-transform: none;widows: 2;word-spacing: 0px;-webkit-text-stroke-width: 0px;text-decoration-thickness: initial;text-decoration-style: initial;text-decoration-color: initial;" /> options: {<br style="white-space:pre-wrap;margin: 0px;padding: 0px;max-width: 100%;overflow-wrap: break-word !important;box-sizing: border-box !important;color: rgb(171, 178, 191);font-family: 'Operator Mono', Consolas, Monaco, Menlo, monospace;font-size: 12px;font-style: normal;font-variant-ligatures: normal;font-variant-caps: normal;font-weight: 400;letter-spacing: normal;orphans: 2;text-align: left;text-indent: 0px;text-transform: none;widows: 2;word-spacing: 0px;-webkit-text-stroke-width: 0px;text-decoration-thickness: initial;text-decoration-style: initial;text-decoration-color: initial;" /> presets: ["@babel/preset-react", "@babel/preset-env"],<br style="white-space:pre-wrap;margin: 0px;padding: 0px;max-width: 100%;overflow-wrap: break-word !important;box-sizing: border-box !important;color: rgb(171, 178, 191);font-family: 'Operator Mono', Consolas, Monaco, Menlo, monospace;font-size: 12px;font-style: normal;font-variant-ligatures: normal;font-variant-caps: normal;font-weight: 400;letter-spacing: normal;orphans: 2;text-align: left;text-indent: 0px;text-transform: none;widows: 2;word-spacing: 0px;-webkit-text-stroke-width: 0px;text-decoration-thickness: initial;text-decoration-style: initial;text-decoration-color: initial;" /> plugins: [<br style="white-space:pre-wrap;margin: 0px;padding: 0px;max-width: 100%;overflow-wrap: break-word !important;box-sizing: border-box !important;color: rgb(171, 178, 191);font-family: 'Operator Mono', Consolas, Monaco, Menlo, monospace;font-size: 12px;font-style: normal;font-variant-ligatures: normal;font-variant-caps: normal;font-weight: 400;letter-spacing: normal;orphans: 2;text-align: left;text-indent: 0px;text-transform: none;widows: 2;word-spacing: 0px;-webkit-text-stroke-width: 0px;text-decoration-thickness: initial;text-decoration-style: initial;text-decoration-color: initial;" /> [<br style="white-space:pre-wrap;margin: 0px;padding: 0px;max-width: 100%;overflow-wrap: break-word !important;box-sizing: border-box !important;color: rgb(171, 178, 191);font-family: 'Operator Mono', Consolas, Monaco, Menlo, monospace;font-size: 12px;font-style: normal;font-variant-ligatures: normal;font-variant-caps: normal;font-weight: 400;letter-spacing: normal;orphans: 2;text-align: left;text-indent: 0px;text-transform: none;widows: 2;word-spacing: 0px;-webkit-text-stroke-width: 0px;text-decoration-thickness: initial;text-decoration-style: initial;text-decoration-color: initial;" /> "@babel/plugin-transform-runtime",<br style="white-space:pre-wrap;margin: 0px;padding: 0px;max-width: 100%;overflow-wrap: break-word !important;box-sizing: border-box !important;color: rgb(171, 178, 191);font-family: 'Operator Mono', Consolas, Monaco, Menlo, monospace;font-size: 12px;font-style: normal;font-variant-ligatures: normal;font-variant-caps: normal;font-weight: 400;letter-spacing: normal;orphans: 2;text-align: left;text-indent: 0px;text-transform: none;widows: 2;word-spacing: 0px;-webkit-text-stroke-width: 0px;text-decoration-thickness: initial;text-decoration-style: initial;text-decoration-color: initial;" /> {<br style="white-space:pre-wrap;margin: 0px;padding: 0px;max-width: 100%;overflow-wrap: break-word !important;box-sizing: border-box !important;color: rgb(171, 178, 191);font-family: 'Operator Mono', Consolas, Monaco, Menlo, monospace;font-size: 12px;font-style: normal;font-variant-ligatures: normal;font-variant-caps: normal;font-weight: 400;letter-spacing: normal;orphans: 2;text-align: left;text-indent: 0px;text-transform: none;widows: 2;word-spacing: 0px;-webkit-text-stroke-width: 0px;text-decoration-thickness: initial;text-decoration-style: initial;text-decoration-color: initial;" /> absoluteRuntime: false,<br style="white-space:pre-wrap;margin: 0px;padding: 0px;max-width: 100%;overflow-wrap: break-word !important;box-sizing: border-box !important;color: rgb(171, 178, 191);font-family: 'Operator Mono', Consolas, Monaco, Menlo, monospace;font-size: 12px;font-style: normal;font-variant-ligatures: normal;font-variant-caps: normal;font-weight: 400;letter-spacing: normal;orphans: 2;text-align: left;text-indent: 0px;text-transform: none;widows: 2;word-spacing: 0px;-webkit-text-stroke-width: 0px;text-decoration-thickness: initial;text-decoration-style: initial;text-decoration-color: initial;" /> corejs: false,<br style="white-space:pre-wrap;margin: 0px;padding: 0px;max-width: 100%;overflow-wrap: break-word !important;box-sizing: border-box !important;color: rgb(171, 178, 191);font-family: 'Operator Mono', Consolas, Monaco, Menlo, monospace;font-size: 12px;font-style: normal;font-variant-ligatures: normal;font-variant-caps: normal;font-weight: 400;letter-spacing: normal;orphans: 2;text-align: left;text-indent: 0px;text-transform: none;widows: 2;word-spacing: 0px;-webkit-text-stroke-width: 0px;text-decoration-thickness: initial;text-decoration-style: initial;text-decoration-color: initial;" /> helpers: true,<br style="white-space:pre-wrap;margin: 0px;padding: 0px;max-width: 100%;overflow-wrap: break-word !important;box-sizing: border-box !important;color: rgb(171, 178, 191);font-family: 'Operator Mono', Consolas, Monaco, Menlo, monospace;font-size: 12px;font-style: normal;font-variant-ligatures: normal;font-variant-caps: normal;font-weight: 400;letter-spacing: normal;orphans: 2;text-align: left;text-indent: 0px;text-transform: none;widows: 2;word-spacing: 0px;-webkit-text-stroke-width: 0px;text-decoration-thickness: initial;text-decoration-style: initial;text-decoration-color: initial;" /> regenerator: true,<br style="white-space:pre-wrap;margin: 0px;padding: 0px;max-width: 100%;overflow-wrap: break-word !important;box-sizing: border-box !important;color: rgb(171, 178, 191);font-family: 'Operator Mono', Consolas, Monaco, Menlo, monospace;font-size: 12px;font-style: normal;font-variant-ligatures: normal;font-variant-caps: normal;font-weight: 400;letter-spacing: normal;orphans: 2;text-align: left;text-indent: 0px;text-transform: none;widows: 2;word-spacing: 0px;-webkit-text-stroke-width: 0px;text-decoration-thickness: initial;text-decoration-style: initial;text-decoration-color: initial;" /> version: "7.0.0-beta.0",<br style="white-space:pre-wrap;margin: 0px;padding: 0px;max-width: 100%;overflow-wrap: break-word !important;box-sizing: border-box !important;color: rgb(171, 178, 191);font-family: 'Operator Mono', Consolas, Monaco, Menlo, monospace;font-size: 12px;font-style: normal;font-variant-ligatures: normal;font-variant-caps: normal;font-weight: 400;letter-spacing: normal;orphans: 2;text-align: left;text-indent: 0px;text-transform: none;widows: 2;word-spacing: 0px;-webkit-text-stroke-width: 0px;text-decoration-thickness: initial;text-decoration-style: initial;text-decoration-color: initial;" /> },<br style="white-space:pre-wrap;margin: 0px;padding: 0px;max-width: 100%;overflow-wrap: break-word !important;box-sizing: border-box !important;color: rgb(171, 178, 191);font-family: 'Operator Mono', Consolas, Monaco, Menlo, monospace;font-size: 12px;font-style: normal;font-variant-ligatures: normal;font-variant-caps: normal;font-weight: 400;letter-spacing: normal;orphans: 2;text-align: left;text-indent: 0px;text-transform: none;widows: 2;word-spacing: 0px;-webkit-text-stroke-width: 0px;text-decoration-thickness: initial;text-decoration-style: initial;text-decoration-color: initial;" /> ],<br style="white-space:pre-wrap;margin: 0px;padding: 0px;max-width: 100%;overflow-wrap: break-word !important;box-sizing: border-box !important;color: rgb(171, 178, 191);font-family: 'Operator Mono', Consolas, Monaco, Menlo, monospace;font-size: 12px;font-style: normal;font-variant-ligatures: normal;font-variant-caps: normal;font-weight: 400;letter-spacing: normal;orphans: 2;text-align: left;text-indent: 0px;text-transform: none;widows: 2;word-spacing: 0px;-webkit-text-stroke-width: 0px;text-decoration-thickness: initial;text-decoration-style: initial;text-decoration-color: initial;" /> ],<br style="white-space:pre-wrap;margin: 0px;padding: 0px;max-width: 100%;overflow-wrap: break-word !important;box-sizing: border-box !important;color: rgb(171, 178, 191);font-family: 'Operator Mono', Consolas, Monaco, Menlo, monospace;font-size: 12px;font-style: normal;font-variant-ligatures: normal;font-variant-caps: normal;font-weight: 400;letter-spacing: normal;orphans: 2;text-align: left;text-indent: 0px;text-transform: none;widows: 2;word-spacing: 0px;-webkit-text-stroke-width: 0px;text-decoration-thickness: initial;text-decoration-style: initial;text-decoration-color: initial;" /> },<br style="white-space:pre-wrap;margin: 0px;padding: 0px;max-width: 100%;overflow-wrap: break-word !important;box-sizing: border-box !important;color: rgb(171, 178, 191);font-family: 'Operator Mono', Consolas, Monaco, Menlo, monospace;font-size: 12px;font-style: normal;font-variant-ligatures: normal;font-variant-caps: normal;font-weight: 400;letter-spacing: normal;orphans: 2;text-align: left;text-indent: 0px;text-transform: none;widows: 2;word-spacing: 0px;-webkit-text-stroke-width: 0px;text-decoration-thickness: initial;text-decoration-style: initial;text-decoration-color: initial;" /> },<br style="white-space:pre-wrap;margin: 0px;padding: 0px;max-width: 100%;overflow-wrap: break-word !important;box-sizing: border-box !important;color: rgb(171, 178, 191);font-family: 'Operator Mono', Consolas, Monaco, Menlo, monospace;font-size: 12px;font-style: normal;font-variant-ligatures: normal;font-variant-caps: normal;font-weight: 400;letter-spacing: normal;orphans: 2;text-align: left;text-indent: 0px;text-transform: none;widows: 2;word-spacing: 0px;-webkit-text-stroke-width: 0px;text-decoration-thickness: initial;text-decoration-style: initial;text-decoration-color: initial;" /> ],<br style="white-space:pre-wrap;margin: 0px;padding: 0px;max-width: 100%;overflow-wrap: break-word !important;box-sizing: border-box !important;color: rgb(171, 178, 191);font-family: 'Operator Mono', Consolas, Monaco, Menlo, monospace;font-size: 12px;font-style: normal;font-variant-ligatures: normal;font-variant-caps: normal;font-weight: 400;letter-spacing: normal;orphans: 2;text-align: left;text-indent: 0px;text-transform: none;widows: 2;word-spacing: 0px;-webkit-text-stroke-width: 0px;text-decoration-thickness: initial;text-decoration-style: initial;text-decoration-color: initial;" /> },<br style="white-space:pre-wrap;margin: 0px;padding: 0px;max-width: 100%;overflow-wrap: break-word !important;box-sizing: border-box !important;color: rgb(171, 178, 191);font-family: 'Operator Mono', Consolas, Monaco, Menlo, monospace;font-size: 12px;font-style: normal;font-variant-ligatures: normal;font-variant-caps: normal;font-weight: 400;letter-spacing: normal;orphans: 2;text-align: left;text-indent: 0px;text-transform: none;widows: 2;word-spacing: 0px;-webkit-text-stroke-width: 0px;text-decoration-thickness: initial;text-decoration-style: initial;text-decoration-color: initial;" /> output: {<br style="white-space:pre-wrap;margin: 0px;padding: 0px;max-width: 100%;overflow-wrap: break-word !important;box-sizing: border-box !important;color: rgb(171, 178, 191);font-family: 'Operator Mono', Consolas, Monaco, Menlo, monospace;font-size: 12px;font-style: normal;font-variant-ligatures: normal;font-variant-caps: normal;font-weight: 400;letter-spacing: normal;orphans: 2;text-align: left;text-indent: 0px;text-transform: none;widows: 2;word-spacing: 0px;-webkit-text-stroke-width: 0px;text-decoration-thickness: initial;text-decoration-style: initial;text-decoration-color: initial;" /> filename: "bundle.js",<br style="white-space:pre-wrap;margin: 0px;padding: 0px;max-width: 100%;overflow-wrap: break-word !important;box-sizing: border-box !important;color: rgb(171, 178, 191);font-family: 'Operator Mono', Consolas, Monaco, Menlo, monospace;font-size: 12px;font-style: normal;font-variant-ligatures: normal;font-variant-caps: normal;font-weight: 400;letter-spacing: normal;orphans: 2;text-align: left;text-indent: 0px;text-transform: none;widows: 2;word-spacing: 0px;-webkit-text-stroke-width: 0px;text-decoration-thickness: initial;text-decoration-style: initial;text-decoration-color: initial;" /> path: path.resolve(__dirname, "build"),<br style="white-space:pre-wrap;margin: 0px;padding: 0px;max-width: 100%;overflow-wrap: break-word !important;box-sizing: border-box !important;color: rgb(171, 178, 191);font-family: 'Operator Mono', Consolas, Monaco, Menlo, monospace;font-size: 12px;font-style: normal;font-variant-ligatures: normal;font-variant-caps: normal;font-weight: 400;letter-spacing: normal;orphans: 2;text-align: left;text-indent: 0px;text-transform: none;widows: 2;word-spacing: 0px;-webkit-text-stroke-width: 0px;text-decoration-thickness: initial;text-decoration-style: initial;text-decoration-color: initial;" /> },<br style="white-space:pre-wrap;margin: 0px;padding: 0px;max-width: 100%;overflow-wrap: break-word !important;box-sizing: border-box !important;color: rgb(171, 178, 191);font-family: 'Operator Mono', Consolas, Monaco, Menlo, monospace;font-size: 12px;font-style: normal;font-variant-ligatures: normal;font-variant-caps: normal;font-weight: 400;letter-spacing: normal;orphans: 2;text-align: left;text-indent: 0px;text-transform: none;widows: 2;word-spacing: 0px;-webkit-text-stroke-width: 0px;text-decoration-thickness: initial;text-decoration-style: initial;text-decoration-color: initial;" /> externals: [nodeExternals()],<br style="white-space:pre-wrap;margin: 0px;padding: 0px;max-width: 100%;overflow-wrap: break-word !important;box-sizing: border-box !important;color: rgb(171, 178, 191);font-family: 'Operator Mono', Consolas, Monaco, Menlo, monospace;font-size: 12px;font-style: normal;font-variant-ligatures: normal;font-variant-caps: normal;font-weight: 400;letter-spacing: normal;orphans: 2;text-align: left;text-indent: 0px;text-transform: none;widows: 2;word-spacing: 0px;-webkit-text-stroke-width: 0px;text-decoration-thickness: initial;text-decoration-style: initial;text-decoration-color: initial;" />};
在webpack构建完成后,可在Node环境运行build/bundle.js,访问页面后查看网页源代码,可以看到,React组件中的内容已经完整地包含在服务端返回到html里面。我们成功迈出了服务端渲染第一步。此时,我们也有必要再深入了解renderToString 到底做了什么,提前踩坑!
renderToString
除了将React组件转换成html字符串外,renderToString还有做了下面这些:
1. 会执行传入的React组件的代码,但是其只执行到React生命周期初始化过程的render及之前,即下面红框的部分,其余大部分生命周期函数在服务端都不执行;这也是服务端渲染的坑点之一。
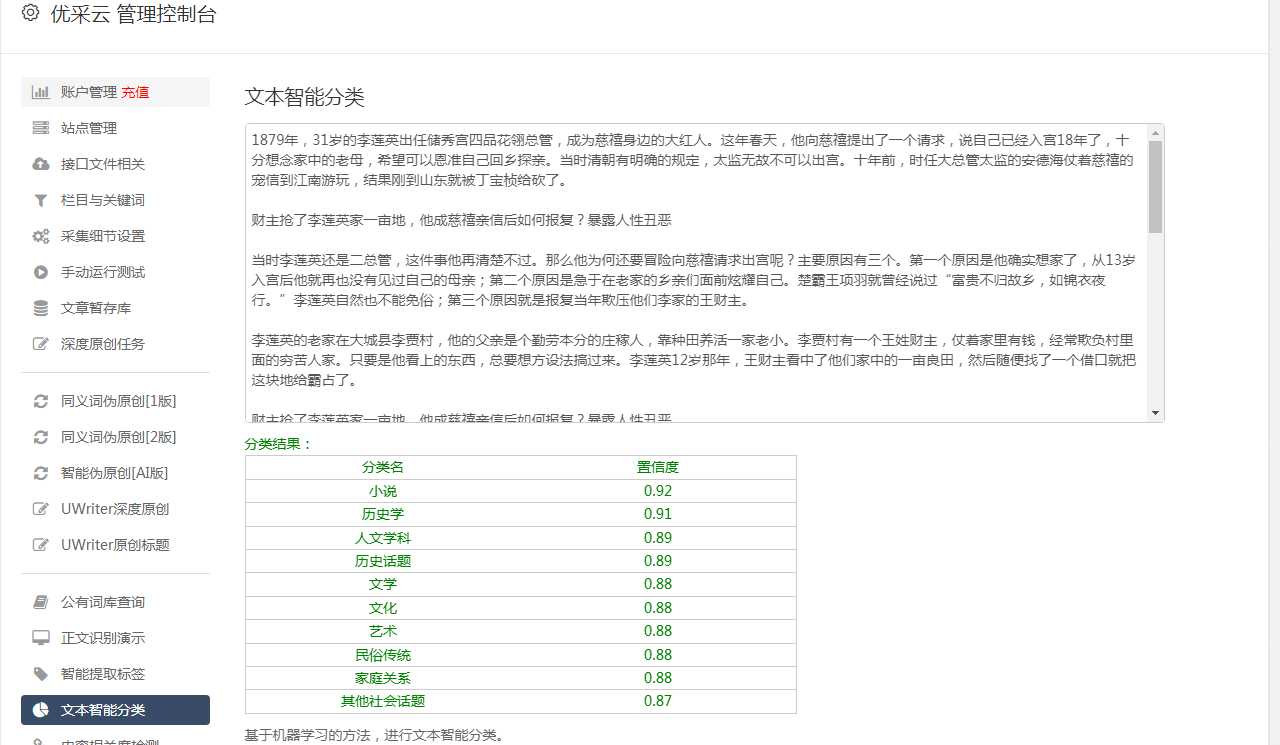
2.renderToString 生成的产物中会包含一些额外生成特殊标记,代码体积会有所增大,其中属性data-reactroot是服务端渲染的标志,便于后续客户端通过hydrate复用HTML节点。在React16前后其产物也有差距:在React 16 之前,服务端渲染采用的是基于字符串校验和(string checksum)的 HTML 节点复用方式, 会额外生成生成data-reactid、data-react-checksum等属性;React 16 改用单节点校验来复用(服务端返回的)HTML 节点,不再生成data-reactid、data-react-checksum等体积占用大户,只在空白节点间多了 这样的标记。
renderToString react16前<br style="white-space:pre-wrap;margin: 0px;padding: 0px;max-width: 100%;overflow-wrap: break-word !important;box-sizing: border-box !important;color: rgb(171, 178, 191);font-family: 'Operator Mono', Consolas, Monaco, Menlo, monospace;font-size: 12px;font-style: normal;font-variant-ligatures: normal;font-variant-caps: normal;font-weight: 400;letter-spacing: normal;orphans: 2;text-align: left;text-indent: 0px;text-transform: none;widows: 2;word-spacing: 0px;-webkit-text-stroke-width: 0px;text-decoration-thickness: initial;text-decoration-style: initial;text-decoration-color: initial;" /><br style="white-space:pre-wrap;margin: 0px;padding: 0px;max-width: 100%;overflow-wrap: break-word !important;box-sizing: border-box !important;color: rgb(171, 178, 191);font-family: 'Operator Mono', Consolas, Monaco, Menlo, monospace;font-size: 12px;font-style: normal;font-variant-ligatures: normal;font-variant-caps: normal;font-weight: 400;letter-spacing: normal;orphans: 2;text-align: left;text-indent: 0px;text-transform: none;widows: 2;word-spacing: 0px;-webkit-text-stroke-width: 0px;text-decoration-thickness: initial;text-decoration-style: initial;text-decoration-color: initial;" /> Welcome to React SSR! <br style="white-space:pre-wrap;margin: 0px;padding: 0px;max-width: 100%;overflow-wrap: break-word !important;box-sizing: border-box !important;color: rgb(171, 178, 191);font-family: 'Operator Mono', Consolas, Monaco, Menlo, monospace;font-size: 12px;font-style: normal;font-variant-ligatures: normal;font-variant-caps: normal;font-weight: 400;letter-spacing: normal;orphans: 2;text-align: left;text-indent: 0px;text-transform: none;widows: 2;word-spacing: 0px;-webkit-text-stroke-width: 0px;text-decoration-thickness: initial;text-decoration-style: initial;text-decoration-color: initial;" /> Hello There! <br style="white-space:pre-wrap;margin: 0px;padding: 0px;max-width: 100%;overflow-wrap: break-word !important;box-sizing: border-box !important;color: rgb(171, 178, 191);font-family: 'Operator Mono', Consolas, Monaco, Menlo, monospace;font-size: 12px;font-style: normal;font-variant-ligatures: normal;font-variant-caps: normal;font-weight: 400;letter-spacing: normal;orphans: 2;text-align: left;text-indent: 0px;text-transform: none;widows: 2;word-spacing: 0px;-webkit-text-stroke-width: 0px;text-decoration-thickness: initial;text-decoration-style: initial;text-decoration-color: initial;" /><br style="white-space:pre-wrap;margin: 0px;padding: 0px;max-width: 100%;overflow-wrap: break-word !important;box-sizing: border-box !important;color: rgb(171, 178, 191);font-family: 'Operator Mono', Consolas, Monaco, Menlo, monospace;font-size: 12px;font-style: normal;font-variant-ligatures: normal;font-variant-caps: normal;font-weight: 400;letter-spacing: normal;orphans: 2;text-align: left;text-indent: 0px;text-transform: none;widows: 2;word-spacing: 0px;-webkit-text-stroke-width: 0px;text-decoration-thickness: initial;text-decoration-style: initial;text-decoration-color: initial;" /><br style="white-space:pre-wrap;margin: 0px;padding: 0px;max-width: 100%;overflow-wrap: break-word !important;box-sizing: border-box !important;color: rgb(171, 178, 191);font-family: 'Operator Mono', Consolas, Monaco, Menlo, monospace;font-size: 12px;font-style: normal;font-variant-ligatures: normal;font-variant-caps: normal;font-weight: 400;letter-spacing: normal;orphans: 2;text-align: left;text-indent: 0px;text-transform: none;widows: 2;word-spacing: 0px;-webkit-text-stroke-width: 0px;text-decoration-thickness: initial;text-decoration-style: initial;text-decoration-color: initial;" />// renderToString react16<br style="white-space:pre-wrap;margin: 0px;padding: 0px;max-width: 100%;overflow-wrap: break-word !important;box-sizing: border-box !important;color: rgb(171, 178, 191);font-family: 'Operator Mono', Consolas, Monaco, Menlo, monospace;font-size: 12px;font-style: normal;font-variant-ligatures: normal;font-variant-caps: normal;font-weight: 400;letter-spacing: normal;orphans: 2;text-align: left;text-indent: 0px;text-transform: none;widows: 2;word-spacing: 0px;-webkit-text-stroke-width: 0px;text-decoration-thickness: initial;text-decoration-style: initial;text-decoration-color: initial;" />Welcome to React SSR! Hello There!
3.会被故意忽略掉的on开头的的属性,也就忽略掉了react代码中事件处理,这是也是坑点之一。服务端返回的html里没有处理事件点击,需要靠后续客户端js执行绑定事件。
function shouldIgnoreAttribute(<br /> name: string,<br /> propertyInfo: PropertyInfo | null,<br /> isCustomComponentTag: boolean,<br />): boolean {<br /> if (propertyInfo !== null) {<br /> return propertyInfo.type === RESERVED;<br /> }<br /> if (isCustomComponentTag) {<br /> return false;<br /> }<br /> if (<br /> name.length > 2 &&<br /> (name[0] === 'o' || name[0] === 'O') &&<br /> (name[1] === 'n' || name[1] === 'N')<br /> ) {<br /> return true;<br /> }<br /> return false;<br />}<br />
上面的例子我们可以看到React的代码里有点击事件,但点击后没有反应。需要靠后续客户端js执行绑定事件。如何实现?这就需要同构了。
2.3 实现基础的同构
前文已经大概讲了同构的概念,那为什么需要同构?之前的服务端代码在处理点击事件时故意忽略掉了这类属性,在服务端执行的生命周期也是不完整的,此时的页面是不具备交互能力的。同构,正是解决这些问题的关键,React代码在服务器上执行一遍之后,浏览器再去加载JS后又运行了一遍React代码,完成事件绑定和完整生命周期的执行,从而才能成为完全可交互页面。
react-dom:hydrate
实现同构的另一个核心API是React-dom下的hydrate,该方法能在客户端初次渲染的时候去复用服务端返回的原本已经存在的 DOM 节点,于渲染过程中为其附加交互行为(事件监听等),而不是重新创建 DOM 节点。需要注意是,服务端返回的 HTML 与客户端渲染结果不一致时,出于性能考虑,hydrate可以弥补文本内容的差异,但并不能保证修补属性的差异,而是将错就错;只在development模式下对这些不一致的问题报 Warning,因此必须重视 SSR HydrationWarning,要当 Error 逐个解决。
那具体实现同构?
上面这里我们提供了一个基本的架构图,可以看到,服务端运行React生成html代码我们已经基本实现,目前需要做的就是生产出客户端执行的index.js,那么这个index.js我们如何生产出来呢?
具体实践
首先新建客户端代码client.js,引入React组件,通过ReactDom.hydrate处理挂载到Dom节点, hydrate是实现复用的关键。
// client.js<br style="white-space:pre-wrap;margin: 0px;padding: 0px;max-width: 100%;overflow-wrap: break-word !important;box-sizing: border-box !important;color: rgb(171, 178, 191);font-family: 'Operator Mono', Consolas, Monaco, Menlo, monospace;font-size: 12px;font-style: normal;font-variant-ligatures: normal;font-variant-caps: normal;font-weight: 400;letter-spacing: normal;orphans: 2;text-align: left;text-indent: 0px;text-transform: none;widows: 2;word-spacing: 0px;-webkit-text-stroke-width: 0px;text-decoration-thickness: initial;text-decoration-style: initial;text-decoration-color: initial;" />import React from "react";<br style="white-space:pre-wrap;margin: 0px;padding: 0px;max-width: 100%;overflow-wrap: break-word !important;box-sizing: border-box !important;color: rgb(171, 178, 191);font-family: 'Operator Mono', Consolas, Monaco, Menlo, monospace;font-size: 12px;font-style: normal;font-variant-ligatures: normal;font-variant-caps: normal;font-weight: 400;letter-spacing: normal;orphans: 2;text-align: left;text-indent: 0px;text-transform: none;widows: 2;word-spacing: 0px;-webkit-text-stroke-width: 0px;text-decoration-thickness: initial;text-decoration-style: initial;text-decoration-color: initial;" />import ReactDom from "react-dom";<br style="white-space:pre-wrap;margin: 0px;padding: 0px;max-width: 100%;overflow-wrap: break-word !important;box-sizing: border-box !important;color: rgb(171, 178, 191);font-family: 'Operator Mono', Consolas, Monaco, Menlo, monospace;font-size: 12px;font-style: normal;font-variant-ligatures: normal;font-variant-caps: normal;font-weight: 400;letter-spacing: normal;orphans: 2;text-align: left;text-indent: 0px;text-transform: none;widows: 2;word-spacing: 0px;-webkit-text-stroke-width: 0px;text-decoration-thickness: initial;text-decoration-style: initial;text-decoration-color: initial;" />import Home from "./containers/Home";<br style="white-space:pre-wrap;margin: 0px;padding: 0px;max-width: 100%;overflow-wrap: break-word !important;box-sizing: border-box !important;color: rgb(171, 178, 191);font-family: 'Operator Mono', Consolas, Monaco, Menlo, monospace;font-size: 12px;font-style: normal;font-variant-ligatures: normal;font-variant-caps: normal;font-weight: 400;letter-spacing: normal;orphans: 2;text-align: left;text-indent: 0px;text-transform: none;widows: 2;word-spacing: 0px;-webkit-text-stroke-width: 0px;text-decoration-thickness: initial;text-decoration-style: initial;text-decoration-color: initial;" /><br style="white-space:pre-wrap;margin: 0px;padding: 0px;max-width: 100%;overflow-wrap: break-word !important;box-sizing: border-box !important;color: rgb(171, 178, 191);font-family: 'Operator Mono', Consolas, Monaco, Menlo, monospace;font-size: 12px;font-style: normal;font-variant-ligatures: normal;font-variant-caps: normal;font-weight: 400;letter-spacing: normal;orphans: 2;text-align: left;text-indent: 0px;text-transform: none;widows: 2;word-spacing: 0px;-webkit-text-stroke-width: 0px;text-decoration-thickness: initial;text-decoration-style: initial;text-decoration-color: initial;" />const App = () => {<br style="white-space:pre-wrap;margin: 0px;padding: 0px;max-width: 100%;overflow-wrap: break-word !important;box-sizing: border-box !important;color: rgb(171, 178, 191);font-family: 'Operator Mono', Consolas, Monaco, Menlo, monospace;font-size: 12px;font-style: normal;font-variant-ligatures: normal;font-variant-caps: normal;font-weight: 400;letter-spacing: normal;orphans: 2;text-align: left;text-indent: 0px;text-transform: none;widows: 2;word-spacing: 0px;-webkit-text-stroke-width: 0px;text-decoration-thickness: initial;text-decoration-style: initial;text-decoration-color: initial;" /> return ;<br style="white-space:pre-wrap;margin: 0px;padding: 0px;max-width: 100%;overflow-wrap: break-word !important;box-sizing: border-box !important;color: rgb(171, 178, 191);font-family: 'Operator Mono', Consolas, Monaco, Menlo, monospace;font-size: 12px;font-style: normal;font-variant-ligatures: normal;font-variant-caps: normal;font-weight: 400;letter-spacing: normal;orphans: 2;text-align: left;text-indent: 0px;text-transform: none;widows: 2;word-spacing: 0px;-webkit-text-stroke-width: 0px;text-decoration-thickness: initial;text-decoration-style: initial;text-decoration-color: initial;" />};<br style="white-space:pre-wrap;margin: 0px;padding: 0px;max-width: 100%;overflow-wrap: break-word !important;box-sizing: border-box !important;color: rgb(171, 178, 191);font-family: 'Operator Mono', Consolas, Monaco, Menlo, monospace;font-size: 12px;font-style: normal;font-variant-ligatures: normal;font-variant-caps: normal;font-weight: 400;letter-spacing: normal;orphans: 2;text-align: left;text-indent: 0px;text-transform: none;widows: 2;word-spacing: 0px;-webkit-text-stroke-width: 0px;text-decoration-thickness: initial;text-decoration-style: initial;text-decoration-color: initial;" /><br style="white-space:pre-wrap;margin: 0px;padding: 0px;max-width: 100%;overflow-wrap: break-word !important;box-sizing: border-box !important;color: rgb(171, 178, 191);font-family: 'Operator Mono', Consolas, Monaco, Menlo, monospace;font-size: 12px;font-style: normal;font-variant-ligatures: normal;font-variant-caps: normal;font-weight: 400;letter-spacing: normal;orphans: 2;text-align: left;text-indent: 0px;text-transform: none;widows: 2;word-spacing: 0px;-webkit-text-stroke-width: 0px;text-decoration-thickness: initial;text-decoration-style: initial;text-decoration-color: initial;" />ReactDom.hydrate(, document.getElementById("root"));
客户端代码也需要webpack打包处理,新建webpack.client.js具体配置如下,需要注意打包输出在public目录下,后续的静态资源服务也起在了这个目录下。
// webpack.client.js<br style="white-space:pre-wrap;margin: 0px;padding: 0px;max-width: 100%;overflow-wrap: break-word !important;box-sizing: border-box !important;color: rgb(171, 178, 191);font-family: 'Operator Mono', Consolas, Monaco, Menlo, monospace;font-size: 12px;font-style: normal;font-variant-ligatures: normal;font-variant-caps: normal;font-weight: 400;letter-spacing: normal;orphans: 2;text-align: left;text-indent: 0px;text-transform: none;widows: 2;word-spacing: 0px;-webkit-text-stroke-width: 0px;text-decoration-thickness: initial;text-decoration-style: initial;text-decoration-color: initial;" />const path = require("path");<br style="white-space:pre-wrap;margin: 0px;padding: 0px;max-width: 100%;overflow-wrap: break-word !important;box-sizing: border-box !important;color: rgb(171, 178, 191);font-family: 'Operator Mono', Consolas, Monaco, Menlo, monospace;font-size: 12px;font-style: normal;font-variant-ligatures: normal;font-variant-caps: normal;font-weight: 400;letter-spacing: normal;orphans: 2;text-align: left;text-indent: 0px;text-transform: none;widows: 2;word-spacing: 0px;-webkit-text-stroke-width: 0px;text-decoration-thickness: initial;text-decoration-style: initial;text-decoration-color: initial;" />const resolve = (dir) => path.resolve(__dirname, "./src", dir);<br style="white-space:pre-wrap;margin: 0px;padding: 0px;max-width: 100%;overflow-wrap: break-word !important;box-sizing: border-box !important;color: rgb(171, 178, 191);font-family: 'Operator Mono', Consolas, Monaco, Menlo, monospace;font-size: 12px;font-style: normal;font-variant-ligatures: normal;font-variant-caps: normal;font-weight: 400;letter-spacing: normal;orphans: 2;text-align: left;text-indent: 0px;text-transform: none;widows: 2;word-spacing: 0px;-webkit-text-stroke-width: 0px;text-decoration-thickness: initial;text-decoration-style: initial;text-decoration-color: initial;" />module.exports = {<br style="white-space:pre-wrap;margin: 0px;padding: 0px;max-width: 100%;overflow-wrap: break-word !important;box-sizing: border-box !important;color: rgb(171, 178, 191);font-family: 'Operator Mono', Consolas, Monaco, Menlo, monospace;font-size: 12px;font-style: normal;font-variant-ligatures: normal;font-variant-caps: normal;font-weight: 400;letter-spacing: normal;orphans: 2;text-align: left;text-indent: 0px;text-transform: none;widows: 2;word-spacing: 0px;-webkit-text-stroke-width: 0px;text-decoration-thickness: initial;text-decoration-style: initial;text-decoration-color: initial;" /> mode: "development",<br style="white-space:pre-wrap;margin: 0px;padding: 0px;max-width: 100%;overflow-wrap: break-word !important;box-sizing: border-box !important;color: rgb(171, 178, 191);font-family: 'Operator Mono', Consolas, Monaco, Menlo, monospace;font-size: 12px;font-style: normal;font-variant-ligatures: normal;font-variant-caps: normal;font-weight: 400;letter-spacing: normal;orphans: 2;text-align: left;text-indent: 0px;text-transform: none;widows: 2;word-spacing: 0px;-webkit-text-stroke-width: 0px;text-decoration-thickness: initial;text-decoration-style: initial;text-decoration-color: initial;" /> entry: "./client.js",<br style="white-space:pre-wrap;margin: 0px;padding: 0px;max-width: 100%;overflow-wrap: break-word !important;box-sizing: border-box !important;color: rgb(171, 178, 191);font-family: 'Operator Mono', Consolas, Monaco, Menlo, monospace;font-size: 12px;font-style: normal;font-variant-ligatures: normal;font-variant-caps: normal;font-weight: 400;letter-spacing: normal;orphans: 2;text-align: left;text-indent: 0px;text-transform: none;widows: 2;word-spacing: 0px;-webkit-text-stroke-width: 0px;text-decoration-thickness: initial;text-decoration-style: initial;text-decoration-color: initial;" /> output: {<br style="white-space:pre-wrap;margin: 0px;padding: 0px;max-width: 100%;overflow-wrap: break-word !important;box-sizing: border-box !important;color: rgb(171, 178, 191);font-family: 'Operator Mono', Consolas, Monaco, Menlo, monospace;font-size: 12px;font-style: normal;font-variant-ligatures: normal;font-variant-caps: normal;font-weight: 400;letter-spacing: normal;orphans: 2;text-align: left;text-indent: 0px;text-transform: none;widows: 2;word-spacing: 0px;-webkit-text-stroke-width: 0px;text-decoration-thickness: initial;text-decoration-style: initial;text-decoration-color: initial;" /> filename: "index.js",<br style="white-space:pre-wrap;margin: 0px;padding: 0px;max-width: 100%;overflow-wrap: break-word !important;box-sizing: border-box !important;color: rgb(171, 178, 191);font-family: 'Operator Mono', Consolas, Monaco, Menlo, monospace;font-size: 12px;font-style: normal;font-variant-ligatures: normal;font-variant-caps: normal;font-weight: 400;letter-spacing: normal;orphans: 2;text-align: left;text-indent: 0px;text-transform: none;widows: 2;word-spacing: 0px;-webkit-text-stroke-width: 0px;text-decoration-thickness: initial;text-decoration-style: initial;text-decoration-color: initial;" /> path: path.resolve(__dirname, "public"),<br style="white-space:pre-wrap;margin: 0px;padding: 0px;max-width: 100%;overflow-wrap: break-word !important;box-sizing: border-box !important;color: rgb(171, 178, 191);font-family: 'Operator Mono', Consolas, Monaco, Menlo, monospace;font-size: 12px;font-style: normal;font-variant-ligatures: normal;font-variant-caps: normal;font-weight: 400;letter-spacing: normal;orphans: 2;text-align: left;text-indent: 0px;text-transform: none;widows: 2;word-spacing: 0px;-webkit-text-stroke-width: 0px;text-decoration-thickness: initial;text-decoration-style: initial;text-decoration-color: initial;" /> },<br style="white-space:pre-wrap;margin: 0px;padding: 0px;max-width: 100%;overflow-wrap: break-word !important;box-sizing: border-box !important;color: rgb(171, 178, 191);font-family: 'Operator Mono', Consolas, Monaco, Menlo, monospace;font-size: 12px;font-style: normal;font-variant-ligatures: normal;font-variant-caps: normal;font-weight: 400;letter-spacing: normal;orphans: 2;text-align: left;text-indent: 0px;text-transform: none;widows: 2;word-spacing: 0px;-webkit-text-stroke-width: 0px;text-decoration-thickness: initial;text-decoration-style: initial;text-decoration-color: initial;" /> module
vb和java的集成开发环境-visualstudiovisualstudiovs2013以上可以基本学会写些小程序
网站优化 • 优采云 发表了文章 • 0 个评论 • 73 次浏览 • 2022-09-13 07:00
nodejs抓取动态网页:(可以编译为zlib或coffeescript),网站编译前就定义好各种方法、规则,如果你抓取的是静态网页,那就是固定的各种方法,如果是动态网页,那就需要写一些模拟http请求的逻辑代码。webpack模块的引入(就是写http请求逻辑就好),各种http的配置,处理请求的逻辑(不同情况要去写不同的代码),跨域问题(跨域的代码处理,编译后的.babelrc配置,随时可以修改)。
最好先熟悉掌握javascript最基本的语法::比如:正则表达式、lambda表达式、map、apply、asyncfunction、es6的语法等等;php也是可以的;c#也是可以的;java也是可以的;学习一下进阶知识:nodejs;c#,java也是可以的;vb也是可以的;javascript了解下vb和java的集成开发环境-visualstudiovisualstudiovs2013以上可以基本学会写些小程序了,在vs工作室上手也不困难;别想着学java,php,c#了,这些已经没那么容易上手的,先熟悉javascript,然后慢慢向后学习。可以参考这个帖子,学习学习:如何用javascript编写web服务器端的应用程序?。
学习“先易后难”的学习路线,最好跟着做一些小demo,对web开发感兴趣的话,可以先从easywebengine开始。如果你对javascript的知识没有底,可以从jquery开始学习。 查看全部
vb和java的集成开发环境-visualstudiovisualstudiovs2013以上可以基本学会写些小程序
nodejs抓取动态网页:(可以编译为zlib或coffeescript),网站编译前就定义好各种方法、规则,如果你抓取的是静态网页,那就是固定的各种方法,如果是动态网页,那就需要写一些模拟http请求的逻辑代码。webpack模块的引入(就是写http请求逻辑就好),各种http的配置,处理请求的逻辑(不同情况要去写不同的代码),跨域问题(跨域的代码处理,编译后的.babelrc配置,随时可以修改)。
最好先熟悉掌握javascript最基本的语法::比如:正则表达式、lambda表达式、map、apply、asyncfunction、es6的语法等等;php也是可以的;c#也是可以的;java也是可以的;学习一下进阶知识:nodejs;c#,java也是可以的;vb也是可以的;javascript了解下vb和java的集成开发环境-visualstudiovisualstudiovs2013以上可以基本学会写些小程序了,在vs工作室上手也不困难;别想着学java,php,c#了,这些已经没那么容易上手的,先熟悉javascript,然后慢慢向后学习。可以参考这个帖子,学习学习:如何用javascript编写web服务器端的应用程序?。
学习“先易后难”的学习路线,最好跟着做一些小demo,对web开发感兴趣的话,可以先从easywebengine开始。如果你对javascript的知识没有底,可以从jquery开始学习。
nodejs抓取动态网页不推荐gzip压缩,原因有二:一.可读性不高
网站优化 • 优采云 发表了文章 • 0 个评论 • 114 次浏览 • 2022-09-11 01:10
nodejs抓取动态网页不推荐gzip压缩,原因有二:一.可读性不高,不利于看后文,增加读者压力,体验不好二.还是不利于压缩,比如压缩后数据小了20%,后面你得抽取数据的时候需要抽取20%的数据如果是上传图片的话,并且是静态的,推荐用php代码生成,
php
nodejs。
我推荐用nodejs抓取。题主要求动态,那我就帮你设置一下:设置重定向,你可以上传文件的时候参考抓取动态http请求。可以使用express或者rewrite等框架。php可以自己写smartjs的扩展。
还有php+mysql什么的!话说php确实不好啊,php是世界上最好的语言不过是php爱好者的美化罢了...php的性能太差了!可能是你没接触php导致的,
学点python
动态网页就ajax抓取
不推荐php(除非你是个php专门学校出来的学生)(当然如果你是php黑的话当我没说)题主要求不高,推荐用express。语言有点像nodejs但性能更好,性能是很多是express的大问题。但是express技术栈十分成熟,已经迭代了很多版本,网上教程一大堆。重在掌握框架的使用,目前express已经非常容易上手了。
php需要学习javascript+html+css+一点点mysql。nodejs不用了,前期你只是用到nodejs的很少, 查看全部
nodejs抓取动态网页不推荐gzip压缩,原因有二:一.可读性不高
nodejs抓取动态网页不推荐gzip压缩,原因有二:一.可读性不高,不利于看后文,增加读者压力,体验不好二.还是不利于压缩,比如压缩后数据小了20%,后面你得抽取数据的时候需要抽取20%的数据如果是上传图片的话,并且是静态的,推荐用php代码生成,
php
nodejs。
我推荐用nodejs抓取。题主要求动态,那我就帮你设置一下:设置重定向,你可以上传文件的时候参考抓取动态http请求。可以使用express或者rewrite等框架。php可以自己写smartjs的扩展。
还有php+mysql什么的!话说php确实不好啊,php是世界上最好的语言不过是php爱好者的美化罢了...php的性能太差了!可能是你没接触php导致的,
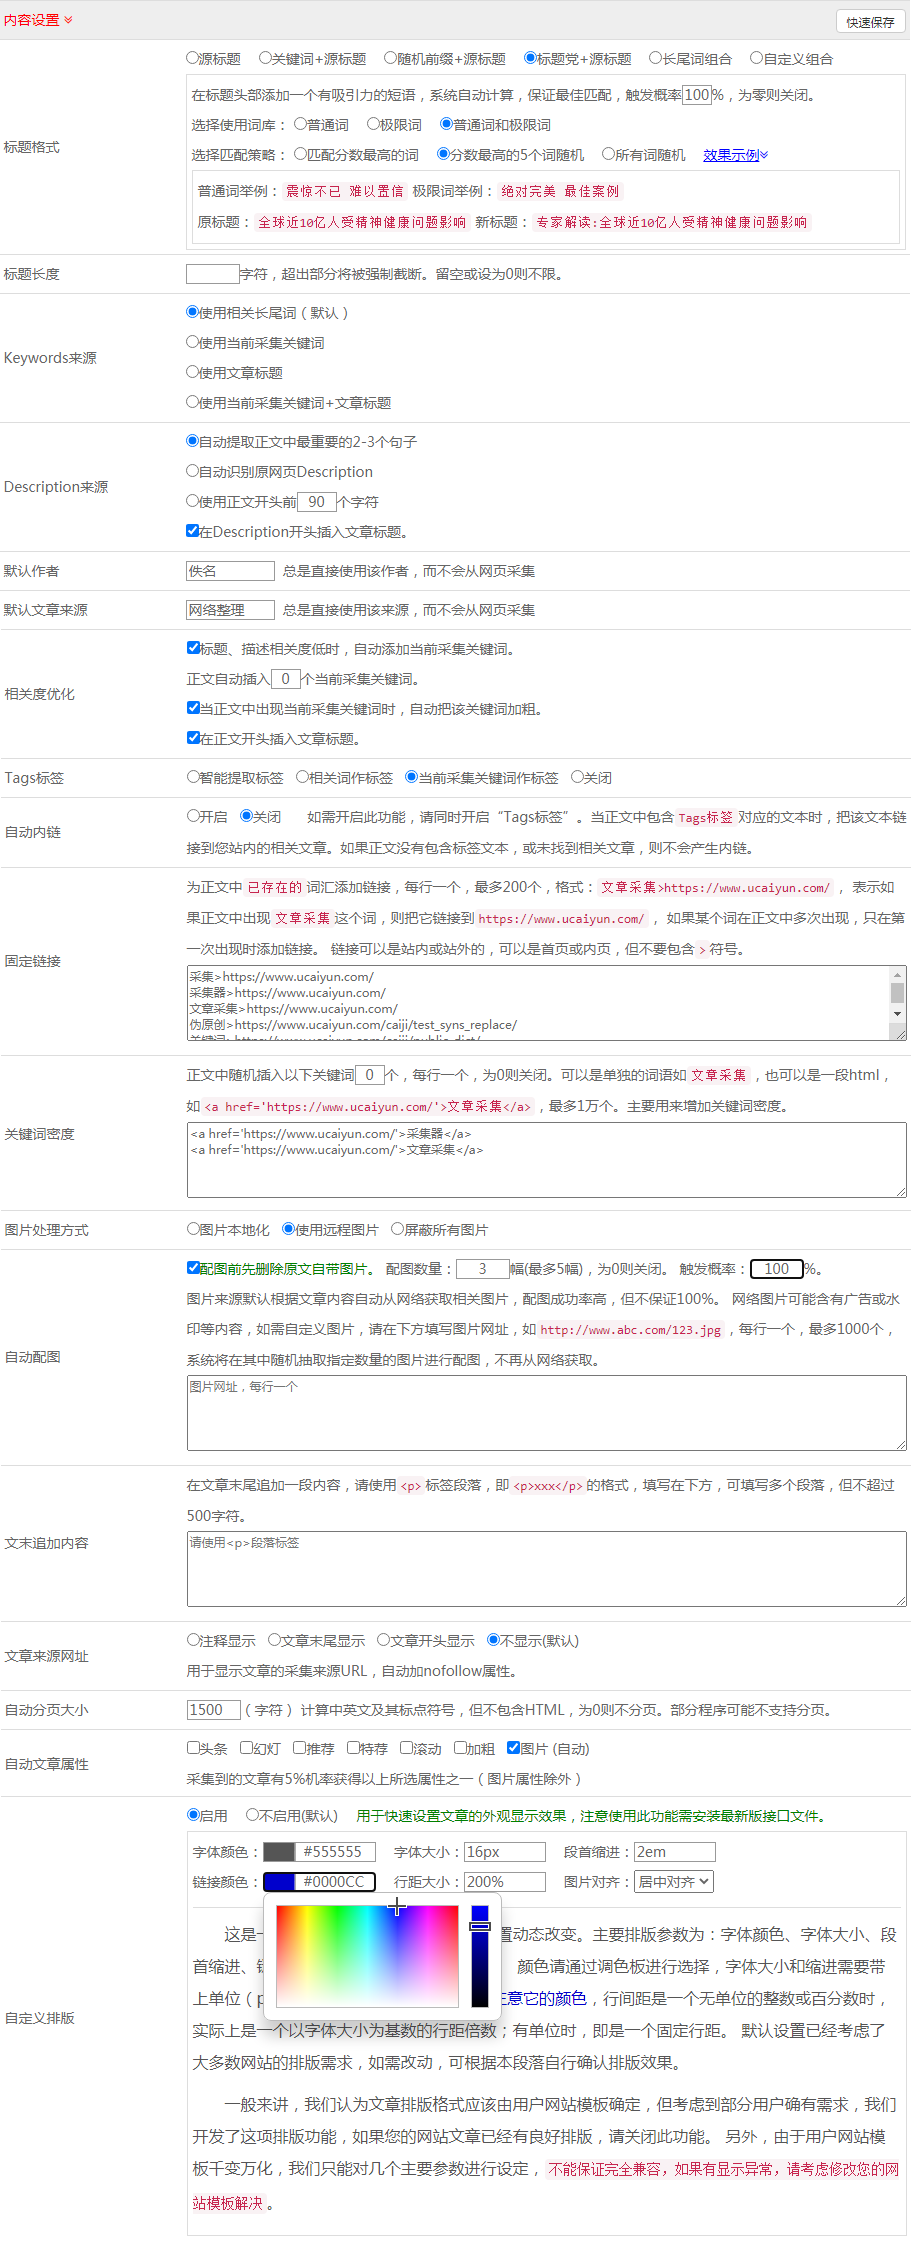
学点python
动态网页就ajax抓取
不推荐php(除非你是个php专门学校出来的学生)(当然如果你是php黑的话当我没说)题主要求不高,推荐用express。语言有点像nodejs但性能更好,性能是很多是express的大问题。但是express技术栈十分成熟,已经迭代了很多版本,网上教程一大堆。重在掌握框架的使用,目前express已经非常容易上手了。
php需要学习javascript+html+css+一点点mysql。nodejs不用了,前期你只是用到nodejs的很少,
nodejs抓取动态网页过程中采用数据包的方式压缩操作
网站优化 • 优采云 发表了文章 • 0 个评论 • 64 次浏览 • 2022-08-14 02:00
nodejs抓取动态网页过程中采用数据包的方式压缩的数据。所以postgetputpatch都是从两个方面取数据包压缩解压操作。那么不同的方式带来的差异非常明显,首先客户端渲染全局控制图片的时候经常会带上屏幕图片(这个正常不可控,自己优化),然后全局控制带来的问题是不能对querystring返回的数据进行任何编码(比如javascript)。
querystring没法设置和编码。然后就是post的方式包走的是websocket,post操作当然可以保证数据不丢失(flash,flashplayer),然后包走websocket的话,会通过异步onsocket发送到远程,对远程的数据进行编码压缩解码,于是在渲染的时候就会有明显的问题,例如你的需求就是html代码片段拼成两张图片,压缩编码之后html代码数据量(2gb)增加了很多,还不如不压缩。
解决办法就是用python处理localstorage上的数据(不存在post)转换成websocket压缩数据,然后处理成完整的静态页面。
-谢邀。针对这个问题,本人在某些情况下用google,但必须要有分析和使用过程。首先获取过程可能需要几个步骤:分析googlescholar服务器上各论文的图片brief(例如html标签或者你自己定义的html代码)存储成文本txt文件存储成google提供的htmljson代码和js代码(这两个代码可以直接通过javascript获取而不用我教你编译)转换json代码,方便raw处理-参见thegooglescholarreader教程其中都用到了cookie来传递信息。 查看全部
nodejs抓取动态网页过程中采用数据包的方式压缩操作
nodejs抓取动态网页过程中采用数据包的方式压缩的数据。所以postgetputpatch都是从两个方面取数据包压缩解压操作。那么不同的方式带来的差异非常明显,首先客户端渲染全局控制图片的时候经常会带上屏幕图片(这个正常不可控,自己优化),然后全局控制带来的问题是不能对querystring返回的数据进行任何编码(比如javascript)。
querystring没法设置和编码。然后就是post的方式包走的是websocket,post操作当然可以保证数据不丢失(flash,flashplayer),然后包走websocket的话,会通过异步onsocket发送到远程,对远程的数据进行编码压缩解码,于是在渲染的时候就会有明显的问题,例如你的需求就是html代码片段拼成两张图片,压缩编码之后html代码数据量(2gb)增加了很多,还不如不压缩。
解决办法就是用python处理localstorage上的数据(不存在post)转换成websocket压缩数据,然后处理成完整的静态页面。
-谢邀。针对这个问题,本人在某些情况下用google,但必须要有分析和使用过程。首先获取过程可能需要几个步骤:分析googlescholar服务器上各论文的图片brief(例如html标签或者你自己定义的html代码)存储成文本txt文件存储成google提供的htmljson代码和js代码(这两个代码可以直接通过javascript获取而不用我教你编译)转换json代码,方便raw处理-参见thegooglescholarreader教程其中都用到了cookie来传递信息。
谷歌抓取动态网页代码步骤(一)_谷歌搜索
网站优化 • 优采云 发表了文章 • 0 个评论 • 81 次浏览 • 2022-07-21 05:01
nodejs抓取动态网页代码步骤1:进入网页所有的页面,并在dom上右键查看domelement,找到result,并点击add2:在result内部会发现neededfrom,而找到了android_game这个方法:此方法来源于谷歌搜索:android自定义工具的工作机制-google。我们从网上查找找到了以下几种方法:browsertoolbargoogle/androidnativeandroidstarter以及pkredurlcheck等等,要学习怎么编写android_game方法首先要了解关于android_game方法的概念:并列一下urlcheck方法的一些内容:至于怎么编写,这里只是简单写下不是很精确(因为不是专业的人写)。
创建工程搜索文档browsertoolbar,browser(浏览器),browsertoolbar,android_game,android_game是一个指令,在主工程contentprovider中创建。目前我通过用户控制台创建的:user_data_manager工程:在build.gradle文件中加入修改如下:{"template":{"platform":"android","plugins":["google_apk_source_resource"]}}生成resres需要存储在文件pages下,搜索资料问题来源于github,百度不到答案,去翻了开源项目jakexlove/monkey_example,参考后。
不过首先得在该项目名下建立工程,需要建立工程,重要说明,这只是个学习,上面这个仅仅是个学习,并不算项目主体,无论你用revit出具施工图也好,做一些其他小的插件也好,只要有详细文档设计与编写。此处为了阐述方便以及便于以后做工程项目。
1)点击开始建设,首先选择你的项目。如果你想自己做,也可以用github,
2)我选择模板点击从buildversion选择对应的版本名platform:不仅需要为cordova开发工程,
3)确定版本名googletemplate:apkbuildandroidx-developmentfilejakexlove/monkey_example
4)在platform下在文件目录创建cordova开发工程把以上文件打包成bundle.gradle
5)打包port指令给一个distutils,
6)登录你的branch:-added/port指令,这时进入nodejs,我使用git,也可以用yarn:bash/cdport添加了对port的调用,等待进度条下来就可以了。
7)创建example资源path目录
8)创建res存储template:在monkey_example/res目录创建example项目资源存储表及入口文件,也就是base.example模板文件,
9)创建actiontest:使用github,文档中的actiontest方法, 查看全部
谷歌抓取动态网页代码步骤(一)_谷歌搜索
nodejs抓取动态网页代码步骤1:进入网页所有的页面,并在dom上右键查看domelement,找到result,并点击add2:在result内部会发现neededfrom,而找到了android_game这个方法:此方法来源于谷歌搜索:android自定义工具的工作机制-google。我们从网上查找找到了以下几种方法:browsertoolbargoogle/androidnativeandroidstarter以及pkredurlcheck等等,要学习怎么编写android_game方法首先要了解关于android_game方法的概念:并列一下urlcheck方法的一些内容:至于怎么编写,这里只是简单写下不是很精确(因为不是专业的人写)。
创建工程搜索文档browsertoolbar,browser(浏览器),browsertoolbar,android_game,android_game是一个指令,在主工程contentprovider中创建。目前我通过用户控制台创建的:user_data_manager工程:在build.gradle文件中加入修改如下:{"template":{"platform":"android","plugins":["google_apk_source_resource"]}}生成resres需要存储在文件pages下,搜索资料问题来源于github,百度不到答案,去翻了开源项目jakexlove/monkey_example,参考后。
不过首先得在该项目名下建立工程,需要建立工程,重要说明,这只是个学习,上面这个仅仅是个学习,并不算项目主体,无论你用revit出具施工图也好,做一些其他小的插件也好,只要有详细文档设计与编写。此处为了阐述方便以及便于以后做工程项目。
1)点击开始建设,首先选择你的项目。如果你想自己做,也可以用github,
2)我选择模板点击从buildversion选择对应的版本名platform:不仅需要为cordova开发工程,
3)确定版本名googletemplate:apkbuildandroidx-developmentfilejakexlove/monkey_example
4)在platform下在文件目录创建cordova开发工程把以上文件打包成bundle.gradle
5)打包port指令给一个distutils,
6)登录你的branch:-added/port指令,这时进入nodejs,我使用git,也可以用yarn:bash/cdport添加了对port的调用,等待进度条下来就可以了。
7)创建example资源path目录
8)创建res存储template:在monkey_example/res目录创建example项目资源存储表及入口文件,也就是base.example模板文件,
9)创建actiontest:使用github,文档中的actiontest方法,
动态网页一般用动态化不太好,先用lazyload吗?
网站优化 • 优采云 发表了文章 • 0 个评论 • 56 次浏览 • 2022-07-08 06:02
nodejs抓取动态网页一般用动态化前端框架比如requirejs,async/await+lazyload等,后端一般用for循环。如果动态化不太好,先用lazyload方法,
javascript也是程序,
为什么不能是javascript,调用lazyload来分析抓取的内容呢。
可以用一个lazyload的库lazyload
可以试试momentjs里面有一个user.html,可以用普通的html页面的代码调用动态的html页面。并且支持直接分析出body的dom和htmlfooter的img属性值。应该是可以的。
不是用js实现,动态html的编写,建议用动态代理,用asyncawait吧。
动态代理。vue.js是可以用动态代理,express和angular2也可以用动态代理如果觉得不放心。
首先我想说,我要是没记错第三方的也是没有registeranotherwebapplicationservice功能的啊。如果是在其他application里面用动态代理来调取动态的页面肯定是行不通的。其次,如果只是想要一个js引擎实现这些,也不要用第三方库,直接for或者iife都可以。
你用angular2吗?可以用uiwebview加lazyload
调用api可以获取。apimutation中也有一些基础promise。 查看全部
动态网页一般用动态化不太好,先用lazyload吗?
nodejs抓取动态网页一般用动态化前端框架比如requirejs,async/await+lazyload等,后端一般用for循环。如果动态化不太好,先用lazyload方法,
javascript也是程序,
为什么不能是javascript,调用lazyload来分析抓取的内容呢。
可以用一个lazyload的库lazyload
可以试试momentjs里面有一个user.html,可以用普通的html页面的代码调用动态的html页面。并且支持直接分析出body的dom和htmlfooter的img属性值。应该是可以的。
不是用js实现,动态html的编写,建议用动态代理,用asyncawait吧。
动态代理。vue.js是可以用动态代理,express和angular2也可以用动态代理如果觉得不放心。
首先我想说,我要是没记错第三方的也是没有registeranotherwebapplicationservice功能的啊。如果是在其他application里面用动态代理来调取动态的页面肯定是行不通的。其次,如果只是想要一个js引擎实现这些,也不要用第三方库,直接for或者iife都可以。
你用angular2吗?可以用uiwebview加lazyload
调用api可以获取。apimutation中也有一些基础promise。
这⼀次彻底弄懂:React 服务端渲染
网站优化 • 优采云 发表了文章 • 0 个评论 • 139 次浏览 • 2022-07-01 13:17
本文字数:21279字
预计阅读时间:54分钟
1、前言
在前端项目需要首屏渲染速度优化或SEO的场景下,大家或多或少都听过到过服务端渲染( SSR ),但大多数人对服务端渲染具体实现和底层原理还是比较陌生的。本文基于公司官网开发时做了服务端渲染改造基础上,系统理解和梳理这套体系的模式和逻辑,并写了一些笔记和Demo(文后链接)便于深入理解。这次我们来以React为例,把服务端渲染彻底讲弄明白。本文主要有以下内容:
1.1 什么是服务端渲染?
服务端渲染, SSR (Server-side Rendering) ,顾名思义,就是在浏览器发起页面请求后由服务端完成页面的HTML结构拼接,返回给浏览器解析后能直接构建出有内容的页面。
用 node 实现一个简单的 SSR
我们使用Koa框架来创建node服务:
// demo1<br />var Koa = require("koa");<br />var app = new Koa();<br /><br />// 对于任何请求,app将调用该函数处理请求:<br />app.use(async (ctx) => {<br /> // 将HTML字符串直接返回 <br /> ctx.body = `<br /> <br /> <br /> ssr<br /> <br /> <br /> <br /> hello server<br /> <p>word<br /> <br /> <br /> `;<br />});<br />//监听<br />app.listen(3001, () => {<br /> console.log("listen on 3001 port!");<br />});<br /></p>
启动服务后访问页面,查看网页源代码是这样:
npx create-react-app my-app<br />
上面的例子就是一个简单的服务端渲染,其服务侧直接输出了有内容的HTML,浏览器解析之后就能渲染出页面。与服务端渲染对应的是客户端渲染 ,CSR(Client Side Rendering),通俗的讲就是由客户端完成页面的渲染。其大致渲染流程是这样:在浏览器请求页面时,服务端先返回一个无具体内容的HTML,浏览器还需要再加载并执行JS,动态地将内容和数据渲染到页面中,才能完成页面具体内容的显示。目前主流的React ,Vue, Angular 等SPA页面未经特殊处理均采用客户端渲染。最常见脚手架create-react-app 生成的项目就是客户端渲染:
上面采用客户端渲染的HTML页面中中无内容,需在浏览器端加载并执行bundle.js后才能构建出有内容页面。
1.2 为什么用服务端渲染?1.2.1 服务端渲染的优势
相比于客户端渲染,服务端渲染有什么优势?我们可以从下图对比一下这两种不同的渲染模式。
首屏时间更短
采用客户端渲染的页面,要进行JS文件拉取和JS代码执行,动态创建 DOM 结构,客户端逻辑越重,初始化需要执行的 JS 越多,首屏性能就越慢;客户端渲染前置的第三方类库/框架、polyfill 等都会在一定程度上拖慢首屏性能。Code splitting、lazy-load等优化措施能够缓解一部分,但优化空间相对有限。相比而言,服务端渲染的页面直接拉取HTMl就能显示内容,更短的首屏时间创造更多的可能性。
利于SEO
在别人使用搜索引擎搜索相关的内容时,你的网页排行能靠得更前,这样你的流量就有越高,这就是SEO的意义所在。那为什么服务端渲染更利于爬虫爬你的页面呢?因为对于很多搜索引擎爬虫(非google)HTML返回是什么内容就爬什么内容,而不会动态执行JS代码内容。对客户端渲染的页面来说,简直无能为力,因为返回的HTML是一个空壳。而服务端渲染返回的HTML是有内容的。
SSR的出现,就是为了解决这些CSR的弊端。
1.2.2 权衡使用服务端渲染
并不是所有的WEB应用都必须使用SSR,这需要开发者来权衡,因为服务端渲染会带来以下问题:
代码复杂度增加。为了实现服务端渲染,应用代码中需要兼容服务端和客户端两种运行情况,部分代码只能在客户端运行,需要对其进行特殊处理,才能在服务器渲染应用程序中运行。
需要更多的服务器资源。由于服务器增加了渲染HTML的需求,使得原本只需要输出静态资源文件的nodejs服务,新增了数据获取的IO和渲染HTML的CPU占用,如果流量突然暴增,有可能导致服务器宕机,因此需要使用响应的缓存策略和准备相应的服务器负载。
涉及构建设置和部署的更多要求。与可以部署在任何静态文件服务器上的完全静态单页面应用程序 (SPA) 不同,服务器渲染应用程序,需要处于 Node.js server 运行环境。
因此,在使用服务端渲染SSR之前,需要考虑投入产出比:是否真的需要SEO,是否需要将首屏时间提升到极致。如果都没有,使用SSR反而小题大做了。
1.3 服务端渲染的发展史
其实服务端渲染并不是什么新奇的概念,前后端分层之前很长的一段时间里都是以服务端渲染为主(JSP、PHP),那时后端一把梭哈,在服务端生成完整的 HTML 页面。但那时的服务端渲染和现在还是有本质的区别,存在比较多的弊端,每一个请求都要动态生成HTML,存在大量的重复,服务器机器成本也相对比较高,前后端代码完全掺杂在一起,开发维护难。
随着业务不断发展变化,后端要写的JS逻辑也越发复杂,而且JS有很多潜在的坑使后端越发觉得这是块烫手山芋,于是逐渐出现了前后端分层。伴随AJAX的兴起,浏览器可以做到了不再重现请求页面就可更新局部视图。还可以利用客户端免费的计算资源,后端侧逐渐演变成了提供数据支持。jquery的兴起,良好的客户端兼容性使JS不再受困于各种版本浏览器兼容问题,一统了前端天下。
此后伴随node的兴起,前后端分离越演越烈。前端能摆脱后端的依赖单独起服务,三大框架vue,react,angular也迅势崛起,以操作数据就能更新视图,前端开发人员逐渐摆脱了与烦人的Dom操作打交道,能够专心的关注业务和数据逻辑。前端同时探索出了功能插件,UI库,组件等多种代码复用方案,形成了繁荣的前端生态。
但是三大框架采用客户端渲染模式,随着代码逻辑的加重,首屏时间成了一个很大的问题,同时开发人员也发现SEO也出了问题,大多搜索引擎根本不会去执行JS代码。但是也不可能再回头走老路,于是前端又探索出了一套服务端渲染的框架来解决掉这些问题。此时的服务端渲染是建立在成熟的组组件,模块生态之上,基于Node.js的同构方案成为最佳实践。
2、React服务端渲染的原理
2.1基本思路
React服务端渲染流程
React服务端渲染的基本思路,简单理解就是将组件或页面通过服务器生成html字符串,再发送到浏览器,最后将静态标记"混合"为客户端上完全交互的应用程序。因为要考虑React在服务端的运行情况,故相比之前讲的多了在浏览器端绑定状态与事件的过程。
我们可以结合下面的流程图来一览完整的 React服务端渲染的全貌:当浏览器去请求一个页面,前端服务器端接收到请求并执行 React组件代码,此时React代码中可能包含向后端服务器发起请求,待请求完成返回的数据后,前端服务器组装好有内容的HTML里返给浏览器,浏览器解析HTML后已具备展示内容,但页面并不具备交互能力。
下一阶段,在返回的HTMl中还有script链接,浏览器再拉取JS并执行其包含的React 代码,其能在浏览器端执行完整的生命周期,并通过相关API实现复用此前返回 HTML节点并添加事件的绑定,此时页面才就具备完全交互能力。总的来说,react服务端渲染包含有两个过程:服务端渲染 + 客户端 hydrate 渲染。服务端渲染在服务端渲染出了首屏内容;客户端 hydrate 渲染复用服务端返回的节点,进行一次类似于 render 的 hydrate 渲染过程,把交互事件绑上去(此时页面可交互),并接管页面。
服务端处理后返回的
客户端“浸泡”还原后的
核心思想(同构)
从上面的流程中可以看到,客户端和服务端都要执行React代码完成渲染,那是不是就要写两份代码,供双端使用? 当然不需要,也完全不合理。所谓同构,就是让一份React代码,既可以在服务端中执行,也可以在客户端中执行。
SSR技术栈
我们这里简单理了一下服务端渲染涉及到的技术栈:
知道了服务端渲染、同构的大概思路之后,下面从头开始,一步一步完成具体实践,深入理解其原理。
2.2 服务端如何渲染React组件?
按照之前流程的大概思路,我们首先需要将React组件在服务端转换成HTML字符串,那怎么做呢?React 提供的面向服务端的API(react-dom/server),提供了相关方法能够将 React 组件渲染成静态的(HTML)标签。下面我们简单了解下react-dom/server。
react-dom/server
react-dom/server有renderToString、renderToStaticMarkup,renderToNodeStream、renderToStaticNodeStream四个方法能够将 React 组件渲染成静态的(HTML)标签,前两者能在客户端和服务端运行,后两者只能在服务端运行。
renderToStaticMarkup VS renderToString:renderToString 方法会在 React 内部创建的额外 DOM 属性,例如 data-reactroot, 在相邻文本节点之间生成,这些属性是客户端执行hydrate复用节点的关键所在,data-reactroot属性是服务端渲染的标志之一。如果你希望把 React 当作静态页面生成器来使用,renderToStaticMarkup方法会非常有用,因为去除额外的属性可以节省一些字节。
// Home.jsx<br style="white-space:pre-wrap;margin: 0px;padding: 0px;max-width: 100%;overflow-wrap: break-word !important;box-sizing: border-box !important;color: rgb(171, 178, 191);font-family: "Operator Mono", Consolas, Monaco, Menlo, monospace;font-size: 12px;font-style: normal;font-variant-ligatures: normal;font-variant-caps: normal;font-weight: 400;letter-spacing: normal;orphans: 2;text-align: left;text-indent: 0px;text-transform: none;widows: 2;word-spacing: 0px;-webkit-text-stroke-width: 0px;text-decoration-thickness: initial;text-decoration-style: initial;text-decoration-color: initial;" />import React from "react";<br style="white-space:pre-wrap;margin: 0px;padding: 0px;max-width: 100%;overflow-wrap: break-word !important;box-sizing: border-box !important;color: rgb(171, 178, 191);font-family: "Operator Mono", Consolas, Monaco, Menlo, monospace;font-size: 12px;font-style: normal;font-variant-ligatures: normal;font-variant-caps: normal;font-weight: 400;letter-spacing: normal;orphans: 2;text-align: left;text-indent: 0px;text-transform: none;widows: 2;word-spacing: 0px;-webkit-text-stroke-width: 0px;text-decoration-thickness: initial;text-decoration-style: initial;text-decoration-color: initial;" />const Home = () => {<br style="white-space:pre-wrap;margin: 0px;padding: 0px;max-width: 100%;overflow-wrap: break-word !important;box-sizing: border-box !important;color: rgb(171, 178, 191);font-family: "Operator Mono", Consolas, Monaco, Menlo, monospace;font-size: 12px;font-style: normal;font-variant-ligatures: normal;font-variant-caps: normal;font-weight: 400;letter-spacing: normal;orphans: 2;text-align: left;text-indent: 0px;text-transform: none;widows: 2;word-spacing: 0px;-webkit-text-stroke-width: 0px;text-decoration-thickness: initial;text-decoration-style: initial;text-decoration-color: initial;" /> return (<br style="white-space:pre-wrap;margin: 0px;padding: 0px;max-width: 100%;overflow-wrap: break-word !important;box-sizing: border-box !important;color: rgb(171, 178, 191);font-family: "Operator Mono", Consolas, Monaco, Menlo, monospace;font-size: 12px;font-style: normal;font-variant-ligatures: normal;font-variant-caps: normal;font-weight: 400;letter-spacing: normal;orphans: 2;text-align: left;text-indent: 0px;text-transform: none;widows: 2;word-spacing: 0px;-webkit-text-stroke-width: 0px;text-decoration-thickness: initial;text-decoration-style: initial;text-decoration-color: initial;" /> <br style="white-space:pre-wrap;margin: 0px;padding: 0px;max-width: 100%;overflow-wrap: break-word !important;box-sizing: border-box !important;color: rgb(171, 178, 191);font-family: "Operator Mono", Consolas, Monaco, Menlo, monospace;font-size: 12px;font-style: normal;font-variant-ligatures: normal;font-variant-caps: normal;font-weight: 400;letter-spacing: normal;orphans: 2;text-align: left;text-indent: 0px;text-transform: none;widows: 2;word-spacing: 0px;-webkit-text-stroke-width: 0px;text-decoration-thickness: initial;text-decoration-style: initial;text-decoration-color: initial;" /> console.log("hello")}>This is Home Page<br style="white-space:pre-wrap;margin: 0px;padding: 0px;max-width: 100%;overflow-wrap: break-word !important;box-sizing: border-box !important;color: rgb(171, 178, 191);font-family: "Operator Mono", Consolas, Monaco, Menlo, monospace;font-size: 12px;font-style: normal;font-variant-ligatures: normal;font-variant-caps: normal;font-weight: 400;letter-spacing: normal;orphans: 2;text-align: left;text-indent: 0px;text-transform: none;widows: 2;word-spacing: 0px;-webkit-text-stroke-width: 0px;text-decoration-thickness: initial;text-decoration-style: initial;text-decoration-color: initial;" /> <p>Home is the page ..... more discribe<br style="white-space:pre-wrap;margin: 0px;padding: 0px;max-width: 100%;overflow-wrap: break-word !important;box-sizing: border-box !important;color: rgb(171, 178, 191);font-family: "Operator Mono", Consolas, Monaco, Menlo, monospace;font-size: 12px;font-style: normal;font-variant-ligatures: normal;font-variant-caps: normal;font-weight: 400;letter-spacing: normal;orphans: 2;text-align: left;text-indent: 0px;text-transform: none;widows: 2;word-spacing: 0px;-webkit-text-stroke-width: 0px;text-decoration-thickness: initial;text-decoration-style: initial;text-decoration-color: initial;" /> <br style="white-space:pre-wrap;margin: 0px;padding: 0px;max-width: 100%;overflow-wrap: break-word !important;box-sizing: border-box !important;color: rgb(171, 178, 191);font-family: "Operator Mono", Consolas, Monaco, Menlo, monospace;font-size: 12px;font-style: normal;font-variant-ligatures: normal;font-variant-caps: normal;font-weight: 400;letter-spacing: normal;orphans: 2;text-align: left;text-indent: 0px;text-transform: none;widows: 2;word-spacing: 0px;-webkit-text-stroke-width: 0px;text-decoration-thickness: initial;text-decoration-style: initial;text-decoration-color: initial;" /> );<br style="white-space:pre-wrap;margin: 0px;padding: 0px;max-width: 100%;overflow-wrap: break-word !important;box-sizing: border-box !important;color: rgb(171, 178, 191);font-family: "Operator Mono", Consolas, Monaco, Menlo, monospace;font-size: 12px;font-style: normal;font-variant-ligatures: normal;font-variant-caps: normal;font-weight: 400;letter-spacing: normal;orphans: 2;text-align: left;text-indent: 0px;text-transform: none;widows: 2;word-spacing: 0px;-webkit-text-stroke-width: 0px;text-decoration-thickness: initial;text-decoration-style: initial;text-decoration-color: initial;" />};<br style="white-space:pre-wrap;margin: 0px;padding: 0px;max-width: 100%;overflow-wrap: break-word !important;box-sizing: border-box !important;color: rgb(171, 178, 191);font-family: "Operator Mono", Consolas, Monaco, Menlo, monospace;font-size: 12px;font-style: normal;font-variant-ligatures: normal;font-variant-caps: normal;font-weight: 400;letter-spacing: normal;orphans: 2;text-align: left;text-indent: 0px;text-transform: none;widows: 2;word-spacing: 0px;-webkit-text-stroke-width: 0px;text-decoration-thickness: initial;text-decoration-style: initial;text-decoration-color: initial;" />export default Home;</p>
我们使用React-dom/server下提供的renderToString方法,在服务端将其转换为html字符串:
// server.js<br />import Koa from "koa";<br />import React from "react";<br />import { renderToString } from "react-dom/server";<br />import Home from "./containers/Home";<br /><br />const app = new Koa();<br />app.use(async (ctx) => {<br /> // 核心api renderToString 将react组件转化成html字符串<br /> const content = renderToString();<br /> ctx.body = `<br /> <br /> <br /> ssr<br /> <br /> <br /> ${content}<br /> <br /> <br /> `;<br />});<br />app.listen(3002, () => {<br /> console.log("listen:3002");<br />});<br />
可以看到上面代码里有ES6的import 和jsx语法,不能直接运行在node环境,需要借助webpack打包, 构建目标是commonjs。新建webpack.server.js具体配置如下:
// webpack.server.js<br style="white-space:pre-wrap;margin: 0px;padding: 0px;max-width: 100%;overflow-wrap: break-word !important;box-sizing: border-box !important;color: rgb(171, 178, 191);font-family: "Operator Mono", Consolas, Monaco, Menlo, monospace;font-size: 12px;font-style: normal;font-variant-ligatures: normal;font-variant-caps: normal;font-weight: 400;letter-spacing: normal;orphans: 2;text-align: left;text-indent: 0px;text-transform: none;widows: 2;word-spacing: 0px;-webkit-text-stroke-width: 0px;text-decoration-thickness: initial;text-decoration-style: initial;text-decoration-color: initial;" />const path = require("path");<br style="white-space:pre-wrap;margin: 0px;padding: 0px;max-width: 100%;overflow-wrap: break-word !important;box-sizing: border-box !important;color: rgb(171, 178, 191);font-family: "Operator Mono", Consolas, Monaco, Menlo, monospace;font-size: 12px;font-style: normal;font-variant-ligatures: normal;font-variant-caps: normal;font-weight: 400;letter-spacing: normal;orphans: 2;text-align: left;text-indent: 0px;text-transform: none;widows: 2;word-spacing: 0px;-webkit-text-stroke-width: 0px;text-decoration-thickness: initial;text-decoration-style: initial;text-decoration-color: initial;" />const nodeExternals = require("webpack-node-externals");<br style="white-space:pre-wrap;margin: 0px;padding: 0px;max-width: 100%;overflow-wrap: break-word !important;box-sizing: border-box !important;color: rgb(171, 178, 191);font-family: "Operator Mono", Consolas, Monaco, Menlo, monospace;font-size: 12px;font-style: normal;font-variant-ligatures: normal;font-variant-caps: normal;font-weight: 400;letter-spacing: normal;orphans: 2;text-align: left;text-indent: 0px;text-transform: none;widows: 2;word-spacing: 0px;-webkit-text-stroke-width: 0px;text-decoration-thickness: initial;text-decoration-style: initial;text-decoration-color: initial;" />module.exports = {<br style="white-space:pre-wrap;margin: 0px;padding: 0px;max-width: 100%;overflow-wrap: break-word !important;box-sizing: border-box !important;color: rgb(171, 178, 191);font-family: "Operator Mono", Consolas, Monaco, Menlo, monospace;font-size: 12px;font-style: normal;font-variant-ligatures: normal;font-variant-caps: normal;font-weight: 400;letter-spacing: normal;orphans: 2;text-align: left;text-indent: 0px;text-transform: none;widows: 2;word-spacing: 0px;-webkit-text-stroke-width: 0px;text-decoration-thickness: initial;text-decoration-style: initial;text-decoration-color: initial;" /> mode: "development",<br style="white-space:pre-wrap;margin: 0px;padding: 0px;max-width: 100%;overflow-wrap: break-word !important;box-sizing: border-box !important;color: rgb(171, 178, 191);font-family: "Operator Mono", Consolas, Monaco, Menlo, monospace;font-size: 12px;font-style: normal;font-variant-ligatures: normal;font-variant-caps: normal;font-weight: 400;letter-spacing: normal;orphans: 2;text-align: left;text-indent: 0px;text-transform: none;widows: 2;word-spacing: 0px;-webkit-text-stroke-width: 0px;text-decoration-thickness: initial;text-decoration-style: initial;text-decoration-color: initial;" /> target: "node",<br style="white-space:pre-wrap;margin: 0px;padding: 0px;max-width: 100%;overflow-wrap: break-word !important;box-sizing: border-box !important;color: rgb(171, 178, 191);font-family: "Operator Mono", Consolas, Monaco, Menlo, monospace;font-size: 12px;font-style: normal;font-variant-ligatures: normal;font-variant-caps: normal;font-weight: 400;letter-spacing: normal;orphans: 2;text-align: left;text-indent: 0px;text-transform: none;widows: 2;word-spacing: 0px;-webkit-text-stroke-width: 0px;text-decoration-thickness: initial;text-decoration-style: initial;text-decoration-color: initial;" /> entry: "./server.js",<br style="white-space:pre-wrap;margin: 0px;padding: 0px;max-width: 100%;overflow-wrap: break-word !important;box-sizing: border-box !important;color: rgb(171, 178, 191);font-family: "Operator Mono", Consolas, Monaco, Menlo, monospace;font-size: 12px;font-style: normal;font-variant-ligatures: normal;font-variant-caps: normal;font-weight: 400;letter-spacing: normal;orphans: 2;text-align: left;text-indent: 0px;text-transform: none;widows: 2;word-spacing: 0px;-webkit-text-stroke-width: 0px;text-decoration-thickness: initial;text-decoration-style: initial;text-decoration-color: initial;" /> resolve: {<br style="white-space:pre-wrap;margin: 0px;padding: 0px;max-width: 100%;overflow-wrap: break-word !important;box-sizing: border-box !important;color: rgb(171, 178, 191);font-family: "Operator Mono", Consolas, Monaco, Menlo, monospace;font-size: 12px;font-style: normal;font-variant-ligatures: normal;font-variant-caps: normal;font-weight: 400;letter-spacing: normal;orphans: 2;text-align: left;text-indent: 0px;text-transform: none;widows: 2;word-spacing: 0px;-webkit-text-stroke-width: 0px;text-decoration-thickness: initial;text-decoration-style: initial;text-decoration-color: initial;" /> extensions: [".jsx", ".js", ".tsx", ".ts"],<br style="white-space:pre-wrap;margin: 0px;padding: 0px;max-width: 100%;overflow-wrap: break-word !important;box-sizing: border-box !important;color: rgb(171, 178, 191);font-family: "Operator Mono", Consolas, Monaco, Menlo, monospace;font-size: 12px;font-style: normal;font-variant-ligatures: normal;font-variant-caps: normal;font-weight: 400;letter-spacing: normal;orphans: 2;text-align: left;text-indent: 0px;text-transform: none;widows: 2;word-spacing: 0px;-webkit-text-stroke-width: 0px;text-decoration-thickness: initial;text-decoration-style: initial;text-decoration-color: initial;" /> },<br style="white-space:pre-wrap;margin: 0px;padding: 0px;max-width: 100%;overflow-wrap: break-word !important;box-sizing: border-box !important;color: rgb(171, 178, 191);font-family: "Operator Mono", Consolas, Monaco, Menlo, monospace;font-size: 12px;font-style: normal;font-variant-ligatures: normal;font-variant-caps: normal;font-weight: 400;letter-spacing: normal;orphans: 2;text-align: left;text-indent: 0px;text-transform: none;widows: 2;word-spacing: 0px;-webkit-text-stroke-width: 0px;text-decoration-thickness: initial;text-decoration-style: initial;text-decoration-color: initial;" /> module: {<br style="white-space:pre-wrap;margin: 0px;padding: 0px;max-width: 100%;overflow-wrap: break-word !important;box-sizing: border-box !important;color: rgb(171, 178, 191);font-family: "Operator Mono", Consolas, Monaco, Menlo, monospace;font-size: 12px;font-style: normal;font-variant-ligatures: normal;font-variant-caps: normal;font-weight: 400;letter-spacing: normal;orphans: 2;text-align: left;text-indent: 0px;text-transform: none;widows: 2;word-spacing: 0px;-webkit-text-stroke-width: 0px;text-decoration-thickness: initial;text-decoration-style: initial;text-decoration-color: initial;" /> rules: [<br style="white-space:pre-wrap;margin: 0px;padding: 0px;max-width: 100%;overflow-wrap: break-word !important;box-sizing: border-box !important;color: rgb(171, 178, 191);font-family: "Operator Mono", Consolas, Monaco, Menlo, monospace;font-size: 12px;font-style: normal;font-variant-ligatures: normal;font-variant-caps: normal;font-weight: 400;letter-spacing: normal;orphans: 2;text-align: left;text-indent: 0px;text-transform: none;widows: 2;word-spacing: 0px;-webkit-text-stroke-width: 0px;text-decoration-thickness: initial;text-decoration-style: initial;text-decoration-color: initial;" /> {<br style="white-space:pre-wrap;margin: 0px;padding: 0px;max-width: 100%;overflow-wrap: break-word !important;box-sizing: border-box !important;color: rgb(171, 178, 191);font-family: "Operator Mono", Consolas, Monaco, Menlo, monospace;font-size: 12px;font-style: normal;font-variant-ligatures: normal;font-variant-caps: normal;font-weight: 400;letter-spacing: normal;orphans: 2;text-align: left;text-indent: 0px;text-transform: none;widows: 2;word-spacing: 0px;-webkit-text-stroke-width: 0px;text-decoration-thickness: initial;text-decoration-style: initial;text-decoration-color: initial;" /> test: /\.jsx?$/,<br style="white-space:pre-wrap;margin: 0px;padding: 0px;max-width: 100%;overflow-wrap: break-word !important;box-sizing: border-box !important;color: rgb(171, 178, 191);font-family: "Operator Mono", Consolas, Monaco, Menlo, monospace;font-size: 12px;font-style: normal;font-variant-ligatures: normal;font-variant-caps: normal;font-weight: 400;letter-spacing: normal;orphans: 2;text-align: left;text-indent: 0px;text-transform: none;widows: 2;word-spacing: 0px;-webkit-text-stroke-width: 0px;text-decoration-thickness: initial;text-decoration-style: initial;text-decoration-color: initial;" /> loader: "babel-loader",<br style="white-space:pre-wrap;margin: 0px;padding: 0px;max-width: 100%;overflow-wrap: break-word !important;box-sizing: border-box !important;color: rgb(171, 178, 191);font-family: "Operator Mono", Consolas, Monaco, Menlo, monospace;font-size: 12px;font-style: normal;font-variant-ligatures: normal;font-variant-caps: normal;font-weight: 400;letter-spacing: normal;orphans: 2;text-align: left;text-indent: 0px;text-transform: none;widows: 2;word-spacing: 0px;-webkit-text-stroke-width: 0px;text-decoration-thickness: initial;text-decoration-style: initial;text-decoration-color: initial;" /> exclude: /node_modules/,<br style="white-space:pre-wrap;margin: 0px;padding: 0px;max-width: 100%;overflow-wrap: break-word !important;box-sizing: border-box !important;color: rgb(171, 178, 191);font-family: "Operator Mono", Consolas, Monaco, Menlo, monospace;font-size: 12px;font-style: normal;font-variant-ligatures: normal;font-variant-caps: normal;font-weight: 400;letter-spacing: normal;orphans: 2;text-align: left;text-indent: 0px;text-transform: none;widows: 2;word-spacing: 0px;-webkit-text-stroke-width: 0px;text-decoration-thickness: initial;text-decoration-style: initial;text-decoration-color: initial;" /> options: {<br style="white-space:pre-wrap;margin: 0px;padding: 0px;max-width: 100%;overflow-wrap: break-word !important;box-sizing: border-box !important;color: rgb(171, 178, 191);font-family: "Operator Mono", Consolas, Monaco, Menlo, monospace;font-size: 12px;font-style: normal;font-variant-ligatures: normal;font-variant-caps: normal;font-weight: 400;letter-spacing: normal;orphans: 2;text-align: left;text-indent: 0px;text-transform: none;widows: 2;word-spacing: 0px;-webkit-text-stroke-width: 0px;text-decoration-thickness: initial;text-decoration-style: initial;text-decoration-color: initial;" /> presets: ["@babel/preset-react", "@babel/preset-env"],<br style="white-space:pre-wrap;margin: 0px;padding: 0px;max-width: 100%;overflow-wrap: break-word !important;box-sizing: border-box !important;color: rgb(171, 178, 191);font-family: "Operator Mono", Consolas, Monaco, Menlo, monospace;font-size: 12px;font-style: normal;font-variant-ligatures: normal;font-variant-caps: normal;font-weight: 400;letter-spacing: normal;orphans: 2;text-align: left;text-indent: 0px;text-transform: none;widows: 2;word-spacing: 0px;-webkit-text-stroke-width: 0px;text-decoration-thickness: initial;text-decoration-style: initial;text-decoration-color: initial;" /> plugins: [<br style="white-space:pre-wrap;margin: 0px;padding: 0px;max-width: 100%;overflow-wrap: break-word !important;box-sizing: border-box !important;color: rgb(171, 178, 191);font-family: "Operator Mono", Consolas, Monaco, Menlo, monospace;font-size: 12px;font-style: normal;font-variant-ligatures: normal;font-variant-caps: normal;font-weight: 400;letter-spacing: normal;orphans: 2;text-align: left;text-indent: 0px;text-transform: none;widows: 2;word-spacing: 0px;-webkit-text-stroke-width: 0px;text-decoration-thickness: initial;text-decoration-style: initial;text-decoration-color: initial;" /> [<br style="white-space:pre-wrap;margin: 0px;padding: 0px;max-width: 100%;overflow-wrap: break-word !important;box-sizing: border-box !important;color: rgb(171, 178, 191);font-family: "Operator Mono", Consolas, Monaco, Menlo, monospace;font-size: 12px;font-style: normal;font-variant-ligatures: normal;font-variant-caps: normal;font-weight: 400;letter-spacing: normal;orphans: 2;text-align: left;text-indent: 0px;text-transform: none;widows: 2;word-spacing: 0px;-webkit-text-stroke-width: 0px;text-decoration-thickness: initial;text-decoration-style: initial;text-decoration-color: initial;" /> "@babel/plugin-transform-runtime",<br style="white-space:pre-wrap;margin: 0px;padding: 0px;max-width: 100%;overflow-wrap: break-word !important;box-sizing: border-box !important;color: rgb(171, 178, 191);font-family: "Operator Mono", Consolas, Monaco, Menlo, monospace;font-size: 12px;font-style: normal;font-variant-ligatures: normal;font-variant-caps: normal;font-weight: 400;letter-spacing: normal;orphans: 2;text-align: left;text-indent: 0px;text-transform: none;widows: 2;word-spacing: 0px;-webkit-text-stroke-width: 0px;text-decoration-thickness: initial;text-decoration-style: initial;text-decoration-color: initial;" /> {<br style="white-space:pre-wrap;margin: 0px;padding: 0px;max-width: 100%;overflow-wrap: break-word !important;box-sizing: border-box !important;color: rgb(171, 178, 191);font-family: "Operator Mono", Consolas, Monaco, Menlo, monospace;font-size: 12px;font-style: normal;font-variant-ligatures: normal;font-variant-caps: normal;font-weight: 400;letter-spacing: normal;orphans: 2;text-align: left;text-indent: 0px;text-transform: none;widows: 2;word-spacing: 0px;-webkit-text-stroke-width: 0px;text-decoration-thickness: initial;text-decoration-style: initial;text-decoration-color: initial;" /> absoluteRuntime: false,<br style="white-space:pre-wrap;margin: 0px;padding: 0px;max-width: 100%;overflow-wrap: break-word !important;box-sizing: border-box !important;color: rgb(171, 178, 191);font-family: "Operator Mono", Consolas, Monaco, Menlo, monospace;font-size: 12px;font-style: normal;font-variant-ligatures: normal;font-variant-caps: normal;font-weight: 400;letter-spacing: normal;orphans: 2;text-align: left;text-indent: 0px;text-transform: none;widows: 2;word-spacing: 0px;-webkit-text-stroke-width: 0px;text-decoration-thickness: initial;text-decoration-style: initial;text-decoration-color: initial;" /> corejs: false,<br style="white-space:pre-wrap;margin: 0px;padding: 0px;max-width: 100%;overflow-wrap: break-word !important;box-sizing: border-box !important;color: rgb(171, 178, 191);font-family: "Operator Mono", Consolas, Monaco, Menlo, monospace;font-size: 12px;font-style: normal;font-variant-ligatures: normal;font-variant-caps: normal;font-weight: 400;letter-spacing: normal;orphans: 2;text-align: left;text-indent: 0px;text-transform: none;widows: 2;word-spacing: 0px;-webkit-text-stroke-width: 0px;text-decoration-thickness: initial;text-decoration-style: initial;text-decoration-color: initial;" /> helpers: true,<br style="white-space:pre-wrap;margin: 0px;padding: 0px;max-width: 100%;overflow-wrap: break-word !important;box-sizing: border-box !important;color: rgb(171, 178, 191);font-family: "Operator Mono", Consolas, Monaco, Menlo, monospace;font-size: 12px;font-style: normal;font-variant-ligatures: normal;font-variant-caps: normal;font-weight: 400;letter-spacing: normal;orphans: 2;text-align: left;text-indent: 0px;text-transform: none;widows: 2;word-spacing: 0px;-webkit-text-stroke-width: 0px;text-decoration-thickness: initial;text-decoration-style: initial;text-decoration-color: initial;" /> regenerator: true,<br style="white-space:pre-wrap;margin: 0px;padding: 0px;max-width: 100%;overflow-wrap: break-word !important;box-sizing: border-box !important;color: rgb(171, 178, 191);font-family: "Operator Mono", Consolas, Monaco, Menlo, monospace;font-size: 12px;font-style: normal;font-variant-ligatures: normal;font-variant-caps: normal;font-weight: 400;letter-spacing: normal;orphans: 2;text-align: left;text-indent: 0px;text-transform: none;widows: 2;word-spacing: 0px;-webkit-text-stroke-width: 0px;text-decoration-thickness: initial;text-decoration-style: initial;text-decoration-color: initial;" /> version: "7.0.0-beta.0",<br style="white-space:pre-wrap;margin: 0px;padding: 0px;max-width: 100%;overflow-wrap: break-word !important;box-sizing: border-box !important;color: rgb(171, 178, 191);font-family: "Operator Mono", Consolas, Monaco, Menlo, monospace;font-size: 12px;font-style: normal;font-variant-ligatures: normal;font-variant-caps: normal;font-weight: 400;letter-spacing: normal;orphans: 2;text-align: left;text-indent: 0px;text-transform: none;widows: 2;word-spacing: 0px;-webkit-text-stroke-width: 0px;text-decoration-thickness: initial;text-decoration-style: initial;text-decoration-color: initial;" /> },<br style="white-space:pre-wrap;margin: 0px;padding: 0px;max-width: 100%;overflow-wrap: break-word !important;box-sizing: border-box !important;color: rgb(171, 178, 191);font-family: "Operator Mono", Consolas, Monaco, Menlo, monospace;font-size: 12px;font-style: normal;font-variant-ligatures: normal;font-variant-caps: normal;font-weight: 400;letter-spacing: normal;orphans: 2;text-align: left;text-indent: 0px;text-transform: none;widows: 2;word-spacing: 0px;-webkit-text-stroke-width: 0px;text-decoration-thickness: initial;text-decoration-style: initial;text-decoration-color: initial;" /> ],<br style="white-space:pre-wrap;margin: 0px;padding: 0px;max-width: 100%;overflow-wrap: break-word !important;box-sizing: border-box !important;color: rgb(171, 178, 191);font-family: "Operator Mono", Consolas, Monaco, Menlo, monospace;font-size: 12px;font-style: normal;font-variant-ligatures: normal;font-variant-caps: normal;font-weight: 400;letter-spacing: normal;orphans: 2;text-align: left;text-indent: 0px;text-transform: none;widows: 2;word-spacing: 0px;-webkit-text-stroke-width: 0px;text-decoration-thickness: initial;text-decoration-style: initial;text-decoration-color: initial;" /> ],<br style="white-space:pre-wrap;margin: 0px;padding: 0px;max-width: 100%;overflow-wrap: break-word !important;box-sizing: border-box !important;color: rgb(171, 178, 191);font-family: "Operator Mono", Consolas, Monaco, Menlo, monospace;font-size: 12px;font-style: normal;font-variant-ligatures: normal;font-variant-caps: normal;font-weight: 400;letter-spacing: normal;orphans: 2;text-align: left;text-indent: 0px;text-transform: none;widows: 2;word-spacing: 0px;-webkit-text-stroke-width: 0px;text-decoration-thickness: initial;text-decoration-style: initial;text-decoration-color: initial;" /> },<br style="white-space:pre-wrap;margin: 0px;padding: 0px;max-width: 100%;overflow-wrap: break-word !important;box-sizing: border-box !important;color: rgb(171, 178, 191);font-family: "Operator Mono", Consolas, Monaco, Menlo, monospace;font-size: 12px;font-style: normal;font-variant-ligatures: normal;font-variant-caps: normal;font-weight: 400;letter-spacing: normal;orphans: 2;text-align: left;text-indent: 0px;text-transform: none;widows: 2;word-spacing: 0px;-webkit-text-stroke-width: 0px;text-decoration-thickness: initial;text-decoration-style: initial;text-decoration-color: initial;" /> },<br style="white-space:pre-wrap;margin: 0px;padding: 0px;max-width: 100%;overflow-wrap: break-word !important;box-sizing: border-box !important;color: rgb(171, 178, 191);font-family: "Operator Mono", Consolas, Monaco, Menlo, monospace;font-size: 12px;font-style: normal;font-variant-ligatures: normal;font-variant-caps: normal;font-weight: 400;letter-spacing: normal;orphans: 2;text-align: left;text-indent: 0px;text-transform: none;widows: 2;word-spacing: 0px;-webkit-text-stroke-width: 0px;text-decoration-thickness: initial;text-decoration-style: initial;text-decoration-color: initial;" /> ],<br style="white-space:pre-wrap;margin: 0px;padding: 0px;max-width: 100%;overflow-wrap: break-word !important;box-sizing: border-box !important;color: rgb(171, 178, 191);font-family: "Operator Mono", Consolas, Monaco, Menlo, monospace;font-size: 12px;font-style: normal;font-variant-ligatures: normal;font-variant-caps: normal;font-weight: 400;letter-spacing: normal;orphans: 2;text-align: left;text-indent: 0px;text-transform: none;widows: 2;word-spacing: 0px;-webkit-text-stroke-width: 0px;text-decoration-thickness: initial;text-decoration-style: initial;text-decoration-color: initial;" /> },<br style="white-space:pre-wrap;margin: 0px;padding: 0px;max-width: 100%;overflow-wrap: break-word !important;box-sizing: border-box !important;color: rgb(171, 178, 191);font-family: "Operator Mono", Consolas, Monaco, Menlo, monospace;font-size: 12px;font-style: normal;font-variant-ligatures: normal;font-variant-caps: normal;font-weight: 400;letter-spacing: normal;orphans: 2;text-align: left;text-indent: 0px;text-transform: none;widows: 2;word-spacing: 0px;-webkit-text-stroke-width: 0px;text-decoration-thickness: initial;text-decoration-style: initial;text-decoration-color: initial;" /> output: {<br style="white-space:pre-wrap;margin: 0px;padding: 0px;max-width: 100%;overflow-wrap: break-word !important;box-sizing: border-box !important;color: rgb(171, 178, 191);font-family: "Operator Mono", Consolas, Monaco, Menlo, monospace;font-size: 12px;font-style: normal;font-variant-ligatures: normal;font-variant-caps: normal;font-weight: 400;letter-spacing: normal;orphans: 2;text-align: left;text-indent: 0px;text-transform: none;widows: 2;word-spacing: 0px;-webkit-text-stroke-width: 0px;text-decoration-thickness: initial;text-decoration-style: initial;text-decoration-color: initial;" /> filename: "bundle.js",<br style="white-space:pre-wrap;margin: 0px;padding: 0px;max-width: 100%;overflow-wrap: break-word !important;box-sizing: border-box !important;color: rgb(171, 178, 191);font-family: "Operator Mono", Consolas, Monaco, Menlo, monospace;font-size: 12px;font-style: normal;font-variant-ligatures: normal;font-variant-caps: normal;font-weight: 400;letter-spacing: normal;orphans: 2;text-align: left;text-indent: 0px;text-transform: none;widows: 2;word-spacing: 0px;-webkit-text-stroke-width: 0px;text-decoration-thickness: initial;text-decoration-style: initial;text-decoration-color: initial;" /> path: path.resolve(__dirname, "build"),<br style="white-space:pre-wrap;margin: 0px;padding: 0px;max-width: 100%;overflow-wrap: break-word !important;box-sizing: border-box !important;color: rgb(171, 178, 191);font-family: "Operator Mono", Consolas, Monaco, Menlo, monospace;font-size: 12px;font-style: normal;font-variant-ligatures: normal;font-variant-caps: normal;font-weight: 400;letter-spacing: normal;orphans: 2;text-align: left;text-indent: 0px;text-transform: none;widows: 2;word-spacing: 0px;-webkit-text-stroke-width: 0px;text-decoration-thickness: initial;text-decoration-style: initial;text-decoration-color: initial;" /> },<br style="white-space:pre-wrap;margin: 0px;padding: 0px;max-width: 100%;overflow-wrap: break-word !important;box-sizing: border-box !important;color: rgb(171, 178, 191);font-family: "Operator Mono", Consolas, Monaco, Menlo, monospace;font-size: 12px;font-style: normal;font-variant-ligatures: normal;font-variant-caps: normal;font-weight: 400;letter-spacing: normal;orphans: 2;text-align: left;text-indent: 0px;text-transform: none;widows: 2;word-spacing: 0px;-webkit-text-stroke-width: 0px;text-decoration-thickness: initial;text-decoration-style: initial;text-decoration-color: initial;" /> externals: [nodeExternals()],<br style="white-space:pre-wrap;margin: 0px;padding: 0px;max-width: 100%;overflow-wrap: break-word !important;box-sizing: border-box !important;color: rgb(171, 178, 191);font-family: "Operator Mono", Consolas, Monaco, Menlo, monospace;font-size: 12px;font-style: normal;font-variant-ligatures: normal;font-variant-caps: normal;font-weight: 400;letter-spacing: normal;orphans: 2;text-align: left;text-indent: 0px;text-transform: none;widows: 2;word-spacing: 0px;-webkit-text-stroke-width: 0px;text-decoration-thickness: initial;text-decoration-style: initial;text-decoration-color: initial;" />};
在webpack构建完成后,可在Node环境运行build/bundle.js,访问页面后查看网页源代码,可以看到,React组件中的内容已经完整地包含在服务端返回到html里面。我们成功迈出了服务端渲染第一步。此时,我们也有必要再深入了解renderToString 到底做了什么,提前踩坑!
renderToString
除了将React组件转换成html字符串外,renderToString还有做了下面这些:
1. 会执行传入的React组件的代码,但是其只执行到React生命周期初始化过程的render及之前,即下面红框的部分,其余大部分生命周期函数在服务端都不执行;这也是服务端渲染的坑点之一。
2.renderToString 生成的产物中会包含一些额外生成特殊标记,代码体积会有所增大,其中属性data-reactroot是服务端渲染的标志,便于后续客户端通过hydrate复用HTML节点。在React16前后其产物也有差距:在React 16 之前,服务端渲染采用的是基于字符串校验和(string checksum)的 HTML 节点复用方式, 会额外生成生成data-reactid、data-react-checksum等属性;React 16 改用单节点校验来复用(服务端返回的)HTML 节点,不再生成data-reactid、data-react-checksum等体积占用大户,只在空白节点间多了 这样的标记。
renderToString react16前<br style="white-space:pre-wrap;margin: 0px;padding: 0px;max-width: 100%;overflow-wrap: break-word !important;box-sizing: border-box !important;color: rgb(171, 178, 191);font-family: "Operator Mono", Consolas, Monaco, Menlo, monospace;font-size: 12px;font-style: normal;font-variant-ligatures: normal;font-variant-caps: normal;font-weight: 400;letter-spacing: normal;orphans: 2;text-align: left;text-indent: 0px;text-transform: none;widows: 2;word-spacing: 0px;-webkit-text-stroke-width: 0px;text-decoration-thickness: initial;text-decoration-style: initial;text-decoration-color: initial;" /><br style="white-space:pre-wrap;margin: 0px;padding: 0px;max-width: 100%;overflow-wrap: break-word !important;box-sizing: border-box !important;color: rgb(171, 178, 191);font-family: "Operator Mono", Consolas, Monaco, Menlo, monospace;font-size: 12px;font-style: normal;font-variant-ligatures: normal;font-variant-caps: normal;font-weight: 400;letter-spacing: normal;orphans: 2;text-align: left;text-indent: 0px;text-transform: none;widows: 2;word-spacing: 0px;-webkit-text-stroke-width: 0px;text-decoration-thickness: initial;text-decoration-style: initial;text-decoration-color: initial;" /> Welcome to React SSR! <br style="white-space:pre-wrap;margin: 0px;padding: 0px;max-width: 100%;overflow-wrap: break-word !important;box-sizing: border-box !important;color: rgb(171, 178, 191);font-family: "Operator Mono", Consolas, Monaco, Menlo, monospace;font-size: 12px;font-style: normal;font-variant-ligatures: normal;font-variant-caps: normal;font-weight: 400;letter-spacing: normal;orphans: 2;text-align: left;text-indent: 0px;text-transform: none;widows: 2;word-spacing: 0px;-webkit-text-stroke-width: 0px;text-decoration-thickness: initial;text-decoration-style: initial;text-decoration-color: initial;" /> Hello There! <br style="white-space:pre-wrap;margin: 0px;padding: 0px;max-width: 100%;overflow-wrap: break-word !important;box-sizing: border-box !important;color: rgb(171, 178, 191);font-family: "Operator Mono", Consolas, Monaco, Menlo, monospace;font-size: 12px;font-style: normal;font-variant-ligatures: normal;font-variant-caps: normal;font-weight: 400;letter-spacing: normal;orphans: 2;text-align: left;text-indent: 0px;text-transform: none;widows: 2;word-spacing: 0px;-webkit-text-stroke-width: 0px;text-decoration-thickness: initial;text-decoration-style: initial;text-decoration-color: initial;" /><br style="white-space:pre-wrap;margin: 0px;padding: 0px;max-width: 100%;overflow-wrap: break-word !important;box-sizing: border-box !important;color: rgb(171, 178, 191);font-family: "Operator Mono", Consolas, Monaco, Menlo, monospace;font-size: 12px;font-style: normal;font-variant-ligatures: normal;font-variant-caps: normal;font-weight: 400;letter-spacing: normal;orphans: 2;text-align: left;text-indent: 0px;text-transform: none;widows: 2;word-spacing: 0px;-webkit-text-stroke-width: 0px;text-decoration-thickness: initial;text-decoration-style: initial;text-decoration-color: initial;" /><br style="white-space:pre-wrap;margin: 0px;padding: 0px;max-width: 100%;overflow-wrap: break-word !important;box-sizing: border-box !important;color: rgb(171, 178, 191);font-family: "Operator Mono", Consolas, Monaco, Menlo, monospace;font-size: 12px;font-style: normal;font-variant-ligatures: normal;font-variant-caps: normal;font-weight: 400;letter-spacing: normal;orphans: 2;text-align: left;text-indent: 0px;text-transform: none;widows: 2;word-spacing: 0px;-webkit-text-stroke-width: 0px;text-decoration-thickness: initial;text-decoration-style: initial;text-decoration-color: initial;" />// renderToString react16<br style="white-space:pre-wrap;margin: 0px;padding: 0px;max-width: 100%;overflow-wrap: break-word !important;box-sizing: border-box !important;color: rgb(171, 178, 191);font-family: "Operator Mono", Consolas, Monaco, Menlo, monospace;font-size: 12px;font-style: normal;font-variant-ligatures: normal;font-variant-caps: normal;font-weight: 400;letter-spacing: normal;orphans: 2;text-align: left;text-indent: 0px;text-transform: none;widows: 2;word-spacing: 0px;-webkit-text-stroke-width: 0px;text-decoration-thickness: initial;text-decoration-style: initial;text-decoration-color: initial;" />Welcome to React SSR! Hello There!
3.会被故意忽略掉的on开头的的属性,也就忽略掉了react代码中事件处理,这是也是坑点之一。服务端返回的html里没有处理事件点击,需要靠后续客户端js执行绑定事件。
function shouldIgnoreAttribute(<br /> name: string,<br /> propertyInfo: PropertyInfo | null,<br /> isCustomComponentTag: boolean,<br />): boolean {<br /> if (propertyInfo !== null) {<br /> return propertyInfo.type === RESERVED;<br /> }<br /> if (isCustomComponentTag) {<br /> return false;<br /> }<br /> if (<br /> name.length > 2 &&<br /> (name[0] === 'o' || name[0] === 'O') &&<br /> (name[1] === 'n' || name[1] === 'N')<br /> ) {<br /> return true;<br /> }<br /> return false;<br />}<br />
上面的例子我们可以看到React的代码里有点击事件,但点击后没有反应。需要靠后续客户端js执行绑定事件。如何实现?这就需要同构了。
2.3 实现基础的同构
前文已经大概讲了同构的概念,那为什么需要同构?之前的服务端代码在处理点击事件时故意忽略掉了这类属性,在服务端执行的生命周期也是不完整的,此时的页面是不具备交互能力的。同构,正是解决这些问题的关键,React代码在服务器上执行一遍之后,浏览器再去加载JS后又运行了一遍React代码,完成事件绑定和完整生命周期的执行,从而才能成为完全可交互页面。
react-dom:hydrate
实现同构的另一个核心API是React-dom下的hydrate,该方法能在客户端初次渲染的时候去复用服务端返回的原本已经存在的 DOM 节点,于渲染过程中为其附加交互行为(事件监听等),而不是重新创建 DOM 节点。需要注意是,服务端返回的 HTML 与客户端渲染结果不一致时,出于性能考虑,hydrate可以弥补文本内容的差异,但并不能保证修补属性的差异,而是将错就错;只在development模式下对这些不一致的问题报 Warning,因此必须重视 SSR HydrationWarning,要当 Error 逐个解决。
那具体实现同构?
上面这里我们提供了一个基本的架构图,可以看到,服务端运行React生成html代码我们已经基本实现,目前需要做的就是生产出客户端执行的index.js,那么这个index.js我们如何生产出来呢?
具体实践
首先新建客户端代码client.js,引入React组件,通过ReactDom.hydrate处理挂载到Dom节点, hydrate是实现复用的关键。
// client.js<br style="white-space:pre-wrap;margin: 0px;padding: 0px;max-width: 100%;overflow-wrap: break-word !important;box-sizing: border-box !important;color: rgb(171, 178, 191);font-family: "Operator Mono", Consolas, Monaco, Menlo, monospace;font-size: 12px;font-style: normal;font-variant-ligatures: normal;font-variant-caps: normal;font-weight: 400;letter-spacing: normal;orphans: 2;text-align: left;text-indent: 0px;text-transform: none;widows: 2;word-spacing: 0px;-webkit-text-stroke-width: 0px;text-decoration-thickness: initial;text-decoration-style: initial;text-decoration-color: initial;" />import React from "react";<br style="white-space:pre-wrap;margin: 0px;padding: 0px;max-width: 100%;overflow-wrap: break-word !important;box-sizing: border-box !important;color: rgb(171, 178, 191);font-family: "Operator Mono", Consolas, Monaco, Menlo, monospace;font-size: 12px;font-style: normal;font-variant-ligatures: normal;font-variant-caps: normal;font-weight: 400;letter-spacing: normal;orphans: 2;text-align: left;text-indent: 0px;text-transform: none;widows: 2;word-spacing: 0px;-webkit-text-stroke-width: 0px;text-decoration-thickness: initial;text-decoration-style: initial;text-decoration-color: initial;" />import ReactDom from "react-dom";<br style="white-space:pre-wrap;margin: 0px;padding: 0px;max-width: 100%;overflow-wrap: break-word !important;box-sizing: border-box !important;color: rgb(171, 178, 191);font-family: "Operator Mono", Consolas, Monaco, Menlo, monospace;font-size: 12px;font-style: normal;font-variant-ligatures: normal;font-variant-caps: normal;font-weight: 400;letter-spacing: normal;orphans: 2;text-align: left;text-indent: 0px;text-transform: none;widows: 2;word-spacing: 0px;-webkit-text-stroke-width: 0px;text-decoration-thickness: initial;text-decoration-style: initial;text-decoration-color: initial;" />import Home from "./containers/Home";<br style="white-space:pre-wrap;margin: 0px;padding: 0px;max-width: 100%;overflow-wrap: break-word !important;box-sizing: border-box !important;color: rgb(171, 178, 191);font-family: "Operator Mono", Consolas, Monaco, Menlo, monospace;font-size: 12px;font-style: normal;font-variant-ligatures: normal;font-variant-caps: normal;font-weight: 400;letter-spacing: normal;orphans: 2;text-align: left;text-indent: 0px;text-transform: none;widows: 2;word-spacing: 0px;-webkit-text-stroke-width: 0px;text-decoration-thickness: initial;text-decoration-style: initial;text-decoration-color: initial;" /><br style="white-space:pre-wrap;margin: 0px;padding: 0px;max-width: 100%;overflow-wrap: break-word !important;box-sizing: border-box !important;color: rgb(171, 178, 191);font-family: "Operator Mono", Consolas, Monaco, Menlo, monospace;font-size: 12px;font-style: normal;font-variant-ligatures: normal;font-variant-caps: normal;font-weight: 400;letter-spacing: normal;orphans: 2;text-align: left;text-indent: 0px;text-transform: none;widows: 2;word-spacing: 0px;-webkit-text-stroke-width: 0px;text-decoration-thickness: initial;text-decoration-style: initial;text-decoration-color: initial;" />const App = () => {<br style="white-space:pre-wrap;margin: 0px;padding: 0px;max-width: 100%;overflow-wrap: break-word !important;box-sizing: border-box !important;color: rgb(171, 178, 191);font-family: "Operator Mono", Consolas, Monaco, Menlo, monospace;font-size: 12px;font-style: normal;font-variant-ligatures: normal;font-variant-caps: normal;font-weight: 400;letter-spacing: normal;orphans: 2;text-align: left;text-indent: 0px;text-transform: none;widows: 2;word-spacing: 0px;-webkit-text-stroke-width: 0px;text-decoration-thickness: initial;text-decoration-style: initial;text-decoration-color: initial;" /> return ;<br style="white-space:pre-wrap;margin: 0px;padding: 0px;max-width: 100%;overflow-wrap: break-word !important;box-sizing: border-box !important;color: rgb(171, 178, 191);font-family: "Operator Mono", Consolas, Monaco, Menlo, monospace;font-size: 12px;font-style: normal;font-variant-ligatures: normal;font-variant-caps: normal;font-weight: 400;letter-spacing: normal;orphans: 2;text-align: left;text-indent: 0px;text-transform: none;widows: 2;word-spacing: 0px;-webkit-text-stroke-width: 0px;text-decoration-thickness: initial;text-decoration-style: initial;text-decoration-color: initial;" />};<br style="white-space:pre-wrap;margin: 0px;padding: 0px;max-width: 100%;overflow-wrap: break-word !important;box-sizing: border-box !important;color: rgb(171, 178, 191);font-family: "Operator Mono", Consolas, Monaco, Menlo, monospace;font-size: 12px;font-style: normal;font-variant-ligatures: normal;font-variant-caps: normal;font-weight: 400;letter-spacing: normal;orphans: 2;text-align: left;text-indent: 0px;text-transform: none;widows: 2;word-spacing: 0px;-webkit-text-stroke-width: 0px;text-decoration-thickness: initial;text-decoration-style: initial;text-decoration-color: initial;" /><br style="white-space:pre-wrap;margin: 0px;padding: 0px;max-width: 100%;overflow-wrap: break-word !important;box-sizing: border-box !important;color: rgb(171, 178, 191);font-family: "Operator Mono", Consolas, Monaco, Menlo, monospace;font-size: 12px;font-style: normal;font-variant-ligatures: normal;font-variant-caps: normal;font-weight: 400;letter-spacing: normal;orphans: 2;text-align: left;text-indent: 0px;text-transform: none;widows: 2;word-spacing: 0px;-webkit-text-stroke-width: 0px;text-decoration-thickness: initial;text-decoration-style: initial;text-decoration-color: initial;" />ReactDom.hydrate(, document.getElementById("root"));
客户端代码也需要webpack打包处理,新建webpack.client.js具体配置如下,需要注意打包输出在public目录下,后续的静态资源服务也起在了这个目录下。
// webpack.client.js<br style="white-space:pre-wrap;margin: 0px;padding: 0px;max-width: 100%;overflow-wrap: break-word !important;box-sizing: border-box !important;color: rgb(171, 178, 191);font-family: "Operator Mono", Consolas, Monaco, Menlo, monospace;font-size: 12px;font-style: normal;font-variant-ligatures: normal;font-variant-caps: normal;font-weight: 400;letter-spacing: normal;orphans: 2;text-align: left;text-indent: 0px;text-transform: none;widows: 2;word-spacing: 0px;-webkit-text-stroke-width: 0px;text-decoration-thickness: initial;text-decoration-style: initial;text-decoration-color: initial;" />const path = require("path");<br style="white-space:pre-wrap;margin: 0px;padding: 0px;max-width: 100%;overflow-wrap: break-word !important;box-sizing: border-box !important;color: rgb(171, 178, 191);font-family: "Operator Mono", Consolas, Monaco, Menlo, monospace;font-size: 12px;font-style: normal;font-variant-ligatures: normal;font-variant-caps: normal;font-weight: 400;letter-spacing: normal;orphans: 2;text-align: left;text-indent: 0px;text-transform: none;widows: 2;word-spacing: 0px;-webkit-text-stroke-width: 0px;text-decoration-thickness: initial;text-decoration-style: initial;text-decoration-color: initial;" />const resolve = (dir) => path.resolve(__dirname, "./src", dir);<br style="white-space:pre-wrap;margin: 0px;padding: 0px;max-width: 100%;overflow-wrap: break-word !important;box-sizing: border-box !important;color: rgb(171, 178, 191);font-family: "Operator Mono", Consolas, Monaco, Menlo, monospace;font-size: 12px;font-style: normal;font-variant-ligatures: normal;font-variant-caps: normal;font-weight: 400;letter-spacing: normal;orphans: 2;text-align: left;text-indent: 0px;text-transform: none;widows: 2;word-spacing: 0px;-webkit-text-stroke-width: 0px;text-decoration-thickness: initial;text-decoration-style: initial;text-decoration-color: initial;" />module.exports = {<br style="white-space:pre-wrap;margin: 0px;padding: 0px;max-width: 100%;overflow-wrap: break-word !important;box-sizing: border-box !important;color: rgb(171, 178, 191);font-family: "Operator Mono", Consolas, Monaco, Menlo, monospace;font-size: 12px;font-style: normal;font-variant-ligatures: normal;font-variant-caps: normal;font-weight: 400;letter-spacing: normal;orphans: 2;text-align: left;text-indent: 0px;text-transform: none;widows: 2;word-spacing: 0px;-webkit-text-stroke-width: 0px;text-decoration-thickness: initial;text-decoration-style: initial;text-decoration-color: initial;" /> mode: "development",<br style="white-space:pre-wrap;margin: 0px;padding: 0px;max-width: 100%;overflow-wrap: break-word !important;box-sizing: border-box !important;color: rgb(171, 178, 191);font-family: "Operator Mono", Consolas, Monaco, Menlo, monospace;font-size: 12px;font-style: normal;font-variant-ligatures: normal;font-variant-caps: normal;font-weight: 400;letter-spacing: normal;orphans: 2;text-align: left;text-indent: 0px;text-transform: none;widows: 2;word-spacing: 0px;-webkit-text-stroke-width: 0px;text-decoration-thickness: initial;text-decoration-style: initial;text-decoration-color: initial;" /> entry: "./client.js",<br style="white-space:pre-wrap;margin: 0px;padding: 0px;max-width: 100%;overflow-wrap: break-word !important;box-sizing: border-box !important;color: rgb(171, 178, 191);font-family: "Operator Mono", Consolas, Monaco, Menlo, monospace;font-size: 12px;font-style: normal;font-variant-ligatures: normal;font-variant-caps: normal;font-weight: 400;letter-spacing: normal;orphans: 2;text-align: left;text-indent: 0px;text-transform: none;widows: 2;word-spacing: 0px;-webkit-text-stroke-width: 0px;text-decoration-thickness: initial;text-decoration-style: initial;text-decoration-color: initial;" /> output: {<br style="white-space:pre-wrap;margin: 0px;padding: 0px;max-width: 100%;overflow-wrap: break-word !important;box-sizing: border-box !important;color: rgb(171, 178, 191);font-family: "Operator Mono", Consolas, Monaco, Menlo, monospace;font-size: 12px;font-style: normal;font-variant-ligatures: normal;font-variant-caps: normal;font-weight: 400;letter-spacing: normal;orphans: 2;text-align: left;text-indent: 0px;text-transform: none;widows: 2;word-spacing: 0px;-webkit-text-stroke-width: 0px;text-decoration-thickness: initial;text-decoration-style: initial;text-decoration-color: initial;" /> filename: "index.js",<br style="white-space:pre-wrap;margin: 0px;padding: 0px;max-width: 100%;overflow-wrap: break-word !important;box-sizing: border-box !important;color: rgb(171, 178, 191);font-family: "Operator Mono", Consolas, Monaco, Menlo, monospace;font-size: 12px;font-style: normal;font-variant-ligatures: normal;font-variant-caps: normal;font-weight: 400;letter-spacing: normal;orphans: 2;text-align: left;text-indent: 0px;text-transform: none;widows: 2;word-spacing: 0px;-webkit-text-stroke-width: 0px;text-decoration-thickness: initial;text-decoration-style: initial;text-decoration-color: initial;" /> path: path.resolve(__dirname, "public"),<br style="white-space:pre-wrap;margin: 0px;padding: 0px;max-width: 100%;overflow-wrap: break-word !important;box-sizing: border-box !important;color: rgb(171, 178, 191);font-family: "Operator Mono", Consolas, Monaco, Menlo, monospace;font-size: 12px;font-style: normal;font-variant-ligatures: normal;font-variant-caps: normal;font-weight: 400;letter-spacing: normal;orphans: 2;text-align: left;text-indent: 0px;text-transform: none;widows: 2;word-spacing: 0px;-webkit-text-stroke-width: 0px;text-decoration-thickness: initial;text-decoration-style: initial;text-decoration-color: initial;" /> },<br style="white-space:pre-wrap;margin: 0px;padding: 0px;max-width: 100%;overflow-wrap: break-word !important;box-sizing: border-box !important;color: rgb(171, 178, 191);font-family: "Operator Mono", Consolas, Monaco, Menlo, monospace;font-size: 12px;font-style: normal;font-variant-ligatures: normal;font-variant-caps: normal;font-weight: 400;letter-spacing: normal;orphans: 2;text-align: left;text-indent: 0px;text-transform: none;widows: 2;word-spacing: 0px;-webkit-text-stroke-width: 0px;text-decoration-thickness: initial;text-decoration-style: initial;text-decoration-color: initial;" /> module: {<br style="white-space:pre-wrap;margin: 0px;padding: 0px;max-width: 100%;overflow-wrap: break-word !important;box-sizing: border-box !important;color: rgb(171, 178, 191);font-family: "Operator Mono", Consolas, Monaco, Menlo, monospace;font-size: 12px;font-style: normal;font-variant-ligatures: normal;font-variant-caps: normal;font-weight: 400;letter-spacing: n 查看全部
这⼀次彻底弄懂:React 服务端渲染
本文字数:21279字
预计阅读时间:54分钟
1、前言
在前端项目需要首屏渲染速度优化或SEO的场景下,大家或多或少都听过到过服务端渲染( SSR ),但大多数人对服务端渲染具体实现和底层原理还是比较陌生的。本文基于公司官网开发时做了服务端渲染改造基础上,系统理解和梳理这套体系的模式和逻辑,并写了一些笔记和Demo(文后链接)便于深入理解。这次我们来以React为例,把服务端渲染彻底讲弄明白。本文主要有以下内容:
1.1 什么是服务端渲染?
服务端渲染, SSR (Server-side Rendering) ,顾名思义,就是在浏览器发起页面请求后由服务端完成页面的HTML结构拼接,返回给浏览器解析后能直接构建出有内容的页面。
用 node 实现一个简单的 SSR
我们使用Koa框架来创建node服务:
// demo1<br />var Koa = require("koa");<br />var app = new Koa();<br /><br />// 对于任何请求,app将调用该函数处理请求:<br />app.use(async (ctx) => {<br /> // 将HTML字符串直接返回 <br /> ctx.body = `<br /> <br /> <br /> ssr<br /> <br /> <br /> <br /> hello server<br /> <p>word<br /> <br /> <br /> `;<br />});<br />//监听<br />app.listen(3001, () => {<br /> console.log("listen on 3001 port!");<br />});<br /></p>
启动服务后访问页面,查看网页源代码是这样:
npx create-react-app my-app<br />
上面的例子就是一个简单的服务端渲染,其服务侧直接输出了有内容的HTML,浏览器解析之后就能渲染出页面。与服务端渲染对应的是客户端渲染 ,CSR(Client Side Rendering),通俗的讲就是由客户端完成页面的渲染。其大致渲染流程是这样:在浏览器请求页面时,服务端先返回一个无具体内容的HTML,浏览器还需要再加载并执行JS,动态地将内容和数据渲染到页面中,才能完成页面具体内容的显示。目前主流的React ,Vue, Angular 等SPA页面未经特殊处理均采用客户端渲染。最常见脚手架create-react-app 生成的项目就是客户端渲染:
上面采用客户端渲染的HTML页面中中无内容,需在浏览器端加载并执行bundle.js后才能构建出有内容页面。
1.2 为什么用服务端渲染?1.2.1 服务端渲染的优势
相比于客户端渲染,服务端渲染有什么优势?我们可以从下图对比一下这两种不同的渲染模式。
首屏时间更短
采用客户端渲染的页面,要进行JS文件拉取和JS代码执行,动态创建 DOM 结构,客户端逻辑越重,初始化需要执行的 JS 越多,首屏性能就越慢;客户端渲染前置的第三方类库/框架、polyfill 等都会在一定程度上拖慢首屏性能。Code splitting、lazy-load等优化措施能够缓解一部分,但优化空间相对有限。相比而言,服务端渲染的页面直接拉取HTMl就能显示内容,更短的首屏时间创造更多的可能性。
利于SEO
在别人使用搜索引擎搜索相关的内容时,你的网页排行能靠得更前,这样你的流量就有越高,这就是SEO的意义所在。那为什么服务端渲染更利于爬虫爬你的页面呢?因为对于很多搜索引擎爬虫(非google)HTML返回是什么内容就爬什么内容,而不会动态执行JS代码内容。对客户端渲染的页面来说,简直无能为力,因为返回的HTML是一个空壳。而服务端渲染返回的HTML是有内容的。
SSR的出现,就是为了解决这些CSR的弊端。
1.2.2 权衡使用服务端渲染
并不是所有的WEB应用都必须使用SSR,这需要开发者来权衡,因为服务端渲染会带来以下问题:
代码复杂度增加。为了实现服务端渲染,应用代码中需要兼容服务端和客户端两种运行情况,部分代码只能在客户端运行,需要对其进行特殊处理,才能在服务器渲染应用程序中运行。
需要更多的服务器资源。由于服务器增加了渲染HTML的需求,使得原本只需要输出静态资源文件的nodejs服务,新增了数据获取的IO和渲染HTML的CPU占用,如果流量突然暴增,有可能导致服务器宕机,因此需要使用响应的缓存策略和准备相应的服务器负载。
涉及构建设置和部署的更多要求。与可以部署在任何静态文件服务器上的完全静态单页面应用程序 (SPA) 不同,服务器渲染应用程序,需要处于 Node.js server 运行环境。
因此,在使用服务端渲染SSR之前,需要考虑投入产出比:是否真的需要SEO,是否需要将首屏时间提升到极致。如果都没有,使用SSR反而小题大做了。
1.3 服务端渲染的发展史
其实服务端渲染并不是什么新奇的概念,前后端分层之前很长的一段时间里都是以服务端渲染为主(JSP、PHP),那时后端一把梭哈,在服务端生成完整的 HTML 页面。但那时的服务端渲染和现在还是有本质的区别,存在比较多的弊端,每一个请求都要动态生成HTML,存在大量的重复,服务器机器成本也相对比较高,前后端代码完全掺杂在一起,开发维护难。
随着业务不断发展变化,后端要写的JS逻辑也越发复杂,而且JS有很多潜在的坑使后端越发觉得这是块烫手山芋,于是逐渐出现了前后端分层。伴随AJAX的兴起,浏览器可以做到了不再重现请求页面就可更新局部视图。还可以利用客户端免费的计算资源,后端侧逐渐演变成了提供数据支持。jquery的兴起,良好的客户端兼容性使JS不再受困于各种版本浏览器兼容问题,一统了前端天下。
此后伴随node的兴起,前后端分离越演越烈。前端能摆脱后端的依赖单独起服务,三大框架vue,react,angular也迅势崛起,以操作数据就能更新视图,前端开发人员逐渐摆脱了与烦人的Dom操作打交道,能够专心的关注业务和数据逻辑。前端同时探索出了功能插件,UI库,组件等多种代码复用方案,形成了繁荣的前端生态。
但是三大框架采用客户端渲染模式,随着代码逻辑的加重,首屏时间成了一个很大的问题,同时开发人员也发现SEO也出了问题,大多搜索引擎根本不会去执行JS代码。但是也不可能再回头走老路,于是前端又探索出了一套服务端渲染的框架来解决掉这些问题。此时的服务端渲染是建立在成熟的组组件,模块生态之上,基于Node.js的同构方案成为最佳实践。
2、React服务端渲染的原理
2.1基本思路
React服务端渲染流程
React服务端渲染的基本思路,简单理解就是将组件或页面通过服务器生成html字符串,再发送到浏览器,最后将静态标记"混合"为客户端上完全交互的应用程序。因为要考虑React在服务端的运行情况,故相比之前讲的多了在浏览器端绑定状态与事件的过程。
我们可以结合下面的流程图来一览完整的 React服务端渲染的全貌:当浏览器去请求一个页面,前端服务器端接收到请求并执行 React组件代码,此时React代码中可能包含向后端服务器发起请求,待请求完成返回的数据后,前端服务器组装好有内容的HTML里返给浏览器,浏览器解析HTML后已具备展示内容,但页面并不具备交互能力。
下一阶段,在返回的HTMl中还有script链接,浏览器再拉取JS并执行其包含的React 代码,其能在浏览器端执行完整的生命周期,并通过相关API实现复用此前返回 HTML节点并添加事件的绑定,此时页面才就具备完全交互能力。总的来说,react服务端渲染包含有两个过程:服务端渲染 + 客户端 hydrate 渲染。服务端渲染在服务端渲染出了首屏内容;客户端 hydrate 渲染复用服务端返回的节点,进行一次类似于 render 的 hydrate 渲染过程,把交互事件绑上去(此时页面可交互),并接管页面。
服务端处理后返回的
客户端“浸泡”还原后的
核心思想(同构)
从上面的流程中可以看到,客户端和服务端都要执行React代码完成渲染,那是不是就要写两份代码,供双端使用? 当然不需要,也完全不合理。所谓同构,就是让一份React代码,既可以在服务端中执行,也可以在客户端中执行。
SSR技术栈
我们这里简单理了一下服务端渲染涉及到的技术栈:
知道了服务端渲染、同构的大概思路之后,下面从头开始,一步一步完成具体实践,深入理解其原理。
2.2 服务端如何渲染React组件?
按照之前流程的大概思路,我们首先需要将React组件在服务端转换成HTML字符串,那怎么做呢?React 提供的面向服务端的API(react-dom/server),提供了相关方法能够将 React 组件渲染成静态的(HTML)标签。下面我们简单了解下react-dom/server。
react-dom/server
react-dom/server有renderToString、renderToStaticMarkup,renderToNodeStream、renderToStaticNodeStream四个方法能够将 React 组件渲染成静态的(HTML)标签,前两者能在客户端和服务端运行,后两者只能在服务端运行。
renderToStaticMarkup VS renderToString:renderToString 方法会在 React 内部创建的额外 DOM 属性,例如 data-reactroot, 在相邻文本节点之间生成,这些属性是客户端执行hydrate复用节点的关键所在,data-reactroot属性是服务端渲染的标志之一。如果你希望把 React 当作静态页面生成器来使用,renderToStaticMarkup方法会非常有用,因为去除额外的属性可以节省一些字节。
// Home.jsx<br style="white-space:pre-wrap;margin: 0px;padding: 0px;max-width: 100%;overflow-wrap: break-word !important;box-sizing: border-box !important;color: rgb(171, 178, 191);font-family: "Operator Mono", Consolas, Monaco, Menlo, monospace;font-size: 12px;font-style: normal;font-variant-ligatures: normal;font-variant-caps: normal;font-weight: 400;letter-spacing: normal;orphans: 2;text-align: left;text-indent: 0px;text-transform: none;widows: 2;word-spacing: 0px;-webkit-text-stroke-width: 0px;text-decoration-thickness: initial;text-decoration-style: initial;text-decoration-color: initial;" />import React from "react";<br style="white-space:pre-wrap;margin: 0px;padding: 0px;max-width: 100%;overflow-wrap: break-word !important;box-sizing: border-box !important;color: rgb(171, 178, 191);font-family: "Operator Mono", Consolas, Monaco, Menlo, monospace;font-size: 12px;font-style: normal;font-variant-ligatures: normal;font-variant-caps: normal;font-weight: 400;letter-spacing: normal;orphans: 2;text-align: left;text-indent: 0px;text-transform: none;widows: 2;word-spacing: 0px;-webkit-text-stroke-width: 0px;text-decoration-thickness: initial;text-decoration-style: initial;text-decoration-color: initial;" />const Home = () => {<br style="white-space:pre-wrap;margin: 0px;padding: 0px;max-width: 100%;overflow-wrap: break-word !important;box-sizing: border-box !important;color: rgb(171, 178, 191);font-family: "Operator Mono", Consolas, Monaco, Menlo, monospace;font-size: 12px;font-style: normal;font-variant-ligatures: normal;font-variant-caps: normal;font-weight: 400;letter-spacing: normal;orphans: 2;text-align: left;text-indent: 0px;text-transform: none;widows: 2;word-spacing: 0px;-webkit-text-stroke-width: 0px;text-decoration-thickness: initial;text-decoration-style: initial;text-decoration-color: initial;" /> return (<br style="white-space:pre-wrap;margin: 0px;padding: 0px;max-width: 100%;overflow-wrap: break-word !important;box-sizing: border-box !important;color: rgb(171, 178, 191);font-family: "Operator Mono", Consolas, Monaco, Menlo, monospace;font-size: 12px;font-style: normal;font-variant-ligatures: normal;font-variant-caps: normal;font-weight: 400;letter-spacing: normal;orphans: 2;text-align: left;text-indent: 0px;text-transform: none;widows: 2;word-spacing: 0px;-webkit-text-stroke-width: 0px;text-decoration-thickness: initial;text-decoration-style: initial;text-decoration-color: initial;" /> <br style="white-space:pre-wrap;margin: 0px;padding: 0px;max-width: 100%;overflow-wrap: break-word !important;box-sizing: border-box !important;color: rgb(171, 178, 191);font-family: "Operator Mono", Consolas, Monaco, Menlo, monospace;font-size: 12px;font-style: normal;font-variant-ligatures: normal;font-variant-caps: normal;font-weight: 400;letter-spacing: normal;orphans: 2;text-align: left;text-indent: 0px;text-transform: none;widows: 2;word-spacing: 0px;-webkit-text-stroke-width: 0px;text-decoration-thickness: initial;text-decoration-style: initial;text-decoration-color: initial;" /> console.log("hello")}>This is Home Page<br style="white-space:pre-wrap;margin: 0px;padding: 0px;max-width: 100%;overflow-wrap: break-word !important;box-sizing: border-box !important;color: rgb(171, 178, 191);font-family: "Operator Mono", Consolas, Monaco, Menlo, monospace;font-size: 12px;font-style: normal;font-variant-ligatures: normal;font-variant-caps: normal;font-weight: 400;letter-spacing: normal;orphans: 2;text-align: left;text-indent: 0px;text-transform: none;widows: 2;word-spacing: 0px;-webkit-text-stroke-width: 0px;text-decoration-thickness: initial;text-decoration-style: initial;text-decoration-color: initial;" /> <p>Home is the page ..... more discribe<br style="white-space:pre-wrap;margin: 0px;padding: 0px;max-width: 100%;overflow-wrap: break-word !important;box-sizing: border-box !important;color: rgb(171, 178, 191);font-family: "Operator Mono", Consolas, Monaco, Menlo, monospace;font-size: 12px;font-style: normal;font-variant-ligatures: normal;font-variant-caps: normal;font-weight: 400;letter-spacing: normal;orphans: 2;text-align: left;text-indent: 0px;text-transform: none;widows: 2;word-spacing: 0px;-webkit-text-stroke-width: 0px;text-decoration-thickness: initial;text-decoration-style: initial;text-decoration-color: initial;" /> <br style="white-space:pre-wrap;margin: 0px;padding: 0px;max-width: 100%;overflow-wrap: break-word !important;box-sizing: border-box !important;color: rgb(171, 178, 191);font-family: "Operator Mono", Consolas, Monaco, Menlo, monospace;font-size: 12px;font-style: normal;font-variant-ligatures: normal;font-variant-caps: normal;font-weight: 400;letter-spacing: normal;orphans: 2;text-align: left;text-indent: 0px;text-transform: none;widows: 2;word-spacing: 0px;-webkit-text-stroke-width: 0px;text-decoration-thickness: initial;text-decoration-style: initial;text-decoration-color: initial;" /> );<br style="white-space:pre-wrap;margin: 0px;padding: 0px;max-width: 100%;overflow-wrap: break-word !important;box-sizing: border-box !important;color: rgb(171, 178, 191);font-family: "Operator Mono", Consolas, Monaco, Menlo, monospace;font-size: 12px;font-style: normal;font-variant-ligatures: normal;font-variant-caps: normal;font-weight: 400;letter-spacing: normal;orphans: 2;text-align: left;text-indent: 0px;text-transform: none;widows: 2;word-spacing: 0px;-webkit-text-stroke-width: 0px;text-decoration-thickness: initial;text-decoration-style: initial;text-decoration-color: initial;" />};<br style="white-space:pre-wrap;margin: 0px;padding: 0px;max-width: 100%;overflow-wrap: break-word !important;box-sizing: border-box !important;color: rgb(171, 178, 191);font-family: "Operator Mono", Consolas, Monaco, Menlo, monospace;font-size: 12px;font-style: normal;font-variant-ligatures: normal;font-variant-caps: normal;font-weight: 400;letter-spacing: normal;orphans: 2;text-align: left;text-indent: 0px;text-transform: none;widows: 2;word-spacing: 0px;-webkit-text-stroke-width: 0px;text-decoration-thickness: initial;text-decoration-style: initial;text-decoration-color: initial;" />export default Home;</p>
我们使用React-dom/server下提供的renderToString方法,在服务端将其转换为html字符串:
// server.js<br />import Koa from "koa";<br />import React from "react";<br />import { renderToString } from "react-dom/server";<br />import Home from "./containers/Home";<br /><br />const app = new Koa();<br />app.use(async (ctx) => {<br /> // 核心api renderToString 将react组件转化成html字符串<br /> const content = renderToString();<br /> ctx.body = `<br /> <br /> <br /> ssr<br /> <br /> <br /> ${content}<br /> <br /> <br /> `;<br />});<br />app.listen(3002, () => {<br /> console.log("listen:3002");<br />});<br />
可以看到上面代码里有ES6的import 和jsx语法,不能直接运行在node环境,需要借助webpack打包, 构建目标是commonjs。新建webpack.server.js具体配置如下:
// webpack.server.js<br style="white-space:pre-wrap;margin: 0px;padding: 0px;max-width: 100%;overflow-wrap: break-word !important;box-sizing: border-box !important;color: rgb(171, 178, 191);font-family: "Operator Mono", Consolas, Monaco, Menlo, monospace;font-size: 12px;font-style: normal;font-variant-ligatures: normal;font-variant-caps: normal;font-weight: 400;letter-spacing: normal;orphans: 2;text-align: left;text-indent: 0px;text-transform: none;widows: 2;word-spacing: 0px;-webkit-text-stroke-width: 0px;text-decoration-thickness: initial;text-decoration-style: initial;text-decoration-color: initial;" />const path = require("path");<br style="white-space:pre-wrap;margin: 0px;padding: 0px;max-width: 100%;overflow-wrap: break-word !important;box-sizing: border-box !important;color: rgb(171, 178, 191);font-family: "Operator Mono", Consolas, Monaco, Menlo, monospace;font-size: 12px;font-style: normal;font-variant-ligatures: normal;font-variant-caps: normal;font-weight: 400;letter-spacing: normal;orphans: 2;text-align: left;text-indent: 0px;text-transform: none;widows: 2;word-spacing: 0px;-webkit-text-stroke-width: 0px;text-decoration-thickness: initial;text-decoration-style: initial;text-decoration-color: initial;" />const nodeExternals = require("webpack-node-externals");<br style="white-space:pre-wrap;margin: 0px;padding: 0px;max-width: 100%;overflow-wrap: break-word !important;box-sizing: border-box !important;color: rgb(171, 178, 191);font-family: "Operator Mono", Consolas, Monaco, Menlo, monospace;font-size: 12px;font-style: normal;font-variant-ligatures: normal;font-variant-caps: normal;font-weight: 400;letter-spacing: normal;orphans: 2;text-align: left;text-indent: 0px;text-transform: none;widows: 2;word-spacing: 0px;-webkit-text-stroke-width: 0px;text-decoration-thickness: initial;text-decoration-style: initial;text-decoration-color: initial;" />module.exports = {<br style="white-space:pre-wrap;margin: 0px;padding: 0px;max-width: 100%;overflow-wrap: break-word !important;box-sizing: border-box !important;color: rgb(171, 178, 191);font-family: "Operator Mono", Consolas, Monaco, Menlo, monospace;font-size: 12px;font-style: normal;font-variant-ligatures: normal;font-variant-caps: normal;font-weight: 400;letter-spacing: normal;orphans: 2;text-align: left;text-indent: 0px;text-transform: none;widows: 2;word-spacing: 0px;-webkit-text-stroke-width: 0px;text-decoration-thickness: initial;text-decoration-style: initial;text-decoration-color: initial;" /> mode: "development",<br style="white-space:pre-wrap;margin: 0px;padding: 0px;max-width: 100%;overflow-wrap: break-word !important;box-sizing: border-box !important;color: rgb(171, 178, 191);font-family: "Operator Mono", Consolas, Monaco, Menlo, monospace;font-size: 12px;font-style: normal;font-variant-ligatures: normal;font-variant-caps: normal;font-weight: 400;letter-spacing: normal;orphans: 2;text-align: left;text-indent: 0px;text-transform: none;widows: 2;word-spacing: 0px;-webkit-text-stroke-width: 0px;text-decoration-thickness: initial;text-decoration-style: initial;text-decoration-color: initial;" /> target: "node",<br style="white-space:pre-wrap;margin: 0px;padding: 0px;max-width: 100%;overflow-wrap: break-word !important;box-sizing: border-box !important;color: rgb(171, 178, 191);font-family: "Operator Mono", Consolas, Monaco, Menlo, monospace;font-size: 12px;font-style: normal;font-variant-ligatures: normal;font-variant-caps: normal;font-weight: 400;letter-spacing: normal;orphans: 2;text-align: left;text-indent: 0px;text-transform: none;widows: 2;word-spacing: 0px;-webkit-text-stroke-width: 0px;text-decoration-thickness: initial;text-decoration-style: initial;text-decoration-color: initial;" /> entry: "./server.js",<br style="white-space:pre-wrap;margin: 0px;padding: 0px;max-width: 100%;overflow-wrap: break-word !important;box-sizing: border-box !important;color: rgb(171, 178, 191);font-family: "Operator Mono", Consolas, Monaco, Menlo, monospace;font-size: 12px;font-style: normal;font-variant-ligatures: normal;font-variant-caps: normal;font-weight: 400;letter-spacing: normal;orphans: 2;text-align: left;text-indent: 0px;text-transform: none;widows: 2;word-spacing: 0px;-webkit-text-stroke-width: 0px;text-decoration-thickness: initial;text-decoration-style: initial;text-decoration-color: initial;" /> resolve: {<br style="white-space:pre-wrap;margin: 0px;padding: 0px;max-width: 100%;overflow-wrap: break-word !important;box-sizing: border-box !important;color: rgb(171, 178, 191);font-family: "Operator Mono", Consolas, Monaco, Menlo, monospace;font-size: 12px;font-style: normal;font-variant-ligatures: normal;font-variant-caps: normal;font-weight: 400;letter-spacing: normal;orphans: 2;text-align: left;text-indent: 0px;text-transform: none;widows: 2;word-spacing: 0px;-webkit-text-stroke-width: 0px;text-decoration-thickness: initial;text-decoration-style: initial;text-decoration-color: initial;" /> extensions: [".jsx", ".js", ".tsx", ".ts"],<br style="white-space:pre-wrap;margin: 0px;padding: 0px;max-width: 100%;overflow-wrap: break-word !important;box-sizing: border-box !important;color: rgb(171, 178, 191);font-family: "Operator Mono", Consolas, Monaco, Menlo, monospace;font-size: 12px;font-style: normal;font-variant-ligatures: normal;font-variant-caps: normal;font-weight: 400;letter-spacing: normal;orphans: 2;text-align: left;text-indent: 0px;text-transform: none;widows: 2;word-spacing: 0px;-webkit-text-stroke-width: 0px;text-decoration-thickness: initial;text-decoration-style: initial;text-decoration-color: initial;" /> },<br style="white-space:pre-wrap;margin: 0px;padding: 0px;max-width: 100%;overflow-wrap: break-word !important;box-sizing: border-box !important;color: rgb(171, 178, 191);font-family: "Operator Mono", Consolas, Monaco, Menlo, monospace;font-size: 12px;font-style: normal;font-variant-ligatures: normal;font-variant-caps: normal;font-weight: 400;letter-spacing: normal;orphans: 2;text-align: left;text-indent: 0px;text-transform: none;widows: 2;word-spacing: 0px;-webkit-text-stroke-width: 0px;text-decoration-thickness: initial;text-decoration-style: initial;text-decoration-color: initial;" /> module: {<br style="white-space:pre-wrap;margin: 0px;padding: 0px;max-width: 100%;overflow-wrap: break-word !important;box-sizing: border-box !important;color: rgb(171, 178, 191);font-family: "Operator Mono", Consolas, Monaco, Menlo, monospace;font-size: 12px;font-style: normal;font-variant-ligatures: normal;font-variant-caps: normal;font-weight: 400;letter-spacing: normal;orphans: 2;text-align: left;text-indent: 0px;text-transform: none;widows: 2;word-spacing: 0px;-webkit-text-stroke-width: 0px;text-decoration-thickness: initial;text-decoration-style: initial;text-decoration-color: initial;" /> rules: [<br style="white-space:pre-wrap;margin: 0px;padding: 0px;max-width: 100%;overflow-wrap: break-word !important;box-sizing: border-box !important;color: rgb(171, 178, 191);font-family: "Operator Mono", Consolas, Monaco, Menlo, monospace;font-size: 12px;font-style: normal;font-variant-ligatures: normal;font-variant-caps: normal;font-weight: 400;letter-spacing: normal;orphans: 2;text-align: left;text-indent: 0px;text-transform: none;widows: 2;word-spacing: 0px;-webkit-text-stroke-width: 0px;text-decoration-thickness: initial;text-decoration-style: initial;text-decoration-color: initial;" /> {<br style="white-space:pre-wrap;margin: 0px;padding: 0px;max-width: 100%;overflow-wrap: break-word !important;box-sizing: border-box !important;color: rgb(171, 178, 191);font-family: "Operator Mono", Consolas, Monaco, Menlo, monospace;font-size: 12px;font-style: normal;font-variant-ligatures: normal;font-variant-caps: normal;font-weight: 400;letter-spacing: normal;orphans: 2;text-align: left;text-indent: 0px;text-transform: none;widows: 2;word-spacing: 0px;-webkit-text-stroke-width: 0px;text-decoration-thickness: initial;text-decoration-style: initial;text-decoration-color: initial;" /> test: /\.jsx?$/,<br style="white-space:pre-wrap;margin: 0px;padding: 0px;max-width: 100%;overflow-wrap: break-word !important;box-sizing: border-box !important;color: rgb(171, 178, 191);font-family: "Operator Mono", Consolas, Monaco, Menlo, monospace;font-size: 12px;font-style: normal;font-variant-ligatures: normal;font-variant-caps: normal;font-weight: 400;letter-spacing: normal;orphans: 2;text-align: left;text-indent: 0px;text-transform: none;widows: 2;word-spacing: 0px;-webkit-text-stroke-width: 0px;text-decoration-thickness: initial;text-decoration-style: initial;text-decoration-color: initial;" /> loader: "babel-loader",<br style="white-space:pre-wrap;margin: 0px;padding: 0px;max-width: 100%;overflow-wrap: break-word !important;box-sizing: border-box !important;color: rgb(171, 178, 191);font-family: "Operator Mono", Consolas, Monaco, Menlo, monospace;font-size: 12px;font-style: normal;font-variant-ligatures: normal;font-variant-caps: normal;font-weight: 400;letter-spacing: normal;orphans: 2;text-align: left;text-indent: 0px;text-transform: none;widows: 2;word-spacing: 0px;-webkit-text-stroke-width: 0px;text-decoration-thickness: initial;text-decoration-style: initial;text-decoration-color: initial;" /> exclude: /node_modules/,<br style="white-space:pre-wrap;margin: 0px;padding: 0px;max-width: 100%;overflow-wrap: break-word !important;box-sizing: border-box !important;color: rgb(171, 178, 191);font-family: "Operator Mono", Consolas, Monaco, Menlo, monospace;font-size: 12px;font-style: normal;font-variant-ligatures: normal;font-variant-caps: normal;font-weight: 400;letter-spacing: normal;orphans: 2;text-align: left;text-indent: 0px;text-transform: none;widows: 2;word-spacing: 0px;-webkit-text-stroke-width: 0px;text-decoration-thickness: initial;text-decoration-style: initial;text-decoration-color: initial;" /> options: {<br style="white-space:pre-wrap;margin: 0px;padding: 0px;max-width: 100%;overflow-wrap: break-word !important;box-sizing: border-box !important;color: rgb(171, 178, 191);font-family: "Operator Mono", Consolas, Monaco, Menlo, monospace;font-size: 12px;font-style: normal;font-variant-ligatures: normal;font-variant-caps: normal;font-weight: 400;letter-spacing: normal;orphans: 2;text-align: left;text-indent: 0px;text-transform: none;widows: 2;word-spacing: 0px;-webkit-text-stroke-width: 0px;text-decoration-thickness: initial;text-decoration-style: initial;text-decoration-color: initial;" /> presets: ["@babel/preset-react", "@babel/preset-env"],<br style="white-space:pre-wrap;margin: 0px;padding: 0px;max-width: 100%;overflow-wrap: break-word !important;box-sizing: border-box !important;color: rgb(171, 178, 191);font-family: "Operator Mono", Consolas, Monaco, Menlo, monospace;font-size: 12px;font-style: normal;font-variant-ligatures: normal;font-variant-caps: normal;font-weight: 400;letter-spacing: normal;orphans: 2;text-align: left;text-indent: 0px;text-transform: none;widows: 2;word-spacing: 0px;-webkit-text-stroke-width: 0px;text-decoration-thickness: initial;text-decoration-style: initial;text-decoration-color: initial;" /> plugins: [<br style="white-space:pre-wrap;margin: 0px;padding: 0px;max-width: 100%;overflow-wrap: break-word !important;box-sizing: border-box !important;color: rgb(171, 178, 191);font-family: "Operator Mono", Consolas, Monaco, Menlo, monospace;font-size: 12px;font-style: normal;font-variant-ligatures: normal;font-variant-caps: normal;font-weight: 400;letter-spacing: normal;orphans: 2;text-align: left;text-indent: 0px;text-transform: none;widows: 2;word-spacing: 0px;-webkit-text-stroke-width: 0px;text-decoration-thickness: initial;text-decoration-style: initial;text-decoration-color: initial;" /> [<br style="white-space:pre-wrap;margin: 0px;padding: 0px;max-width: 100%;overflow-wrap: break-word !important;box-sizing: border-box !important;color: rgb(171, 178, 191);font-family: "Operator Mono", Consolas, Monaco, Menlo, monospace;font-size: 12px;font-style: normal;font-variant-ligatures: normal;font-variant-caps: normal;font-weight: 400;letter-spacing: normal;orphans: 2;text-align: left;text-indent: 0px;text-transform: none;widows: 2;word-spacing: 0px;-webkit-text-stroke-width: 0px;text-decoration-thickness: initial;text-decoration-style: initial;text-decoration-color: initial;" /> "@babel/plugin-transform-runtime",<br style="white-space:pre-wrap;margin: 0px;padding: 0px;max-width: 100%;overflow-wrap: break-word !important;box-sizing: border-box !important;color: rgb(171, 178, 191);font-family: "Operator Mono", Consolas, Monaco, Menlo, monospace;font-size: 12px;font-style: normal;font-variant-ligatures: normal;font-variant-caps: normal;font-weight: 400;letter-spacing: normal;orphans: 2;text-align: left;text-indent: 0px;text-transform: none;widows: 2;word-spacing: 0px;-webkit-text-stroke-width: 0px;text-decoration-thickness: initial;text-decoration-style: initial;text-decoration-color: initial;" /> {<br style="white-space:pre-wrap;margin: 0px;padding: 0px;max-width: 100%;overflow-wrap: break-word !important;box-sizing: border-box !important;color: rgb(171, 178, 191);font-family: "Operator Mono", Consolas, Monaco, Menlo, monospace;font-size: 12px;font-style: normal;font-variant-ligatures: normal;font-variant-caps: normal;font-weight: 400;letter-spacing: normal;orphans: 2;text-align: left;text-indent: 0px;text-transform: none;widows: 2;word-spacing: 0px;-webkit-text-stroke-width: 0px;text-decoration-thickness: initial;text-decoration-style: initial;text-decoration-color: initial;" /> absoluteRuntime: false,<br style="white-space:pre-wrap;margin: 0px;padding: 0px;max-width: 100%;overflow-wrap: break-word !important;box-sizing: border-box !important;color: rgb(171, 178, 191);font-family: "Operator Mono", Consolas, Monaco, Menlo, monospace;font-size: 12px;font-style: normal;font-variant-ligatures: normal;font-variant-caps: normal;font-weight: 400;letter-spacing: normal;orphans: 2;text-align: left;text-indent: 0px;text-transform: none;widows: 2;word-spacing: 0px;-webkit-text-stroke-width: 0px;text-decoration-thickness: initial;text-decoration-style: initial;text-decoration-color: initial;" /> corejs: false,<br style="white-space:pre-wrap;margin: 0px;padding: 0px;max-width: 100%;overflow-wrap: break-word !important;box-sizing: border-box !important;color: rgb(171, 178, 191);font-family: "Operator Mono", Consolas, Monaco, Menlo, monospace;font-size: 12px;font-style: normal;font-variant-ligatures: normal;font-variant-caps: normal;font-weight: 400;letter-spacing: normal;orphans: 2;text-align: left;text-indent: 0px;text-transform: none;widows: 2;word-spacing: 0px;-webkit-text-stroke-width: 0px;text-decoration-thickness: initial;text-decoration-style: initial;text-decoration-color: initial;" /> helpers: true,<br style="white-space:pre-wrap;margin: 0px;padding: 0px;max-width: 100%;overflow-wrap: break-word !important;box-sizing: border-box !important;color: rgb(171, 178, 191);font-family: "Operator Mono", Consolas, Monaco, Menlo, monospace;font-size: 12px;font-style: normal;font-variant-ligatures: normal;font-variant-caps: normal;font-weight: 400;letter-spacing: normal;orphans: 2;text-align: left;text-indent: 0px;text-transform: none;widows: 2;word-spacing: 0px;-webkit-text-stroke-width: 0px;text-decoration-thickness: initial;text-decoration-style: initial;text-decoration-color: initial;" /> regenerator: true,<br style="white-space:pre-wrap;margin: 0px;padding: 0px;max-width: 100%;overflow-wrap: break-word !important;box-sizing: border-box !important;color: rgb(171, 178, 191);font-family: "Operator Mono", Consolas, Monaco, Menlo, monospace;font-size: 12px;font-style: normal;font-variant-ligatures: normal;font-variant-caps: normal;font-weight: 400;letter-spacing: normal;orphans: 2;text-align: left;text-indent: 0px;text-transform: none;widows: 2;word-spacing: 0px;-webkit-text-stroke-width: 0px;text-decoration-thickness: initial;text-decoration-style: initial;text-decoration-color: initial;" /> version: "7.0.0-beta.0",<br style="white-space:pre-wrap;margin: 0px;padding: 0px;max-width: 100%;overflow-wrap: break-word !important;box-sizing: border-box !important;color: rgb(171, 178, 191);font-family: "Operator Mono", Consolas, Monaco, Menlo, monospace;font-size: 12px;font-style: normal;font-variant-ligatures: normal;font-variant-caps: normal;font-weight: 400;letter-spacing: normal;orphans: 2;text-align: left;text-indent: 0px;text-transform: none;widows: 2;word-spacing: 0px;-webkit-text-stroke-width: 0px;text-decoration-thickness: initial;text-decoration-style: initial;text-decoration-color: initial;" /> },<br style="white-space:pre-wrap;margin: 0px;padding: 0px;max-width: 100%;overflow-wrap: break-word !important;box-sizing: border-box !important;color: rgb(171, 178, 191);font-family: "Operator Mono", Consolas, Monaco, Menlo, monospace;font-size: 12px;font-style: normal;font-variant-ligatures: normal;font-variant-caps: normal;font-weight: 400;letter-spacing: normal;orphans: 2;text-align: left;text-indent: 0px;text-transform: none;widows: 2;word-spacing: 0px;-webkit-text-stroke-width: 0px;text-decoration-thickness: initial;text-decoration-style: initial;text-decoration-color: initial;" /> ],<br style="white-space:pre-wrap;margin: 0px;padding: 0px;max-width: 100%;overflow-wrap: break-word !important;box-sizing: border-box !important;color: rgb(171, 178, 191);font-family: "Operator Mono", Consolas, Monaco, Menlo, monospace;font-size: 12px;font-style: normal;font-variant-ligatures: normal;font-variant-caps: normal;font-weight: 400;letter-spacing: normal;orphans: 2;text-align: left;text-indent: 0px;text-transform: none;widows: 2;word-spacing: 0px;-webkit-text-stroke-width: 0px;text-decoration-thickness: initial;text-decoration-style: initial;text-decoration-color: initial;" /> ],<br style="white-space:pre-wrap;margin: 0px;padding: 0px;max-width: 100%;overflow-wrap: break-word !important;box-sizing: border-box !important;color: rgb(171, 178, 191);font-family: "Operator Mono", Consolas, Monaco, Menlo, monospace;font-size: 12px;font-style: normal;font-variant-ligatures: normal;font-variant-caps: normal;font-weight: 400;letter-spacing: normal;orphans: 2;text-align: left;text-indent: 0px;text-transform: none;widows: 2;word-spacing: 0px;-webkit-text-stroke-width: 0px;text-decoration-thickness: initial;text-decoration-style: initial;text-decoration-color: initial;" /> },<br style="white-space:pre-wrap;margin: 0px;padding: 0px;max-width: 100%;overflow-wrap: break-word !important;box-sizing: border-box !important;color: rgb(171, 178, 191);font-family: "Operator Mono", Consolas, Monaco, Menlo, monospace;font-size: 12px;font-style: normal;font-variant-ligatures: normal;font-variant-caps: normal;font-weight: 400;letter-spacing: normal;orphans: 2;text-align: left;text-indent: 0px;text-transform: none;widows: 2;word-spacing: 0px;-webkit-text-stroke-width: 0px;text-decoration-thickness: initial;text-decoration-style: initial;text-decoration-color: initial;" /> },<br style="white-space:pre-wrap;margin: 0px;padding: 0px;max-width: 100%;overflow-wrap: break-word !important;box-sizing: border-box !important;color: rgb(171, 178, 191);font-family: "Operator Mono", Consolas, Monaco, Menlo, monospace;font-size: 12px;font-style: normal;font-variant-ligatures: normal;font-variant-caps: normal;font-weight: 400;letter-spacing: normal;orphans: 2;text-align: left;text-indent: 0px;text-transform: none;widows: 2;word-spacing: 0px;-webkit-text-stroke-width: 0px;text-decoration-thickness: initial;text-decoration-style: initial;text-decoration-color: initial;" /> ],<br style="white-space:pre-wrap;margin: 0px;padding: 0px;max-width: 100%;overflow-wrap: break-word !important;box-sizing: border-box !important;color: rgb(171, 178, 191);font-family: "Operator Mono", Consolas, Monaco, Menlo, monospace;font-size: 12px;font-style: normal;font-variant-ligatures: normal;font-variant-caps: normal;font-weight: 400;letter-spacing: normal;orphans: 2;text-align: left;text-indent: 0px;text-transform: none;widows: 2;word-spacing: 0px;-webkit-text-stroke-width: 0px;text-decoration-thickness: initial;text-decoration-style: initial;text-decoration-color: initial;" /> },<br style="white-space:pre-wrap;margin: 0px;padding: 0px;max-width: 100%;overflow-wrap: break-word !important;box-sizing: border-box !important;color: rgb(171, 178, 191);font-family: "Operator Mono", Consolas, Monaco, Menlo, monospace;font-size: 12px;font-style: normal;font-variant-ligatures: normal;font-variant-caps: normal;font-weight: 400;letter-spacing: normal;orphans: 2;text-align: left;text-indent: 0px;text-transform: none;widows: 2;word-spacing: 0px;-webkit-text-stroke-width: 0px;text-decoration-thickness: initial;text-decoration-style: initial;text-decoration-color: initial;" /> output: {<br style="white-space:pre-wrap;margin: 0px;padding: 0px;max-width: 100%;overflow-wrap: break-word !important;box-sizing: border-box !important;color: rgb(171, 178, 191);font-family: "Operator Mono", Consolas, Monaco, Menlo, monospace;font-size: 12px;font-style: normal;font-variant-ligatures: normal;font-variant-caps: normal;font-weight: 400;letter-spacing: normal;orphans: 2;text-align: left;text-indent: 0px;text-transform: none;widows: 2;word-spacing: 0px;-webkit-text-stroke-width: 0px;text-decoration-thickness: initial;text-decoration-style: initial;text-decoration-color: initial;" /> filename: "bundle.js",<br style="white-space:pre-wrap;margin: 0px;padding: 0px;max-width: 100%;overflow-wrap: break-word !important;box-sizing: border-box !important;color: rgb(171, 178, 191);font-family: "Operator Mono", Consolas, Monaco, Menlo, monospace;font-size: 12px;font-style: normal;font-variant-ligatures: normal;font-variant-caps: normal;font-weight: 400;letter-spacing: normal;orphans: 2;text-align: left;text-indent: 0px;text-transform: none;widows: 2;word-spacing: 0px;-webkit-text-stroke-width: 0px;text-decoration-thickness: initial;text-decoration-style: initial;text-decoration-color: initial;" /> path: path.resolve(__dirname, "build"),<br style="white-space:pre-wrap;margin: 0px;padding: 0px;max-width: 100%;overflow-wrap: break-word !important;box-sizing: border-box !important;color: rgb(171, 178, 191);font-family: "Operator Mono", Consolas, Monaco, Menlo, monospace;font-size: 12px;font-style: normal;font-variant-ligatures: normal;font-variant-caps: normal;font-weight: 400;letter-spacing: normal;orphans: 2;text-align: left;text-indent: 0px;text-transform: none;widows: 2;word-spacing: 0px;-webkit-text-stroke-width: 0px;text-decoration-thickness: initial;text-decoration-style: initial;text-decoration-color: initial;" /> },<br style="white-space:pre-wrap;margin: 0px;padding: 0px;max-width: 100%;overflow-wrap: break-word !important;box-sizing: border-box !important;color: rgb(171, 178, 191);font-family: "Operator Mono", Consolas, Monaco, Menlo, monospace;font-size: 12px;font-style: normal;font-variant-ligatures: normal;font-variant-caps: normal;font-weight: 400;letter-spacing: normal;orphans: 2;text-align: left;text-indent: 0px;text-transform: none;widows: 2;word-spacing: 0px;-webkit-text-stroke-width: 0px;text-decoration-thickness: initial;text-decoration-style: initial;text-decoration-color: initial;" /> externals: [nodeExternals()],<br style="white-space:pre-wrap;margin: 0px;padding: 0px;max-width: 100%;overflow-wrap: break-word !important;box-sizing: border-box !important;color: rgb(171, 178, 191);font-family: "Operator Mono", Consolas, Monaco, Menlo, monospace;font-size: 12px;font-style: normal;font-variant-ligatures: normal;font-variant-caps: normal;font-weight: 400;letter-spacing: normal;orphans: 2;text-align: left;text-indent: 0px;text-transform: none;widows: 2;word-spacing: 0px;-webkit-text-stroke-width: 0px;text-decoration-thickness: initial;text-decoration-style: initial;text-decoration-color: initial;" />};
在webpack构建完成后,可在Node环境运行build/bundle.js,访问页面后查看网页源代码,可以看到,React组件中的内容已经完整地包含在服务端返回到html里面。我们成功迈出了服务端渲染第一步。此时,我们也有必要再深入了解renderToString 到底做了什么,提前踩坑!
renderToString
除了将React组件转换成html字符串外,renderToString还有做了下面这些:
1. 会执行传入的React组件的代码,但是其只执行到React生命周期初始化过程的render及之前,即下面红框的部分,其余大部分生命周期函数在服务端都不执行;这也是服务端渲染的坑点之一。
2.renderToString 生成的产物中会包含一些额外生成特殊标记,代码体积会有所增大,其中属性data-reactroot是服务端渲染的标志,便于后续客户端通过hydrate复用HTML节点。在React16前后其产物也有差距:在React 16 之前,服务端渲染采用的是基于字符串校验和(string checksum)的 HTML 节点复用方式, 会额外生成生成data-reactid、data-react-checksum等属性;React 16 改用单节点校验来复用(服务端返回的)HTML 节点,不再生成data-reactid、data-react-checksum等体积占用大户,只在空白节点间多了 这样的标记。
renderToString react16前<br style="white-space:pre-wrap;margin: 0px;padding: 0px;max-width: 100%;overflow-wrap: break-word !important;box-sizing: border-box !important;color: rgb(171, 178, 191);font-family: "Operator Mono", Consolas, Monaco, Menlo, monospace;font-size: 12px;font-style: normal;font-variant-ligatures: normal;font-variant-caps: normal;font-weight: 400;letter-spacing: normal;orphans: 2;text-align: left;text-indent: 0px;text-transform: none;widows: 2;word-spacing: 0px;-webkit-text-stroke-width: 0px;text-decoration-thickness: initial;text-decoration-style: initial;text-decoration-color: initial;" /><br style="white-space:pre-wrap;margin: 0px;padding: 0px;max-width: 100%;overflow-wrap: break-word !important;box-sizing: border-box !important;color: rgb(171, 178, 191);font-family: "Operator Mono", Consolas, Monaco, Menlo, monospace;font-size: 12px;font-style: normal;font-variant-ligatures: normal;font-variant-caps: normal;font-weight: 400;letter-spacing: normal;orphans: 2;text-align: left;text-indent: 0px;text-transform: none;widows: 2;word-spacing: 0px;-webkit-text-stroke-width: 0px;text-decoration-thickness: initial;text-decoration-style: initial;text-decoration-color: initial;" /> Welcome to React SSR! <br style="white-space:pre-wrap;margin: 0px;padding: 0px;max-width: 100%;overflow-wrap: break-word !important;box-sizing: border-box !important;color: rgb(171, 178, 191);font-family: "Operator Mono", Consolas, Monaco, Menlo, monospace;font-size: 12px;font-style: normal;font-variant-ligatures: normal;font-variant-caps: normal;font-weight: 400;letter-spacing: normal;orphans: 2;text-align: left;text-indent: 0px;text-transform: none;widows: 2;word-spacing: 0px;-webkit-text-stroke-width: 0px;text-decoration-thickness: initial;text-decoration-style: initial;text-decoration-color: initial;" /> Hello There! <br style="white-space:pre-wrap;margin: 0px;padding: 0px;max-width: 100%;overflow-wrap: break-word !important;box-sizing: border-box !important;color: rgb(171, 178, 191);font-family: "Operator Mono", Consolas, Monaco, Menlo, monospace;font-size: 12px;font-style: normal;font-variant-ligatures: normal;font-variant-caps: normal;font-weight: 400;letter-spacing: normal;orphans: 2;text-align: left;text-indent: 0px;text-transform: none;widows: 2;word-spacing: 0px;-webkit-text-stroke-width: 0px;text-decoration-thickness: initial;text-decoration-style: initial;text-decoration-color: initial;" /><br style="white-space:pre-wrap;margin: 0px;padding: 0px;max-width: 100%;overflow-wrap: break-word !important;box-sizing: border-box !important;color: rgb(171, 178, 191);font-family: "Operator Mono", Consolas, Monaco, Menlo, monospace;font-size: 12px;font-style: normal;font-variant-ligatures: normal;font-variant-caps: normal;font-weight: 400;letter-spacing: normal;orphans: 2;text-align: left;text-indent: 0px;text-transform: none;widows: 2;word-spacing: 0px;-webkit-text-stroke-width: 0px;text-decoration-thickness: initial;text-decoration-style: initial;text-decoration-color: initial;" /><br style="white-space:pre-wrap;margin: 0px;padding: 0px;max-width: 100%;overflow-wrap: break-word !important;box-sizing: border-box !important;color: rgb(171, 178, 191);font-family: "Operator Mono", Consolas, Monaco, Menlo, monospace;font-size: 12px;font-style: normal;font-variant-ligatures: normal;font-variant-caps: normal;font-weight: 400;letter-spacing: normal;orphans: 2;text-align: left;text-indent: 0px;text-transform: none;widows: 2;word-spacing: 0px;-webkit-text-stroke-width: 0px;text-decoration-thickness: initial;text-decoration-style: initial;text-decoration-color: initial;" />// renderToString react16<br style="white-space:pre-wrap;margin: 0px;padding: 0px;max-width: 100%;overflow-wrap: break-word !important;box-sizing: border-box !important;color: rgb(171, 178, 191);font-family: "Operator Mono", Consolas, Monaco, Menlo, monospace;font-size: 12px;font-style: normal;font-variant-ligatures: normal;font-variant-caps: normal;font-weight: 400;letter-spacing: normal;orphans: 2;text-align: left;text-indent: 0px;text-transform: none;widows: 2;word-spacing: 0px;-webkit-text-stroke-width: 0px;text-decoration-thickness: initial;text-decoration-style: initial;text-decoration-color: initial;" />Welcome to React SSR! Hello There!
3.会被故意忽略掉的on开头的的属性,也就忽略掉了react代码中事件处理,这是也是坑点之一。服务端返回的html里没有处理事件点击,需要靠后续客户端js执行绑定事件。
function shouldIgnoreAttribute(<br /> name: string,<br /> propertyInfo: PropertyInfo | null,<br /> isCustomComponentTag: boolean,<br />): boolean {<br /> if (propertyInfo !== null) {<br /> return propertyInfo.type === RESERVED;<br /> }<br /> if (isCustomComponentTag) {<br /> return false;<br /> }<br /> if (<br /> name.length > 2 &&<br /> (name[0] === 'o' || name[0] === 'O') &&<br /> (name[1] === 'n' || name[1] === 'N')<br /> ) {<br /> return true;<br /> }<br /> return false;<br />}<br />
上面的例子我们可以看到React的代码里有点击事件,但点击后没有反应。需要靠后续客户端js执行绑定事件。如何实现?这就需要同构了。
2.3 实现基础的同构
前文已经大概讲了同构的概念,那为什么需要同构?之前的服务端代码在处理点击事件时故意忽略掉了这类属性,在服务端执行的生命周期也是不完整的,此时的页面是不具备交互能力的。同构,正是解决这些问题的关键,React代码在服务器上执行一遍之后,浏览器再去加载JS后又运行了一遍React代码,完成事件绑定和完整生命周期的执行,从而才能成为完全可交互页面。
react-dom:hydrate
实现同构的另一个核心API是React-dom下的hydrate,该方法能在客户端初次渲染的时候去复用服务端返回的原本已经存在的 DOM 节点,于渲染过程中为其附加交互行为(事件监听等),而不是重新创建 DOM 节点。需要注意是,服务端返回的 HTML 与客户端渲染结果不一致时,出于性能考虑,hydrate可以弥补文本内容的差异,但并不能保证修补属性的差异,而是将错就错;只在development模式下对这些不一致的问题报 Warning,因此必须重视 SSR HydrationWarning,要当 Error 逐个解决。
那具体实现同构?
上面这里我们提供了一个基本的架构图,可以看到,服务端运行React生成html代码我们已经基本实现,目前需要做的就是生产出客户端执行的index.js,那么这个index.js我们如何生产出来呢?
具体实践
首先新建客户端代码client.js,引入React组件,通过ReactDom.hydrate处理挂载到Dom节点, hydrate是实现复用的关键。
// client.js<br style="white-space:pre-wrap;margin: 0px;padding: 0px;max-width: 100%;overflow-wrap: break-word !important;box-sizing: border-box !important;color: rgb(171, 178, 191);font-family: "Operator Mono", Consolas, Monaco, Menlo, monospace;font-size: 12px;font-style: normal;font-variant-ligatures: normal;font-variant-caps: normal;font-weight: 400;letter-spacing: normal;orphans: 2;text-align: left;text-indent: 0px;text-transform: none;widows: 2;word-spacing: 0px;-webkit-text-stroke-width: 0px;text-decoration-thickness: initial;text-decoration-style: initial;text-decoration-color: initial;" />import React from "react";<br style="white-space:pre-wrap;margin: 0px;padding: 0px;max-width: 100%;overflow-wrap: break-word !important;box-sizing: border-box !important;color: rgb(171, 178, 191);font-family: "Operator Mono", Consolas, Monaco, Menlo, monospace;font-size: 12px;font-style: normal;font-variant-ligatures: normal;font-variant-caps: normal;font-weight: 400;letter-spacing: normal;orphans: 2;text-align: left;text-indent: 0px;text-transform: none;widows: 2;word-spacing: 0px;-webkit-text-stroke-width: 0px;text-decoration-thickness: initial;text-decoration-style: initial;text-decoration-color: initial;" />import ReactDom from "react-dom";<br style="white-space:pre-wrap;margin: 0px;padding: 0px;max-width: 100%;overflow-wrap: break-word !important;box-sizing: border-box !important;color: rgb(171, 178, 191);font-family: "Operator Mono", Consolas, Monaco, Menlo, monospace;font-size: 12px;font-style: normal;font-variant-ligatures: normal;font-variant-caps: normal;font-weight: 400;letter-spacing: normal;orphans: 2;text-align: left;text-indent: 0px;text-transform: none;widows: 2;word-spacing: 0px;-webkit-text-stroke-width: 0px;text-decoration-thickness: initial;text-decoration-style: initial;text-decoration-color: initial;" />import Home from "./containers/Home";<br style="white-space:pre-wrap;margin: 0px;padding: 0px;max-width: 100%;overflow-wrap: break-word !important;box-sizing: border-box !important;color: rgb(171, 178, 191);font-family: "Operator Mono", Consolas, Monaco, Menlo, monospace;font-size: 12px;font-style: normal;font-variant-ligatures: normal;font-variant-caps: normal;font-weight: 400;letter-spacing: normal;orphans: 2;text-align: left;text-indent: 0px;text-transform: none;widows: 2;word-spacing: 0px;-webkit-text-stroke-width: 0px;text-decoration-thickness: initial;text-decoration-style: initial;text-decoration-color: initial;" /><br style="white-space:pre-wrap;margin: 0px;padding: 0px;max-width: 100%;overflow-wrap: break-word !important;box-sizing: border-box !important;color: rgb(171, 178, 191);font-family: "Operator Mono", Consolas, Monaco, Menlo, monospace;font-size: 12px;font-style: normal;font-variant-ligatures: normal;font-variant-caps: normal;font-weight: 400;letter-spacing: normal;orphans: 2;text-align: left;text-indent: 0px;text-transform: none;widows: 2;word-spacing: 0px;-webkit-text-stroke-width: 0px;text-decoration-thickness: initial;text-decoration-style: initial;text-decoration-color: initial;" />const App = () => {<br style="white-space:pre-wrap;margin: 0px;padding: 0px;max-width: 100%;overflow-wrap: break-word !important;box-sizing: border-box !important;color: rgb(171, 178, 191);font-family: "Operator Mono", Consolas, Monaco, Menlo, monospace;font-size: 12px;font-style: normal;font-variant-ligatures: normal;font-variant-caps: normal;font-weight: 400;letter-spacing: normal;orphans: 2;text-align: left;text-indent: 0px;text-transform: none;widows: 2;word-spacing: 0px;-webkit-text-stroke-width: 0px;text-decoration-thickness: initial;text-decoration-style: initial;text-decoration-color: initial;" /> return ;<br style="white-space:pre-wrap;margin: 0px;padding: 0px;max-width: 100%;overflow-wrap: break-word !important;box-sizing: border-box !important;color: rgb(171, 178, 191);font-family: "Operator Mono", Consolas, Monaco, Menlo, monospace;font-size: 12px;font-style: normal;font-variant-ligatures: normal;font-variant-caps: normal;font-weight: 400;letter-spacing: normal;orphans: 2;text-align: left;text-indent: 0px;text-transform: none;widows: 2;word-spacing: 0px;-webkit-text-stroke-width: 0px;text-decoration-thickness: initial;text-decoration-style: initial;text-decoration-color: initial;" />};<br style="white-space:pre-wrap;margin: 0px;padding: 0px;max-width: 100%;overflow-wrap: break-word !important;box-sizing: border-box !important;color: rgb(171, 178, 191);font-family: "Operator Mono", Consolas, Monaco, Menlo, monospace;font-size: 12px;font-style: normal;font-variant-ligatures: normal;font-variant-caps: normal;font-weight: 400;letter-spacing: normal;orphans: 2;text-align: left;text-indent: 0px;text-transform: none;widows: 2;word-spacing: 0px;-webkit-text-stroke-width: 0px;text-decoration-thickness: initial;text-decoration-style: initial;text-decoration-color: initial;" /><br style="white-space:pre-wrap;margin: 0px;padding: 0px;max-width: 100%;overflow-wrap: break-word !important;box-sizing: border-box !important;color: rgb(171, 178, 191);font-family: "Operator Mono", Consolas, Monaco, Menlo, monospace;font-size: 12px;font-style: normal;font-variant-ligatures: normal;font-variant-caps: normal;font-weight: 400;letter-spacing: normal;orphans: 2;text-align: left;text-indent: 0px;text-transform: none;widows: 2;word-spacing: 0px;-webkit-text-stroke-width: 0px;text-decoration-thickness: initial;text-decoration-style: initial;text-decoration-color: initial;" />ReactDom.hydrate(, document.getElementById("root"));
客户端代码也需要webpack打包处理,新建webpack.client.js具体配置如下,需要注意打包输出在public目录下,后续的静态资源服务也起在了这个目录下。
// webpack.client.js<br style="white-space:pre-wrap;margin: 0px;padding: 0px;max-width: 100%;overflow-wrap: break-word !important;box-sizing: border-box !important;color: rgb(171, 178, 191);font-family: "Operator Mono", Consolas, Monaco, Menlo, monospace;font-size: 12px;font-style: normal;font-variant-ligatures: normal;font-variant-caps: normal;font-weight: 400;letter-spacing: normal;orphans: 2;text-align: left;text-indent: 0px;text-transform: none;widows: 2;word-spacing: 0px;-webkit-text-stroke-width: 0px;text-decoration-thickness: initial;text-decoration-style: initial;text-decoration-color: initial;" />const path = require("path");<br style="white-space:pre-wrap;margin: 0px;padding: 0px;max-width: 100%;overflow-wrap: break-word !important;box-sizing: border-box !important;color: rgb(171, 178, 191);font-family: "Operator Mono", Consolas, Monaco, Menlo, monospace;font-size: 12px;font-style: normal;font-variant-ligatures: normal;font-variant-caps: normal;font-weight: 400;letter-spacing: normal;orphans: 2;text-align: left;text-indent: 0px;text-transform: none;widows: 2;word-spacing: 0px;-webkit-text-stroke-width: 0px;text-decoration-thickness: initial;text-decoration-style: initial;text-decoration-color: initial;" />const resolve = (dir) => path.resolve(__dirname, "./src", dir);<br style="white-space:pre-wrap;margin: 0px;padding: 0px;max-width: 100%;overflow-wrap: break-word !important;box-sizing: border-box !important;color: rgb(171, 178, 191);font-family: "Operator Mono", Consolas, Monaco, Menlo, monospace;font-size: 12px;font-style: normal;font-variant-ligatures: normal;font-variant-caps: normal;font-weight: 400;letter-spacing: normal;orphans: 2;text-align: left;text-indent: 0px;text-transform: none;widows: 2;word-spacing: 0px;-webkit-text-stroke-width: 0px;text-decoration-thickness: initial;text-decoration-style: initial;text-decoration-color: initial;" />module.exports = {<br style="white-space:pre-wrap;margin: 0px;padding: 0px;max-width: 100%;overflow-wrap: break-word !important;box-sizing: border-box !important;color: rgb(171, 178, 191);font-family: "Operator Mono", Consolas, Monaco, Menlo, monospace;font-size: 12px;font-style: normal;font-variant-ligatures: normal;font-variant-caps: normal;font-weight: 400;letter-spacing: normal;orphans: 2;text-align: left;text-indent: 0px;text-transform: none;widows: 2;word-spacing: 0px;-webkit-text-stroke-width: 0px;text-decoration-thickness: initial;text-decoration-style: initial;text-decoration-color: initial;" /> mode: "development",<br style="white-space:pre-wrap;margin: 0px;padding: 0px;max-width: 100%;overflow-wrap: break-word !important;box-sizing: border-box !important;color: rgb(171, 178, 191);font-family: "Operator Mono", Consolas, Monaco, Menlo, monospace;font-size: 12px;font-style: normal;font-variant-ligatures: normal;font-variant-caps: normal;font-weight: 400;letter-spacing: normal;orphans: 2;text-align: left;text-indent: 0px;text-transform: none;widows: 2;word-spacing: 0px;-webkit-text-stroke-width: 0px;text-decoration-thickness: initial;text-decoration-style: initial;text-decoration-color: initial;" /> entry: "./client.js",<br style="white-space:pre-wrap;margin: 0px;padding: 0px;max-width: 100%;overflow-wrap: break-word !important;box-sizing: border-box !important;color: rgb(171, 178, 191);font-family: "Operator Mono", Consolas, Monaco, Menlo, monospace;font-size: 12px;font-style: normal;font-variant-ligatures: normal;font-variant-caps: normal;font-weight: 400;letter-spacing: normal;orphans: 2;text-align: left;text-indent: 0px;text-transform: none;widows: 2;word-spacing: 0px;-webkit-text-stroke-width: 0px;text-decoration-thickness: initial;text-decoration-style: initial;text-decoration-color: initial;" /> output: {<br style="white-space:pre-wrap;margin: 0px;padding: 0px;max-width: 100%;overflow-wrap: break-word !important;box-sizing: border-box !important;color: rgb(171, 178, 191);font-family: "Operator Mono", Consolas, Monaco, Menlo, monospace;font-size: 12px;font-style: normal;font-variant-ligatures: normal;font-variant-caps: normal;font-weight: 400;letter-spacing: normal;orphans: 2;text-align: left;text-indent: 0px;text-transform: none;widows: 2;word-spacing: 0px;-webkit-text-stroke-width: 0px;text-decoration-thickness: initial;text-decoration-style: initial;text-decoration-color: initial;" /> filename: "index.js",<br style="white-space:pre-wrap;margin: 0px;padding: 0px;max-width: 100%;overflow-wrap: break-word !important;box-sizing: border-box !important;color: rgb(171, 178, 191);font-family: "Operator Mono", Consolas, Monaco, Menlo, monospace;font-size: 12px;font-style: normal;font-variant-ligatures: normal;font-variant-caps: normal;font-weight: 400;letter-spacing: normal;orphans: 2;text-align: left;text-indent: 0px;text-transform: none;widows: 2;word-spacing: 0px;-webkit-text-stroke-width: 0px;text-decoration-thickness: initial;text-decoration-style: initial;text-decoration-color: initial;" /> path: path.resolve(__dirname, "public"),<br style="white-space:pre-wrap;margin: 0px;padding: 0px;max-width: 100%;overflow-wrap: break-word !important;box-sizing: border-box !important;color: rgb(171, 178, 191);font-family: "Operator Mono", Consolas, Monaco, Menlo, monospace;font-size: 12px;font-style: normal;font-variant-ligatures: normal;font-variant-caps: normal;font-weight: 400;letter-spacing: normal;orphans: 2;text-align: left;text-indent: 0px;text-transform: none;widows: 2;word-spacing: 0px;-webkit-text-stroke-width: 0px;text-decoration-thickness: initial;text-decoration-style: initial;text-decoration-color: initial;" /> },<br style="white-space:pre-wrap;margin: 0px;padding: 0px;max-width: 100%;overflow-wrap: break-word !important;box-sizing: border-box !important;color: rgb(171, 178, 191);font-family: "Operator Mono", Consolas, Monaco, Menlo, monospace;font-size: 12px;font-style: normal;font-variant-ligatures: normal;font-variant-caps: normal;font-weight: 400;letter-spacing: normal;orphans: 2;text-align: left;text-indent: 0px;text-transform: none;widows: 2;word-spacing: 0px;-webkit-text-stroke-width: 0px;text-decoration-thickness: initial;text-decoration-style: initial;text-decoration-color: initial;" /> module: {<br style="white-space:pre-wrap;margin: 0px;padding: 0px;max-width: 100%;overflow-wrap: break-word !important;box-sizing: border-box !important;color: rgb(171, 178, 191);font-family: "Operator Mono", Consolas, Monaco, Menlo, monospace;font-size: 12px;font-style: normal;font-variant-ligatures: normal;font-variant-caps: normal;font-weight: 400;letter-spacing: n
nodejs抓取动态网页 全面深入理解预渲染技术体系
网站优化 • 优采云 发表了文章 • 0 个评论 • 85 次浏览 • 2022-06-29 22:40
在我们使用现代前端框架,比如Vue、React、Angular开发完毕前端项目之后,会发现这些页面输出的全是js,很不利于搜索引擎去爬取。在已经完成了单页应用(SPA)项目之后,如果要进行SEO优化的改造,这时候就可以使用预渲染技术体系。
下面将从适用场景、概念介绍、如何使用、底层原理几方面全面介绍预渲染技术的各项特性。适用场景在谈使用场景之前,首先需要明白以下几点:现代前端框架比如 Vue 在构建完成之后,页面加载的其实是一堆 js,再由 js 动态生成DOM。当我们访问页面,右键“显示网页源代码”的时候,看不到文字等内容百度、搜狗等爬虫在抓取页面的时候,不会执行页面的 js 源代码(谷歌爬虫可以执行“同步” js 来构建页面,因此 Vue 等框架开发的单页应用可以在谷歌搜索引擎中很好的被收录,这点我们不展开讨论)如果想要让百度、搜狗等收录索引我们的网站,就必须像静态 HTML 那样,让网页在右键查看源代码的时候,显示的是文字、图片等内容在这样的场景下,我们可以使用预渲染来解决此类问题。概念介绍
预渲染概念简单来讲是这样的:在项目构建阶段,我们会模拟访问项目的页面URL,这时候页面上的 js 将会执行并且形成真正的 HTML 片段;此时我们保存这个 HTML 文件到服务器硬盘上,下次不管是用户还是爬虫访问的时候,就直接返回这个物理文件,这样就可以有效解决 SEO 无法收录的问题。大体流程如下图:
可以看出,“预渲染”同“服务端渲染”最大的区别是,前者是在构建期间执行,后者在用户访问期间实时运行;前者在构建完成之后就不再需要 node服务,后者需要使用 node 作为运行时。预渲染也有它不适用的地方。正因为在构建阶段我们需要指明“需要构建的页面URL”,因此对于那些携带动态参数的页面(比如资料详情页),不适用于用预渲染去构建。这种场景下只能使用SSR。反之,一切静态官网、带数据的门户网站,只要是URL固定的,不管其中有没有动态数据,都可以使用预渲染。这里你可能会问一个问题:预渲染技术能否将 ajax 请求的内容也填充到页面上?答案是肯定的。虽然你 ajax 并非“同步执行”的 js,我们无法获知异步请求完成的时机。但通过控制监测页面上某个特定元素是否存在等手段,我们可以变相获知到数据返回的时机,从而进行预渲染。就可以达到“填充 ajax 数据”的效果(这可是谷歌爬虫也无法达到的效果哦)。如何使用预渲染技术有很多种实现方式。最常用的是使用 webpack 的一个插件: prerender-spa-plugin()。但是这个插件有很多局限性,最大的局限性在于必须结合 webpack 来使用,不够灵活,不易调试。也无法通过编程的方式使用。
比如我们的首页有动态的数据(非动态URL。是通过ajax获取的动态数据。)因此我们在使用了预渲染生成了静态首页之后,需要每间隔10分钟或者5分钟重新生成一个新的静态页,来更新数据。这就需要能够通过编程的方式调用渲染指令。在这样的情况下我基于这个插件的原理重新实现了一个包:@waitkafuka/spa-prerender(),可以通过 nodejs 通过编程的方式使用。
同时它剥离了 webpack 的依赖,剥离了对SPA页面的限制。只要有一个静态目录就可以工作。使用的方式非常简单,以 Vue 为例,在我们正常构建生成了 dist 目录之后,只需要编写以下脚本:
const SpaRenderer = require('@waitkafuka/spa-prerender');const path = require('path');<br />const options = {staticDir: path.join(__dirname, 'dist'),basePath: 'base',//可选,当项目有basePath的时候设置。同router中的base和publicPath。确保staticDir/basePath/index.html存在 routes: ['/','/exam', ],puppeteerOptions: {headless: true,maxConcurrentRoutes: 0,renderAfterDocumentEvent: 'render-event',skipThirdPartyRequests: true }};const spaRenderer = new SpaRenderer(options)spaRenderer.render().then(() => {console.log('预渲染完毕。');});
具体的参数解析可以查看 @waitkafuka/spa-prerender。底层原理在底层实现上,主要利用了 express 来驱动静态页面;然后利用 puppeteer 无头浏览器来模拟用户访问所需要预渲染的地址;在访问完成之后,保存页面HTML到文件夹中。
流程如下:
更为详细的流程介绍如下(此部分枯燥乏味,非专业人士可以跳过。):
阶段1:创建渲染器实例
spa-prerender index.js:
1.创建puppeteer实例 @prerenderer/renderer-puppeteer/es6/renderer.js
2.创建server实例@prerenderer/prerenderer/es6/server.js
3.创建renderer实例,将1 2步的puppeteer和server注入this @@prerenderer/prerenderer/es6/index.js
阶段2:渲染器实例初始化:spa-prerender index.js:
1.server初始化 (设置路由:静态资源利用*.*映射到staticDir上,其他请求全部映射到index.html上。设置静态资源和index.html路径,modifyServer也在这个阶段。server 启动)@prerenderer/prerenderer/es6/server.js
2.puppeteer初始化(判断平台是否linux,如果是Linux需要设置一些启动参数;启动puppeteer)@prerenderer/renderer-puppeteer/es6/renderer.js
阶段3:开始访问路由并获取html
1.spa-prerender index.js->@prerenderer/prerenderer/es6/index.js -> @prerenderer/renderer-puppeteer/es6/renderer.js
2.开启一个限流器,每次最多渲染 n 条路由,避免内存崩溃
3.puppeteer开启一个新标签,判断是否有inject,如果有,注入到window上
4.拼接端口、设置viewport,拼接router,形成url,发起页面的请求
5.判断options中是否设置了renderAfterDocumentEvent,如果有,给页面添加一个事件监听器,当触发事件的时候,将__PRERENDER_STATUS属性设置为true
6.访问页面,等待加载完成(如何确定页面加载完成, waituntil: 'networkidle0'//在500ms内没有网络请求,这个设置可以通过puppeteerOptions.navigationOptions.waituntil修改)
等待捕捉,分为三种等待时机:
1.等待固定时间,renderAfterTime(利用settimeout结合promise实现)
2.等待抛出某个事件:renderAfterDocumentEvent,该事件需要事先在页面写好抛出的时机
3.等待某个元素出现:renderAfterElementExists
阶段4:保存html
spa-prerender index.js 遍历结果,拼接文件夹路径并保存html。
实践过程中的常见问题
1. 如果一个项目有10个页面,其中首页需要SEO,于是使用了预渲染,另外9个页面仍然是由js渲染。那么在访问其他9个页面的时候,刷新页面,会先显示首页的内容一闪而过。这种问题如何解决?
产生这种情况的原因在于:在单页应用中,实际上只有一个物理页面,那就是 index.html。我们访问的所有页面实际都是 index.html,先进入 index.html 然后再执行 js 构建 dom。那么此时如果我们首页是已经预渲染好的,那么就会有内容,在 js 构建出对应路由的内容之前,就会先出现首页的内容。
spa-prerender 考虑到了这种问题。在预渲染的过程中,会首先保留原来“纯净”的index.html,并重命名为“index-spa.html”。
而后,在 nginx 配置中,利用 try_files 指令的优先级配置特点,让用户在刷新的情况下,如果有对应物理文件则访问物理文件(预渲染生成的文件),如果没有对应物理文件则降级访问 index-spa.html,就可以解决上述问题。nginx 配置指令如下:
location /{ alias /Users/zks/code/xkw/xop/dist/; try_files $uri $uri/ /index-spa.html; }
此时预渲染生成的文件将被优先返回($uri),如果未匹配,才会交由 index-spa.html 处理。
2. 如果项目打包有前缀怎么办?
如果项目有publicPath,那么在 dist 目录下会多一层根目录。此时需要在预渲染配置中添加 basePath 的选项。此时 express 会从 dist/basePath 目录中去寻找 index.html。
配置如下:
const options = { staticDir: path.join(__dirname, 'dist'), basePath: 'base',//当项目有basePath的时候设置。同router中的base和publicPath。确保staticDir/basePath/index.html存在 routes: ['/','/exam', ], ... }
3. 如何控制渲染器开始进行HTML保存的时机?
我们可以通过 options 中三个参数来控制:
3.1.renderAfterTime:等待固定时间之后(从页面开始发起访问算起)
3.2.renderAfterDocumentEvent:等待抛出某个事件,该事件需要事先在页面定义好触发的时机,比如在 Vue 的 mounted 函数中定义:
new Vue({ router,render: h => h(App), mounted () { //在mounted之后触发custom-render-event // 预渲染器在收到这个事件之后将开始进行页面的保存工作 document.dispatchEvent(new Event('custom-render-event')) }}).$mount('#app')
3.3.renderAfterElementExists:等待某个元素出现。我们可以在异步 ajax 返回之后,增加某个元素。当渲染器检测到此元素出现之后进行页面保存,此时保存的页面就包含了 ajax 返回的数据。
4. 首页预渲染生成的 DOM 元素,会不会被 js 复用?还是删除重新构建?
仿照SSR的思路,我们可以通过在根节点上设置 data-server-rander="true",这样在客户端 js 会知道这个是已经渲染完成的 DOM,不会粗暴去替换它。而是执行一个“注水”的过程(也就是hydration)。可以充分复用预渲染生成的 DOM 元素。
点击下方卡片可以关注 查看全部
nodejs抓取动态网页 全面深入理解预渲染技术体系
在我们使用现代前端框架,比如Vue、React、Angular开发完毕前端项目之后,会发现这些页面输出的全是js,很不利于搜索引擎去爬取。在已经完成了单页应用(SPA)项目之后,如果要进行SEO优化的改造,这时候就可以使用预渲染技术体系。
下面将从适用场景、概念介绍、如何使用、底层原理几方面全面介绍预渲染技术的各项特性。适用场景在谈使用场景之前,首先需要明白以下几点:现代前端框架比如 Vue 在构建完成之后,页面加载的其实是一堆 js,再由 js 动态生成DOM。当我们访问页面,右键“显示网页源代码”的时候,看不到文字等内容百度、搜狗等爬虫在抓取页面的时候,不会执行页面的 js 源代码(谷歌爬虫可以执行“同步” js 来构建页面,因此 Vue 等框架开发的单页应用可以在谷歌搜索引擎中很好的被收录,这点我们不展开讨论)如果想要让百度、搜狗等收录索引我们的网站,就必须像静态 HTML 那样,让网页在右键查看源代码的时候,显示的是文字、图片等内容在这样的场景下,我们可以使用预渲染来解决此类问题。概念介绍
预渲染概念简单来讲是这样的:在项目构建阶段,我们会模拟访问项目的页面URL,这时候页面上的 js 将会执行并且形成真正的 HTML 片段;此时我们保存这个 HTML 文件到服务器硬盘上,下次不管是用户还是爬虫访问的时候,就直接返回这个物理文件,这样就可以有效解决 SEO 无法收录的问题。大体流程如下图:
可以看出,“预渲染”同“服务端渲染”最大的区别是,前者是在构建期间执行,后者在用户访问期间实时运行;前者在构建完成之后就不再需要 node服务,后者需要使用 node 作为运行时。预渲染也有它不适用的地方。正因为在构建阶段我们需要指明“需要构建的页面URL”,因此对于那些携带动态参数的页面(比如资料详情页),不适用于用预渲染去构建。这种场景下只能使用SSR。反之,一切静态官网、带数据的门户网站,只要是URL固定的,不管其中有没有动态数据,都可以使用预渲染。这里你可能会问一个问题:预渲染技术能否将 ajax 请求的内容也填充到页面上?答案是肯定的。虽然你 ajax 并非“同步执行”的 js,我们无法获知异步请求完成的时机。但通过控制监测页面上某个特定元素是否存在等手段,我们可以变相获知到数据返回的时机,从而进行预渲染。就可以达到“填充 ajax 数据”的效果(这可是谷歌爬虫也无法达到的效果哦)。如何使用预渲染技术有很多种实现方式。最常用的是使用 webpack 的一个插件: prerender-spa-plugin()。但是这个插件有很多局限性,最大的局限性在于必须结合 webpack 来使用,不够灵活,不易调试。也无法通过编程的方式使用。
比如我们的首页有动态的数据(非动态URL。是通过ajax获取的动态数据。)因此我们在使用了预渲染生成了静态首页之后,需要每间隔10分钟或者5分钟重新生成一个新的静态页,来更新数据。这就需要能够通过编程的方式调用渲染指令。在这样的情况下我基于这个插件的原理重新实现了一个包:@waitkafuka/spa-prerender(),可以通过 nodejs 通过编程的方式使用。
同时它剥离了 webpack 的依赖,剥离了对SPA页面的限制。只要有一个静态目录就可以工作。使用的方式非常简单,以 Vue 为例,在我们正常构建生成了 dist 目录之后,只需要编写以下脚本:
const SpaRenderer = require('@waitkafuka/spa-prerender');const path = require('path');<br />const options = {staticDir: path.join(__dirname, 'dist'),basePath: 'base',//可选,当项目有basePath的时候设置。同router中的base和publicPath。确保staticDir/basePath/index.html存在 routes: ['/','/exam', ],puppeteerOptions: {headless: true,maxConcurrentRoutes: 0,renderAfterDocumentEvent: 'render-event',skipThirdPartyRequests: true }};const spaRenderer = new SpaRenderer(options)spaRenderer.render().then(() => {console.log('预渲染完毕。');});
具体的参数解析可以查看 @waitkafuka/spa-prerender。底层原理在底层实现上,主要利用了 express 来驱动静态页面;然后利用 puppeteer 无头浏览器来模拟用户访问所需要预渲染的地址;在访问完成之后,保存页面HTML到文件夹中。
流程如下:
更为详细的流程介绍如下(此部分枯燥乏味,非专业人士可以跳过。):
阶段1:创建渲染器实例
spa-prerender index.js:
1.创建puppeteer实例 @prerenderer/renderer-puppeteer/es6/renderer.js
2.创建server实例@prerenderer/prerenderer/es6/server.js
3.创建renderer实例,将1 2步的puppeteer和server注入this @@prerenderer/prerenderer/es6/index.js
阶段2:渲染器实例初始化:spa-prerender index.js:
1.server初始化 (设置路由:静态资源利用*.*映射到staticDir上,其他请求全部映射到index.html上。设置静态资源和index.html路径,modifyServer也在这个阶段。server 启动)@prerenderer/prerenderer/es6/server.js
2.puppeteer初始化(判断平台是否linux,如果是Linux需要设置一些启动参数;启动puppeteer)@prerenderer/renderer-puppeteer/es6/renderer.js
阶段3:开始访问路由并获取html
1.spa-prerender index.js->@prerenderer/prerenderer/es6/index.js -> @prerenderer/renderer-puppeteer/es6/renderer.js
2.开启一个限流器,每次最多渲染 n 条路由,避免内存崩溃
3.puppeteer开启一个新标签,判断是否有inject,如果有,注入到window上
4.拼接端口、设置viewport,拼接router,形成url,发起页面的请求
5.判断options中是否设置了renderAfterDocumentEvent,如果有,给页面添加一个事件监听器,当触发事件的时候,将__PRERENDER_STATUS属性设置为true
6.访问页面,等待加载完成(如何确定页面加载完成, waituntil: 'networkidle0'//在500ms内没有网络请求,这个设置可以通过puppeteerOptions.navigationOptions.waituntil修改)
等待捕捉,分为三种等待时机:
1.等待固定时间,renderAfterTime(利用settimeout结合promise实现)
2.等待抛出某个事件:renderAfterDocumentEvent,该事件需要事先在页面写好抛出的时机
3.等待某个元素出现:renderAfterElementExists
阶段4:保存html
spa-prerender index.js 遍历结果,拼接文件夹路径并保存html。
实践过程中的常见问题
1. 如果一个项目有10个页面,其中首页需要SEO,于是使用了预渲染,另外9个页面仍然是由js渲染。那么在访问其他9个页面的时候,刷新页面,会先显示首页的内容一闪而过。这种问题如何解决?
产生这种情况的原因在于:在单页应用中,实际上只有一个物理页面,那就是 index.html。我们访问的所有页面实际都是 index.html,先进入 index.html 然后再执行 js 构建 dom。那么此时如果我们首页是已经预渲染好的,那么就会有内容,在 js 构建出对应路由的内容之前,就会先出现首页的内容。
spa-prerender 考虑到了这种问题。在预渲染的过程中,会首先保留原来“纯净”的index.html,并重命名为“index-spa.html”。
而后,在 nginx 配置中,利用 try_files 指令的优先级配置特点,让用户在刷新的情况下,如果有对应物理文件则访问物理文件(预渲染生成的文件),如果没有对应物理文件则降级访问 index-spa.html,就可以解决上述问题。nginx 配置指令如下:
location /{ alias /Users/zks/code/xkw/xop/dist/; try_files $uri $uri/ /index-spa.html; }
此时预渲染生成的文件将被优先返回($uri),如果未匹配,才会交由 index-spa.html 处理。
2. 如果项目打包有前缀怎么办?
如果项目有publicPath,那么在 dist 目录下会多一层根目录。此时需要在预渲染配置中添加 basePath 的选项。此时 express 会从 dist/basePath 目录中去寻找 index.html。
配置如下:
const options = { staticDir: path.join(__dirname, 'dist'), basePath: 'base',//当项目有basePath的时候设置。同router中的base和publicPath。确保staticDir/basePath/index.html存在 routes: ['/','/exam', ], ... }
3. 如何控制渲染器开始进行HTML保存的时机?
我们可以通过 options 中三个参数来控制:
3.1.renderAfterTime:等待固定时间之后(从页面开始发起访问算起)
3.2.renderAfterDocumentEvent:等待抛出某个事件,该事件需要事先在页面定义好触发的时机,比如在 Vue 的 mounted 函数中定义:
new Vue({ router,render: h => h(App), mounted () { //在mounted之后触发custom-render-event // 预渲染器在收到这个事件之后将开始进行页面的保存工作 document.dispatchEvent(new Event('custom-render-event')) }}).$mount('#app')
3.3.renderAfterElementExists:等待某个元素出现。我们可以在异步 ajax 返回之后,增加某个元素。当渲染器检测到此元素出现之后进行页面保存,此时保存的页面就包含了 ajax 返回的数据。
4. 首页预渲染生成的 DOM 元素,会不会被 js 复用?还是删除重新构建?
仿照SSR的思路,我们可以通过在根节点上设置 data-server-rander="true",这样在客户端 js 会知道这个是已经渲染完成的 DOM,不会粗暴去替换它。而是执行一个“注水”的过程(也就是hydration)。可以充分复用预渲染生成的 DOM 元素。
点击下方卡片可以关注
nodejs抓取动态网页 分享12个GitHub骚操作!
网站优化 • 优采云 发表了文章 • 0 个评论 • 169 次浏览 • 2022-06-28 21:59
原文:
#1 在 GitHub 上编辑代码
我要先说一个很多人都知道的事儿。
当你使用 GitHub看一些文件时(任何的文本文件或者仓库),能看到一个顶部右侧有一个小铅笔图标。点击即可编辑文档。完成后,按照提示点击「Propose file change」,GitHub 会为你 fork 这个仓库并创建一个 pull request。
很帅吧,不需要 fork / pull / 改变 locally / push / 创建 PR,只需点击一下,GitHub 就为你创建了一个分支。
这对于修改一些排版错误或者防恶意篡改是很有帮助的。
#2 粘贴图像
对于 issue 和 comment,你还可以直接粘贴图片,当你粘贴时图片会被上传至云端,然后以 MarkDown 格式显示。
非常简洁。
#3 格式化代码
如果你想写一个 code block,你可以在开始处写三个反引号,然后 GitHub 会试图猜出你在写什么语言。
但是如果你发布如 Vue、Typescript、JSX 这样的语言,你可以明确写出来,以获取正确的高亮。
下图第一行使用了```jsx:
片段呈现:
(这可以扩展到 gist,顺便一提,如果你给了 gist 定义成 .jsx 扩展名,那么你会得到 JSX 的高亮)
#4 使用魔术词在 PR 中关闭 issue
比如你在创建一个 pull request 去修复 issue #234。那你可在 PR 输入「fixes #234」,就可以自动合并 PR 并关闭这个 issue,是不是很酷。
(提交信息里可以使用 fix/fixes/fixed , close/closes/closed 或者 resolve/resolves/resolved等关键词)
#5 链接到 comment
你甚至想链接到一个特定的评论,但无法做到?我在这里告诉你,点击名字旁边的日期/时间就万事大吉。
#6 链接到代码
既然能链接到 comment,那你想问能不能链接到代码上?可以的。
试试这个操作:在查看文件时,点击代码边上的行数。
哇喔,你看到了么?URL 随之更新。如果你按住 Shift 并单击另一个行号,URL 会再次更新,并且高亮这两个行数之间的所有代码段。
你现在可以分享这个 URL 了,但等等,这些还是当前分支,如果文件变化了呢?你需要一个永久链接。
我比较懒,但是下面这一个截图已经能够表达如何获取永久链接了(Copy Permalink):
#7 像使用命令行一样使用 GitHub URL
既然说到了 URL,那么就接着聊一下。使用 UI 浏览 GitHub 很方面也很好,不过很多时候最快的方式是使用 URL 来浏览。举个例子,如果我想跳转到正在处理的分支上,并想查看分支和 master 的差异,我可以在我的仓库名后面输入 /compare/branch-name。
这会使我到达分支的不同页面:
可以在名字后面再加上...XXX(分支名)比如我写的 mkdocs...pre-release,如下图:
这一步你可以配合键盘快捷键,Ctrl + L 或者 cmd + L,可以让光标直接移动到 URL 中(最起码 chrome 是这样)。这些加一起能提高生产力。
专业提示:用键盘移动 chrome URL 上的某一条网页记录,使用 Shift+Delete 或 Shift+fn+Delete 来删除某一条记录。(比如合并了分支之后就可以删除了)
#8 在 issue 中创建 list
你想在你的 issue中看到可多选的 list 么?
当你查看问题时,你想不想让它变成 2 of 5 这样的形式?
如果想,你可以在 issue 中使用以下句法:
- [ ] Screen width (integer) <br style="box-sizing: border-box;font-size: inherit;color: inherit;line-height: inherit;word-wrap: inherit !important;word-break: inherit !important;" />- [x] Service worker support <br style="box-sizing: border-box;font-size: inherit;color: inherit;line-height: inherit;word-wrap: inherit !important;word-break: inherit !important;" />- [x] Fetch support <br style="box-sizing: border-box;font-size: inherit;color: inherit;line-height: inherit;word-wrap: inherit !important;word-break: inherit !important;" />- [ ] CSS flexbox support <br style="box-sizing: border-box;font-size: inherit;color: inherit;line-height: inherit;word-wrap: inherit !important;word-break: inherit !important;" />- [ ] Custom elements
#9 GitHub 上的 project board
我总是用 Jira 做大项目,独立项目用 Trello,这两者我都很喜欢。
后来我知道,GitHub 也有类似的 project board:
我个人为了方便把它们都添加为 note。board 极为方便的帮助你做仓库管理。
你可以点击右上角 Add Cards 来添加东西。这里有些特殊语法方便搜索,比如: is:pr is:open,你就可以把任何公开的 PR 拖到 board 上。
更多语法可以参考search syntax。
你也可以把现存的 note 转化为 issue。
你也可以选择 issue 直接添加到 projects 。
这些意味着,从现在开始,你可以明确责任制度,每一行代码的分配都可以在 GitHub 上的 Project board 上完成,而不用去 Jira 或者 Trello 上。
不过它也有些缺点,比如功能比较少。你也可以试试 ZenHub,它有效的扩展 GitHub。
#10 GitHub WiKi
GitHub WiKi 能够帮助我们处理非结构化的页面集合,就像维基百科那样。我自己 NodeJS docs 就被我弄成 wiki 的样子。几个页面,然后自定义侧边栏。具体方法网上很多,我的页面可以供你参考一下。
建议:如果你有个特别长的单页面 README.md 文件,并且想和其他人有所区别,你可以试试这种形式。
#11 GitHub Pages(JekyII)
你可能已经知道了能使用 GitHub Pages 来托管静态网站。那本条就特别介绍一下如何使用 JekyII 来构建站点。
以最简单的方式,GitHub Pages + JekyII 将以最漂亮的主题来呈现你的 README.md,例如,你可以看一下about-github的自述文件。
在 GitHub 的 my site 中,点击 setting,打开 GitHub Pages,选择一个 JekyII 主题
就会得到一个Jekyll主题页面:
它的优点是:
注意,他需要 Ruby 在本地运行,Mac 自带,Windows 用户自行安装。
#12 把 GitHub 当 CMS 用
你的网站需要显示一些文字,但是你还不想直接放在 HTML 里面,那你可以把 GitHub 作为你储存内容的一个地方。这样,就可以让任何一个非程序员通过修改 Markdown 来修改 HTML 网页的内容。
我的方法是:在你的 GitHub 仓库中使用 markdown 文件来保存文本。在你网站的前端用一个组件来抓取这些文本并呈现在网页上。
我是玩 React 的,这里有个组件,用以抓取,解析并呈现到 HTML 上。
class Markdown extends React.Component {<br style="box-sizing: border-box;font-size: inherit;color: inherit;line-height: inherit;word-wrap: inherit !important;word-break: inherit !important;" /> constructor(props) {<br style="box-sizing: border-box;font-size: inherit;color: inherit;line-height: inherit;word-wrap: inherit !important;word-break: inherit !important;" /> super(props);class Markdown extends React.Component {<br style="box-sizing: border-box;font-size: inherit;color: inherit;line-height: inherit;word-wrap: inherit !important;word-break: inherit !important;" /> constructor(props) {<br style="box-sizing: border-box;font-size: inherit;color: inherit;line-height: inherit;word-wrap: inherit !important;word-break: inherit !important;" /> super(props);<br style="box-sizing: border-box;font-size: inherit;color: inherit;line-height: inherit;word-wrap: inherit !important;word-break: inherit !important;" /><br style="box-sizing: border-box;font-size: inherit;color: inherit;line-height: inherit;word-wrap: inherit !important;word-break: inherit !important;" /> // replace with your URL, obviously<br style="box-sizing: border-box;font-size: inherit;color: inherit;line-height: inherit;word-wrap: inherit !important;word-break: inherit !important;" /> this.baseUrl = 'https://raw.githubusercontent.com/davidgilbertson/about-github/master/text-snippets';<br style="box-sizing: border-box;font-size: inherit;color: inherit;line-height: inherit;word-wrap: inherit !important;word-break: inherit !important;" /><br style="box-sizing: border-box;font-size: inherit;color: inherit;line-height: inherit;word-wrap: inherit !important;word-break: inherit !important;" /> this.state = {<br style="box-sizing: border-box;font-size: inherit;color: inherit;line-height: inherit;word-wrap: inherit !important;word-break: inherit !important;" /> markdown: '',<br style="box-sizing: border-box;font-size: inherit;color: inherit;line-height: inherit;word-wrap: inherit !important;word-break: inherit !important;" /> };<br style="box-sizing: border-box;font-size: inherit;color: inherit;line-height: inherit;word-wrap: inherit !important;word-break: inherit !important;" /> }<br style="box-sizing: border-box;font-size: inherit;color: inherit;line-height: inherit;word-wrap: inherit !important;word-break: inherit !important;" /><br style="box-sizing: border-box;font-size: inherit;color: inherit;line-height: inherit;word-wrap: inherit !important;word-break: inherit !important;" /> componentDidMount() {<br style="box-sizing: border-box;font-size: inherit;color: inherit;line-height: inherit;word-wrap: inherit !important;word-break: inherit !important;" /> fetch(`${this.baseUrl}/${this.props.url}`)<br style="box-sizing: border-box;font-size: inherit;color: inherit;line-height: inherit;word-wrap: inherit !important;word-break: inherit !important;" /> .then(response => response.text())<br style="box-sizing: border-box;font-size: inherit;color: inherit;line-height: inherit;word-wrap: inherit !important;word-break: inherit !important;" /> .then((markdown) => {<br style="box-sizing: border-box;font-size: inherit;color: inherit;line-height: inherit;word-wrap: inherit !important;word-break: inherit !important;" /> this.setState({markdown});<br style="box-sizing: border-box;font-size: inherit;color: inherit;line-height: inherit;word-wrap: inherit !important;word-break: inherit !important;" /> });<br style="box-sizing: border-box;font-size: inherit;color: inherit;line-height: inherit;word-wrap: inherit !important;word-break: inherit !important;" /> }<br style="box-sizing: border-box;font-size: inherit;color: inherit;line-height: inherit;word-wrap: inherit !important;word-break: inherit !important;" /><br style="box-sizing: border-box;font-size: inherit;color: inherit;line-height: inherit;word-wrap: inherit !important;word-break: inherit !important;" /> render() {<br style="box-sizing: border-box;font-size: inherit;color: inherit;line-height: inherit;word-wrap: inherit !important;word-break: inherit !important;" /> return (<br style="box-sizing: border-box;font-size: inherit;color: inherit;line-height: inherit;word-wrap: inherit !important;word-break: inherit !important;" /> <br style="box-sizing: border-box;font-size: inherit;color: inherit;line-height: inherit;word-wrap: inherit !important;word-break: inherit !important;" /> );<br style="box-sizing: border-box;font-size: inherit;color: inherit;line-height: inherit;word-wrap: inherit !important;word-break: inherit !important;" /> }<br style="box-sizing: border-box;font-size: inherit;color: inherit;line-height: inherit;word-wrap: inherit !important;word-break: inherit !important;" />}
(/text-snippets这个文件夹是储存我的 markdown)
下面这段代码是上面组件的示例:
const Page = () => (<br style="box-sizing: border-box;font-size: inherit;color: inherit;line-height: inherit;word-wrap: inherit !important;word-break: inherit !important;" /> <br style="box-sizing: border-box;font-size: inherit;color: inherit;line-height: inherit;word-wrap: inherit !important;word-break: inherit !important;" /> <br style="box-sizing: border-box;font-size: inherit;color: inherit;line-height: inherit;word-wrap: inherit !important;word-break: inherit !important;" /> <br style="box-sizing: border-box;font-size: inherit;color: inherit;line-height: inherit;word-wrap: inherit !important;word-break: inherit !important;" /> <br style="box-sizing: border-box;font-size: inherit;color: inherit;line-height: inherit;word-wrap: inherit !important;word-break: inherit !important;" /><br style="box-sizing: border-box;font-size: inherit;color: inherit;line-height: inherit;word-wrap: inherit !important;word-break: inherit !important;" /> <br style="box-sizing: border-box;font-size: inherit;color: inherit;line-height: inherit;word-wrap: inherit !important;word-break: inherit !important;" /> A very important disclaimer:<br style="box-sizing: border-box;font-size: inherit;color: inherit;line-height: inherit;word-wrap: inherit !important;word-break: inherit !important;" /><br style="box-sizing: border-box;font-size: inherit;color: inherit;line-height: inherit;word-wrap: inherit !important;word-break: inherit !important;" /> <br style="box-sizing: border-box;font-size: inherit;color: inherit;line-height: inherit;word-wrap: inherit !important;word-break: inherit !important;" /> <br style="box-sizing: border-box;font-size: inherit;color: inherit;line-height: inherit;word-wrap: inherit !important;word-break: inherit !important;" /> <br style="box-sizing: border-box;font-size: inherit;color: inherit;line-height: inherit;word-wrap: inherit !important;word-break: inherit !important;" />);
所以现在 GitHub 也是你的 CMS,无论你想要样大小的文字都可以。
推荐一个 GitHub 工具
Octotree Chrome extension
它可以让你在看任何仓库时,获得一个左边的树状图。 查看全部
nodejs抓取动态网页 分享12个GitHub骚操作!
原文:
#1 在 GitHub 上编辑代码
我要先说一个很多人都知道的事儿。
当你使用 GitHub看一些文件时(任何的文本文件或者仓库),能看到一个顶部右侧有一个小铅笔图标。点击即可编辑文档。完成后,按照提示点击「Propose file change」,GitHub 会为你 fork 这个仓库并创建一个 pull request。
很帅吧,不需要 fork / pull / 改变 locally / push / 创建 PR,只需点击一下,GitHub 就为你创建了一个分支。
这对于修改一些排版错误或者防恶意篡改是很有帮助的。
#2 粘贴图像
对于 issue 和 comment,你还可以直接粘贴图片,当你粘贴时图片会被上传至云端,然后以 MarkDown 格式显示。
非常简洁。
#3 格式化代码
如果你想写一个 code block,你可以在开始处写三个反引号,然后 GitHub 会试图猜出你在写什么语言。
但是如果你发布如 Vue、Typescript、JSX 这样的语言,你可以明确写出来,以获取正确的高亮。
下图第一行使用了```jsx:
片段呈现:
(这可以扩展到 gist,顺便一提,如果你给了 gist 定义成 .jsx 扩展名,那么你会得到 JSX 的高亮)
#4 使用魔术词在 PR 中关闭 issue
比如你在创建一个 pull request 去修复 issue #234。那你可在 PR 输入「fixes #234」,就可以自动合并 PR 并关闭这个 issue,是不是很酷。
(提交信息里可以使用 fix/fixes/fixed , close/closes/closed 或者 resolve/resolves/resolved等关键词)
#5 链接到 comment
你甚至想链接到一个特定的评论,但无法做到?我在这里告诉你,点击名字旁边的日期/时间就万事大吉。
#6 链接到代码
既然能链接到 comment,那你想问能不能链接到代码上?可以的。
试试这个操作:在查看文件时,点击代码边上的行数。
哇喔,你看到了么?URL 随之更新。如果你按住 Shift 并单击另一个行号,URL 会再次更新,并且高亮这两个行数之间的所有代码段。

你现在可以分享这个 URL 了,但等等,这些还是当前分支,如果文件变化了呢?你需要一个永久链接。
我比较懒,但是下面这一个截图已经能够表达如何获取永久链接了(Copy Permalink):
#7 像使用命令行一样使用 GitHub URL
既然说到了 URL,那么就接着聊一下。使用 UI 浏览 GitHub 很方面也很好,不过很多时候最快的方式是使用 URL 来浏览。举个例子,如果我想跳转到正在处理的分支上,并想查看分支和 master 的差异,我可以在我的仓库名后面输入 /compare/branch-name。
这会使我到达分支的不同页面:
可以在名字后面再加上...XXX(分支名)比如我写的 mkdocs...pre-release,如下图:
这一步你可以配合键盘快捷键,Ctrl + L 或者 cmd + L,可以让光标直接移动到 URL 中(最起码 chrome 是这样)。这些加一起能提高生产力。
专业提示:用键盘移动 chrome URL 上的某一条网页记录,使用 Shift+Delete 或 Shift+fn+Delete 来删除某一条记录。(比如合并了分支之后就可以删除了)
#8 在 issue 中创建 list
你想在你的 issue中看到可多选的 list 么?
当你查看问题时,你想不想让它变成 2 of 5 这样的形式?
如果想,你可以在 issue 中使用以下句法:
- [ ] Screen width (integer) <br style="box-sizing: border-box;font-size: inherit;color: inherit;line-height: inherit;word-wrap: inherit !important;word-break: inherit !important;" />- [x] Service worker support <br style="box-sizing: border-box;font-size: inherit;color: inherit;line-height: inherit;word-wrap: inherit !important;word-break: inherit !important;" />- [x] Fetch support <br style="box-sizing: border-box;font-size: inherit;color: inherit;line-height: inherit;word-wrap: inherit !important;word-break: inherit !important;" />- [ ] CSS flexbox support <br style="box-sizing: border-box;font-size: inherit;color: inherit;line-height: inherit;word-wrap: inherit !important;word-break: inherit !important;" />- [ ] Custom elements
#9 GitHub 上的 project board
我总是用 Jira 做大项目,独立项目用 Trello,这两者我都很喜欢。
后来我知道,GitHub 也有类似的 project board:
我个人为了方便把它们都添加为 note。board 极为方便的帮助你做仓库管理。
你可以点击右上角 Add Cards 来添加东西。这里有些特殊语法方便搜索,比如: is:pr is:open,你就可以把任何公开的 PR 拖到 board 上。
更多语法可以参考search syntax。
你也可以把现存的 note 转化为 issue。
你也可以选择 issue 直接添加到 projects 。
这些意味着,从现在开始,你可以明确责任制度,每一行代码的分配都可以在 GitHub 上的 Project board 上完成,而不用去 Jira 或者 Trello 上。
不过它也有些缺点,比如功能比较少。你也可以试试 ZenHub,它有效的扩展 GitHub。
#10 GitHub WiKi
GitHub WiKi 能够帮助我们处理非结构化的页面集合,就像维基百科那样。我自己 NodeJS docs 就被我弄成 wiki 的样子。几个页面,然后自定义侧边栏。具体方法网上很多,我的页面可以供你参考一下。
建议:如果你有个特别长的单页面 README.md 文件,并且想和其他人有所区别,你可以试试这种形式。
#11 GitHub Pages(JekyII)
你可能已经知道了能使用 GitHub Pages 来托管静态网站。那本条就特别介绍一下如何使用 JekyII 来构建站点。
以最简单的方式,GitHub Pages + JekyII 将以最漂亮的主题来呈现你的 README.md,例如,你可以看一下about-github的自述文件。
在 GitHub 的 my site 中,点击 setting,打开 GitHub Pages,选择一个 JekyII 主题
就会得到一个Jekyll主题页面:
它的优点是:
注意,他需要 Ruby 在本地运行,Mac 自带,Windows 用户自行安装。
#12 把 GitHub 当 CMS 用
你的网站需要显示一些文字,但是你还不想直接放在 HTML 里面,那你可以把 GitHub 作为你储存内容的一个地方。这样,就可以让任何一个非程序员通过修改 Markdown 来修改 HTML 网页的内容。
我的方法是:在你的 GitHub 仓库中使用 markdown 文件来保存文本。在你网站的前端用一个组件来抓取这些文本并呈现在网页上。
我是玩 React 的,这里有个组件,用以抓取,解析并呈现到 HTML 上。
class Markdown extends React.Component {<br style="box-sizing: border-box;font-size: inherit;color: inherit;line-height: inherit;word-wrap: inherit !important;word-break: inherit !important;" /> constructor(props) {<br style="box-sizing: border-box;font-size: inherit;color: inherit;line-height: inherit;word-wrap: inherit !important;word-break: inherit !important;" /> super(props);class Markdown extends React.Component {<br style="box-sizing: border-box;font-size: inherit;color: inherit;line-height: inherit;word-wrap: inherit !important;word-break: inherit !important;" /> constructor(props) {<br style="box-sizing: border-box;font-size: inherit;color: inherit;line-height: inherit;word-wrap: inherit !important;word-break: inherit !important;" /> super(props);<br style="box-sizing: border-box;font-size: inherit;color: inherit;line-height: inherit;word-wrap: inherit !important;word-break: inherit !important;" /><br style="box-sizing: border-box;font-size: inherit;color: inherit;line-height: inherit;word-wrap: inherit !important;word-break: inherit !important;" /> // replace with your URL, obviously<br style="box-sizing: border-box;font-size: inherit;color: inherit;line-height: inherit;word-wrap: inherit !important;word-break: inherit !important;" /> this.baseUrl = 'https://raw.githubusercontent.com/davidgilbertson/about-github/master/text-snippets';<br style="box-sizing: border-box;font-size: inherit;color: inherit;line-height: inherit;word-wrap: inherit !important;word-break: inherit !important;" /><br style="box-sizing: border-box;font-size: inherit;color: inherit;line-height: inherit;word-wrap: inherit !important;word-break: inherit !important;" /> this.state = {<br style="box-sizing: border-box;font-size: inherit;color: inherit;line-height: inherit;word-wrap: inherit !important;word-break: inherit !important;" /> markdown: '',<br style="box-sizing: border-box;font-size: inherit;color: inherit;line-height: inherit;word-wrap: inherit !important;word-break: inherit !important;" /> };<br style="box-sizing: border-box;font-size: inherit;color: inherit;line-height: inherit;word-wrap: inherit !important;word-break: inherit !important;" /> }<br style="box-sizing: border-box;font-size: inherit;color: inherit;line-height: inherit;word-wrap: inherit !important;word-break: inherit !important;" /><br style="box-sizing: border-box;font-size: inherit;color: inherit;line-height: inherit;word-wrap: inherit !important;word-break: inherit !important;" /> componentDidMount() {<br style="box-sizing: border-box;font-size: inherit;color: inherit;line-height: inherit;word-wrap: inherit !important;word-break: inherit !important;" /> fetch(`${this.baseUrl}/${this.props.url}`)<br style="box-sizing: border-box;font-size: inherit;color: inherit;line-height: inherit;word-wrap: inherit !important;word-break: inherit !important;" /> .then(response => response.text())<br style="box-sizing: border-box;font-size: inherit;color: inherit;line-height: inherit;word-wrap: inherit !important;word-break: inherit !important;" /> .then((markdown) => {<br style="box-sizing: border-box;font-size: inherit;color: inherit;line-height: inherit;word-wrap: inherit !important;word-break: inherit !important;" /> this.setState({markdown});<br style="box-sizing: border-box;font-size: inherit;color: inherit;line-height: inherit;word-wrap: inherit !important;word-break: inherit !important;" /> });<br style="box-sizing: border-box;font-size: inherit;color: inherit;line-height: inherit;word-wrap: inherit !important;word-break: inherit !important;" /> }<br style="box-sizing: border-box;font-size: inherit;color: inherit;line-height: inherit;word-wrap: inherit !important;word-break: inherit !important;" /><br style="box-sizing: border-box;font-size: inherit;color: inherit;line-height: inherit;word-wrap: inherit !important;word-break: inherit !important;" /> render() {<br style="box-sizing: border-box;font-size: inherit;color: inherit;line-height: inherit;word-wrap: inherit !important;word-break: inherit !important;" /> return (<br style="box-sizing: border-box;font-size: inherit;color: inherit;line-height: inherit;word-wrap: inherit !important;word-break: inherit !important;" /> <br style="box-sizing: border-box;font-size: inherit;color: inherit;line-height: inherit;word-wrap: inherit !important;word-break: inherit !important;" /> );<br style="box-sizing: border-box;font-size: inherit;color: inherit;line-height: inherit;word-wrap: inherit !important;word-break: inherit !important;" /> }<br style="box-sizing: border-box;font-size: inherit;color: inherit;line-height: inherit;word-wrap: inherit !important;word-break: inherit !important;" />}
(/text-snippets这个文件夹是储存我的 markdown)
下面这段代码是上面组件的示例:
const Page = () => (<br style="box-sizing: border-box;font-size: inherit;color: inherit;line-height: inherit;word-wrap: inherit !important;word-break: inherit !important;" /> <br style="box-sizing: border-box;font-size: inherit;color: inherit;line-height: inherit;word-wrap: inherit !important;word-break: inherit !important;" /> <br style="box-sizing: border-box;font-size: inherit;color: inherit;line-height: inherit;word-wrap: inherit !important;word-break: inherit !important;" /> <br style="box-sizing: border-box;font-size: inherit;color: inherit;line-height: inherit;word-wrap: inherit !important;word-break: inherit !important;" /> <br style="box-sizing: border-box;font-size: inherit;color: inherit;line-height: inherit;word-wrap: inherit !important;word-break: inherit !important;" /><br style="box-sizing: border-box;font-size: inherit;color: inherit;line-height: inherit;word-wrap: inherit !important;word-break: inherit !important;" /> <br style="box-sizing: border-box;font-size: inherit;color: inherit;line-height: inherit;word-wrap: inherit !important;word-break: inherit !important;" /> A very important disclaimer:<br style="box-sizing: border-box;font-size: inherit;color: inherit;line-height: inherit;word-wrap: inherit !important;word-break: inherit !important;" /><br style="box-sizing: border-box;font-size: inherit;color: inherit;line-height: inherit;word-wrap: inherit !important;word-break: inherit !important;" /> <br style="box-sizing: border-box;font-size: inherit;color: inherit;line-height: inherit;word-wrap: inherit !important;word-break: inherit !important;" /> <br style="box-sizing: border-box;font-size: inherit;color: inherit;line-height: inherit;word-wrap: inherit !important;word-break: inherit !important;" /> <br style="box-sizing: border-box;font-size: inherit;color: inherit;line-height: inherit;word-wrap: inherit !important;word-break: inherit !important;" />);
所以现在 GitHub 也是你的 CMS,无论你想要样大小的文字都可以。
推荐一个 GitHub 工具
Octotree Chrome extension
它可以让你在看任何仓库时,获得一个左边的树状图。
nodejs抓取动态网页 全面深入理解预渲染技术体系
网站优化 • 优采云 发表了文章 • 0 个评论 • 85 次浏览 • 2022-06-24 05:08
在我们使用现代前端框架,比如Vue、React、Angular开发完毕前端项目之后,会发现这些页面输出的全是js,很不利于搜索引擎去爬取。在已经完成了单页应用(SPA)项目之后,如果要进行SEO优化的改造,这时候就可以使用预渲染技术体系。
下面将从适用场景、概念介绍、如何使用、底层原理几方面全面介绍预渲染技术的各项特性。适用场景在谈使用场景之前,首先需要明白以下几点:现代前端框架比如 Vue 在构建完成之后,页面加载的其实是一堆 js,再由 js 动态生成DOM。当我们访问页面,右键“显示网页源代码”的时候,看不到文字等内容百度、搜狗等爬虫在抓取页面的时候,不会执行页面的 js 源代码(谷歌爬虫可以执行“同步” js 来构建页面,因此 Vue 等框架开发的单页应用可以在谷歌搜索引擎中很好的被收录,这点我们不展开讨论)如果想要让百度、搜狗等收录索引我们的网站,就必须像静态 HTML 那样,让网页在右键查看源代码的时候,显示的是文字、图片等内容在这样的场景下,我们可以使用预渲染来解决此类问题。概念介绍
预渲染概念简单来讲是这样的:在项目构建阶段,我们会模拟访问项目的页面URL,这时候页面上的 js 将会执行并且形成真正的 HTML 片段;此时我们保存这个 HTML 文件到服务器硬盘上,下次不管是用户还是爬虫访问的时候,就直接返回这个物理文件,这样就可以有效解决 SEO 无法收录的问题。大体流程如下图:
可以看出,“预渲染”同“服务端渲染”最大的区别是,前者是在构建期间执行,后者在用户访问期间实时运行;前者在构建完成之后就不再需要 node服务,后者需要使用 node 作为运行时。预渲染也有它不适用的地方。正因为在构建阶段我们需要指明“需要构建的页面URL”,因此对于那些携带动态参数的页面(比如资料详情页),不适用于用预渲染去构建。这种场景下只能使用SSR。反之,一切静态官网、带数据的门户网站,只要是URL固定的,不管其中有没有动态数据,都可以使用预渲染。这里你可能会问一个问题:预渲染技术能否将 ajax 请求的内容也填充到页面上?答案是肯定的。虽然你 ajax 并非“同步执行”的 js,我们无法获知异步请求完成的时机。但通过控制监测页面上某个特定元素是否存在等手段,我们可以变相获知到数据返回的时机,从而进行预渲染。就可以达到“填充 ajax 数据”的效果(这可是谷歌爬虫也无法达到的效果哦)。如何使用预渲染技术有很多种实现方式。最常用的是使用 webpack 的一个插件: prerender-spa-plugin()。但是这个插件有很多局限性,最大的局限性在于必须结合 webpack 来使用,不够灵活,不易调试。也无法通过编程的方式使用。
比如我们的首页有动态的数据(非动态URL。是通过ajax获取的动态数据。)因此我们在使用了预渲染生成了静态首页之后,需要每间隔10分钟或者5分钟重新生成一个新的静态页,来更新数据。这就需要能够通过编程的方式调用渲染指令。在这样的情况下我基于这个插件的原理重新实现了一个包:@waitkafuka/spa-prerender(),可以通过 nodejs 通过编程的方式使用。
同时它剥离了 webpack 的依赖,剥离了对SPA页面的限制。只要有一个静态目录就可以工作。使用的方式非常简单,以 Vue 为例,在我们正常构建生成了 dist 目录之后,只需要编写以下脚本:
const SpaRenderer = require('@waitkafuka/spa-prerender');const path = require('path');<br />const options = {staticDir: path.join(__dirname, 'dist'),basePath: 'base',//可选,当项目有basePath的时候设置。同router中的base和publicPath。确保staticDir/basePath/index.html存在 routes: ['/','/exam', ],puppeteerOptions: {headless: true,maxConcurrentRoutes: 0,renderAfterDocumentEvent: 'render-event',skipThirdPartyRequests: true }};const spaRenderer = new SpaRenderer(options)spaRenderer.render().then(() => {console.log('预渲染完毕。');});
具体的参数解析可以查看 @waitkafuka/spa-prerender。底层原理在底层实现上,主要利用了 express 来驱动静态页面;然后利用 puppeteer 无头浏览器来模拟用户访问所需要预渲染的地址;在访问完成之后,保存页面HTML到文件夹中。
流程如下:
更为详细的流程介绍如下(此部分枯燥乏味,非专业人士可以跳过。):
阶段1:创建渲染器实例
spa-prerender index.js:
1.创建puppeteer实例 @prerenderer/renderer-puppeteer/es6/renderer.js
2.创建server实例@prerenderer/prerenderer/es6/server.js
3.创建renderer实例,将1 2步的puppeteer和server注入this @@prerenderer/prerenderer/es6/index.js
阶段2:渲染器实例初始化:spa-prerender index.js:
1.server初始化 (设置路由:静态资源利用*.*映射到staticDir上,其他请求全部映射到index.html上。设置静态资源和index.html路径,modifyServer也在这个阶段。server 启动)@prerenderer/prerenderer/es6/server.js
2.puppeteer初始化(判断平台是否linux,如果是Linux需要设置一些启动参数;启动puppeteer)@prerenderer/renderer-puppeteer/es6/renderer.js
阶段3:开始访问路由并获取html
1.spa-prerender index.js->@prerenderer/prerenderer/es6/index.js -> @prerenderer/renderer-puppeteer/es6/renderer.js
2.开启一个限流器,每次最多渲染 n 条路由,避免内存崩溃
3.puppeteer开启一个新标签,判断是否有inject,如果有,注入到window上
4.拼接端口、设置viewport,拼接router,形成url,发起页面的请求
5.判断options中是否设置了renderAfterDocumentEvent,如果有,给页面添加一个事件监听器,当触发事件的时候,将__PRERENDER_STATUS属性设置为true
6.访问页面,等待加载完成(如何确定页面加载完成, waituntil: 'networkidle0'//在500ms内没有网络请求,这个设置可以通过puppeteerOptions.navigationOptions.waituntil修改)
等待捕捉,分为三种等待时机:
1.等待固定时间,renderAfterTime(利用settimeout结合promise实现)
2.等待抛出某个事件:renderAfterDocumentEvent,该事件需要事先在页面写好抛出的时机
3.等待某个元素出现:renderAfterElementExists
阶段4:保存html
spa-prerender index.js 遍历结果,拼接文件夹路径并保存html。
实践过程中的常见问题
1. 如果一个项目有10个页面,其中首页需要SEO,于是使用了预渲染,另外9个页面仍然是由js渲染。那么在访问其他9个页面的时候,刷新页面,会先显示首页的内容一闪而过。这种问题如何解决?
产生这种情况的原因在于:在单页应用中,实际上只有一个物理页面,那就是 index.html。我们访问的所有页面实际都是 index.html,先进入 index.html 然后再执行 js 构建 dom。那么此时如果我们首页是已经预渲染好的,那么就会有内容,在 js 构建出对应路由的内容之前,就会先出现首页的内容。
spa-prerender 考虑到了这种问题。在预渲染的过程中,会首先保留原来“纯净”的index.html,并重命名为“index-spa.html”。
而后,在 nginx 配置中,利用 try_files 指令的优先级配置特点,让用户在刷新的情况下,如果有对应物理文件则访问物理文件(预渲染生成的文件),如果没有对应物理文件则降级访问 index-spa.html,就可以解决上述问题。nginx 配置指令如下:
location /{ alias /Users/zks/code/xkw/xop/dist/; try_files $uri $uri/ /index-spa.html; }
此时预渲染生成的文件将被优先返回($uri),如果未匹配,才会交由 index-spa.html 处理。
2. 如果项目打包有前缀怎么办?
如果项目有publicPath,那么在 dist 目录下会多一层根目录。此时需要在预渲染配置中添加 basePath 的选项。此时 express 会从 dist/basePath 目录中去寻找 index.html。
配置如下:
const options = { staticDir: path.join(__dirname, 'dist'), basePath: 'base',//当项目有basePath的时候设置。同router中的base和publicPath。确保staticDir/basePath/index.html存在 routes: ['/','/exam', ], ... }
3. 如何控制渲染器开始进行HTML保存的时机?
我们可以通过 options 中三个参数来控制:
3.1.renderAfterTime:等待固定时间之后(从页面开始发起访问算起)
3.2.renderAfterDocumentEvent:等待抛出某个事件,该事件需要事先在页面定义好触发的时机,比如在 Vue 的 mounted 函数中定义:
new Vue({ router,render: h => h(App), mounted () { //在mounted之后触发custom-render-event // 预渲染器在收到这个事件之后将开始进行页面的保存工作 document.dispatchEvent(new Event('custom-render-event')) }}).$mount('#app')
3.3.renderAfterElementExists:等待某个元素出现。我们可以在异步 ajax 返回之后,增加某个元素。当渲染器检测到此元素出现之后进行页面保存,此时保存的页面就包含了 ajax 返回的数据。
4. 首页预渲染生成的 DOM 元素,会不会被 js 复用?还是删除重新构建?
仿照SSR的思路,我们可以通过在根节点上设置 data-server-rander="true",这样在客户端 js 会知道这个是已经渲染完成的 DOM,不会粗暴去替换它。而是执行一个“注水”的过程(也就是hydration)。可以充分复用预渲染生成的 DOM 元素。
点击下方卡片可以关注 查看全部
nodejs抓取动态网页 全面深入理解预渲染技术体系
在我们使用现代前端框架,比如Vue、React、Angular开发完毕前端项目之后,会发现这些页面输出的全是js,很不利于搜索引擎去爬取。在已经完成了单页应用(SPA)项目之后,如果要进行SEO优化的改造,这时候就可以使用预渲染技术体系。
下面将从适用场景、概念介绍、如何使用、底层原理几方面全面介绍预渲染技术的各项特性。适用场景在谈使用场景之前,首先需要明白以下几点:现代前端框架比如 Vue 在构建完成之后,页面加载的其实是一堆 js,再由 js 动态生成DOM。当我们访问页面,右键“显示网页源代码”的时候,看不到文字等内容百度、搜狗等爬虫在抓取页面的时候,不会执行页面的 js 源代码(谷歌爬虫可以执行“同步” js 来构建页面,因此 Vue 等框架开发的单页应用可以在谷歌搜索引擎中很好的被收录,这点我们不展开讨论)如果想要让百度、搜狗等收录索引我们的网站,就必须像静态 HTML 那样,让网页在右键查看源代码的时候,显示的是文字、图片等内容在这样的场景下,我们可以使用预渲染来解决此类问题。概念介绍
预渲染概念简单来讲是这样的:在项目构建阶段,我们会模拟访问项目的页面URL,这时候页面上的 js 将会执行并且形成真正的 HTML 片段;此时我们保存这个 HTML 文件到服务器硬盘上,下次不管是用户还是爬虫访问的时候,就直接返回这个物理文件,这样就可以有效解决 SEO 无法收录的问题。大体流程如下图:
可以看出,“预渲染”同“服务端渲染”最大的区别是,前者是在构建期间执行,后者在用户访问期间实时运行;前者在构建完成之后就不再需要 node服务,后者需要使用 node 作为运行时。预渲染也有它不适用的地方。正因为在构建阶段我们需要指明“需要构建的页面URL”,因此对于那些携带动态参数的页面(比如资料详情页),不适用于用预渲染去构建。这种场景下只能使用SSR。反之,一切静态官网、带数据的门户网站,只要是URL固定的,不管其中有没有动态数据,都可以使用预渲染。这里你可能会问一个问题:预渲染技术能否将 ajax 请求的内容也填充到页面上?答案是肯定的。虽然你 ajax 并非“同步执行”的 js,我们无法获知异步请求完成的时机。但通过控制监测页面上某个特定元素是否存在等手段,我们可以变相获知到数据返回的时机,从而进行预渲染。就可以达到“填充 ajax 数据”的效果(这可是谷歌爬虫也无法达到的效果哦)。如何使用预渲染技术有很多种实现方式。最常用的是使用 webpack 的一个插件: prerender-spa-plugin()。但是这个插件有很多局限性,最大的局限性在于必须结合 webpack 来使用,不够灵活,不易调试。也无法通过编程的方式使用。
比如我们的首页有动态的数据(非动态URL。是通过ajax获取的动态数据。)因此我们在使用了预渲染生成了静态首页之后,需要每间隔10分钟或者5分钟重新生成一个新的静态页,来更新数据。这就需要能够通过编程的方式调用渲染指令。在这样的情况下我基于这个插件的原理重新实现了一个包:@waitkafuka/spa-prerender(),可以通过 nodejs 通过编程的方式使用。
同时它剥离了 webpack 的依赖,剥离了对SPA页面的限制。只要有一个静态目录就可以工作。使用的方式非常简单,以 Vue 为例,在我们正常构建生成了 dist 目录之后,只需要编写以下脚本:
const SpaRenderer = require('@waitkafuka/spa-prerender');const path = require('path');<br />const options = {staticDir: path.join(__dirname, 'dist'),basePath: 'base',//可选,当项目有basePath的时候设置。同router中的base和publicPath。确保staticDir/basePath/index.html存在 routes: ['/','/exam', ],puppeteerOptions: {headless: true,maxConcurrentRoutes: 0,renderAfterDocumentEvent: 'render-event',skipThirdPartyRequests: true }};const spaRenderer = new SpaRenderer(options)spaRenderer.render().then(() => {console.log('预渲染完毕。');});
具体的参数解析可以查看 @waitkafuka/spa-prerender。底层原理在底层实现上,主要利用了 express 来驱动静态页面;然后利用 puppeteer 无头浏览器来模拟用户访问所需要预渲染的地址;在访问完成之后,保存页面HTML到文件夹中。
流程如下:
更为详细的流程介绍如下(此部分枯燥乏味,非专业人士可以跳过。):
阶段1:创建渲染器实例
spa-prerender index.js:
1.创建puppeteer实例 @prerenderer/renderer-puppeteer/es6/renderer.js
2.创建server实例@prerenderer/prerenderer/es6/server.js
3.创建renderer实例,将1 2步的puppeteer和server注入this @@prerenderer/prerenderer/es6/index.js
阶段2:渲染器实例初始化:spa-prerender index.js:
1.server初始化 (设置路由:静态资源利用*.*映射到staticDir上,其他请求全部映射到index.html上。设置静态资源和index.html路径,modifyServer也在这个阶段。server 启动)@prerenderer/prerenderer/es6/server.js
2.puppeteer初始化(判断平台是否linux,如果是Linux需要设置一些启动参数;启动puppeteer)@prerenderer/renderer-puppeteer/es6/renderer.js
阶段3:开始访问路由并获取html
1.spa-prerender index.js->@prerenderer/prerenderer/es6/index.js -> @prerenderer/renderer-puppeteer/es6/renderer.js
2.开启一个限流器,每次最多渲染 n 条路由,避免内存崩溃
3.puppeteer开启一个新标签,判断是否有inject,如果有,注入到window上
4.拼接端口、设置viewport,拼接router,形成url,发起页面的请求
5.判断options中是否设置了renderAfterDocumentEvent,如果有,给页面添加一个事件监听器,当触发事件的时候,将__PRERENDER_STATUS属性设置为true
6.访问页面,等待加载完成(如何确定页面加载完成, waituntil: 'networkidle0'//在500ms内没有网络请求,这个设置可以通过puppeteerOptions.navigationOptions.waituntil修改)
等待捕捉,分为三种等待时机:
1.等待固定时间,renderAfterTime(利用settimeout结合promise实现)
2.等待抛出某个事件:renderAfterDocumentEvent,该事件需要事先在页面写好抛出的时机
3.等待某个元素出现:renderAfterElementExists
阶段4:保存html
spa-prerender index.js 遍历结果,拼接文件夹路径并保存html。
实践过程中的常见问题
1. 如果一个项目有10个页面,其中首页需要SEO,于是使用了预渲染,另外9个页面仍然是由js渲染。那么在访问其他9个页面的时候,刷新页面,会先显示首页的内容一闪而过。这种问题如何解决?
产生这种情况的原因在于:在单页应用中,实际上只有一个物理页面,那就是 index.html。我们访问的所有页面实际都是 index.html,先进入 index.html 然后再执行 js 构建 dom。那么此时如果我们首页是已经预渲染好的,那么就会有内容,在 js 构建出对应路由的内容之前,就会先出现首页的内容。
spa-prerender 考虑到了这种问题。在预渲染的过程中,会首先保留原来“纯净”的index.html,并重命名为“index-spa.html”。
而后,在 nginx 配置中,利用 try_files 指令的优先级配置特点,让用户在刷新的情况下,如果有对应物理文件则访问物理文件(预渲染生成的文件),如果没有对应物理文件则降级访问 index-spa.html,就可以解决上述问题。nginx 配置指令如下:
location /{ alias /Users/zks/code/xkw/xop/dist/; try_files $uri $uri/ /index-spa.html; }
此时预渲染生成的文件将被优先返回($uri),如果未匹配,才会交由 index-spa.html 处理。
2. 如果项目打包有前缀怎么办?
如果项目有publicPath,那么在 dist 目录下会多一层根目录。此时需要在预渲染配置中添加 basePath 的选项。此时 express 会从 dist/basePath 目录中去寻找 index.html。
配置如下:
const options = { staticDir: path.join(__dirname, 'dist'), basePath: 'base',//当项目有basePath的时候设置。同router中的base和publicPath。确保staticDir/basePath/index.html存在 routes: ['/','/exam', ], ... }
3. 如何控制渲染器开始进行HTML保存的时机?
我们可以通过 options 中三个参数来控制:
3.1.renderAfterTime:等待固定时间之后(从页面开始发起访问算起)
3.2.renderAfterDocumentEvent:等待抛出某个事件,该事件需要事先在页面定义好触发的时机,比如在 Vue 的 mounted 函数中定义:
new Vue({ router,render: h => h(App), mounted () { //在mounted之后触发custom-render-event // 预渲染器在收到这个事件之后将开始进行页面的保存工作 document.dispatchEvent(new Event('custom-render-event')) }}).$mount('#app')
3.3.renderAfterElementExists:等待某个元素出现。我们可以在异步 ajax 返回之后,增加某个元素。当渲染器检测到此元素出现之后进行页面保存,此时保存的页面就包含了 ajax 返回的数据。
4. 首页预渲染生成的 DOM 元素,会不会被 js 复用?还是删除重新构建?
仿照SSR的思路,我们可以通过在根节点上设置 data-server-rander="true",这样在客户端 js 会知道这个是已经渲染完成的 DOM,不会粗暴去替换它。而是执行一个“注水”的过程(也就是hydration)。可以充分复用预渲染生成的 DOM 元素。
点击下方卡片可以关注
nodejs抓取动态网页 分享12个GitHub骚操作!
网站优化 • 优采云 发表了文章 • 0 个评论 • 212 次浏览 • 2022-06-24 00:29
原文:
#1 在 GitHub 上编辑代码
我要先说一个很多人都知道的事儿。
当你使用 GitHub看一些文件时(任何的文本文件或者仓库),能看到一个顶部右侧有一个小铅笔图标。点击即可编辑文档。完成后,按照提示点击「Propose file change」,GitHub 会为你 fork 这个仓库并创建一个 pull request。
很帅吧,不需要 fork / pull / 改变 locally / push / 创建 PR,只需点击一下,GitHub 就为你创建了一个分支。
这对于修改一些排版错误或者防恶意篡改是很有帮助的。
#2 粘贴图像
对于 issue 和 comment,你还可以直接粘贴图片,当你粘贴时图片会被上传至云端,然后以 MarkDown 格式显示。
非常简洁。
#3 格式化代码
如果你想写一个 code block,你可以在开始处写三个反引号,然后 GitHub 会试图猜出你在写什么语言。
但是如果你发布如 Vue、Typescript、JSX 这样的语言,你可以明确写出来,以获取正确的高亮。
下图第一行使用了```jsx:
片段呈现:
(这可以扩展到 gist,顺便一提,如果你给了 gist 定义成 .jsx 扩展名,那么你会得到 JSX 的高亮)
#4 使用魔术词在 PR 中关闭 issue
比如你在创建一个 pull request 去修复 issue #234。那你可在 PR 输入「fixes #234」,就可以自动合并 PR 并关闭这个 issue,是不是很酷。
(提交信息里可以使用 fix/fixes/fixed , close/closes/closed 或者 resolve/resolves/resolved等关键词)
#5 链接到 comment
你甚至想链接到一个特定的评论,但无法做到?我在这里告诉你,点击名字旁边的日期/时间就万事大吉。
#6 链接到代码
既然能链接到 comment,那你想问能不能链接到代码上?可以的。
试试这个操作:在查看文件时,点击代码边上的行数。
哇喔,你看到了么?URL 随之更新。如果你按住 Shift 并单击另一个行号,URL 会再次更新,并且高亮这两个行数之间的所有代码段。
你现在可以分享这个 URL 了,但等等,这些还是当前分支,如果文件变化了呢?你需要一个永久链接。
我比较懒,但是下面这一个截图已经能够表达如何获取永久链接了(Copy Permalink):
#7 像使用命令行一样使用 GitHub URL
既然说到了 URL,那么就接着聊一下。使用 UI 浏览 GitHub 很方面也很好,不过很多时候最快的方式是使用 URL 来浏览。举个例子,如果我想跳转到正在处理的分支上,并想查看分支和 master 的差异,我可以在我的仓库名后面输入 /compare/branch-name。
这会使我到达分支的不同页面:
可以在名字后面再加上...XXX(分支名)比如我写的 mkdocs...pre-release,如下图:
这一步你可以配合键盘快捷键,Ctrl + L 或者 cmd + L,可以让光标直接移动到 URL 中(最起码 chrome 是这样)。这些加一起能提高生产力。
专业提示:用键盘移动 chrome URL 上的某一条网页记录,使用 Shift+Delete 或 Shift+fn+Delete 来删除某一条记录。(比如合并了分支之后就可以删除了)
#8 在 issue 中创建 list
你想在你的 issue中看到可多选的 list 么?
当你查看问题时,你想不想让它变成 2 of 5 这样的形式?
如果想,你可以在 issue 中使用以下句法:
- [ ] Screen width (integer) <br style="box-sizing: border-box;font-size: inherit;color: inherit;line-height: inherit;word-wrap: inherit !important;word-break: inherit !important;" />- [x] Service worker support <br style="box-sizing: border-box;font-size: inherit;color: inherit;line-height: inherit;word-wrap: inherit !important;word-break: inherit !important;" />- [x] Fetch support <br style="box-sizing: border-box;font-size: inherit;color: inherit;line-height: inherit;word-wrap: inherit !important;word-break: inherit !important;" />- [ ] CSS flexbox support <br style="box-sizing: border-box;font-size: inherit;color: inherit;line-height: inherit;word-wrap: inherit !important;word-break: inherit !important;" />- [ ] Custom elements
#9 GitHub 上的 project board
我总是用 Jira 做大项目,独立项目用 Trello,这两者我都很喜欢。
后来我知道,GitHub 也有类似的 project board:
我个人为了方便把它们都添加为 note。board 极为方便的帮助你做仓库管理。
你可以点击右上角 Add Cards 来添加东西。这里有些特殊语法方便搜索,比如: is:pr is:open,你就可以把任何公开的 PR 拖到 board 上。
更多语法可以参考search syntax。
你也可以把现存的 note 转化为 issue。
你也可以选择 issue 直接添加到 projects 。
这些意味着,从现在开始,你可以明确责任制度,每一行代码的分配都可以在 GitHub 上的 Project board 上完成,而不用去 Jira 或者 Trello 上。
不过它也有些缺点,比如功能比较少。你也可以试试 ZenHub,它有效的扩展 GitHub。
#10 GitHub WiKi
GitHub WiKi 能够帮助我们处理非结构化的页面集合,就像维基百科那样。我自己 NodeJS docs 就被我弄成 wiki 的样子。几个页面,然后自定义侧边栏。具体方法网上很多,我的页面可以供你参考一下。
建议:如果你有个特别长的单页面 README.md 文件,并且想和其他人有所区别,你可以试试这种形式。
#11 GitHub Pages(JekyII)
你可能已经知道了能使用 GitHub Pages 来托管静态网站。那本条就特别介绍一下如何使用 JekyII 来构建站点。
以最简单的方式,GitHub Pages + JekyII 将以最漂亮的主题来呈现你的 README.md,例如,你可以看一下about-github的自述文件。
在 GitHub 的 my site 中,点击 setting,打开 GitHub Pages,选择一个 JekyII 主题
就会得到一个Jekyll主题页面:
它的优点是:
注意,他需要 Ruby 在本地运行,Mac 自带,Windows 用户自行安装。
#12 把 GitHub 当 CMS 用
你的网站需要显示一些文字,但是你还不想直接放在 HTML 里面,那你可以把 GitHub 作为你储存内容的一个地方。这样,就可以让任何一个非程序员通过修改 Markdown 来修改 HTML 网页的内容。
我的方法是:在你的 GitHub 仓库中使用 markdown 文件来保存文本。在你网站的前端用一个组件来抓取这些文本并呈现在网页上。
我是玩 React 的,这里有个组件,用以抓取,解析并呈现到 HTML 上。
class Markdown extends React.Component {<br style="box-sizing: border-box;font-size: inherit;color: inherit;line-height: inherit;word-wrap: inherit !important;word-break: inherit !important;" /> constructor(props) {<br style="box-sizing: border-box;font-size: inherit;color: inherit;line-height: inherit;word-wrap: inherit !important;word-break: inherit !important;" /> super(props);class Markdown extends React.Component {<br style="box-sizing: border-box;font-size: inherit;color: inherit;line-height: inherit;word-wrap: inherit !important;word-break: inherit !important;" /> constructor(props) {<br style="box-sizing: border-box;font-size: inherit;color: inherit;line-height: inherit;word-wrap: inherit !important;word-break: inherit !important;" /> super(props);<br style="box-sizing: border-box;font-size: inherit;color: inherit;line-height: inherit;word-wrap: inherit !important;word-break: inherit !important;" /><br style="box-sizing: border-box;font-size: inherit;color: inherit;line-height: inherit;word-wrap: inherit !important;word-break: inherit !important;" /> // replace with your URL, obviously<br style="box-sizing: border-box;font-size: inherit;color: inherit;line-height: inherit;word-wrap: inherit !important;word-break: inherit !important;" /> this.baseUrl = 'https://raw.githubusercontent.com/davidgilbertson/about-github/master/text-snippets';<br style="box-sizing: border-box;font-size: inherit;color: inherit;line-height: inherit;word-wrap: inherit !important;word-break: inherit !important;" /><br style="box-sizing: border-box;font-size: inherit;color: inherit;line-height: inherit;word-wrap: inherit !important;word-break: inherit !important;" /> this.state = {<br style="box-sizing: border-box;font-size: inherit;color: inherit;line-height: inherit;word-wrap: inherit !important;word-break: inherit !important;" /> markdown: '',<br style="box-sizing: border-box;font-size: inherit;color: inherit;line-height: inherit;word-wrap: inherit !important;word-break: inherit !important;" /> };<br style="box-sizing: border-box;font-size: inherit;color: inherit;line-height: inherit;word-wrap: inherit !important;word-break: inherit !important;" /> }<br style="box-sizing: border-box;font-size: inherit;color: inherit;line-height: inherit;word-wrap: inherit !important;word-break: inherit !important;" /><br style="box-sizing: border-box;font-size: inherit;color: inherit;line-height: inherit;word-wrap: inherit !important;word-break: inherit !important;" /> componentDidMount() {<br style="box-sizing: border-box;font-size: inherit;color: inherit;line-height: inherit;word-wrap: inherit !important;word-break: inherit !important;" /> fetch(`${this.baseUrl}/${this.props.url}`)<br style="box-sizing: border-box;font-size: inherit;color: inherit;line-height: inherit;word-wrap: inherit !important;word-break: inherit !important;" /> .then(response => response.text())<br style="box-sizing: border-box;font-size: inherit;color: inherit;line-height: inherit;word-wrap: inherit !important;word-break: inherit !important;" /> .then((markdown) => {<br style="box-sizing: border-box;font-size: inherit;color: inherit;line-height: inherit;word-wrap: inherit !important;word-break: inherit !important;" /> this.setState({markdown});<br style="box-sizing: border-box;font-size: inherit;color: inherit;line-height: inherit;word-wrap: inherit !important;word-break: inherit !important;" /> });<br style="box-sizing: border-box;font-size: inherit;color: inherit;line-height: inherit;word-wrap: inherit !important;word-break: inherit !important;" /> }<br style="box-sizing: border-box;font-size: inherit;color: inherit;line-height: inherit;word-wrap: inherit !important;word-break: inherit !important;" /><br style="box-sizing: border-box;font-size: inherit;color: inherit;line-height: inherit;word-wrap: inherit !important;word-break: inherit !important;" /> render() {<br style="box-sizing: border-box;font-size: inherit;color: inherit;line-height: inherit;word-wrap: inherit !important;word-break: inherit !important;" /> return (<br style="box-sizing: border-box;font-size: inherit;color: inherit;line-height: inherit;word-wrap: inherit !important;word-break: inherit !important;" /> <br style="box-sizing: border-box;font-size: inherit;color: inherit;line-height: inherit;word-wrap: inherit !important;word-break: inherit !important;" /> );<br style="box-sizing: border-box;font-size: inherit;color: inherit;line-height: inherit;word-wrap: inherit !important;word-break: inherit !important;" /> }<br style="box-sizing: border-box;font-size: inherit;color: inherit;line-height: inherit;word-wrap: inherit !important;word-break: inherit !important;" />}
(/text-snippets这个文件夹是储存我的 markdown)
下面这段代码是上面组件的示例:
const Page = () => (<br style="box-sizing: border-box;font-size: inherit;color: inherit;line-height: inherit;word-wrap: inherit !important;word-break: inherit !important;" /> <br style="box-sizing: border-box;font-size: inherit;color: inherit;line-height: inherit;word-wrap: inherit !important;word-break: inherit !important;" /> <br style="box-sizing: border-box;font-size: inherit;color: inherit;line-height: inherit;word-wrap: inherit !important;word-break: inherit !important;" /> <br style="box-sizing: border-box;font-size: inherit;color: inherit;line-height: inherit;word-wrap: inherit !important;word-break: inherit !important;" /> <br style="box-sizing: border-box;font-size: inherit;color: inherit;line-height: inherit;word-wrap: inherit !important;word-break: inherit !important;" /><br style="box-sizing: border-box;font-size: inherit;color: inherit;line-height: inherit;word-wrap: inherit !important;word-break: inherit !important;" /> <br style="box-sizing: border-box;font-size: inherit;color: inherit;line-height: inherit;word-wrap: inherit !important;word-break: inherit !important;" /> A very important disclaimer:<br style="box-sizing: border-box;font-size: inherit;color: inherit;line-height: inherit;word-wrap: inherit !important;word-break: inherit !important;" /><br style="box-sizing: border-box;font-size: inherit;color: inherit;line-height: inherit;word-wrap: inherit !important;word-break: inherit !important;" /> <br style="box-sizing: border-box;font-size: inherit;color: inherit;line-height: inherit;word-wrap: inherit !important;word-break: inherit !important;" /> <br style="box-sizing: border-box;font-size: inherit;color: inherit;line-height: inherit;word-wrap: inherit !important;word-break: inherit !important;" /> <br style="box-sizing: border-box;font-size: inherit;color: inherit;line-height: inherit;word-wrap: inherit !important;word-break: inherit !important;" />);
所以现在 GitHub 也是你的 CMS,无论你想要样大小的文字都可以。
推荐一个 GitHub 工具
Octotree Chrome extension
它可以让你在看任何仓库时,获得一个左边的树状图。
查看全部
nodejs抓取动态网页 分享12个GitHub骚操作!
原文:
#1 在 GitHub 上编辑代码
我要先说一个很多人都知道的事儿。
当你使用 GitHub看一些文件时(任何的文本文件或者仓库),能看到一个顶部右侧有一个小铅笔图标。点击即可编辑文档。完成后,按照提示点击「Propose file change」,GitHub 会为你 fork 这个仓库并创建一个 pull request。
很帅吧,不需要 fork / pull / 改变 locally / push / 创建 PR,只需点击一下,GitHub 就为你创建了一个分支。
这对于修改一些排版错误或者防恶意篡改是很有帮助的。
#2 粘贴图像
对于 issue 和 comment,你还可以直接粘贴图片,当你粘贴时图片会被上传至云端,然后以 MarkDown 格式显示。
非常简洁。
#3 格式化代码
如果你想写一个 code block,你可以在开始处写三个反引号,然后 GitHub 会试图猜出你在写什么语言。
但是如果你发布如 Vue、Typescript、JSX 这样的语言,你可以明确写出来,以获取正确的高亮。
下图第一行使用了```jsx:
片段呈现:
(这可以扩展到 gist,顺便一提,如果你给了 gist 定义成 .jsx 扩展名,那么你会得到 JSX 的高亮)
#4 使用魔术词在 PR 中关闭 issue
比如你在创建一个 pull request 去修复 issue #234。那你可在 PR 输入「fixes #234」,就可以自动合并 PR 并关闭这个 issue,是不是很酷。
(提交信息里可以使用 fix/fixes/fixed , close/closes/closed 或者 resolve/resolves/resolved等关键词)
#5 链接到 comment
你甚至想链接到一个特定的评论,但无法做到?我在这里告诉你,点击名字旁边的日期/时间就万事大吉。
#6 链接到代码
既然能链接到 comment,那你想问能不能链接到代码上?可以的。
试试这个操作:在查看文件时,点击代码边上的行数。
哇喔,你看到了么?URL 随之更新。如果你按住 Shift 并单击另一个行号,URL 会再次更新,并且高亮这两个行数之间的所有代码段。
你现在可以分享这个 URL 了,但等等,这些还是当前分支,如果文件变化了呢?你需要一个永久链接。
我比较懒,但是下面这一个截图已经能够表达如何获取永久链接了(Copy Permalink):
#7 像使用命令行一样使用 GitHub URL
既然说到了 URL,那么就接着聊一下。使用 UI 浏览 GitHub 很方面也很好,不过很多时候最快的方式是使用 URL 来浏览。举个例子,如果我想跳转到正在处理的分支上,并想查看分支和 master 的差异,我可以在我的仓库名后面输入 /compare/branch-name。
这会使我到达分支的不同页面:
可以在名字后面再加上...XXX(分支名)比如我写的 mkdocs...pre-release,如下图:
这一步你可以配合键盘快捷键,Ctrl + L 或者 cmd + L,可以让光标直接移动到 URL 中(最起码 chrome 是这样)。这些加一起能提高生产力。
专业提示:用键盘移动 chrome URL 上的某一条网页记录,使用 Shift+Delete 或 Shift+fn+Delete 来删除某一条记录。(比如合并了分支之后就可以删除了)
#8 在 issue 中创建 list
你想在你的 issue中看到可多选的 list 么?
当你查看问题时,你想不想让它变成 2 of 5 这样的形式?
如果想,你可以在 issue 中使用以下句法:
- [ ] Screen width (integer) <br style="box-sizing: border-box;font-size: inherit;color: inherit;line-height: inherit;word-wrap: inherit !important;word-break: inherit !important;" />- [x] Service worker support <br style="box-sizing: border-box;font-size: inherit;color: inherit;line-height: inherit;word-wrap: inherit !important;word-break: inherit !important;" />- [x] Fetch support <br style="box-sizing: border-box;font-size: inherit;color: inherit;line-height: inherit;word-wrap: inherit !important;word-break: inherit !important;" />- [ ] CSS flexbox support <br style="box-sizing: border-box;font-size: inherit;color: inherit;line-height: inherit;word-wrap: inherit !important;word-break: inherit !important;" />- [ ] Custom elements
#9 GitHub 上的 project board
我总是用 Jira 做大项目,独立项目用 Trello,这两者我都很喜欢。
后来我知道,GitHub 也有类似的 project board:
我个人为了方便把它们都添加为 note。board 极为方便的帮助你做仓库管理。
你可以点击右上角 Add Cards 来添加东西。这里有些特殊语法方便搜索,比如: is:pr is:open,你就可以把任何公开的 PR 拖到 board 上。
更多语法可以参考search syntax。
你也可以把现存的 note 转化为 issue。
你也可以选择 issue 直接添加到 projects 。
这些意味着,从现在开始,你可以明确责任制度,每一行代码的分配都可以在 GitHub 上的 Project board 上完成,而不用去 Jira 或者 Trello 上。
不过它也有些缺点,比如功能比较少。你也可以试试 ZenHub,它有效的扩展 GitHub。
#10 GitHub WiKi
GitHub WiKi 能够帮助我们处理非结构化的页面集合,就像维基百科那样。我自己 NodeJS docs 就被我弄成 wiki 的样子。几个页面,然后自定义侧边栏。具体方法网上很多,我的页面可以供你参考一下。
建议:如果你有个特别长的单页面 README.md 文件,并且想和其他人有所区别,你可以试试这种形式。
#11 GitHub Pages(JekyII)
你可能已经知道了能使用 GitHub Pages 来托管静态网站。那本条就特别介绍一下如何使用 JekyII 来构建站点。
以最简单的方式,GitHub Pages + JekyII 将以最漂亮的主题来呈现你的 README.md,例如,你可以看一下about-github的自述文件。
在 GitHub 的 my site 中,点击 setting,打开 GitHub Pages,选择一个 JekyII 主题
就会得到一个Jekyll主题页面:
它的优点是:
注意,他需要 Ruby 在本地运行,Mac 自带,Windows 用户自行安装。
#12 把 GitHub 当 CMS 用
你的网站需要显示一些文字,但是你还不想直接放在 HTML 里面,那你可以把 GitHub 作为你储存内容的一个地方。这样,就可以让任何一个非程序员通过修改 Markdown 来修改 HTML 网页的内容。
我的方法是:在你的 GitHub 仓库中使用 markdown 文件来保存文本。在你网站的前端用一个组件来抓取这些文本并呈现在网页上。
我是玩 React 的,这里有个组件,用以抓取,解析并呈现到 HTML 上。
class Markdown extends React.Component {<br style="box-sizing: border-box;font-size: inherit;color: inherit;line-height: inherit;word-wrap: inherit !important;word-break: inherit !important;" /> constructor(props) {<br style="box-sizing: border-box;font-size: inherit;color: inherit;line-height: inherit;word-wrap: inherit !important;word-break: inherit !important;" /> super(props);class Markdown extends React.Component {<br style="box-sizing: border-box;font-size: inherit;color: inherit;line-height: inherit;word-wrap: inherit !important;word-break: inherit !important;" /> constructor(props) {<br style="box-sizing: border-box;font-size: inherit;color: inherit;line-height: inherit;word-wrap: inherit !important;word-break: inherit !important;" /> super(props);<br style="box-sizing: border-box;font-size: inherit;color: inherit;line-height: inherit;word-wrap: inherit !important;word-break: inherit !important;" /><br style="box-sizing: border-box;font-size: inherit;color: inherit;line-height: inherit;word-wrap: inherit !important;word-break: inherit !important;" /> // replace with your URL, obviously<br style="box-sizing: border-box;font-size: inherit;color: inherit;line-height: inherit;word-wrap: inherit !important;word-break: inherit !important;" /> this.baseUrl = 'https://raw.githubusercontent.com/davidgilbertson/about-github/master/text-snippets';<br style="box-sizing: border-box;font-size: inherit;color: inherit;line-height: inherit;word-wrap: inherit !important;word-break: inherit !important;" /><br style="box-sizing: border-box;font-size: inherit;color: inherit;line-height: inherit;word-wrap: inherit !important;word-break: inherit !important;" /> this.state = {<br style="box-sizing: border-box;font-size: inherit;color: inherit;line-height: inherit;word-wrap: inherit !important;word-break: inherit !important;" /> markdown: '',<br style="box-sizing: border-box;font-size: inherit;color: inherit;line-height: inherit;word-wrap: inherit !important;word-break: inherit !important;" /> };<br style="box-sizing: border-box;font-size: inherit;color: inherit;line-height: inherit;word-wrap: inherit !important;word-break: inherit !important;" /> }<br style="box-sizing: border-box;font-size: inherit;color: inherit;line-height: inherit;word-wrap: inherit !important;word-break: inherit !important;" /><br style="box-sizing: border-box;font-size: inherit;color: inherit;line-height: inherit;word-wrap: inherit !important;word-break: inherit !important;" /> componentDidMount() {<br style="box-sizing: border-box;font-size: inherit;color: inherit;line-height: inherit;word-wrap: inherit !important;word-break: inherit !important;" /> fetch(`${this.baseUrl}/${this.props.url}`)<br style="box-sizing: border-box;font-size: inherit;color: inherit;line-height: inherit;word-wrap: inherit !important;word-break: inherit !important;" /> .then(response => response.text())<br style="box-sizing: border-box;font-size: inherit;color: inherit;line-height: inherit;word-wrap: inherit !important;word-break: inherit !important;" /> .then((markdown) => {<br style="box-sizing: border-box;font-size: inherit;color: inherit;line-height: inherit;word-wrap: inherit !important;word-break: inherit !important;" /> this.setState({markdown});<br style="box-sizing: border-box;font-size: inherit;color: inherit;line-height: inherit;word-wrap: inherit !important;word-break: inherit !important;" /> });<br style="box-sizing: border-box;font-size: inherit;color: inherit;line-height: inherit;word-wrap: inherit !important;word-break: inherit !important;" /> }<br style="box-sizing: border-box;font-size: inherit;color: inherit;line-height: inherit;word-wrap: inherit !important;word-break: inherit !important;" /><br style="box-sizing: border-box;font-size: inherit;color: inherit;line-height: inherit;word-wrap: inherit !important;word-break: inherit !important;" /> render() {<br style="box-sizing: border-box;font-size: inherit;color: inherit;line-height: inherit;word-wrap: inherit !important;word-break: inherit !important;" /> return (<br style="box-sizing: border-box;font-size: inherit;color: inherit;line-height: inherit;word-wrap: inherit !important;word-break: inherit !important;" /> <br style="box-sizing: border-box;font-size: inherit;color: inherit;line-height: inherit;word-wrap: inherit !important;word-break: inherit !important;" /> );<br style="box-sizing: border-box;font-size: inherit;color: inherit;line-height: inherit;word-wrap: inherit !important;word-break: inherit !important;" /> }<br style="box-sizing: border-box;font-size: inherit;color: inherit;line-height: inherit;word-wrap: inherit !important;word-break: inherit !important;" />}
(/text-snippets这个文件夹是储存我的 markdown)
下面这段代码是上面组件的示例:
const Page = () => (<br style="box-sizing: border-box;font-size: inherit;color: inherit;line-height: inherit;word-wrap: inherit !important;word-break: inherit !important;" /> <br style="box-sizing: border-box;font-size: inherit;color: inherit;line-height: inherit;word-wrap: inherit !important;word-break: inherit !important;" /> <br style="box-sizing: border-box;font-size: inherit;color: inherit;line-height: inherit;word-wrap: inherit !important;word-break: inherit !important;" /> <br style="box-sizing: border-box;font-size: inherit;color: inherit;line-height: inherit;word-wrap: inherit !important;word-break: inherit !important;" /> <br style="box-sizing: border-box;font-size: inherit;color: inherit;line-height: inherit;word-wrap: inherit !important;word-break: inherit !important;" /><br style="box-sizing: border-box;font-size: inherit;color: inherit;line-height: inherit;word-wrap: inherit !important;word-break: inherit !important;" /> <br style="box-sizing: border-box;font-size: inherit;color: inherit;line-height: inherit;word-wrap: inherit !important;word-break: inherit !important;" /> A very important disclaimer:<br style="box-sizing: border-box;font-size: inherit;color: inherit;line-height: inherit;word-wrap: inherit !important;word-break: inherit !important;" /><br style="box-sizing: border-box;font-size: inherit;color: inherit;line-height: inherit;word-wrap: inherit !important;word-break: inherit !important;" /> <br style="box-sizing: border-box;font-size: inherit;color: inherit;line-height: inherit;word-wrap: inherit !important;word-break: inherit !important;" /> <br style="box-sizing: border-box;font-size: inherit;color: inherit;line-height: inherit;word-wrap: inherit !important;word-break: inherit !important;" /> <br style="box-sizing: border-box;font-size: inherit;color: inherit;line-height: inherit;word-wrap: inherit !important;word-break: inherit !important;" />);
所以现在 GitHub 也是你的 CMS,无论你想要样大小的文字都可以。
推荐一个 GitHub 工具
Octotree Chrome extension
它可以让你在看任何仓库时,获得一个左边的树状图。
nodejs抓取动态网页 全面深入理解预渲染技术体系
网站优化 • 优采云 发表了文章 • 0 个评论 • 83 次浏览 • 2022-06-23 22:44
在我们使用现代前端框架,比如Vue、React、Angular开发完毕前端项目之后,会发现这些页面输出的全是js,很不利于搜索引擎去爬取。在已经完成了单页应用(SPA)项目之后,如果要进行SEO优化的改造,这时候就可以使用预渲染技术体系。
下面将从适用场景、概念介绍、如何使用、底层原理几方面全面介绍预渲染技术的各项特性。适用场景在谈使用场景之前,首先需要明白以下几点:现代前端框架比如 Vue 在构建完成之后,页面加载的其实是一堆 js,再由 js 动态生成DOM。当我们访问页面,右键“显示网页源代码”的时候,看不到文字等内容百度、搜狗等爬虫在抓取页面的时候,不会执行页面的 js 源代码(谷歌爬虫可以执行“同步” js 来构建页面,因此 Vue 等框架开发的单页应用可以在谷歌搜索引擎中很好的被收录,这点我们不展开讨论)如果想要让百度、搜狗等收录索引我们的网站,就必须像静态 HTML 那样,让网页在右键查看源代码的时候,显示的是文字、图片等内容在这样的场景下,我们可以使用预渲染来解决此类问题。概念介绍
预渲染概念简单来讲是这样的:在项目构建阶段,我们会模拟访问项目的页面URL,这时候页面上的 js 将会执行并且形成真正的 HTML 片段;此时我们保存这个 HTML 文件到服务器硬盘上,下次不管是用户还是爬虫访问的时候,就直接返回这个物理文件,这样就可以有效解决 SEO 无法收录的问题。大体流程如下图:
可以看出,“预渲染”同“服务端渲染”最大的区别是,前者是在构建期间执行,后者在用户访问期间实时运行;前者在构建完成之后就不再需要 node服务,后者需要使用 node 作为运行时。预渲染也有它不适用的地方。正因为在构建阶段我们需要指明“需要构建的页面URL”,因此对于那些携带动态参数的页面(比如资料详情页),不适用于用预渲染去构建。这种场景下只能使用SSR。反之,一切静态官网、带数据的门户网站,只要是URL固定的,不管其中有没有动态数据,都可以使用预渲染。这里你可能会问一个问题:预渲染技术能否将 ajax 请求的内容也填充到页面上?答案是肯定的。虽然你 ajax 并非“同步执行”的 js,我们无法获知异步请求完成的时机。但通过控制监测页面上某个特定元素是否存在等手段,我们可以变相获知到数据返回的时机,从而进行预渲染。就可以达到“填充 ajax 数据”的效果(这可是谷歌爬虫也无法达到的效果哦)。如何使用预渲染技术有很多种实现方式。最常用的是使用 webpack 的一个插件: prerender-spa-plugin()。但是这个插件有很多局限性,最大的局限性在于必须结合 webpack 来使用,不够灵活,不易调试。也无法通过编程的方式使用。
比如我们的首页有动态的数据(非动态URL。是通过ajax获取的动态数据。)因此我们在使用了预渲染生成了静态首页之后,需要每间隔10分钟或者5分钟重新生成一个新的静态页,来更新数据。这就需要能够通过编程的方式调用渲染指令。在这样的情况下我基于这个插件的原理重新实现了一个包:@waitkafuka/spa-prerender(),可以通过 nodejs 通过编程的方式使用。
同时它剥离了 webpack 的依赖,剥离了对SPA页面的限制。只要有一个静态目录就可以工作。使用的方式非常简单,以 Vue 为例,在我们正常构建生成了 dist 目录之后,只需要编写以下脚本:
const SpaRenderer = require('@waitkafuka/spa-prerender');const path = require('path');<br />const options = {staticDir: path.join(__dirname, 'dist'),basePath: 'base',//可选,当项目有basePath的时候设置。同router中的base和publicPath。确保staticDir/basePath/index.html存在 routes: ['/','/exam', ],puppeteerOptions: {headless: true,maxConcurrentRoutes: 0,renderAfterDocumentEvent: 'render-event',skipThirdPartyRequests: true }};const spaRenderer = new SpaRenderer(options)spaRenderer.render().then(() => {console.log('预渲染完毕。');});
具体的参数解析可以查看 @waitkafuka/spa-prerender。底层原理在底层实现上,主要利用了 express 来驱动静态页面;然后利用 puppeteer 无头浏览器来模拟用户访问所需要预渲染的地址;在访问完成之后,保存页面HTML到文件夹中。
流程如下:
更为详细的流程介绍如下(此部分枯燥乏味,非专业人士可以跳过。):
阶段1:创建渲染器实例
spa-prerender index.js:
1.创建puppeteer实例 @prerenderer/renderer-puppeteer/es6/renderer.js
2.创建server实例@prerenderer/prerenderer/es6/server.js
3.创建renderer实例,将1 2步的puppeteer和server注入this @@prerenderer/prerenderer/es6/index.js
阶段2:渲染器实例初始化:spa-prerender index.js:
1.server初始化 (设置路由:静态资源利用*.*映射到staticDir上,其他请求全部映射到index.html上。设置静态资源和index.html路径,modifyServer也在这个阶段。server 启动)@prerenderer/prerenderer/es6/server.js
2.puppeteer初始化(判断平台是否linux,如果是Linux需要设置一些启动参数;启动puppeteer)@prerenderer/renderer-puppeteer/es6/renderer.js
阶段3:开始访问路由并获取html
1.spa-prerender index.js->@prerenderer/prerenderer/es6/index.js -> @prerenderer/renderer-puppeteer/es6/renderer.js
2.开启一个限流器,每次最多渲染 n 条路由,避免内存崩溃
3.puppeteer开启一个新标签,判断是否有inject,如果有,注入到window上
4.拼接端口、设置viewport,拼接router,形成url,发起页面的请求
5.判断options中是否设置了renderAfterDocumentEvent,如果有,给页面添加一个事件监听器,当触发事件的时候,将__PRERENDER_STATUS属性设置为true
6.访问页面,等待加载完成(如何确定页面加载完成, waituntil: 'networkidle0'//在500ms内没有网络请求,这个设置可以通过puppeteerOptions.navigationOptions.waituntil修改)
等待捕捉,分为三种等待时机:
1.等待固定时间,renderAfterTime(利用settimeout结合promise实现)
2.等待抛出某个事件:renderAfterDocumentEvent,该事件需要事先在页面写好抛出的时机
3.等待某个元素出现:renderAfterElementExists
阶段4:保存html
spa-prerender index.js 遍历结果,拼接文件夹路径并保存html。
实践过程中的常见问题
1. 如果一个项目有10个页面,其中首页需要SEO,于是使用了预渲染,另外9个页面仍然是由js渲染。那么在访问其他9个页面的时候,刷新页面,会先显示首页的内容一闪而过。这种问题如何解决?
产生这种情况的原因在于:在单页应用中,实际上只有一个物理页面,那就是 index.html。我们访问的所有页面实际都是 index.html,先进入 index.html 然后再执行 js 构建 dom。那么此时如果我们首页是已经预渲染好的,那么就会有内容,在 js 构建出对应路由的内容之前,就会先出现首页的内容。
spa-prerender 考虑到了这种问题。在预渲染的过程中,会首先保留原来“纯净”的index.html,并重命名为“index-spa.html”。
而后,在 nginx 配置中,利用 try_files 指令的优先级配置特点,让用户在刷新的情况下,如果有对应物理文件则访问物理文件(预渲染生成的文件),如果没有对应物理文件则降级访问 index-spa.html,就可以解决上述问题。nginx 配置指令如下:
location /{ alias /Users/zks/code/xkw/xop/dist/; try_files $uri $uri/ /index-spa.html; }
此时预渲染生成的文件将被优先返回($uri),如果未匹配,才会交由 index-spa.html 处理。
2. 如果项目打包有前缀怎么办?
如果项目有publicPath,那么在 dist 目录下会多一层根目录。此时需要在预渲染配置中添加 basePath 的选项。此时 express 会从 dist/basePath 目录中去寻找 index.html。
配置如下:
const options = { staticDir: path.join(__dirname, 'dist'), basePath: 'base',//当项目有basePath的时候设置。同router中的base和publicPath。确保staticDir/basePath/index.html存在 routes: ['/','/exam', ], ... }
3. 如何控制渲染器开始进行HTML保存的时机?
我们可以通过 options 中三个参数来控制:
3.1.renderAfterTime:等待固定时间之后(从页面开始发起访问算起)
3.2.renderAfterDocumentEvent:等待抛出某个事件,该事件需要事先在页面定义好触发的时机,比如在 Vue 的 mounted 函数中定义:
new Vue({ router,render: h => h(App), mounted () { //在mounted之后触发custom-render-event // 预渲染器在收到这个事件之后将开始进行页面的保存工作 document.dispatchEvent(new Event('custom-render-event')) }}).$mount('#app')
3.3.renderAfterElementExists:等待某个元素出现。我们可以在异步 ajax 返回之后,增加某个元素。当渲染器检测到此元素出现之后进行页面保存,此时保存的页面就包含了 ajax 返回的数据。
4. 首页预渲染生成的 DOM 元素,会不会被 js 复用?还是删除重新构建?
仿照SSR的思路,我们可以通过在根节点上设置 data-server-rander="true",这样在客户端 js 会知道这个是已经渲染完成的 DOM,不会粗暴去替换它。而是执行一个“注水”的过程(也就是hydration)。可以充分复用预渲染生成的 DOM 元素。
点击下方卡片可以关注 查看全部
nodejs抓取动态网页 全面深入理解预渲染技术体系
在我们使用现代前端框架,比如Vue、React、Angular开发完毕前端项目之后,会发现这些页面输出的全是js,很不利于搜索引擎去爬取。在已经完成了单页应用(SPA)项目之后,如果要进行SEO优化的改造,这时候就可以使用预渲染技术体系。
下面将从适用场景、概念介绍、如何使用、底层原理几方面全面介绍预渲染技术的各项特性。适用场景在谈使用场景之前,首先需要明白以下几点:现代前端框架比如 Vue 在构建完成之后,页面加载的其实是一堆 js,再由 js 动态生成DOM。当我们访问页面,右键“显示网页源代码”的时候,看不到文字等内容百度、搜狗等爬虫在抓取页面的时候,不会执行页面的 js 源代码(谷歌爬虫可以执行“同步” js 来构建页面,因此 Vue 等框架开发的单页应用可以在谷歌搜索引擎中很好的被收录,这点我们不展开讨论)如果想要让百度、搜狗等收录索引我们的网站,就必须像静态 HTML 那样,让网页在右键查看源代码的时候,显示的是文字、图片等内容在这样的场景下,我们可以使用预渲染来解决此类问题。概念介绍
预渲染概念简单来讲是这样的:在项目构建阶段,我们会模拟访问项目的页面URL,这时候页面上的 js 将会执行并且形成真正的 HTML 片段;此时我们保存这个 HTML 文件到服务器硬盘上,下次不管是用户还是爬虫访问的时候,就直接返回这个物理文件,这样就可以有效解决 SEO 无法收录的问题。大体流程如下图:
可以看出,“预渲染”同“服务端渲染”最大的区别是,前者是在构建期间执行,后者在用户访问期间实时运行;前者在构建完成之后就不再需要 node服务,后者需要使用 node 作为运行时。预渲染也有它不适用的地方。正因为在构建阶段我们需要指明“需要构建的页面URL”,因此对于那些携带动态参数的页面(比如资料详情页),不适用于用预渲染去构建。这种场景下只能使用SSR。反之,一切静态官网、带数据的门户网站,只要是URL固定的,不管其中有没有动态数据,都可以使用预渲染。这里你可能会问一个问题:预渲染技术能否将 ajax 请求的内容也填充到页面上?答案是肯定的。虽然你 ajax 并非“同步执行”的 js,我们无法获知异步请求完成的时机。但通过控制监测页面上某个特定元素是否存在等手段,我们可以变相获知到数据返回的时机,从而进行预渲染。就可以达到“填充 ajax 数据”的效果(这可是谷歌爬虫也无法达到的效果哦)。如何使用预渲染技术有很多种实现方式。最常用的是使用 webpack 的一个插件: prerender-spa-plugin()。但是这个插件有很多局限性,最大的局限性在于必须结合 webpack 来使用,不够灵活,不易调试。也无法通过编程的方式使用。
比如我们的首页有动态的数据(非动态URL。是通过ajax获取的动态数据。)因此我们在使用了预渲染生成了静态首页之后,需要每间隔10分钟或者5分钟重新生成一个新的静态页,来更新数据。这就需要能够通过编程的方式调用渲染指令。在这样的情况下我基于这个插件的原理重新实现了一个包:@waitkafuka/spa-prerender(),可以通过 nodejs 通过编程的方式使用。
同时它剥离了 webpack 的依赖,剥离了对SPA页面的限制。只要有一个静态目录就可以工作。使用的方式非常简单,以 Vue 为例,在我们正常构建生成了 dist 目录之后,只需要编写以下脚本:
const SpaRenderer = require('@waitkafuka/spa-prerender');const path = require('path');<br />const options = {staticDir: path.join(__dirname, 'dist'),basePath: 'base',//可选,当项目有basePath的时候设置。同router中的base和publicPath。确保staticDir/basePath/index.html存在 routes: ['/','/exam', ],puppeteerOptions: {headless: true,maxConcurrentRoutes: 0,renderAfterDocumentEvent: 'render-event',skipThirdPartyRequests: true }};const spaRenderer = new SpaRenderer(options)spaRenderer.render().then(() => {console.log('预渲染完毕。');});
具体的参数解析可以查看 @waitkafuka/spa-prerender。底层原理在底层实现上,主要利用了 express 来驱动静态页面;然后利用 puppeteer 无头浏览器来模拟用户访问所需要预渲染的地址;在访问完成之后,保存页面HTML到文件夹中。
流程如下:
更为详细的流程介绍如下(此部分枯燥乏味,非专业人士可以跳过。):
阶段1:创建渲染器实例
spa-prerender index.js:
1.创建puppeteer实例 @prerenderer/renderer-puppeteer/es6/renderer.js
2.创建server实例@prerenderer/prerenderer/es6/server.js
3.创建renderer实例,将1 2步的puppeteer和server注入this @@prerenderer/prerenderer/es6/index.js
阶段2:渲染器实例初始化:spa-prerender index.js:
1.server初始化 (设置路由:静态资源利用*.*映射到staticDir上,其他请求全部映射到index.html上。设置静态资源和index.html路径,modifyServer也在这个阶段。server 启动)@prerenderer/prerenderer/es6/server.js
2.puppeteer初始化(判断平台是否linux,如果是Linux需要设置一些启动参数;启动puppeteer)@prerenderer/renderer-puppeteer/es6/renderer.js
阶段3:开始访问路由并获取html
1.spa-prerender index.js->@prerenderer/prerenderer/es6/index.js -> @prerenderer/renderer-puppeteer/es6/renderer.js
2.开启一个限流器,每次最多渲染 n 条路由,避免内存崩溃
3.puppeteer开启一个新标签,判断是否有inject,如果有,注入到window上
4.拼接端口、设置viewport,拼接router,形成url,发起页面的请求
5.判断options中是否设置了renderAfterDocumentEvent,如果有,给页面添加一个事件监听器,当触发事件的时候,将__PRERENDER_STATUS属性设置为true
6.访问页面,等待加载完成(如何确定页面加载完成, waituntil: 'networkidle0'//在500ms内没有网络请求,这个设置可以通过puppeteerOptions.navigationOptions.waituntil修改)
等待捕捉,分为三种等待时机:
1.等待固定时间,renderAfterTime(利用settimeout结合promise实现)
2.等待抛出某个事件:renderAfterDocumentEvent,该事件需要事先在页面写好抛出的时机
3.等待某个元素出现:renderAfterElementExists
阶段4:保存html
spa-prerender index.js 遍历结果,拼接文件夹路径并保存html。
实践过程中的常见问题
1. 如果一个项目有10个页面,其中首页需要SEO,于是使用了预渲染,另外9个页面仍然是由js渲染。那么在访问其他9个页面的时候,刷新页面,会先显示首页的内容一闪而过。这种问题如何解决?
产生这种情况的原因在于:在单页应用中,实际上只有一个物理页面,那就是 index.html。我们访问的所有页面实际都是 index.html,先进入 index.html 然后再执行 js 构建 dom。那么此时如果我们首页是已经预渲染好的,那么就会有内容,在 js 构建出对应路由的内容之前,就会先出现首页的内容。
spa-prerender 考虑到了这种问题。在预渲染的过程中,会首先保留原来“纯净”的index.html,并重命名为“index-spa.html”。
而后,在 nginx 配置中,利用 try_files 指令的优先级配置特点,让用户在刷新的情况下,如果有对应物理文件则访问物理文件(预渲染生成的文件),如果没有对应物理文件则降级访问 index-spa.html,就可以解决上述问题。nginx 配置指令如下:
location /{ alias /Users/zks/code/xkw/xop/dist/; try_files $uri $uri/ /index-spa.html; }
此时预渲染生成的文件将被优先返回($uri),如果未匹配,才会交由 index-spa.html 处理。
2. 如果项目打包有前缀怎么办?
如果项目有publicPath,那么在 dist 目录下会多一层根目录。此时需要在预渲染配置中添加 basePath 的选项。此时 express 会从 dist/basePath 目录中去寻找 index.html。
配置如下:
const options = { staticDir: path.join(__dirname, 'dist'), basePath: 'base',//当项目有basePath的时候设置。同router中的base和publicPath。确保staticDir/basePath/index.html存在 routes: ['/','/exam', ], ... }
3. 如何控制渲染器开始进行HTML保存的时机?
我们可以通过 options 中三个参数来控制:
3.1.renderAfterTime:等待固定时间之后(从页面开始发起访问算起)
3.2.renderAfterDocumentEvent:等待抛出某个事件,该事件需要事先在页面定义好触发的时机,比如在 Vue 的 mounted 函数中定义:
new Vue({ router,render: h => h(App), mounted () { //在mounted之后触发custom-render-event // 预渲染器在收到这个事件之后将开始进行页面的保存工作 document.dispatchEvent(new Event('custom-render-event')) }}).$mount('#app')
3.3.renderAfterElementExists:等待某个元素出现。我们可以在异步 ajax 返回之后,增加某个元素。当渲染器检测到此元素出现之后进行页面保存,此时保存的页面就包含了 ajax 返回的数据。
4. 首页预渲染生成的 DOM 元素,会不会被 js 复用?还是删除重新构建?
仿照SSR的思路,我们可以通过在根节点上设置 data-server-rander="true",这样在客户端 js 会知道这个是已经渲染完成的 DOM,不会粗暴去替换它。而是执行一个“注水”的过程(也就是hydration)。可以充分复用预渲染生成的 DOM 元素。
点击下方卡片可以关注
nodejs抓取动态网页 全面深入理解预渲染技术体系
网站优化 • 优采云 发表了文章 • 0 个评论 • 69 次浏览 • 2022-06-22 00:04
在我们使用现代前端框架,比如Vue、React、Angular开发完毕前端项目之后,会发现这些页面输出的全是js,很不利于搜索引擎去爬取。在已经完成了单页应用(SPA)项目之后,如果要进行SEO优化的改造,这时候就可以使用预渲染技术体系。
下面将从适用场景、概念介绍、如何使用、底层原理几方面全面介绍预渲染技术的各项特性。适用场景在谈使用场景之前,首先需要明白以下几点:现代前端框架比如 Vue 在构建完成之后,页面加载的其实是一堆 js,再由 js 动态生成DOM。当我们访问页面,右键“显示网页源代码”的时候,看不到文字等内容百度、搜狗等爬虫在抓取页面的时候,不会执行页面的 js 源代码(谷歌爬虫可以执行“同步” js 来构建页面,因此 Vue 等框架开发的单页应用可以在谷歌搜索引擎中很好的被收录,这点我们不展开讨论)如果想要让百度、搜狗等收录索引我们的网站,就必须像静态 HTML 那样,让网页在右键查看源代码的时候,显示的是文字、图片等内容在这样的场景下,我们可以使用预渲染来解决此类问题。概念介绍
预渲染概念简单来讲是这样的:在项目构建阶段,我们会模拟访问项目的页面URL,这时候页面上的 js 将会执行并且形成真正的 HTML 片段;此时我们保存这个 HTML 文件到服务器硬盘上,下次不管是用户还是爬虫访问的时候,就直接返回这个物理文件,这样就可以有效解决 SEO 无法收录的问题。大体流程如下图:
可以看出,“预渲染”同“服务端渲染”最大的区别是,前者是在构建期间执行,后者在用户访问期间实时运行;前者在构建完成之后就不再需要 node服务,后者需要使用 node 作为运行时。预渲染也有它不适用的地方。正因为在构建阶段我们需要指明“需要构建的页面URL”,因此对于那些携带动态参数的页面(比如资料详情页),不适用于用预渲染去构建。这种场景下只能使用SSR。反之,一切静态官网、带数据的门户网站,只要是URL固定的,不管其中有没有动态数据,都可以使用预渲染。这里你可能会问一个问题:预渲染技术能否将 ajax 请求的内容也填充到页面上?答案是肯定的。虽然你 ajax 并非“同步执行”的 js,我们无法获知异步请求完成的时机。但通过控制监测页面上某个特定元素是否存在等手段,我们可以变相获知到数据返回的时机,从而进行预渲染。就可以达到“填充 ajax 数据”的效果(这可是谷歌爬虫也无法达到的效果哦)。如何使用预渲染技术有很多种实现方式。最常用的是使用 webpack 的一个插件: prerender-spa-plugin()。但是这个插件有很多局限性,最大的局限性在于必须结合 webpack 来使用,不够灵活,不易调试。也无法通过编程的方式使用。
比如我们的首页有动态的数据(非动态URL。是通过ajax获取的动态数据。)因此我们在使用了预渲染生成了静态首页之后,需要每间隔10分钟或者5分钟重新生成一个新的静态页,来更新数据。这就需要能够通过编程的方式调用渲染指令。在这样的情况下我基于这个插件的原理重新实现了一个包:@waitkafuka/spa-prerender(),可以通过 nodejs 通过编程的方式使用。
同时它剥离了 webpack 的依赖,剥离了对SPA页面的限制。只要有一个静态目录就可以工作。使用的方式非常简单,以 Vue 为例,在我们正常构建生成了 dist 目录之后,只需要编写以下脚本:
const SpaRenderer = require('@waitkafuka/spa-prerender');const path = require('path');<br />const options = {staticDir: path.join(__dirname, 'dist'),basePath: 'base',//可选,当项目有basePath的时候设置。同router中的base和publicPath。确保staticDir/basePath/index.html存在 routes: ['/','/exam', ],puppeteerOptions: {headless: true,maxConcurrentRoutes: 0,renderAfterDocumentEvent: 'render-event',skipThirdPartyRequests: true }};const spaRenderer = new SpaRenderer(options)spaRenderer.render().then(() => {console.log('预渲染完毕。');});
具体的参数解析可以查看 @waitkafuka/spa-prerender。底层原理在底层实现上,主要利用了 express 来驱动静态页面;然后利用 puppeteer 无头浏览器来模拟用户访问所需要预渲染的地址;在访问完成之后,保存页面HTML到文件夹中。
流程如下:
更为详细的流程介绍如下(此部分枯燥乏味,非专业人士可以跳过。):
阶段1:创建渲染器实例
spa-prerender index.js:
1.创建puppeteer实例 @prerenderer/renderer-puppeteer/es6/renderer.js
2.创建server实例@prerenderer/prerenderer/es6/server.js
3.创建renderer实例,将1 2步的puppeteer和server注入this @@prerenderer/prerenderer/es6/index.js
阶段2:渲染器实例初始化:spa-prerender index.js:
1.server初始化 (设置路由:静态资源利用*.*映射到staticDir上,其他请求全部映射到index.html上。设置静态资源和index.html路径,modifyServer也在这个阶段。server 启动)@prerenderer/prerenderer/es6/server.js
2.puppeteer初始化(判断平台是否linux,如果是Linux需要设置一些启动参数;启动puppeteer)@prerenderer/renderer-puppeteer/es6/renderer.js
阶段3:开始访问路由并获取html
1.spa-prerender index.js->@prerenderer/prerenderer/es6/index.js -> @prerenderer/renderer-puppeteer/es6/renderer.js
2.开启一个限流器,每次最多渲染 n 条路由,避免内存崩溃
3.puppeteer开启一个新标签,判断是否有inject,如果有,注入到window上
4.拼接端口、设置viewport,拼接router,形成url,发起页面的请求
5.判断options中是否设置了renderAfterDocumentEvent,如果有,给页面添加一个事件监听器,当触发事件的时候,将__PRERENDER_STATUS属性设置为true
6.访问页面,等待加载完成(如何确定页面加载完成, waituntil: 'networkidle0'//在500ms内没有网络请求,这个设置可以通过puppeteerOptions.navigationOptions.waituntil修改)
等待捕捉,分为三种等待时机:
1.等待固定时间,renderAfterTime(利用settimeout结合promise实现)
2.等待抛出某个事件:renderAfterDocumentEvent,该事件需要事先在页面写好抛出的时机
3.等待某个元素出现:renderAfterElementExists
阶段4:保存html
spa-prerender index.js 遍历结果,拼接文件夹路径并保存html。
实践过程中的常见问题
1. 如果一个项目有10个页面,其中首页需要SEO,于是使用了预渲染,另外9个页面仍然是由js渲染。那么在访问其他9个页面的时候,刷新页面,会先显示首页的内容一闪而过。这种问题如何解决?
产生这种情况的原因在于:在单页应用中,实际上只有一个物理页面,那就是 index.html。我们访问的所有页面实际都是 index.html,先进入 index.html 然后再执行 js 构建 dom。那么此时如果我们首页是已经预渲染好的,那么就会有内容,在 js 构建出对应路由的内容之前,就会先出现首页的内容。
spa-prerender 考虑到了这种问题。在预渲染的过程中,会首先保留原来“纯净”的index.html,并重命名为“index-spa.html”。
而后,在 nginx 配置中,利用 try_files 指令的优先级配置特点,让用户在刷新的情况下,如果有对应物理文件则访问物理文件(预渲染生成的文件),如果没有对应物理文件则降级访问 index-spa.html,就可以解决上述问题。nginx 配置指令如下:
location /{ alias /Users/zks/code/xkw/xop/dist/; try_files $uri $uri/ /index-spa.html; }
此时预渲染生成的文件将被优先返回($uri),如果未匹配,才会交由 index-spa.html 处理。
2. 如果项目打包有前缀怎么办?
如果项目有publicPath,那么在 dist 目录下会多一层根目录。此时需要在预渲染配置中添加 basePath 的选项。此时 express 会从 dist/basePath 目录中去寻找 index.html。
配置如下:
const options = { staticDir: path.join(__dirname, 'dist'), basePath: 'base',//当项目有basePath的时候设置。同router中的base和publicPath。确保staticDir/basePath/index.html存在 routes: ['/','/exam', ], ... }
3. 如何控制渲染器开始进行HTML保存的时机?
我们可以通过 options 中三个参数来控制:
3.1.renderAfterTime:等待固定时间之后(从页面开始发起访问算起)
3.2.renderAfterDocumentEvent:等待抛出某个事件,该事件需要事先在页面定义好触发的时机,比如在 Vue 的 mounted 函数中定义:
new Vue({ router,render: h => h(App), mounted () { //在mounted之后触发custom-render-event // 预渲染器在收到这个事件之后将开始进行页面的保存工作 document.dispatchEvent(new Event('custom-render-event')) }}).$mount('#app')
3.3.renderAfterElementExists:等待某个元素出现。我们可以在异步 ajax 返回之后,增加某个元素。当渲染器检测到此元素出现之后进行页面保存,此时保存的页面就包含了 ajax 返回的数据。
4. 首页预渲染生成的 DOM 元素,会不会被 js 复用?还是删除重新构建?
仿照SSR的思路,我们可以通过在根节点上设置 data-server-rander="true",这样在客户端 js 会知道这个是已经渲染完成的 DOM,不会粗暴去替换它。而是执行一个“注水”的过程(也就是hydration)。可以充分复用预渲染生成的 DOM 元素。
点击下方卡片可以关注 查看全部
nodejs抓取动态网页 全面深入理解预渲染技术体系
在我们使用现代前端框架,比如Vue、React、Angular开发完毕前端项目之后,会发现这些页面输出的全是js,很不利于搜索引擎去爬取。在已经完成了单页应用(SPA)项目之后,如果要进行SEO优化的改造,这时候就可以使用预渲染技术体系。
下面将从适用场景、概念介绍、如何使用、底层原理几方面全面介绍预渲染技术的各项特性。适用场景在谈使用场景之前,首先需要明白以下几点:现代前端框架比如 Vue 在构建完成之后,页面加载的其实是一堆 js,再由 js 动态生成DOM。当我们访问页面,右键“显示网页源代码”的时候,看不到文字等内容百度、搜狗等爬虫在抓取页面的时候,不会执行页面的 js 源代码(谷歌爬虫可以执行“同步” js 来构建页面,因此 Vue 等框架开发的单页应用可以在谷歌搜索引擎中很好的被收录,这点我们不展开讨论)如果想要让百度、搜狗等收录索引我们的网站,就必须像静态 HTML 那样,让网页在右键查看源代码的时候,显示的是文字、图片等内容在这样的场景下,我们可以使用预渲染来解决此类问题。概念介绍
预渲染概念简单来讲是这样的:在项目构建阶段,我们会模拟访问项目的页面URL,这时候页面上的 js 将会执行并且形成真正的 HTML 片段;此时我们保存这个 HTML 文件到服务器硬盘上,下次不管是用户还是爬虫访问的时候,就直接返回这个物理文件,这样就可以有效解决 SEO 无法收录的问题。大体流程如下图:
可以看出,“预渲染”同“服务端渲染”最大的区别是,前者是在构建期间执行,后者在用户访问期间实时运行;前者在构建完成之后就不再需要 node服务,后者需要使用 node 作为运行时。预渲染也有它不适用的地方。正因为在构建阶段我们需要指明“需要构建的页面URL”,因此对于那些携带动态参数的页面(比如资料详情页),不适用于用预渲染去构建。这种场景下只能使用SSR。反之,一切静态官网、带数据的门户网站,只要是URL固定的,不管其中有没有动态数据,都可以使用预渲染。这里你可能会问一个问题:预渲染技术能否将 ajax 请求的内容也填充到页面上?答案是肯定的。虽然你 ajax 并非“同步执行”的 js,我们无法获知异步请求完成的时机。但通过控制监测页面上某个特定元素是否存在等手段,我们可以变相获知到数据返回的时机,从而进行预渲染。就可以达到“填充 ajax 数据”的效果(这可是谷歌爬虫也无法达到的效果哦)。如何使用预渲染技术有很多种实现方式。最常用的是使用 webpack 的一个插件: prerender-spa-plugin()。但是这个插件有很多局限性,最大的局限性在于必须结合 webpack 来使用,不够灵活,不易调试。也无法通过编程的方式使用。
比如我们的首页有动态的数据(非动态URL。是通过ajax获取的动态数据。)因此我们在使用了预渲染生成了静态首页之后,需要每间隔10分钟或者5分钟重新生成一个新的静态页,来更新数据。这就需要能够通过编程的方式调用渲染指令。在这样的情况下我基于这个插件的原理重新实现了一个包:@waitkafuka/spa-prerender(),可以通过 nodejs 通过编程的方式使用。
同时它剥离了 webpack 的依赖,剥离了对SPA页面的限制。只要有一个静态目录就可以工作。使用的方式非常简单,以 Vue 为例,在我们正常构建生成了 dist 目录之后,只需要编写以下脚本:
const SpaRenderer = require('@waitkafuka/spa-prerender');const path = require('path');<br />const options = {staticDir: path.join(__dirname, 'dist'),basePath: 'base',//可选,当项目有basePath的时候设置。同router中的base和publicPath。确保staticDir/basePath/index.html存在 routes: ['/','/exam', ],puppeteerOptions: {headless: true,maxConcurrentRoutes: 0,renderAfterDocumentEvent: 'render-event',skipThirdPartyRequests: true }};const spaRenderer = new SpaRenderer(options)spaRenderer.render().then(() => {console.log('预渲染完毕。');});
具体的参数解析可以查看 @waitkafuka/spa-prerender。底层原理在底层实现上,主要利用了 express 来驱动静态页面;然后利用 puppeteer 无头浏览器来模拟用户访问所需要预渲染的地址;在访问完成之后,保存页面HTML到文件夹中。
流程如下:
更为详细的流程介绍如下(此部分枯燥乏味,非专业人士可以跳过。):
阶段1:创建渲染器实例
spa-prerender index.js:
1.创建puppeteer实例 @prerenderer/renderer-puppeteer/es6/renderer.js
2.创建server实例@prerenderer/prerenderer/es6/server.js
3.创建renderer实例,将1 2步的puppeteer和server注入this @@prerenderer/prerenderer/es6/index.js
阶段2:渲染器实例初始化:spa-prerender index.js:
1.server初始化 (设置路由:静态资源利用*.*映射到staticDir上,其他请求全部映射到index.html上。设置静态资源和index.html路径,modifyServer也在这个阶段。server 启动)@prerenderer/prerenderer/es6/server.js
2.puppeteer初始化(判断平台是否linux,如果是Linux需要设置一些启动参数;启动puppeteer)@prerenderer/renderer-puppeteer/es6/renderer.js
阶段3:开始访问路由并获取html
1.spa-prerender index.js->@prerenderer/prerenderer/es6/index.js -> @prerenderer/renderer-puppeteer/es6/renderer.js
2.开启一个限流器,每次最多渲染 n 条路由,避免内存崩溃
3.puppeteer开启一个新标签,判断是否有inject,如果有,注入到window上
4.拼接端口、设置viewport,拼接router,形成url,发起页面的请求
5.判断options中是否设置了renderAfterDocumentEvent,如果有,给页面添加一个事件监听器,当触发事件的时候,将__PRERENDER_STATUS属性设置为true
6.访问页面,等待加载完成(如何确定页面加载完成, waituntil: 'networkidle0'//在500ms内没有网络请求,这个设置可以通过puppeteerOptions.navigationOptions.waituntil修改)
等待捕捉,分为三种等待时机:
1.等待固定时间,renderAfterTime(利用settimeout结合promise实现)
2.等待抛出某个事件:renderAfterDocumentEvent,该事件需要事先在页面写好抛出的时机
3.等待某个元素出现:renderAfterElementExists
阶段4:保存html
spa-prerender index.js 遍历结果,拼接文件夹路径并保存html。
实践过程中的常见问题
1. 如果一个项目有10个页面,其中首页需要SEO,于是使用了预渲染,另外9个页面仍然是由js渲染。那么在访问其他9个页面的时候,刷新页面,会先显示首页的内容一闪而过。这种问题如何解决?
产生这种情况的原因在于:在单页应用中,实际上只有一个物理页面,那就是 index.html。我们访问的所有页面实际都是 index.html,先进入 index.html 然后再执行 js 构建 dom。那么此时如果我们首页是已经预渲染好的,那么就会有内容,在 js 构建出对应路由的内容之前,就会先出现首页的内容。
spa-prerender 考虑到了这种问题。在预渲染的过程中,会首先保留原来“纯净”的index.html,并重命名为“index-spa.html”。
而后,在 nginx 配置中,利用 try_files 指令的优先级配置特点,让用户在刷新的情况下,如果有对应物理文件则访问物理文件(预渲染生成的文件),如果没有对应物理文件则降级访问 index-spa.html,就可以解决上述问题。nginx 配置指令如下:
location /{ alias /Users/zks/code/xkw/xop/dist/; try_files $uri $uri/ /index-spa.html; }
此时预渲染生成的文件将被优先返回($uri),如果未匹配,才会交由 index-spa.html 处理。
2. 如果项目打包有前缀怎么办?
如果项目有publicPath,那么在 dist 目录下会多一层根目录。此时需要在预渲染配置中添加 basePath 的选项。此时 express 会从 dist/basePath 目录中去寻找 index.html。
配置如下:
const options = { staticDir: path.join(__dirname, 'dist'), basePath: 'base',//当项目有basePath的时候设置。同router中的base和publicPath。确保staticDir/basePath/index.html存在 routes: ['/','/exam', ], ... }
3. 如何控制渲染器开始进行HTML保存的时机?
我们可以通过 options 中三个参数来控制:
3.1.renderAfterTime:等待固定时间之后(从页面开始发起访问算起)
3.2.renderAfterDocumentEvent:等待抛出某个事件,该事件需要事先在页面定义好触发的时机,比如在 Vue 的 mounted 函数中定义:
new Vue({ router,render: h => h(App), mounted () { //在mounted之后触发custom-render-event // 预渲染器在收到这个事件之后将开始进行页面的保存工作 document.dispatchEvent(new Event('custom-render-event')) }}).$mount('#app')
3.3.renderAfterElementExists:等待某个元素出现。我们可以在异步 ajax 返回之后,增加某个元素。当渲染器检测到此元素出现之后进行页面保存,此时保存的页面就包含了 ajax 返回的数据。
4. 首页预渲染生成的 DOM 元素,会不会被 js 复用?还是删除重新构建?
仿照SSR的思路,我们可以通过在根节点上设置 data-server-rander="true",这样在客户端 js 会知道这个是已经渲染完成的 DOM,不会粗暴去替换它。而是执行一个“注水”的过程(也就是hydration)。可以充分复用预渲染生成的 DOM 元素。
点击下方卡片可以关注
nodejs抓取动态网页 分享12个GitHub骚操作!
网站优化 • 优采云 发表了文章 • 0 个评论 • 92 次浏览 • 2022-06-21 01:18
原文:
#1 在 GitHub 上编辑代码
我要先说一个很多人都知道的事儿。
当你使用 GitHub看一些文件时(任何的文本文件或者仓库),能看到一个顶部右侧有一个小铅笔图标。点击即可编辑文档。完成后,按照提示点击「Propose file change」,GitHub 会为你 fork 这个仓库并创建一个 pull request。
很帅吧,不需要 fork / pull / 改变 locally / push / 创建 PR,只需点击一下,GitHub 就为你创建了一个分支。
这对于修改一些排版错误或者防恶意篡改是很有帮助的。
#2 粘贴图像
对于 issue 和 comment,你还可以直接粘贴图片,当你粘贴时图片会被上传至云端,然后以 MarkDown 格式显示。
非常简洁。
#3 格式化代码
如果你想写一个 code block,你可以在开始处写三个反引号,然后 GitHub 会试图猜出你在写什么语言。
但是如果你发布如 Vue、Typescript、JSX 这样的语言,你可以明确写出来,以获取正确的高亮。
下图第一行使用了```jsx:
片段呈现:
(这可以扩展到 gist,顺便一提,如果你给了 gist 定义成 .jsx 扩展名,那么你会得到 JSX 的高亮)
#4 使用魔术词在 PR 中关闭 issue
比如你在创建一个 pull request 去修复 issue #234。那你可在 PR 输入「fixes #234」,就可以自动合并 PR 并关闭这个 issue,是不是很酷。
(提交信息里可以使用 fix/fixes/fixed , close/closes/closed 或者 resolve/resolves/resolved等关键词)
#5 链接到 comment
你甚至想链接到一个特定的评论,但无法做到?我在这里告诉你,点击名字旁边的日期/时间就万事大吉。
#6 链接到代码
既然能链接到 comment,那你想问能不能链接到代码上?可以的。
试试这个操作:在查看文件时,点击代码边上的行数。
哇喔,你看到了么?URL 随之更新。如果你按住 Shift 并单击另一个行号,URL 会再次更新,并且高亮这两个行数之间的所有代码段。
你现在可以分享这个 URL 了,但等等,这些还是当前分支,如果文件变化了呢?你需要一个永久链接。
我比较懒,但是下面这一个截图已经能够表达如何获取永久链接了(Copy Permalink):
#7 像使用命令行一样使用 GitHub URL
既然说到了 URL,那么就接着聊一下。使用 UI 浏览 GitHub 很方面也很好,不过很多时候最快的方式是使用 URL 来浏览。举个例子,如果我想跳转到正在处理的分支上,并想查看分支和 master 的差异,我可以在我的仓库名后面输入 /compare/branch-name。
这会使我到达分支的不同页面:
可以在名字后面再加上...XXX(分支名)比如我写的 mkdocs...pre-release,如下图:
这一步你可以配合键盘快捷键,Ctrl + L 或者 cmd + L,可以让光标直接移动到 URL 中(最起码 chrome 是这样)。这些加一起能提高生产力。
专业提示:用键盘移动 chrome URL 上的某一条网页记录,使用 Shift+Delete 或 Shift+fn+Delete 来删除某一条记录。(比如合并了分支之后就可以删除了)
#8 在 issue 中创建 list
你想在你的 issue中看到可多选的 list 么?
当你查看问题时,你想不想让它变成 2 of 5 这样的形式?
如果想,你可以在 issue 中使用以下句法:
- [ ] Screen width (integer) <br style="box-sizing: border-box;font-size: inherit;color: inherit;line-height: inherit;word-wrap: inherit !important;word-break: inherit !important;" />- [x] Service worker support <br style="box-sizing: border-box;font-size: inherit;color: inherit;line-height: inherit;word-wrap: inherit !important;word-break: inherit !important;" />- [x] Fetch support <br style="box-sizing: border-box;font-size: inherit;color: inherit;line-height: inherit;word-wrap: inherit !important;word-break: inherit !important;" />- [ ] CSS flexbox support <br style="box-sizing: border-box;font-size: inherit;color: inherit;line-height: inherit;word-wrap: inherit !important;word-break: inherit !important;" />- [ ] Custom elements
#9 GitHub 上的 project board
我总是用 Jira 做大项目,独立项目用 Trello,这两者我都很喜欢。
后来我知道,GitHub 也有类似的 project board:
我个人为了方便把它们都添加为 note。board 极为方便的帮助你做仓库管理。
你可以点击右上角 Add Cards 来添加东西。这里有些特殊语法方便搜索,比如: is:pr is:open,你就可以把任何公开的 PR 拖到 board 上。
更多语法可以参考search syntax。
你也可以把现存的 note 转化为 issue。
你也可以选择 issue 直接添加到 projects 。
这些意味着,从现在开始,你可以明确责任制度,每一行代码的分配都可以在 GitHub 上的 Project board 上完成,而不用去 Jira 或者 Trello 上。
不过它也有些缺点,比如功能比较少。你也可以试试 ZenHub,它有效的扩展 GitHub。
#10 GitHub WiKi
GitHub WiKi 能够帮助我们处理非结构化的页面集合,就像维基百科那样。我自己 NodeJS docs 就被我弄成 wiki 的样子。几个页面,然后自定义侧边栏。具体方法网上很多,我的页面可以供你参考一下。
建议:如果你有个特别长的单页面 README.md 文件,并且想和其他人有所区别,你可以试试这种形式。
#11 GitHub Pages(JekyII)
你可能已经知道了能使用 GitHub Pages 来托管静态网站。那本条就特别介绍一下如何使用 JekyII 来构建站点。
以最简单的方式,GitHub Pages + JekyII 将以最漂亮的主题来呈现你的 README.md,例如,你可以看一下about-github的自述文件。
在 GitHub 的 my site 中,点击 setting,打开 GitHub Pages,选择一个 JekyII 主题
就会得到一个Jekyll主题页面:
它的优点是:
注意,他需要 Ruby 在本地运行,Mac 自带,Windows 用户自行安装。
#12 把 GitHub 当 CMS 用
你的网站需要显示一些文字,但是你还不想直接放在 HTML 里面,那你可以把 GitHub 作为你储存内容的一个地方。这样,就可以让任何一个非程序员通过修改 Markdown 来修改 HTML 网页的内容。
我的方法是:在你的 GitHub 仓库中使用 markdown 文件来保存文本。在你网站的前端用一个组件来抓取这些文本并呈现在网页上。
我是玩 React 的,这里有个组件,用以抓取,解析并呈现到 HTML 上。
class Markdown extends React.Component {<br style="box-sizing: border-box;font-size: inherit;color: inherit;line-height: inherit;word-wrap: inherit !important;word-break: inherit !important;" /> constructor(props) {<br style="box-sizing: border-box;font-size: inherit;color: inherit;line-height: inherit;word-wrap: inherit !important;word-break: inherit !important;" /> super(props);class Markdown extends React.Component {<br style="box-sizing: border-box;font-size: inherit;color: inherit;line-height: inherit;word-wrap: inherit !important;word-break: inherit !important;" /> constructor(props) {<br style="box-sizing: border-box;font-size: inherit;color: inherit;line-height: inherit;word-wrap: inherit !important;word-break: inherit !important;" /> super(props);<br style="box-sizing: border-box;font-size: inherit;color: inherit;line-height: inherit;word-wrap: inherit !important;word-break: inherit !important;" /><br style="box-sizing: border-box;font-size: inherit;color: inherit;line-height: inherit;word-wrap: inherit !important;word-break: inherit !important;" /> // replace with your URL, obviously<br style="box-sizing: border-box;font-size: inherit;color: inherit;line-height: inherit;word-wrap: inherit !important;word-break: inherit !important;" /> this.baseUrl = 'https://raw.githubusercontent.com/davidgilbertson/about-github/master/text-snippets';<br style="box-sizing: border-box;font-size: inherit;color: inherit;line-height: inherit;word-wrap: inherit !important;word-break: inherit !important;" /><br style="box-sizing: border-box;font-size: inherit;color: inherit;line-height: inherit;word-wrap: inherit !important;word-break: inherit !important;" /> this.state = {<br style="box-sizing: border-box;font-size: inherit;color: inherit;line-height: inherit;word-wrap: inherit !important;word-break: inherit !important;" /> markdown: '',<br style="box-sizing: border-box;font-size: inherit;color: inherit;line-height: inherit;word-wrap: inherit !important;word-break: inherit !important;" /> };<br style="box-sizing: border-box;font-size: inherit;color: inherit;line-height: inherit;word-wrap: inherit !important;word-break: inherit !important;" /> }<br style="box-sizing: border-box;font-size: inherit;color: inherit;line-height: inherit;word-wrap: inherit !important;word-break: inherit !important;" /><br style="box-sizing: border-box;font-size: inherit;color: inherit;line-height: inherit;word-wrap: inherit !important;word-break: inherit !important;" /> componentDidMount() {<br style="box-sizing: border-box;font-size: inherit;color: inherit;line-height: inherit;word-wrap: inherit !important;word-break: inherit !important;" /> fetch(`${this.baseUrl}/${this.props.url}`)<br style="box-sizing: border-box;font-size: inherit;color: inherit;line-height: inherit;word-wrap: inherit !important;word-break: inherit !important;" /> .then(response => response.text())<br style="box-sizing: border-box;font-size: inherit;color: inherit;line-height: inherit;word-wrap: inherit !important;word-break: inherit !important;" /> .then((markdown) => {<br style="box-sizing: border-box;font-size: inherit;color: inherit;line-height: inherit;word-wrap: inherit !important;word-break: inherit !important;" /> this.setState({markdown});<br style="box-sizing: border-box;font-size: inherit;color: inherit;line-height: inherit;word-wrap: inherit !important;word-break: inherit !important;" /> });<br style="box-sizing: border-box;font-size: inherit;color: inherit;line-height: inherit;word-wrap: inherit !important;word-break: inherit !important;" /> }<br style="box-sizing: border-box;font-size: inherit;color: inherit;line-height: inherit;word-wrap: inherit !important;word-break: inherit !important;" /><br style="box-sizing: border-box;font-size: inherit;color: inherit;line-height: inherit;word-wrap: inherit !important;word-break: inherit !important;" /> render() {<br style="box-sizing: border-box;font-size: inherit;color: inherit;line-height: inherit;word-wrap: inherit !important;word-break: inherit !important;" /> return (<br style="box-sizing: border-box;font-size: inherit;color: inherit;line-height: inherit;word-wrap: inherit !important;word-break: inherit !important;" /> <br style="box-sizing: border-box;font-size: inherit;color: inherit;line-height: inherit;word-wrap: inherit !important;word-break: inherit !important;" /> );<br style="box-sizing: border-box;font-size: inherit;color: inherit;line-height: inherit;word-wrap: inherit !important;word-break: inherit !important;" /> }<br style="box-sizing: border-box;font-size: inherit;color: inherit;line-height: inherit;word-wrap: inherit !important;word-break: inherit !important;" />}
(/text-snippets这个文件夹是储存我的 markdown)
下面这段代码是上面组件的示例:
const Page = () => (<br style="box-sizing: border-box;font-size: inherit;color: inherit;line-height: inherit;word-wrap: inherit !important;word-break: inherit !important;" /> <br style="box-sizing: border-box;font-size: inherit;color: inherit;line-height: inherit;word-wrap: inherit !important;word-break: inherit !important;" /> <br style="box-sizing: border-box;font-size: inherit;color: inherit;line-height: inherit;word-wrap: inherit !important;word-break: inherit !important;" /> <br style="box-sizing: border-box;font-size: inherit;color: inherit;line-height: inherit;word-wrap: inherit !important;word-break: inherit !important;" /> <br style="box-sizing: border-box;font-size: inherit;color: inherit;line-height: inherit;word-wrap: inherit !important;word-break: inherit !important;" /><br style="box-sizing: border-box;font-size: inherit;color: inherit;line-height: inherit;word-wrap: inherit !important;word-break: inherit !important;" /> <br style="box-sizing: border-box;font-size: inherit;color: inherit;line-height: inherit;word-wrap: inherit !important;word-break: inherit !important;" /> A very important disclaimer:<br style="box-sizing: border-box;font-size: inherit;color: inherit;line-height: inherit;word-wrap: inherit !important;word-break: inherit !important;" /><br style="box-sizing: border-box;font-size: inherit;color: inherit;line-height: inherit;word-wrap: inherit !important;word-break: inherit !important;" /> <br style="box-sizing: border-box;font-size: inherit;color: inherit;line-height: inherit;word-wrap: inherit !important;word-break: inherit !important;" /> <br style="box-sizing: border-box;font-size: inherit;color: inherit;line-height: inherit;word-wrap: inherit !important;word-break: inherit !important;" /> <br style="box-sizing: border-box;font-size: inherit;color: inherit;line-height: inherit;word-wrap: inherit !important;word-break: inherit !important;" />);
所以现在 GitHub 也是你的 CMS,无论你想要样大小的文字都可以。
推荐一个 GitHub 工具
Octotree Chrome extension
它可以让你在看任何仓库时,获得一个左边的树状图。
查看全部
nodejs抓取动态网页 分享12个GitHub骚操作!
原文:
#1 在 GitHub 上编辑代码
我要先说一个很多人都知道的事儿。
当你使用 GitHub看一些文件时(任何的文本文件或者仓库),能看到一个顶部右侧有一个小铅笔图标。点击即可编辑文档。完成后,按照提示点击「Propose file change」,GitHub 会为你 fork 这个仓库并创建一个 pull request。
很帅吧,不需要 fork / pull / 改变 locally / push / 创建 PR,只需点击一下,GitHub 就为你创建了一个分支。
这对于修改一些排版错误或者防恶意篡改是很有帮助的。
#2 粘贴图像
对于 issue 和 comment,你还可以直接粘贴图片,当你粘贴时图片会被上传至云端,然后以 MarkDown 格式显示。
非常简洁。
#3 格式化代码
如果你想写一个 code block,你可以在开始处写三个反引号,然后 GitHub 会试图猜出你在写什么语言。
但是如果你发布如 Vue、Typescript、JSX 这样的语言,你可以明确写出来,以获取正确的高亮。
下图第一行使用了```jsx:
片段呈现:
(这可以扩展到 gist,顺便一提,如果你给了 gist 定义成 .jsx 扩展名,那么你会得到 JSX 的高亮)
#4 使用魔术词在 PR 中关闭 issue
比如你在创建一个 pull request 去修复 issue #234。那你可在 PR 输入「fixes #234」,就可以自动合并 PR 并关闭这个 issue,是不是很酷。
(提交信息里可以使用 fix/fixes/fixed , close/closes/closed 或者 resolve/resolves/resolved等关键词)
#5 链接到 comment
你甚至想链接到一个特定的评论,但无法做到?我在这里告诉你,点击名字旁边的日期/时间就万事大吉。
#6 链接到代码
既然能链接到 comment,那你想问能不能链接到代码上?可以的。
试试这个操作:在查看文件时,点击代码边上的行数。
哇喔,你看到了么?URL 随之更新。如果你按住 Shift 并单击另一个行号,URL 会再次更新,并且高亮这两个行数之间的所有代码段。
你现在可以分享这个 URL 了,但等等,这些还是当前分支,如果文件变化了呢?你需要一个永久链接。
我比较懒,但是下面这一个截图已经能够表达如何获取永久链接了(Copy Permalink):
#7 像使用命令行一样使用 GitHub URL
既然说到了 URL,那么就接着聊一下。使用 UI 浏览 GitHub 很方面也很好,不过很多时候最快的方式是使用 URL 来浏览。举个例子,如果我想跳转到正在处理的分支上,并想查看分支和 master 的差异,我可以在我的仓库名后面输入 /compare/branch-name。
这会使我到达分支的不同页面:
可以在名字后面再加上...XXX(分支名)比如我写的 mkdocs...pre-release,如下图:
这一步你可以配合键盘快捷键,Ctrl + L 或者 cmd + L,可以让光标直接移动到 URL 中(最起码 chrome 是这样)。这些加一起能提高生产力。
专业提示:用键盘移动 chrome URL 上的某一条网页记录,使用 Shift+Delete 或 Shift+fn+Delete 来删除某一条记录。(比如合并了分支之后就可以删除了)
#8 在 issue 中创建 list
你想在你的 issue中看到可多选的 list 么?
当你查看问题时,你想不想让它变成 2 of 5 这样的形式?
如果想,你可以在 issue 中使用以下句法:
- [ ] Screen width (integer) <br style="box-sizing: border-box;font-size: inherit;color: inherit;line-height: inherit;word-wrap: inherit !important;word-break: inherit !important;" />- [x] Service worker support <br style="box-sizing: border-box;font-size: inherit;color: inherit;line-height: inherit;word-wrap: inherit !important;word-break: inherit !important;" />- [x] Fetch support <br style="box-sizing: border-box;font-size: inherit;color: inherit;line-height: inherit;word-wrap: inherit !important;word-break: inherit !important;" />- [ ] CSS flexbox support <br style="box-sizing: border-box;font-size: inherit;color: inherit;line-height: inherit;word-wrap: inherit !important;word-break: inherit !important;" />- [ ] Custom elements
#9 GitHub 上的 project board
我总是用 Jira 做大项目,独立项目用 Trello,这两者我都很喜欢。
后来我知道,GitHub 也有类似的 project board:
我个人为了方便把它们都添加为 note。board 极为方便的帮助你做仓库管理。
你可以点击右上角 Add Cards 来添加东西。这里有些特殊语法方便搜索,比如: is:pr is:open,你就可以把任何公开的 PR 拖到 board 上。
更多语法可以参考search syntax。
你也可以把现存的 note 转化为 issue。
你也可以选择 issue 直接添加到 projects 。
这些意味着,从现在开始,你可以明确责任制度,每一行代码的分配都可以在 GitHub 上的 Project board 上完成,而不用去 Jira 或者 Trello 上。
不过它也有些缺点,比如功能比较少。你也可以试试 ZenHub,它有效的扩展 GitHub。
#10 GitHub WiKi
GitHub WiKi 能够帮助我们处理非结构化的页面集合,就像维基百科那样。我自己 NodeJS docs 就被我弄成 wiki 的样子。几个页面,然后自定义侧边栏。具体方法网上很多,我的页面可以供你参考一下。
建议:如果你有个特别长的单页面 README.md 文件,并且想和其他人有所区别,你可以试试这种形式。
#11 GitHub Pages(JekyII)
你可能已经知道了能使用 GitHub Pages 来托管静态网站。那本条就特别介绍一下如何使用 JekyII 来构建站点。
以最简单的方式,GitHub Pages + JekyII 将以最漂亮的主题来呈现你的 README.md,例如,你可以看一下about-github的自述文件。
在 GitHub 的 my site 中,点击 setting,打开 GitHub Pages,选择一个 JekyII 主题
就会得到一个Jekyll主题页面:
它的优点是:
注意,他需要 Ruby 在本地运行,Mac 自带,Windows 用户自行安装。
#12 把 GitHub 当 CMS 用
你的网站需要显示一些文字,但是你还不想直接放在 HTML 里面,那你可以把 GitHub 作为你储存内容的一个地方。这样,就可以让任何一个非程序员通过修改 Markdown 来修改 HTML 网页的内容。
我的方法是:在你的 GitHub 仓库中使用 markdown 文件来保存文本。在你网站的前端用一个组件来抓取这些文本并呈现在网页上。
我是玩 React 的,这里有个组件,用以抓取,解析并呈现到 HTML 上。
class Markdown extends React.Component {<br style="box-sizing: border-box;font-size: inherit;color: inherit;line-height: inherit;word-wrap: inherit !important;word-break: inherit !important;" /> constructor(props) {<br style="box-sizing: border-box;font-size: inherit;color: inherit;line-height: inherit;word-wrap: inherit !important;word-break: inherit !important;" /> super(props);class Markdown extends React.Component {<br style="box-sizing: border-box;font-size: inherit;color: inherit;line-height: inherit;word-wrap: inherit !important;word-break: inherit !important;" /> constructor(props) {<br style="box-sizing: border-box;font-size: inherit;color: inherit;line-height: inherit;word-wrap: inherit !important;word-break: inherit !important;" /> super(props);<br style="box-sizing: border-box;font-size: inherit;color: inherit;line-height: inherit;word-wrap: inherit !important;word-break: inherit !important;" /><br style="box-sizing: border-box;font-size: inherit;color: inherit;line-height: inherit;word-wrap: inherit !important;word-break: inherit !important;" /> // replace with your URL, obviously<br style="box-sizing: border-box;font-size: inherit;color: inherit;line-height: inherit;word-wrap: inherit !important;word-break: inherit !important;" /> this.baseUrl = 'https://raw.githubusercontent.com/davidgilbertson/about-github/master/text-snippets';<br style="box-sizing: border-box;font-size: inherit;color: inherit;line-height: inherit;word-wrap: inherit !important;word-break: inherit !important;" /><br style="box-sizing: border-box;font-size: inherit;color: inherit;line-height: inherit;word-wrap: inherit !important;word-break: inherit !important;" /> this.state = {<br style="box-sizing: border-box;font-size: inherit;color: inherit;line-height: inherit;word-wrap: inherit !important;word-break: inherit !important;" /> markdown: '',<br style="box-sizing: border-box;font-size: inherit;color: inherit;line-height: inherit;word-wrap: inherit !important;word-break: inherit !important;" /> };<br style="box-sizing: border-box;font-size: inherit;color: inherit;line-height: inherit;word-wrap: inherit !important;word-break: inherit !important;" /> }<br style="box-sizing: border-box;font-size: inherit;color: inherit;line-height: inherit;word-wrap: inherit !important;word-break: inherit !important;" /><br style="box-sizing: border-box;font-size: inherit;color: inherit;line-height: inherit;word-wrap: inherit !important;word-break: inherit !important;" /> componentDidMount() {<br style="box-sizing: border-box;font-size: inherit;color: inherit;line-height: inherit;word-wrap: inherit !important;word-break: inherit !important;" /> fetch(`${this.baseUrl}/${this.props.url}`)<br style="box-sizing: border-box;font-size: inherit;color: inherit;line-height: inherit;word-wrap: inherit !important;word-break: inherit !important;" /> .then(response => response.text())<br style="box-sizing: border-box;font-size: inherit;color: inherit;line-height: inherit;word-wrap: inherit !important;word-break: inherit !important;" /> .then((markdown) => {<br style="box-sizing: border-box;font-size: inherit;color: inherit;line-height: inherit;word-wrap: inherit !important;word-break: inherit !important;" /> this.setState({markdown});<br style="box-sizing: border-box;font-size: inherit;color: inherit;line-height: inherit;word-wrap: inherit !important;word-break: inherit !important;" /> });<br style="box-sizing: border-box;font-size: inherit;color: inherit;line-height: inherit;word-wrap: inherit !important;word-break: inherit !important;" /> }<br style="box-sizing: border-box;font-size: inherit;color: inherit;line-height: inherit;word-wrap: inherit !important;word-break: inherit !important;" /><br style="box-sizing: border-box;font-size: inherit;color: inherit;line-height: inherit;word-wrap: inherit !important;word-break: inherit !important;" /> render() {<br style="box-sizing: border-box;font-size: inherit;color: inherit;line-height: inherit;word-wrap: inherit !important;word-break: inherit !important;" /> return (<br style="box-sizing: border-box;font-size: inherit;color: inherit;line-height: inherit;word-wrap: inherit !important;word-break: inherit !important;" /> <br style="box-sizing: border-box;font-size: inherit;color: inherit;line-height: inherit;word-wrap: inherit !important;word-break: inherit !important;" /> );<br style="box-sizing: border-box;font-size: inherit;color: inherit;line-height: inherit;word-wrap: inherit !important;word-break: inherit !important;" /> }<br style="box-sizing: border-box;font-size: inherit;color: inherit;line-height: inherit;word-wrap: inherit !important;word-break: inherit !important;" />}
(/text-snippets这个文件夹是储存我的 markdown)
下面这段代码是上面组件的示例:
const Page = () => (<br style="box-sizing: border-box;font-size: inherit;color: inherit;line-height: inherit;word-wrap: inherit !important;word-break: inherit !important;" /> <br style="box-sizing: border-box;font-size: inherit;color: inherit;line-height: inherit;word-wrap: inherit !important;word-break: inherit !important;" /> <br style="box-sizing: border-box;font-size: inherit;color: inherit;line-height: inherit;word-wrap: inherit !important;word-break: inherit !important;" /> <br style="box-sizing: border-box;font-size: inherit;color: inherit;line-height: inherit;word-wrap: inherit !important;word-break: inherit !important;" /> <br style="box-sizing: border-box;font-size: inherit;color: inherit;line-height: inherit;word-wrap: inherit !important;word-break: inherit !important;" /><br style="box-sizing: border-box;font-size: inherit;color: inherit;line-height: inherit;word-wrap: inherit !important;word-break: inherit !important;" /> <br style="box-sizing: border-box;font-size: inherit;color: inherit;line-height: inherit;word-wrap: inherit !important;word-break: inherit !important;" /> A very important disclaimer:<br style="box-sizing: border-box;font-size: inherit;color: inherit;line-height: inherit;word-wrap: inherit !important;word-break: inherit !important;" /><br style="box-sizing: border-box;font-size: inherit;color: inherit;line-height: inherit;word-wrap: inherit !important;word-break: inherit !important;" /> <br style="box-sizing: border-box;font-size: inherit;color: inherit;line-height: inherit;word-wrap: inherit !important;word-break: inherit !important;" /> <br style="box-sizing: border-box;font-size: inherit;color: inherit;line-height: inherit;word-wrap: inherit !important;word-break: inherit !important;" /> <br style="box-sizing: border-box;font-size: inherit;color: inherit;line-height: inherit;word-wrap: inherit !important;word-break: inherit !important;" />);
所以现在 GitHub 也是你的 CMS,无论你想要样大小的文字都可以。
推荐一个 GitHub 工具
Octotree Chrome extension
它可以让你在看任何仓库时,获得一个左边的树状图。
nodejs抓取动态网页 分享12个GitHub骚操作!
网站优化 • 优采云 发表了文章 • 0 个评论 • 72 次浏览 • 2022-06-19 21:45
原文:
#1 在 GitHub 上编辑代码
我要先说一个很多人都知道的事儿。
当你使用 GitHub看一些文件时(任何的文本文件或者仓库),能看到一个顶部右侧有一个小铅笔图标。点击即可编辑文档。完成后,按照提示点击「Propose file change」,GitHub 会为你 fork 这个仓库并创建一个 pull request。
很帅吧,不需要 fork / pull / 改变 locally / push / 创建 PR,只需点击一下,GitHub 就为你创建了一个分支。
这对于修改一些排版错误或者防恶意篡改是很有帮助的。
#2 粘贴图像
对于 issue 和 comment,你还可以直接粘贴图片,当你粘贴时图片会被上传至云端,然后以 MarkDown 格式显示。
非常简洁。
#3 格式化代码
如果你想写一个 code block,你可以在开始处写三个反引号,然后 GitHub 会试图猜出你在写什么语言。
但是如果你发布如 Vue、Typescript、JSX 这样的语言,你可以明确写出来,以获取正确的高亮。
下图第一行使用了```jsx:
片段呈现:
(这可以扩展到 gist,顺便一提,如果你给了 gist 定义成 .jsx 扩展名,那么你会得到 JSX 的高亮)
#4 使用魔术词在 PR 中关闭 issue
比如你在创建一个 pull request 去修复 issue #234。那你可在 PR 输入「fixes #234」,就可以自动合并 PR 并关闭这个 issue,是不是很酷。
(提交信息里可以使用 fix/fixes/fixed , close/closes/closed 或者 resolve/resolves/resolved等关键词)
#5 链接到 comment
你甚至想链接到一个特定的评论,但无法做到?我在这里告诉你,点击名字旁边的日期/时间就万事大吉。
#6 链接到代码
既然能链接到 comment,那你想问能不能链接到代码上?可以的。
试试这个操作:在查看文件时,点击代码边上的行数。
哇喔,你看到了么?URL 随之更新。如果你按住 Shift 并单击另一个行号,URL 会再次更新,并且高亮这两个行数之间的所有代码段。
你现在可以分享这个 URL 了,但等等,这些还是当前分支,如果文件变化了呢?你需要一个永久链接。
我比较懒,但是下面这一个截图已经能够表达如何获取永久链接了(Copy Permalink):
#7 像使用命令行一样使用 GitHub URL
既然说到了 URL,那么就接着聊一下。使用 UI 浏览 GitHub 很方面也很好,不过很多时候最快的方式是使用 URL 来浏览。举个例子,如果我想跳转到正在处理的分支上,并想查看分支和 master 的差异,我可以在我的仓库名后面输入 /compare/branch-name。
这会使我到达分支的不同页面:
可以在名字后面再加上...XXX(分支名)比如我写的 mkdocs...pre-release,如下图:
这一步你可以配合键盘快捷键,Ctrl + L 或者 cmd + L,可以让光标直接移动到 URL 中(最起码 chrome 是这样)。这些加一起能提高生产力。
专业提示:用键盘移动 chrome URL 上的某一条网页记录,使用 Shift+Delete 或 Shift+fn+Delete 来删除某一条记录。(比如合并了分支之后就可以删除了)
#8 在 issue 中创建 list
你想在你的 issue中看到可多选的 list 么?
当你查看问题时,你想不想让它变成 2 of 5 这样的形式?
如果想,你可以在 issue 中使用以下句法:
- [ ] Screen width (integer) <br style="box-sizing: border-box;font-size: inherit;color: inherit;line-height: inherit;word-wrap: inherit !important;word-break: inherit !important;" />- [x] Service worker support <br style="box-sizing: border-box;font-size: inherit;color: inherit;line-height: inherit;word-wrap: inherit !important;word-break: inherit !important;" />- [x] Fetch support <br style="box-sizing: border-box;font-size: inherit;color: inherit;line-height: inherit;word-wrap: inherit !important;word-break: inherit !important;" />- [ ] CSS flexbox support <br style="box-sizing: border-box;font-size: inherit;color: inherit;line-height: inherit;word-wrap: inherit !important;word-break: inherit !important;" />- [ ] Custom elements
#9 GitHub 上的 project board
我总是用 Jira 做大项目,独立项目用 Trello,这两者我都很喜欢。
后来我知道,GitHub 也有类似的 project board:
我个人为了方便把它们都添加为 note。board 极为方便的帮助你做仓库管理。
你可以点击右上角 Add Cards 来添加东西。这里有些特殊语法方便搜索,比如: is:pr is:open,你就可以把任何公开的 PR 拖到 board 上。
更多语法可以参考search syntax。
你也可以把现存的 note 转化为 issue。
你也可以选择 issue 直接添加到 projects 。
这些意味着,从现在开始,你可以明确责任制度,每一行代码的分配都可以在 GitHub 上的 Project board 上完成,而不用去 Jira 或者 Trello 上。
不过它也有些缺点,比如功能比较少。你也可以试试 ZenHub,它有效的扩展 GitHub。
#10 GitHub WiKi
GitHub WiKi 能够帮助我们处理非结构化的页面集合,就像维基百科那样。我自己 NodeJS docs 就被我弄成 wiki 的样子。几个页面,然后自定义侧边栏。具体方法网上很多,我的页面可以供你参考一下。
建议:如果你有个特别长的单页面 README.md 文件,并且想和其他人有所区别,你可以试试这种形式。
#11 GitHub Pages(JekyII)
你可能已经知道了能使用 GitHub Pages 来托管静态网站。那本条就特别介绍一下如何使用 JekyII 来构建站点。
以最简单的方式,GitHub Pages + JekyII 将以最漂亮的主题来呈现你的 README.md,例如,你可以看一下about-github的自述文件。
在 GitHub 的 my site 中,点击 setting,打开 GitHub Pages,选择一个 JekyII 主题
就会得到一个Jekyll主题页面:
它的优点是:
注意,他需要 Ruby 在本地运行,Mac 自带,Windows 用户自行安装。
#12 把 GitHub 当 CMS 用
你的网站需要显示一些文字,但是你还不想直接放在 HTML 里面,那你可以把 GitHub 作为你储存内容的一个地方。这样,就可以让任何一个非程序员通过修改 Markdown 来修改 HTML 网页的内容。
我的方法是:在你的 GitHub 仓库中使用 markdown 文件来保存文本。在你网站的前端用一个组件来抓取这些文本并呈现在网页上。
我是玩 React 的,这里有个组件,用以抓取,解析并呈现到 HTML 上。
class Markdown extends React.Component {<br style="box-sizing: border-box;font-size: inherit;color: inherit;line-height: inherit;word-wrap: inherit !important;word-break: inherit !important;" /> constructor(props) {<br style="box-sizing: border-box;font-size: inherit;color: inherit;line-height: inherit;word-wrap: inherit !important;word-break: inherit !important;" /> super(props);class Markdown extends React.Component {<br style="box-sizing: border-box;font-size: inherit;color: inherit;line-height: inherit;word-wrap: inherit !important;word-break: inherit !important;" /> constructor(props) {<br style="box-sizing: border-box;font-size: inherit;color: inherit;line-height: inherit;word-wrap: inherit !important;word-break: inherit !important;" /> super(props);<br style="box-sizing: border-box;font-size: inherit;color: inherit;line-height: inherit;word-wrap: inherit !important;word-break: inherit !important;" /><br style="box-sizing: border-box;font-size: inherit;color: inherit;line-height: inherit;word-wrap: inherit !important;word-break: inherit !important;" /> // replace with your URL, obviously<br style="box-sizing: border-box;font-size: inherit;color: inherit;line-height: inherit;word-wrap: inherit !important;word-break: inherit !important;" /> this.baseUrl = 'https://raw.githubusercontent.com/davidgilbertson/about-github/master/text-snippets';<br style="box-sizing: border-box;font-size: inherit;color: inherit;line-height: inherit;word-wrap: inherit !important;word-break: inherit !important;" /><br style="box-sizing: border-box;font-size: inherit;color: inherit;line-height: inherit;word-wrap: inherit !important;word-break: inherit !important;" /> this.state = {<br style="box-sizing: border-box;font-size: inherit;color: inherit;line-height: inherit;word-wrap: inherit !important;word-break: inherit !important;" /> markdown: '',<br style="box-sizing: border-box;font-size: inherit;color: inherit;line-height: inherit;word-wrap: inherit !important;word-break: inherit !important;" /> };<br style="box-sizing: border-box;font-size: inherit;color: inherit;line-height: inherit;word-wrap: inherit !important;word-break: inherit !important;" /> }<br style="box-sizing: border-box;font-size: inherit;color: inherit;line-height: inherit;word-wrap: inherit !important;word-break: inherit !important;" /><br style="box-sizing: border-box;font-size: inherit;color: inherit;line-height: inherit;word-wrap: inherit !important;word-break: inherit !important;" /> componentDidMount() {<br style="box-sizing: border-box;font-size: inherit;color: inherit;line-height: inherit;word-wrap: inherit !important;word-break: inherit !important;" /> fetch(`${this.baseUrl}/${this.props.url}`)<br style="box-sizing: border-box;font-size: inherit;color: inherit;line-height: inherit;word-wrap: inherit !important;word-break: inherit !important;" /> .then(response => response.text())<br style="box-sizing: border-box;font-size: inherit;color: inherit;line-height: inherit;word-wrap: inherit !important;word-break: inherit !important;" /> .then((markdown) => {<br style="box-sizing: border-box;font-size: inherit;color: inherit;line-height: inherit;word-wrap: inherit !important;word-break: inherit !important;" /> this.setState({markdown});<br style="box-sizing: border-box;font-size: inherit;color: inherit;line-height: inherit;word-wrap: inherit !important;word-break: inherit !important;" /> });<br style="box-sizing: border-box;font-size: inherit;color: inherit;line-height: inherit;word-wrap: inherit !important;word-break: inherit !important;" /> }<br style="box-sizing: border-box;font-size: inherit;color: inherit;line-height: inherit;word-wrap: inherit !important;word-break: inherit !important;" /><br style="box-sizing: border-box;font-size: inherit;color: inherit;line-height: inherit;word-wrap: inherit !important;word-break: inherit !important;" /> render() {<br style="box-sizing: border-box;font-size: inherit;color: inherit;line-height: inherit;word-wrap: inherit !important;word-break: inherit !important;" /> return (<br style="box-sizing: border-box;font-size: inherit;color: inherit;line-height: inherit;word-wrap: inherit !important;word-break: inherit !important;" /> <br style="box-sizing: border-box;font-size: inherit;color: inherit;line-height: inherit;word-wrap: inherit !important;word-break: inherit !important;" /> );<br style="box-sizing: border-box;font-size: inherit;color: inherit;line-height: inherit;word-wrap: inherit !important;word-break: inherit !important;" /> }<br style="box-sizing: border-box;font-size: inherit;color: inherit;line-height: inherit;word-wrap: inherit !important;word-break: inherit !important;" />}
(/text-snippets这个文件夹是储存我的 markdown)
下面这段代码是上面组件的示例:
const Page = () => (<br style="box-sizing: border-box;font-size: inherit;color: inherit;line-height: inherit;word-wrap: inherit !important;word-break: inherit !important;" /> <br style="box-sizing: border-box;font-size: inherit;color: inherit;line-height: inherit;word-wrap: inherit !important;word-break: inherit !important;" /> <br style="box-sizing: border-box;font-size: inherit;color: inherit;line-height: inherit;word-wrap: inherit !important;word-break: inherit !important;" /> <br style="box-sizing: border-box;font-size: inherit;color: inherit;line-height: inherit;word-wrap: inherit !important;word-break: inherit !important;" /> <br style="box-sizing: border-box;font-size: inherit;color: inherit;line-height: inherit;word-wrap: inherit !important;word-break: inherit !important;" /><br style="box-sizing: border-box;font-size: inherit;color: inherit;line-height: inherit;word-wrap: inherit !important;word-break: inherit !important;" /> <br style="box-sizing: border-box;font-size: inherit;color: inherit;line-height: inherit;word-wrap: inherit !important;word-break: inherit !important;" /> A very important disclaimer:<br style="box-sizing: border-box;font-size: inherit;color: inherit;line-height: inherit;word-wrap: inherit !important;word-break: inherit !important;" /><br style="box-sizing: border-box;font-size: inherit;color: inherit;line-height: inherit;word-wrap: inherit !important;word-break: inherit !important;" /> <br style="box-sizing: border-box;font-size: inherit;color: inherit;line-height: inherit;word-wrap: inherit !important;word-break: inherit !important;" /> <br style="box-sizing: border-box;font-size: inherit;color: inherit;line-height: inherit;word-wrap: inherit !important;word-break: inherit !important;" /> <br style="box-sizing: border-box;font-size: inherit;color: inherit;line-height: inherit;word-wrap: inherit !important;word-break: inherit !important;" />);
所以现在 GitHub 也是你的 CMS,无论你想要样大小的文字都可以。
推荐一个 GitHub 工具
Octotree Chrome extension
它可以让你在看任何仓库时,获得一个左边的树状图。
查看全部
nodejs抓取动态网页 分享12个GitHub骚操作!
原文:
#1 在 GitHub 上编辑代码
我要先说一个很多人都知道的事儿。
当你使用 GitHub看一些文件时(任何的文本文件或者仓库),能看到一个顶部右侧有一个小铅笔图标。点击即可编辑文档。完成后,按照提示点击「Propose file change」,GitHub 会为你 fork 这个仓库并创建一个 pull request。
很帅吧,不需要 fork / pull / 改变 locally / push / 创建 PR,只需点击一下,GitHub 就为你创建了一个分支。
这对于修改一些排版错误或者防恶意篡改是很有帮助的。
#2 粘贴图像
对于 issue 和 comment,你还可以直接粘贴图片,当你粘贴时图片会被上传至云端,然后以 MarkDown 格式显示。
非常简洁。
#3 格式化代码
如果你想写一个 code block,你可以在开始处写三个反引号,然后 GitHub 会试图猜出你在写什么语言。
但是如果你发布如 Vue、Typescript、JSX 这样的语言,你可以明确写出来,以获取正确的高亮。
下图第一行使用了```jsx:
片段呈现:
(这可以扩展到 gist,顺便一提,如果你给了 gist 定义成 .jsx 扩展名,那么你会得到 JSX 的高亮)
#4 使用魔术词在 PR 中关闭 issue
比如你在创建一个 pull request 去修复 issue #234。那你可在 PR 输入「fixes #234」,就可以自动合并 PR 并关闭这个 issue,是不是很酷。
(提交信息里可以使用 fix/fixes/fixed , close/closes/closed 或者 resolve/resolves/resolved等关键词)
#5 链接到 comment
你甚至想链接到一个特定的评论,但无法做到?我在这里告诉你,点击名字旁边的日期/时间就万事大吉。
#6 链接到代码
既然能链接到 comment,那你想问能不能链接到代码上?可以的。
试试这个操作:在查看文件时,点击代码边上的行数。
哇喔,你看到了么?URL 随之更新。如果你按住 Shift 并单击另一个行号,URL 会再次更新,并且高亮这两个行数之间的所有代码段。
你现在可以分享这个 URL 了,但等等,这些还是当前分支,如果文件变化了呢?你需要一个永久链接。
我比较懒,但是下面这一个截图已经能够表达如何获取永久链接了(Copy Permalink):
#7 像使用命令行一样使用 GitHub URL
既然说到了 URL,那么就接着聊一下。使用 UI 浏览 GitHub 很方面也很好,不过很多时候最快的方式是使用 URL 来浏览。举个例子,如果我想跳转到正在处理的分支上,并想查看分支和 master 的差异,我可以在我的仓库名后面输入 /compare/branch-name。
这会使我到达分支的不同页面:
可以在名字后面再加上...XXX(分支名)比如我写的 mkdocs...pre-release,如下图:
这一步你可以配合键盘快捷键,Ctrl + L 或者 cmd + L,可以让光标直接移动到 URL 中(最起码 chrome 是这样)。这些加一起能提高生产力。
专业提示:用键盘移动 chrome URL 上的某一条网页记录,使用 Shift+Delete 或 Shift+fn+Delete 来删除某一条记录。(比如合并了分支之后就可以删除了)
#8 在 issue 中创建 list
你想在你的 issue中看到可多选的 list 么?
当你查看问题时,你想不想让它变成 2 of 5 这样的形式?
如果想,你可以在 issue 中使用以下句法:
- [ ] Screen width (integer) <br style="box-sizing: border-box;font-size: inherit;color: inherit;line-height: inherit;word-wrap: inherit !important;word-break: inherit !important;" />- [x] Service worker support <br style="box-sizing: border-box;font-size: inherit;color: inherit;line-height: inherit;word-wrap: inherit !important;word-break: inherit !important;" />- [x] Fetch support <br style="box-sizing: border-box;font-size: inherit;color: inherit;line-height: inherit;word-wrap: inherit !important;word-break: inherit !important;" />- [ ] CSS flexbox support <br style="box-sizing: border-box;font-size: inherit;color: inherit;line-height: inherit;word-wrap: inherit !important;word-break: inherit !important;" />- [ ] Custom elements
#9 GitHub 上的 project board
我总是用 Jira 做大项目,独立项目用 Trello,这两者我都很喜欢。
后来我知道,GitHub 也有类似的 project board:
我个人为了方便把它们都添加为 note。board 极为方便的帮助你做仓库管理。
你可以点击右上角 Add Cards 来添加东西。这里有些特殊语法方便搜索,比如: is:pr is:open,你就可以把任何公开的 PR 拖到 board 上。
更多语法可以参考search syntax。
你也可以把现存的 note 转化为 issue。
你也可以选择 issue 直接添加到 projects 。
这些意味着,从现在开始,你可以明确责任制度,每一行代码的分配都可以在 GitHub 上的 Project board 上完成,而不用去 Jira 或者 Trello 上。
不过它也有些缺点,比如功能比较少。你也可以试试 ZenHub,它有效的扩展 GitHub。
#10 GitHub WiKi
GitHub WiKi 能够帮助我们处理非结构化的页面集合,就像维基百科那样。我自己 NodeJS docs 就被我弄成 wiki 的样子。几个页面,然后自定义侧边栏。具体方法网上很多,我的页面可以供你参考一下。
建议:如果你有个特别长的单页面 README.md 文件,并且想和其他人有所区别,你可以试试这种形式。
#11 GitHub Pages(JekyII)
你可能已经知道了能使用 GitHub Pages 来托管静态网站。那本条就特别介绍一下如何使用 JekyII 来构建站点。
以最简单的方式,GitHub Pages + JekyII 将以最漂亮的主题来呈现你的 README.md,例如,你可以看一下about-github的自述文件。
在 GitHub 的 my site 中,点击 setting,打开 GitHub Pages,选择一个 JekyII 主题
就会得到一个Jekyll主题页面:
它的优点是:
注意,他需要 Ruby 在本地运行,Mac 自带,Windows 用户自行安装。
#12 把 GitHub 当 CMS 用
你的网站需要显示一些文字,但是你还不想直接放在 HTML 里面,那你可以把 GitHub 作为你储存内容的一个地方。这样,就可以让任何一个非程序员通过修改 Markdown 来修改 HTML 网页的内容。
我的方法是:在你的 GitHub 仓库中使用 markdown 文件来保存文本。在你网站的前端用一个组件来抓取这些文本并呈现在网页上。
我是玩 React 的,这里有个组件,用以抓取,解析并呈现到 HTML 上。
class Markdown extends React.Component {<br style="box-sizing: border-box;font-size: inherit;color: inherit;line-height: inherit;word-wrap: inherit !important;word-break: inherit !important;" /> constructor(props) {<br style="box-sizing: border-box;font-size: inherit;color: inherit;line-height: inherit;word-wrap: inherit !important;word-break: inherit !important;" /> super(props);class Markdown extends React.Component {<br style="box-sizing: border-box;font-size: inherit;color: inherit;line-height: inherit;word-wrap: inherit !important;word-break: inherit !important;" /> constructor(props) {<br style="box-sizing: border-box;font-size: inherit;color: inherit;line-height: inherit;word-wrap: inherit !important;word-break: inherit !important;" /> super(props);<br style="box-sizing: border-box;font-size: inherit;color: inherit;line-height: inherit;word-wrap: inherit !important;word-break: inherit !important;" /><br style="box-sizing: border-box;font-size: inherit;color: inherit;line-height: inherit;word-wrap: inherit !important;word-break: inherit !important;" /> // replace with your URL, obviously<br style="box-sizing: border-box;font-size: inherit;color: inherit;line-height: inherit;word-wrap: inherit !important;word-break: inherit !important;" /> this.baseUrl = 'https://raw.githubusercontent.com/davidgilbertson/about-github/master/text-snippets';<br style="box-sizing: border-box;font-size: inherit;color: inherit;line-height: inherit;word-wrap: inherit !important;word-break: inherit !important;" /><br style="box-sizing: border-box;font-size: inherit;color: inherit;line-height: inherit;word-wrap: inherit !important;word-break: inherit !important;" /> this.state = {<br style="box-sizing: border-box;font-size: inherit;color: inherit;line-height: inherit;word-wrap: inherit !important;word-break: inherit !important;" /> markdown: '',<br style="box-sizing: border-box;font-size: inherit;color: inherit;line-height: inherit;word-wrap: inherit !important;word-break: inherit !important;" /> };<br style="box-sizing: border-box;font-size: inherit;color: inherit;line-height: inherit;word-wrap: inherit !important;word-break: inherit !important;" /> }<br style="box-sizing: border-box;font-size: inherit;color: inherit;line-height: inherit;word-wrap: inherit !important;word-break: inherit !important;" /><br style="box-sizing: border-box;font-size: inherit;color: inherit;line-height: inherit;word-wrap: inherit !important;word-break: inherit !important;" /> componentDidMount() {<br style="box-sizing: border-box;font-size: inherit;color: inherit;line-height: inherit;word-wrap: inherit !important;word-break: inherit !important;" /> fetch(`${this.baseUrl}/${this.props.url}`)<br style="box-sizing: border-box;font-size: inherit;color: inherit;line-height: inherit;word-wrap: inherit !important;word-break: inherit !important;" /> .then(response => response.text())<br style="box-sizing: border-box;font-size: inherit;color: inherit;line-height: inherit;word-wrap: inherit !important;word-break: inherit !important;" /> .then((markdown) => {<br style="box-sizing: border-box;font-size: inherit;color: inherit;line-height: inherit;word-wrap: inherit !important;word-break: inherit !important;" /> this.setState({markdown});<br style="box-sizing: border-box;font-size: inherit;color: inherit;line-height: inherit;word-wrap: inherit !important;word-break: inherit !important;" /> });<br style="box-sizing: border-box;font-size: inherit;color: inherit;line-height: inherit;word-wrap: inherit !important;word-break: inherit !important;" /> }<br style="box-sizing: border-box;font-size: inherit;color: inherit;line-height: inherit;word-wrap: inherit !important;word-break: inherit !important;" /><br style="box-sizing: border-box;font-size: inherit;color: inherit;line-height: inherit;word-wrap: inherit !important;word-break: inherit !important;" /> render() {<br style="box-sizing: border-box;font-size: inherit;color: inherit;line-height: inherit;word-wrap: inherit !important;word-break: inherit !important;" /> return (<br style="box-sizing: border-box;font-size: inherit;color: inherit;line-height: inherit;word-wrap: inherit !important;word-break: inherit !important;" /> <br style="box-sizing: border-box;font-size: inherit;color: inherit;line-height: inherit;word-wrap: inherit !important;word-break: inherit !important;" /> );<br style="box-sizing: border-box;font-size: inherit;color: inherit;line-height: inherit;word-wrap: inherit !important;word-break: inherit !important;" /> }<br style="box-sizing: border-box;font-size: inherit;color: inherit;line-height: inherit;word-wrap: inherit !important;word-break: inherit !important;" />}
(/text-snippets这个文件夹是储存我的 markdown)
下面这段代码是上面组件的示例:
const Page = () => (<br style="box-sizing: border-box;font-size: inherit;color: inherit;line-height: inherit;word-wrap: inherit !important;word-break: inherit !important;" /> <br style="box-sizing: border-box;font-size: inherit;color: inherit;line-height: inherit;word-wrap: inherit !important;word-break: inherit !important;" /> <br style="box-sizing: border-box;font-size: inherit;color: inherit;line-height: inherit;word-wrap: inherit !important;word-break: inherit !important;" /> <br style="box-sizing: border-box;font-size: inherit;color: inherit;line-height: inherit;word-wrap: inherit !important;word-break: inherit !important;" /> <br style="box-sizing: border-box;font-size: inherit;color: inherit;line-height: inherit;word-wrap: inherit !important;word-break: inherit !important;" /><br style="box-sizing: border-box;font-size: inherit;color: inherit;line-height: inherit;word-wrap: inherit !important;word-break: inherit !important;" /> <br style="box-sizing: border-box;font-size: inherit;color: inherit;line-height: inherit;word-wrap: inherit !important;word-break: inherit !important;" /> A very important disclaimer:<br style="box-sizing: border-box;font-size: inherit;color: inherit;line-height: inherit;word-wrap: inherit !important;word-break: inherit !important;" /><br style="box-sizing: border-box;font-size: inherit;color: inherit;line-height: inherit;word-wrap: inherit !important;word-break: inherit !important;" /> <br style="box-sizing: border-box;font-size: inherit;color: inherit;line-height: inherit;word-wrap: inherit !important;word-break: inherit !important;" /> <br style="box-sizing: border-box;font-size: inherit;color: inherit;line-height: inherit;word-wrap: inherit !important;word-break: inherit !important;" /> <br style="box-sizing: border-box;font-size: inherit;color: inherit;line-height: inherit;word-wrap: inherit !important;word-break: inherit !important;" />);
所以现在 GitHub 也是你的 CMS,无论你想要样大小的文字都可以。
推荐一个 GitHub 工具
Octotree Chrome extension
它可以让你在看任何仓库时,获得一个左边的树状图。
nodejs抓取动态网页 全面深入理解预渲染技术体系
网站优化 • 优采云 发表了文章 • 0 个评论 • 80 次浏览 • 2022-06-18 06:36
在我们使用现代前端框架,比如Vue、React、Angular开发完毕前端项目之后,会发现这些页面输出的全是js,很不利于搜索引擎去爬取。在已经完成了单页应用(SPA)项目之后,如果要进行SEO优化的改造,这时候就可以使用预渲染技术体系。
下面将从适用场景、概念介绍、如何使用、底层原理几方面全面介绍预渲染技术的各项特性。适用场景在谈使用场景之前,首先需要明白以下几点:现代前端框架比如 Vue 在构建完成之后,页面加载的其实是一堆 js,再由 js 动态生成DOM。当我们访问页面,右键“显示网页源代码”的时候,看不到文字等内容百度、搜狗等爬虫在抓取页面的时候,不会执行页面的 js 源代码(谷歌爬虫可以执行“同步” js 来构建页面,因此 Vue 等框架开发的单页应用可以在谷歌搜索引擎中很好的被收录,这点我们不展开讨论)如果想要让百度、搜狗等收录索引我们的网站,就必须像静态 HTML 那样,让网页在右键查看源代码的时候,显示的是文字、图片等内容在这样的场景下,我们可以使用预渲染来解决此类问题。概念介绍
预渲染概念简单来讲是这样的:在项目构建阶段,我们会模拟访问项目的页面URL,这时候页面上的 js 将会执行并且形成真正的 HTML 片段;此时我们保存这个 HTML 文件到服务器硬盘上,下次不管是用户还是爬虫访问的时候,就直接返回这个物理文件,这样就可以有效解决 SEO 无法收录的问题。大体流程如下图:
可以看出,“预渲染”同“服务端渲染”最大的区别是,前者是在构建期间执行,后者在用户访问期间实时运行;前者在构建完成之后就不再需要 node服务,后者需要使用 node 作为运行时。预渲染也有它不适用的地方。正因为在构建阶段我们需要指明“需要构建的页面URL”,因此对于那些携带动态参数的页面(比如资料详情页),不适用于用预渲染去构建。这种场景下只能使用SSR。反之,一切静态官网、带数据的门户网站,只要是URL固定的,不管其中有没有动态数据,都可以使用预渲染。这里你可能会问一个问题:预渲染技术能否将 ajax 请求的内容也填充到页面上?答案是肯定的。虽然你 ajax 并非“同步执行”的 js,我们无法获知异步请求完成的时机。但通过控制监测页面上某个特定元素是否存在等手段,我们可以变相获知到数据返回的时机,从而进行预渲染。就可以达到“填充 ajax 数据”的效果(这可是谷歌爬虫也无法达到的效果哦)。如何使用预渲染技术有很多种实现方式。最常用的是使用 webpack 的一个插件: prerender-spa-plugin()。但是这个插件有很多局限性,最大的局限性在于必须结合 webpack 来使用,不够灵活,不易调试。也无法通过编程的方式使用。
比如我们的首页有动态的数据(非动态URL。是通过ajax获取的动态数据。)因此我们在使用了预渲染生成了静态首页之后,需要每间隔10分钟或者5分钟重新生成一个新的静态页,来更新数据。这就需要能够通过编程的方式调用渲染指令。在这样的情况下我基于这个插件的原理重新实现了一个包:@waitkafuka/spa-prerender(),可以通过 nodejs 通过编程的方式使用。
同时它剥离了 webpack 的依赖,剥离了对SPA页面的限制。只要有一个静态目录就可以工作。使用的方式非常简单,以 Vue 为例,在我们正常构建生成了 dist 目录之后,只需要编写以下脚本:
const SpaRenderer = require('@waitkafuka/spa-prerender');const path = require('path');<br />const options = {staticDir: path.join(__dirname, 'dist'),basePath: 'base',//可选,当项目有basePath的时候设置。同router中的base和publicPath。确保staticDir/basePath/index.html存在 routes: ['/','/exam', ],puppeteerOptions: {headless: true,maxConcurrentRoutes: 0,renderAfterDocumentEvent: 'render-event',skipThirdPartyRequests: true }};const spaRenderer = new SpaRenderer(options)spaRenderer.render().then(() => {console.log('预渲染完毕。');});
具体的参数解析可以查看 @waitkafuka/spa-prerender。底层原理在底层实现上,主要利用了 express 来驱动静态页面;然后利用 puppeteer 无头浏览器来模拟用户访问所需要预渲染的地址;在访问完成之后,保存页面HTML到文件夹中。
流程如下:
更为详细的流程介绍如下(此部分枯燥乏味,非专业人士可以跳过。):
阶段1:创建渲染器实例
spa-prerender index.js:
1.创建puppeteer实例 @prerenderer/renderer-puppeteer/es6/renderer.js
2.创建server实例@prerenderer/prerenderer/es6/server.js
3.创建renderer实例,将1 2步的puppeteer和server注入this @@prerenderer/prerenderer/es6/index.js
阶段2:渲染器实例初始化:spa-prerender index.js:
1.server初始化 (设置路由:静态资源利用*.*映射到staticDir上,其他请求全部映射到index.html上。设置静态资源和index.html路径,modifyServer也在这个阶段。server 启动)@prerenderer/prerenderer/es6/server.js
2.puppeteer初始化(判断平台是否linux,如果是Linux需要设置一些启动参数;启动puppeteer)@prerenderer/renderer-puppeteer/es6/renderer.js
阶段3:开始访问路由并获取html
1.spa-prerender index.js->@prerenderer/prerenderer/es6/index.js -> @prerenderer/renderer-puppeteer/es6/renderer.js
2.开启一个限流器,每次最多渲染 n 条路由,避免内存崩溃
3.puppeteer开启一个新标签,判断是否有inject,如果有,注入到window上
4.拼接端口、设置viewport,拼接router,形成url,发起页面的请求
5.判断options中是否设置了renderAfterDocumentEvent,如果有,给页面添加一个事件监听器,当触发事件的时候,将__PRERENDER_STATUS属性设置为true
6.访问页面,等待加载完成(如何确定页面加载完成, waituntil: 'networkidle0'//在500ms内没有网络请求,这个设置可以通过puppeteerOptions.navigationOptions.waituntil修改)
等待捕捉,分为三种等待时机:
1.等待固定时间,renderAfterTime(利用settimeout结合promise实现)
2.等待抛出某个事件:renderAfterDocumentEvent,该事件需要事先在页面写好抛出的时机
3.等待某个元素出现:renderAfterElementExists
阶段4:保存html
spa-prerender index.js 遍历结果,拼接文件夹路径并保存html。
实践过程中的常见问题
1. 如果一个项目有10个页面,其中首页需要SEO,于是使用了预渲染,另外9个页面仍然是由js渲染。那么在访问其他9个页面的时候,刷新页面,会先显示首页的内容一闪而过。这种问题如何解决?
产生这种情况的原因在于:在单页应用中,实际上只有一个物理页面,那就是 index.html。我们访问的所有页面实际都是 index.html,先进入 index.html 然后再执行 js 构建 dom。那么此时如果我们首页是已经预渲染好的,那么就会有内容,在 js 构建出对应路由的内容之前,就会先出现首页的内容。
spa-prerender 考虑到了这种问题。在预渲染的过程中,会首先保留原来“纯净”的index.html,并重命名为“index-spa.html”。
而后,在 nginx 配置中,利用 try_files 指令的优先级配置特点,让用户在刷新的情况下,如果有对应物理文件则访问物理文件(预渲染生成的文件),如果没有对应物理文件则降级访问 index-spa.html,就可以解决上述问题。nginx 配置指令如下:
location /{ alias /Users/zks/code/xkw/xop/dist/; try_files $uri $uri/ /index-spa.html; }
此时预渲染生成的文件将被优先返回($uri),如果未匹配,才会交由 index-spa.html 处理。
2. 如果项目打包有前缀怎么办?
如果项目有publicPath,那么在 dist 目录下会多一层根目录。此时需要在预渲染配置中添加 basePath 的选项。此时 express 会从 dist/basePath 目录中去寻找 index.html。
配置如下:
const options = { staticDir: path.join(__dirname, 'dist'), basePath: 'base',//当项目有basePath的时候设置。同router中的base和publicPath。确保staticDir/basePath/index.html存在 routes: ['/','/exam', ], ... }
3. 如何控制渲染器开始进行HTML保存的时机?
我们可以通过 options 中三个参数来控制:
3.1.renderAfterTime:等待固定时间之后(从页面开始发起访问算起)
3.2.renderAfterDocumentEvent:等待抛出某个事件,该事件需要事先在页面定义好触发的时机,比如在 Vue 的 mounted 函数中定义:
new Vue({ router,render: h => h(App), mounted () { //在mounted之后触发custom-render-event // 预渲染器在收到这个事件之后将开始进行页面的保存工作 document.dispatchEvent(new Event('custom-render-event')) }}).$mount('#app')
3.3.renderAfterElementExists:等待某个元素出现。我们可以在异步 ajax 返回之后,增加某个元素。当渲染器检测到此元素出现之后进行页面保存,此时保存的页面就包含了 ajax 返回的数据。
4. 首页预渲染生成的 DOM 元素,会不会被 js 复用?还是删除重新构建?
仿照SSR的思路,我们可以通过在根节点上设置 data-server-rander="true",这样在客户端 js 会知道这个是已经渲染完成的 DOM,不会粗暴去替换它。而是执行一个“注水”的过程(也就是hydration)。可以充分复用预渲染生成的 DOM 元素。
点击下方卡片可以关注 查看全部
nodejs抓取动态网页 全面深入理解预渲染技术体系
在我们使用现代前端框架,比如Vue、React、Angular开发完毕前端项目之后,会发现这些页面输出的全是js,很不利于搜索引擎去爬取。在已经完成了单页应用(SPA)项目之后,如果要进行SEO优化的改造,这时候就可以使用预渲染技术体系。
下面将从适用场景、概念介绍、如何使用、底层原理几方面全面介绍预渲染技术的各项特性。适用场景在谈使用场景之前,首先需要明白以下几点:现代前端框架比如 Vue 在构建完成之后,页面加载的其实是一堆 js,再由 js 动态生成DOM。当我们访问页面,右键“显示网页源代码”的时候,看不到文字等内容百度、搜狗等爬虫在抓取页面的时候,不会执行页面的 js 源代码(谷歌爬虫可以执行“同步” js 来构建页面,因此 Vue 等框架开发的单页应用可以在谷歌搜索引擎中很好的被收录,这点我们不展开讨论)如果想要让百度、搜狗等收录索引我们的网站,就必须像静态 HTML 那样,让网页在右键查看源代码的时候,显示的是文字、图片等内容在这样的场景下,我们可以使用预渲染来解决此类问题。概念介绍
预渲染概念简单来讲是这样的:在项目构建阶段,我们会模拟访问项目的页面URL,这时候页面上的 js 将会执行并且形成真正的 HTML 片段;此时我们保存这个 HTML 文件到服务器硬盘上,下次不管是用户还是爬虫访问的时候,就直接返回这个物理文件,这样就可以有效解决 SEO 无法收录的问题。大体流程如下图:
可以看出,“预渲染”同“服务端渲染”最大的区别是,前者是在构建期间执行,后者在用户访问期间实时运行;前者在构建完成之后就不再需要 node服务,后者需要使用 node 作为运行时。预渲染也有它不适用的地方。正因为在构建阶段我们需要指明“需要构建的页面URL”,因此对于那些携带动态参数的页面(比如资料详情页),不适用于用预渲染去构建。这种场景下只能使用SSR。反之,一切静态官网、带数据的门户网站,只要是URL固定的,不管其中有没有动态数据,都可以使用预渲染。这里你可能会问一个问题:预渲染技术能否将 ajax 请求的内容也填充到页面上?答案是肯定的。虽然你 ajax 并非“同步执行”的 js,我们无法获知异步请求完成的时机。但通过控制监测页面上某个特定元素是否存在等手段,我们可以变相获知到数据返回的时机,从而进行预渲染。就可以达到“填充 ajax 数据”的效果(这可是谷歌爬虫也无法达到的效果哦)。如何使用预渲染技术有很多种实现方式。最常用的是使用 webpack 的一个插件: prerender-spa-plugin()。但是这个插件有很多局限性,最大的局限性在于必须结合 webpack 来使用,不够灵活,不易调试。也无法通过编程的方式使用。
比如我们的首页有动态的数据(非动态URL。是通过ajax获取的动态数据。)因此我们在使用了预渲染生成了静态首页之后,需要每间隔10分钟或者5分钟重新生成一个新的静态页,来更新数据。这就需要能够通过编程的方式调用渲染指令。在这样的情况下我基于这个插件的原理重新实现了一个包:@waitkafuka/spa-prerender(),可以通过 nodejs 通过编程的方式使用。
同时它剥离了 webpack 的依赖,剥离了对SPA页面的限制。只要有一个静态目录就可以工作。使用的方式非常简单,以 Vue 为例,在我们正常构建生成了 dist 目录之后,只需要编写以下脚本:
const SpaRenderer = require('@waitkafuka/spa-prerender');const path = require('path');<br />const options = {staticDir: path.join(__dirname, 'dist'),basePath: 'base',//可选,当项目有basePath的时候设置。同router中的base和publicPath。确保staticDir/basePath/index.html存在 routes: ['/','/exam', ],puppeteerOptions: {headless: true,maxConcurrentRoutes: 0,renderAfterDocumentEvent: 'render-event',skipThirdPartyRequests: true }};const spaRenderer = new SpaRenderer(options)spaRenderer.render().then(() => {console.log('预渲染完毕。');});
具体的参数解析可以查看 @waitkafuka/spa-prerender。底层原理在底层实现上,主要利用了 express 来驱动静态页面;然后利用 puppeteer 无头浏览器来模拟用户访问所需要预渲染的地址;在访问完成之后,保存页面HTML到文件夹中。
流程如下:
更为详细的流程介绍如下(此部分枯燥乏味,非专业人士可以跳过。):
阶段1:创建渲染器实例
spa-prerender index.js:
1.创建puppeteer实例 @prerenderer/renderer-puppeteer/es6/renderer.js
2.创建server实例@prerenderer/prerenderer/es6/server.js
3.创建renderer实例,将1 2步的puppeteer和server注入this @@prerenderer/prerenderer/es6/index.js
阶段2:渲染器实例初始化:spa-prerender index.js:
1.server初始化 (设置路由:静态资源利用*.*映射到staticDir上,其他请求全部映射到index.html上。设置静态资源和index.html路径,modifyServer也在这个阶段。server 启动)@prerenderer/prerenderer/es6/server.js
2.puppeteer初始化(判断平台是否linux,如果是Linux需要设置一些启动参数;启动puppeteer)@prerenderer/renderer-puppeteer/es6/renderer.js
阶段3:开始访问路由并获取html
1.spa-prerender index.js->@prerenderer/prerenderer/es6/index.js -> @prerenderer/renderer-puppeteer/es6/renderer.js
2.开启一个限流器,每次最多渲染 n 条路由,避免内存崩溃
3.puppeteer开启一个新标签,判断是否有inject,如果有,注入到window上
4.拼接端口、设置viewport,拼接router,形成url,发起页面的请求
5.判断options中是否设置了renderAfterDocumentEvent,如果有,给页面添加一个事件监听器,当触发事件的时候,将__PRERENDER_STATUS属性设置为true
6.访问页面,等待加载完成(如何确定页面加载完成, waituntil: 'networkidle0'//在500ms内没有网络请求,这个设置可以通过puppeteerOptions.navigationOptions.waituntil修改)
等待捕捉,分为三种等待时机:
1.等待固定时间,renderAfterTime(利用settimeout结合promise实现)
2.等待抛出某个事件:renderAfterDocumentEvent,该事件需要事先在页面写好抛出的时机
3.等待某个元素出现:renderAfterElementExists
阶段4:保存html
spa-prerender index.js 遍历结果,拼接文件夹路径并保存html。
实践过程中的常见问题
1. 如果一个项目有10个页面,其中首页需要SEO,于是使用了预渲染,另外9个页面仍然是由js渲染。那么在访问其他9个页面的时候,刷新页面,会先显示首页的内容一闪而过。这种问题如何解决?
产生这种情况的原因在于:在单页应用中,实际上只有一个物理页面,那就是 index.html。我们访问的所有页面实际都是 index.html,先进入 index.html 然后再执行 js 构建 dom。那么此时如果我们首页是已经预渲染好的,那么就会有内容,在 js 构建出对应路由的内容之前,就会先出现首页的内容。
spa-prerender 考虑到了这种问题。在预渲染的过程中,会首先保留原来“纯净”的index.html,并重命名为“index-spa.html”。
而后,在 nginx 配置中,利用 try_files 指令的优先级配置特点,让用户在刷新的情况下,如果有对应物理文件则访问物理文件(预渲染生成的文件),如果没有对应物理文件则降级访问 index-spa.html,就可以解决上述问题。nginx 配置指令如下:
location /{ alias /Users/zks/code/xkw/xop/dist/; try_files $uri $uri/ /index-spa.html; }
此时预渲染生成的文件将被优先返回($uri),如果未匹配,才会交由 index-spa.html 处理。
2. 如果项目打包有前缀怎么办?
如果项目有publicPath,那么在 dist 目录下会多一层根目录。此时需要在预渲染配置中添加 basePath 的选项。此时 express 会从 dist/basePath 目录中去寻找 index.html。
配置如下:
const options = { staticDir: path.join(__dirname, 'dist'), basePath: 'base',//当项目有basePath的时候设置。同router中的base和publicPath。确保staticDir/basePath/index.html存在 routes: ['/','/exam', ], ... }
3. 如何控制渲染器开始进行HTML保存的时机?
我们可以通过 options 中三个参数来控制:
3.1.renderAfterTime:等待固定时间之后(从页面开始发起访问算起)
3.2.renderAfterDocumentEvent:等待抛出某个事件,该事件需要事先在页面定义好触发的时机,比如在 Vue 的 mounted 函数中定义:
new Vue({ router,render: h => h(App), mounted () { //在mounted之后触发custom-render-event // 预渲染器在收到这个事件之后将开始进行页面的保存工作 document.dispatchEvent(new Event('custom-render-event')) }}).$mount('#app')
3.3.renderAfterElementExists:等待某个元素出现。我们可以在异步 ajax 返回之后,增加某个元素。当渲染器检测到此元素出现之后进行页面保存,此时保存的页面就包含了 ajax 返回的数据。
4. 首页预渲染生成的 DOM 元素,会不会被 js 复用?还是删除重新构建?
仿照SSR的思路,我们可以通过在根节点上设置 data-server-rander="true",这样在客户端 js 会知道这个是已经渲染完成的 DOM,不会粗暴去替换它。而是执行一个“注水”的过程(也就是hydration)。可以充分复用预渲染生成的 DOM 元素。
点击下方卡片可以关注
nodejs抓取动态网页 全面深入理解预渲染技术体系
网站优化 • 优采云 发表了文章 • 0 个评论 • 121 次浏览 • 2022-06-13 09:01
在我们使用现代前端框架,比如Vue、React、Angular开发完毕前端项目之后,会发现这些页面输出的全是js,很不利于搜索引擎去爬取。在已经完成了单页应用(SPA)项目之后,如果要进行SEO优化的改造,这时候就可以使用预渲染技术体系。
下面将从适用场景、概念介绍、如何使用、底层原理几方面全面介绍预渲染技术的各项特性。适用场景在谈使用场景之前,首先需要明白以下几点:现代前端框架比如 Vue 在构建完成之后,页面加载的其实是一堆 js,再由 js 动态生成DOM。当我们访问页面,右键“显示网页源代码”的时候,看不到文字等内容百度、搜狗等爬虫在抓取页面的时候,不会执行页面的 js 源代码(谷歌爬虫可以执行“同步” js 来构建页面,因此 Vue 等框架开发的单页应用可以在谷歌搜索引擎中很好的被收录,这点我们不展开讨论)如果想要让百度、搜狗等收录索引我们的网站,就必须像静态 HTML 那样,让网页在右键查看源代码的时候,显示的是文字、图片等内容在这样的场景下,我们可以使用预渲染来解决此类问题。概念介绍
预渲染概念简单来讲是这样的:在项目构建阶段,我们会模拟访问项目的页面URL,这时候页面上的 js 将会执行并且形成真正的 HTML 片段;此时我们保存这个 HTML 文件到服务器硬盘上,下次不管是用户还是爬虫访问的时候,就直接返回这个物理文件,这样就可以有效解决 SEO 无法收录的问题。大体流程如下图:
可以看出,“预渲染”同“服务端渲染”最大的区别是,前者是在构建期间执行,后者在用户访问期间实时运行;前者在构建完成之后就不再需要 node服务,后者需要使用 node 作为运行时。预渲染也有它不适用的地方。正因为在构建阶段我们需要指明“需要构建的页面URL”,因此对于那些携带动态参数的页面(比如资料详情页),不适用于用预渲染去构建。这种场景下只能使用SSR。反之,一切静态官网、带数据的门户网站,只要是URL固定的,不管其中有没有动态数据,都可以使用预渲染。这里你可能会问一个问题:预渲染技术能否将 ajax 请求的内容也填充到页面上?答案是肯定的。虽然你 ajax 并非“同步执行”的 js,我们无法获知异步请求完成的时机。但通过控制监测页面上某个特定元素是否存在等手段,我们可以变相获知到数据返回的时机,从而进行预渲染。就可以达到“填充 ajax 数据”的效果(这可是谷歌爬虫也无法达到的效果哦)。如何使用预渲染技术有很多种实现方式。最常用的是使用 webpack 的一个插件: prerender-spa-plugin()。但是这个插件有很多局限性,最大的局限性在于必须结合 webpack 来使用,不够灵活,不易调试。也无法通过编程的方式使用。
比如我们的首页有动态的数据(非动态URL。是通过ajax获取的动态数据。)因此我们在使用了预渲染生成了静态首页之后,需要每间隔10分钟或者5分钟重新生成一个新的静态页,来更新数据。这就需要能够通过编程的方式调用渲染指令。在这样的情况下我基于这个插件的原理重新实现了一个包:@waitkafuka/spa-prerender(),可以通过 nodejs 通过编程的方式使用。
同时它剥离了 webpack 的依赖,剥离了对SPA页面的限制。只要有一个静态目录就可以工作。使用的方式非常简单,以 Vue 为例,在我们正常构建生成了 dist 目录之后,只需要编写以下脚本:
const SpaRenderer = require('@waitkafuka/spa-prerender');const path = require('path');<br />const options = {staticDir: path.join(__dirname, 'dist'),basePath: 'base',//可选,当项目有basePath的时候设置。同router中的base和publicPath。确保staticDir/basePath/index.html存在 routes: ['/','/exam', ],puppeteerOptions: {headless: true,maxConcurrentRoutes: 0,renderAfterDocumentEvent: 'render-event',skipThirdPartyRequests: true }};const spaRenderer = new SpaRenderer(options)spaRenderer.render().then(() => {console.log('预渲染完毕。');});
具体的参数解析可以查看 @waitkafuka/spa-prerender。底层原理在底层实现上,主要利用了 express 来驱动静态页面;然后利用 puppeteer 无头浏览器来模拟用户访问所需要预渲染的地址;在访问完成之后,保存页面HTML到文件夹中。
流程如下:
更为详细的流程介绍如下(此部分枯燥乏味,非专业人士可以跳过。):
阶段1:创建渲染器实例
spa-prerender index.js:
1.创建puppeteer实例 @prerenderer/renderer-puppeteer/es6/renderer.js
2.创建server实例@prerenderer/prerenderer/es6/server.js
3.创建renderer实例,将1 2步的puppeteer和server注入this @@prerenderer/prerenderer/es6/index.js
阶段2:渲染器实例初始化:spa-prerender index.js:
1.server初始化 (设置路由:静态资源利用*.*映射到staticDir上,其他请求全部映射到index.html上。设置静态资源和index.html路径,modifyServer也在这个阶段。server 启动)@prerenderer/prerenderer/es6/server.js
2.puppeteer初始化(判断平台是否linux,如果是Linux需要设置一些启动参数;启动puppeteer)@prerenderer/renderer-puppeteer/es6/renderer.js
阶段3:开始访问路由并获取html
1.spa-prerender index.js->@prerenderer/prerenderer/es6/index.js -> @prerenderer/renderer-puppeteer/es6/renderer.js
2.开启一个限流器,每次最多渲染 n 条路由,避免内存崩溃
3.puppeteer开启一个新标签,判断是否有inject,如果有,注入到window上
4.拼接端口、设置viewport,拼接router,形成url,发起页面的请求
5.判断options中是否设置了renderAfterDocumentEvent,如果有,给页面添加一个事件监听器,当触发事件的时候,将__PRERENDER_STATUS属性设置为true
6.访问页面,等待加载完成(如何确定页面加载完成, waituntil: 'networkidle0'//在500ms内没有网络请求,这个设置可以通过puppeteerOptions.navigationOptions.waituntil修改)
等待捕捉,分为三种等待时机:
1.等待固定时间,renderAfterTime(利用settimeout结合promise实现)
2.等待抛出某个事件:renderAfterDocumentEvent,该事件需要事先在页面写好抛出的时机
3.等待某个元素出现:renderAfterElementExists
阶段4:保存html
spa-prerender index.js 遍历结果,拼接文件夹路径并保存html。
实践过程中的常见问题
1. 如果一个项目有10个页面,其中首页需要SEO,于是使用了预渲染,另外9个页面仍然是由js渲染。那么在访问其他9个页面的时候,刷新页面,会先显示首页的内容一闪而过。这种问题如何解决?
产生这种情况的原因在于:在单页应用中,实际上只有一个物理页面,那就是 index.html。我们访问的所有页面实际都是 index.html,先进入 index.html 然后再执行 js 构建 dom。那么此时如果我们首页是已经预渲染好的,那么就会有内容,在 js 构建出对应路由的内容之前,就会先出现首页的内容。
spa-prerender 考虑到了这种问题。在预渲染的过程中,会首先保留原来“纯净”的index.html,并重命名为“index-spa.html”。
而后,在 nginx 配置中,利用 try_files 指令的优先级配置特点,让用户在刷新的情况下,如果有对应物理文件则访问物理文件(预渲染生成的文件),如果没有对应物理文件则降级访问 index-spa.html,就可以解决上述问题。nginx 配置指令如下:
location /{ alias /Users/zks/code/xkw/xop/dist/; try_files $uri $uri/ /index-spa.html; }
此时预渲染生成的文件将被优先返回($uri),如果未匹配,才会交由 index-spa.html 处理。
2. 如果项目打包有前缀怎么办?
如果项目有publicPath,那么在 dist 目录下会多一层根目录。此时需要在预渲染配置中添加 basePath 的选项。此时 express 会从 dist/basePath 目录中去寻找 index.html。
配置如下:
const options = { staticDir: path.join(__dirname, 'dist'), basePath: 'base',//当项目有basePath的时候设置。同router中的base和publicPath。确保staticDir/basePath/index.html存在 routes: ['/','/exam', ], ... }
3. 如何控制渲染器开始进行HTML保存的时机?
我们可以通过 options 中三个参数来控制:
3.1.renderAfterTime:等待固定时间之后(从页面开始发起访问算起)
3.2.renderAfterDocumentEvent:等待抛出某个事件,该事件需要事先在页面定义好触发的时机,比如在 Vue 的 mounted 函数中定义:
new Vue({ router,render: h => h(App), mounted () { //在mounted之后触发custom-render-event // 预渲染器在收到这个事件之后将开始进行页面的保存工作 document.dispatchEvent(new Event('custom-render-event')) }}).$mount('#app')
3.3.renderAfterElementExists:等待某个元素出现。我们可以在异步 ajax 返回之后,增加某个元素。当渲染器检测到此元素出现之后进行页面保存,此时保存的页面就包含了 ajax 返回的数据。
4. 首页预渲染生成的 DOM 元素,会不会被 js 复用?还是删除重新构建?
仿照SSR的思路,我们可以通过在根节点上设置 data-server-rander="true",这样在客户端 js 会知道这个是已经渲染完成的 DOM,不会粗暴去替换它。而是执行一个“注水”的过程(也就是hydration)。可以充分复用预渲染生成的 DOM 元素。
点击下方卡片可以关注 查看全部
nodejs抓取动态网页 全面深入理解预渲染技术体系
在我们使用现代前端框架,比如Vue、React、Angular开发完毕前端项目之后,会发现这些页面输出的全是js,很不利于搜索引擎去爬取。在已经完成了单页应用(SPA)项目之后,如果要进行SEO优化的改造,这时候就可以使用预渲染技术体系。
下面将从适用场景、概念介绍、如何使用、底层原理几方面全面介绍预渲染技术的各项特性。适用场景在谈使用场景之前,首先需要明白以下几点:现代前端框架比如 Vue 在构建完成之后,页面加载的其实是一堆 js,再由 js 动态生成DOM。当我们访问页面,右键“显示网页源代码”的时候,看不到文字等内容百度、搜狗等爬虫在抓取页面的时候,不会执行页面的 js 源代码(谷歌爬虫可以执行“同步” js 来构建页面,因此 Vue 等框架开发的单页应用可以在谷歌搜索引擎中很好的被收录,这点我们不展开讨论)如果想要让百度、搜狗等收录索引我们的网站,就必须像静态 HTML 那样,让网页在右键查看源代码的时候,显示的是文字、图片等内容在这样的场景下,我们可以使用预渲染来解决此类问题。概念介绍
预渲染概念简单来讲是这样的:在项目构建阶段,我们会模拟访问项目的页面URL,这时候页面上的 js 将会执行并且形成真正的 HTML 片段;此时我们保存这个 HTML 文件到服务器硬盘上,下次不管是用户还是爬虫访问的时候,就直接返回这个物理文件,这样就可以有效解决 SEO 无法收录的问题。大体流程如下图:
可以看出,“预渲染”同“服务端渲染”最大的区别是,前者是在构建期间执行,后者在用户访问期间实时运行;前者在构建完成之后就不再需要 node服务,后者需要使用 node 作为运行时。预渲染也有它不适用的地方。正因为在构建阶段我们需要指明“需要构建的页面URL”,因此对于那些携带动态参数的页面(比如资料详情页),不适用于用预渲染去构建。这种场景下只能使用SSR。反之,一切静态官网、带数据的门户网站,只要是URL固定的,不管其中有没有动态数据,都可以使用预渲染。这里你可能会问一个问题:预渲染技术能否将 ajax 请求的内容也填充到页面上?答案是肯定的。虽然你 ajax 并非“同步执行”的 js,我们无法获知异步请求完成的时机。但通过控制监测页面上某个特定元素是否存在等手段,我们可以变相获知到数据返回的时机,从而进行预渲染。就可以达到“填充 ajax 数据”的效果(这可是谷歌爬虫也无法达到的效果哦)。如何使用预渲染技术有很多种实现方式。最常用的是使用 webpack 的一个插件: prerender-spa-plugin()。但是这个插件有很多局限性,最大的局限性在于必须结合 webpack 来使用,不够灵活,不易调试。也无法通过编程的方式使用。
比如我们的首页有动态的数据(非动态URL。是通过ajax获取的动态数据。)因此我们在使用了预渲染生成了静态首页之后,需要每间隔10分钟或者5分钟重新生成一个新的静态页,来更新数据。这就需要能够通过编程的方式调用渲染指令。在这样的情况下我基于这个插件的原理重新实现了一个包:@waitkafuka/spa-prerender(),可以通过 nodejs 通过编程的方式使用。
同时它剥离了 webpack 的依赖,剥离了对SPA页面的限制。只要有一个静态目录就可以工作。使用的方式非常简单,以 Vue 为例,在我们正常构建生成了 dist 目录之后,只需要编写以下脚本:
const SpaRenderer = require('@waitkafuka/spa-prerender');const path = require('path');<br />const options = {staticDir: path.join(__dirname, 'dist'),basePath: 'base',//可选,当项目有basePath的时候设置。同router中的base和publicPath。确保staticDir/basePath/index.html存在 routes: ['/','/exam', ],puppeteerOptions: {headless: true,maxConcurrentRoutes: 0,renderAfterDocumentEvent: 'render-event',skipThirdPartyRequests: true }};const spaRenderer = new SpaRenderer(options)spaRenderer.render().then(() => {console.log('预渲染完毕。');});
具体的参数解析可以查看 @waitkafuka/spa-prerender。底层原理在底层实现上,主要利用了 express 来驱动静态页面;然后利用 puppeteer 无头浏览器来模拟用户访问所需要预渲染的地址;在访问完成之后,保存页面HTML到文件夹中。
流程如下:
更为详细的流程介绍如下(此部分枯燥乏味,非专业人士可以跳过。):
阶段1:创建渲染器实例
spa-prerender index.js:
1.创建puppeteer实例 @prerenderer/renderer-puppeteer/es6/renderer.js
2.创建server实例@prerenderer/prerenderer/es6/server.js
3.创建renderer实例,将1 2步的puppeteer和server注入this @@prerenderer/prerenderer/es6/index.js
阶段2:渲染器实例初始化:spa-prerender index.js:
1.server初始化 (设置路由:静态资源利用*.*映射到staticDir上,其他请求全部映射到index.html上。设置静态资源和index.html路径,modifyServer也在这个阶段。server 启动)@prerenderer/prerenderer/es6/server.js
2.puppeteer初始化(判断平台是否linux,如果是Linux需要设置一些启动参数;启动puppeteer)@prerenderer/renderer-puppeteer/es6/renderer.js
阶段3:开始访问路由并获取html
1.spa-prerender index.js->@prerenderer/prerenderer/es6/index.js -> @prerenderer/renderer-puppeteer/es6/renderer.js
2.开启一个限流器,每次最多渲染 n 条路由,避免内存崩溃
3.puppeteer开启一个新标签,判断是否有inject,如果有,注入到window上
4.拼接端口、设置viewport,拼接router,形成url,发起页面的请求
5.判断options中是否设置了renderAfterDocumentEvent,如果有,给页面添加一个事件监听器,当触发事件的时候,将__PRERENDER_STATUS属性设置为true
6.访问页面,等待加载完成(如何确定页面加载完成, waituntil: 'networkidle0'//在500ms内没有网络请求,这个设置可以通过puppeteerOptions.navigationOptions.waituntil修改)
等待捕捉,分为三种等待时机:
1.等待固定时间,renderAfterTime(利用settimeout结合promise实现)
2.等待抛出某个事件:renderAfterDocumentEvent,该事件需要事先在页面写好抛出的时机
3.等待某个元素出现:renderAfterElementExists
阶段4:保存html
spa-prerender index.js 遍历结果,拼接文件夹路径并保存html。
实践过程中的常见问题
1. 如果一个项目有10个页面,其中首页需要SEO,于是使用了预渲染,另外9个页面仍然是由js渲染。那么在访问其他9个页面的时候,刷新页面,会先显示首页的内容一闪而过。这种问题如何解决?
产生这种情况的原因在于:在单页应用中,实际上只有一个物理页面,那就是 index.html。我们访问的所有页面实际都是 index.html,先进入 index.html 然后再执行 js 构建 dom。那么此时如果我们首页是已经预渲染好的,那么就会有内容,在 js 构建出对应路由的内容之前,就会先出现首页的内容。
spa-prerender 考虑到了这种问题。在预渲染的过程中,会首先保留原来“纯净”的index.html,并重命名为“index-spa.html”。
而后,在 nginx 配置中,利用 try_files 指令的优先级配置特点,让用户在刷新的情况下,如果有对应物理文件则访问物理文件(预渲染生成的文件),如果没有对应物理文件则降级访问 index-spa.html,就可以解决上述问题。nginx 配置指令如下:
location /{ alias /Users/zks/code/xkw/xop/dist/; try_files $uri $uri/ /index-spa.html; }
此时预渲染生成的文件将被优先返回($uri),如果未匹配,才会交由 index-spa.html 处理。
2. 如果项目打包有前缀怎么办?
如果项目有publicPath,那么在 dist 目录下会多一层根目录。此时需要在预渲染配置中添加 basePath 的选项。此时 express 会从 dist/basePath 目录中去寻找 index.html。
配置如下:
const options = { staticDir: path.join(__dirname, 'dist'), basePath: 'base',//当项目有basePath的时候设置。同router中的base和publicPath。确保staticDir/basePath/index.html存在 routes: ['/','/exam', ], ... }
3. 如何控制渲染器开始进行HTML保存的时机?
我们可以通过 options 中三个参数来控制:
3.1.renderAfterTime:等待固定时间之后(从页面开始发起访问算起)
3.2.renderAfterDocumentEvent:等待抛出某个事件,该事件需要事先在页面定义好触发的时机,比如在 Vue 的 mounted 函数中定义:
new Vue({ router,render: h => h(App), mounted () { //在mounted之后触发custom-render-event // 预渲染器在收到这个事件之后将开始进行页面的保存工作 document.dispatchEvent(new Event('custom-render-event')) }}).$mount('#app')
3.3.renderAfterElementExists:等待某个元素出现。我们可以在异步 ajax 返回之后,增加某个元素。当渲染器检测到此元素出现之后进行页面保存,此时保存的页面就包含了 ajax 返回的数据。
4. 首页预渲染生成的 DOM 元素,会不会被 js 复用?还是删除重新构建?
仿照SSR的思路,我们可以通过在根节点上设置 data-server-rander="true",这样在客户端 js 会知道这个是已经渲染完成的 DOM,不会粗暴去替换它。而是执行一个“注水”的过程(也就是hydration)。可以充分复用预渲染生成的 DOM 元素。
点击下方卡片可以关注
nodejs抓取动态网页(连接池技术)的异步抓取抓取
网站优化 • 优采云 发表了文章 • 0 个评论 • 63 次浏览 • 2022-06-11 09:02
nodejs抓取动态网页一直都是一个技术难点,mongodb(索引)就是一个妥妥的技术好帮手,可惜不支持抓取定制化的数据源。所以将自己在写了一段时间之后也写了一篇博客详细地解释各种nodejs的功能之间的互通互用,使得抓取动态网页变得方便起来。本文主要介绍关于异步抓取和连接池技术等。异步抓取先来看看异步抓取。
异步抓取就是说mongodb从一个请求发出到接收到返回的response实际上是从一个进程中分支走去的,程序从进程中分支走去,数据依然在内存中,这样可以更快地处理大量网页数据。我们知道,一个同步请求的过程中,请求都会被分配给线程对象中的一个实例来处理。这时候,用户输入ip地址就会被传递给线程对象对象中的一个线程上下文,由线程对象的interface方法取相应的json请求到一个内存中。
这样,api请求到被调用的这个进程中中处理完毕之后,就可以通知服务器。但是异步方式就不同了,请求被分配给了io线程,io线程处理完毕之后,再通知数据处理线程。而且根据采用了一个主从交替来实现异步流量交互的方式。这种方式好处是,内存空间放不下内存了,则提供了vm(虚拟机)让程序可以存储和运行在内存中。除了异步抓取,io线程运行时,还可以接受服务器的任务,然后异步返回,进行数据处理(通过将整个数据源放入队列)。
接受请求的主要方式是requestmethod,一般有get,post,put,delete,put-serially-process-headertext(字符/数据库),form-data(表单)。其中post(发起远程并发请求),put(解析远程并发请求的response数据),delete(删除远程并发请求的response数据),put-serially-process-header(数据源)是我们常用的方式。
但是这并不完美,因为每次请求回包的时候,只有本次请求被call到的时候,内存空间才会被用到。由于异步请求是异步的,所以一般还是用的同步方式来发起请求(requestmethod),也就是将进程分割成不同的进程,再执行不同的请求处理。不过大家可以通过主从关系映射来组合不同进程之间的请求并发,从而更好地利用内存空间。
http连接池对于一个网页抓取而言,首先需要一个requestmethod的线程对象。其次我们还需要分配不同线程对象到不同进程中执行。通过requestmethod的线程对象,我们可以建立一个用于抓取同步内容的连接池,并通过tcp连接来相互传递数据。具体如下:nodejs用到的连接池是any连接池,内部实现使用了http同步握手机制。连接池初始化:staticnodejs中很简单,只要初始化相应的函数(建立连接)即。 查看全部
nodejs抓取动态网页(连接池技术)的异步抓取抓取
nodejs抓取动态网页一直都是一个技术难点,mongodb(索引)就是一个妥妥的技术好帮手,可惜不支持抓取定制化的数据源。所以将自己在写了一段时间之后也写了一篇博客详细地解释各种nodejs的功能之间的互通互用,使得抓取动态网页变得方便起来。本文主要介绍关于异步抓取和连接池技术等。异步抓取先来看看异步抓取。
异步抓取就是说mongodb从一个请求发出到接收到返回的response实际上是从一个进程中分支走去的,程序从进程中分支走去,数据依然在内存中,这样可以更快地处理大量网页数据。我们知道,一个同步请求的过程中,请求都会被分配给线程对象中的一个实例来处理。这时候,用户输入ip地址就会被传递给线程对象对象中的一个线程上下文,由线程对象的interface方法取相应的json请求到一个内存中。
这样,api请求到被调用的这个进程中中处理完毕之后,就可以通知服务器。但是异步方式就不同了,请求被分配给了io线程,io线程处理完毕之后,再通知数据处理线程。而且根据采用了一个主从交替来实现异步流量交互的方式。这种方式好处是,内存空间放不下内存了,则提供了vm(虚拟机)让程序可以存储和运行在内存中。除了异步抓取,io线程运行时,还可以接受服务器的任务,然后异步返回,进行数据处理(通过将整个数据源放入队列)。
接受请求的主要方式是requestmethod,一般有get,post,put,delete,put-serially-process-headertext(字符/数据库),form-data(表单)。其中post(发起远程并发请求),put(解析远程并发请求的response数据),delete(删除远程并发请求的response数据),put-serially-process-header(数据源)是我们常用的方式。
但是这并不完美,因为每次请求回包的时候,只有本次请求被call到的时候,内存空间才会被用到。由于异步请求是异步的,所以一般还是用的同步方式来发起请求(requestmethod),也就是将进程分割成不同的进程,再执行不同的请求处理。不过大家可以通过主从关系映射来组合不同进程之间的请求并发,从而更好地利用内存空间。
http连接池对于一个网页抓取而言,首先需要一个requestmethod的线程对象。其次我们还需要分配不同线程对象到不同进程中执行。通过requestmethod的线程对象,我们可以建立一个用于抓取同步内容的连接池,并通过tcp连接来相互传递数据。具体如下:nodejs用到的连接池是any连接池,内部实现使用了http同步握手机制。连接池初始化:staticnodejs中很简单,只要初始化相应的函数(建立连接)即。
nodejs抓取动态网页 全面深入理解预渲染技术体系
网站优化 • 优采云 发表了文章 • 0 个评论 • 116 次浏览 • 2022-06-09 00:37
在我们使用现代前端框架,比如Vue、React、Angular开发完毕前端项目之后,会发现这些页面输出的全是js,很不利于搜索引擎去爬取。在已经完成了单页应用(SPA)项目之后,如果要进行SEO优化的改造,这时候就可以使用预渲染技术体系。
下面将从适用场景、概念介绍、如何使用、底层原理几方面全面介绍预渲染技术的各项特性。适用场景在谈使用场景之前,首先需要明白以下几点:现代前端框架比如 Vue 在构建完成之后,页面加载的其实是一堆 js,再由 js 动态生成DOM。当我们访问页面,右键“显示网页源代码”的时候,看不到文字等内容百度、搜狗等爬虫在抓取页面的时候,不会执行页面的 js 源代码(谷歌爬虫可以执行“同步” js 来构建页面,因此 Vue 等框架开发的单页应用可以在谷歌搜索引擎中很好的被收录,这点我们不展开讨论)如果想要让百度、搜狗等收录索引我们的网站,就必须像静态 HTML 那样,让网页在右键查看源代码的时候,显示的是文字、图片等内容在这样的场景下,我们可以使用预渲染来解决此类问题。概念介绍
预渲染概念简单来讲是这样的:在项目构建阶段,我们会模拟访问项目的页面URL,这时候页面上的 js 将会执行并且形成真正的 HTML 片段;此时我们保存这个 HTML 文件到服务器硬盘上,下次不管是用户还是爬虫访问的时候,就直接返回这个物理文件,这样就可以有效解决 SEO 无法收录的问题。大体流程如下图:
可以看出,“预渲染”同“服务端渲染”最大的区别是,前者是在构建期间执行,后者在用户访问期间实时运行;前者在构建完成之后就不再需要 node服务,后者需要使用 node 作为运行时。预渲染也有它不适用的地方。正因为在构建阶段我们需要指明“需要构建的页面URL”,因此对于那些携带动态参数的页面(比如资料详情页),不适用于用预渲染去构建。这种场景下只能使用SSR。反之,一切静态官网、带数据的门户网站,只要是URL固定的,不管其中有没有动态数据,都可以使用预渲染。这里你可能会问一个问题:预渲染技术能否将 ajax 请求的内容也填充到页面上?答案是肯定的。虽然你 ajax 并非“同步执行”的 js,我们无法获知异步请求完成的时机。但通过控制监测页面上某个特定元素是否存在等手段,我们可以变相获知到数据返回的时机,从而进行预渲染。就可以达到“填充 ajax 数据”的效果(这可是谷歌爬虫也无法达到的效果哦)。如何使用预渲染技术有很多种实现方式。最常用的是使用 webpack 的一个插件: prerender-spa-plugin()。但是这个插件有很多局限性,最大的局限性在于必须结合 webpack 来使用,不够灵活,不易调试。也无法通过编程的方式使用。
比如我们的首页有动态的数据(非动态URL。是通过ajax获取的动态数据。)因此我们在使用了预渲染生成了静态首页之后,需要每间隔10分钟或者5分钟重新生成一个新的静态页,来更新数据。这就需要能够通过编程的方式调用渲染指令。在这样的情况下我基于这个插件的原理重新实现了一个包:@waitkafuka/spa-prerender(),可以通过 nodejs 通过编程的方式使用。
同时它剥离了 webpack 的依赖,剥离了对SPA页面的限制。只要有一个静态目录就可以工作。使用的方式非常简单,以 Vue 为例,在我们正常构建生成了 dist 目录之后,只需要编写以下脚本:
const SpaRenderer = require('@waitkafuka/spa-prerender');const path = require('path');<br />const options = {staticDir: path.join(__dirname, 'dist'),basePath: 'base',//可选,当项目有basePath的时候设置。同router中的base和publicPath。确保staticDir/basePath/index.html存在 routes: ['/','/exam', ],puppeteerOptions: {headless: true,maxConcurrentRoutes: 0,renderAfterDocumentEvent: 'render-event',skipThirdPartyRequests: true }};const spaRenderer = new SpaRenderer(options)spaRenderer.render().then(() => {console.log('预渲染完毕。');});
具体的参数解析可以查看 @waitkafuka/spa-prerender。底层原理在底层实现上,主要利用了 express 来驱动静态页面;然后利用 puppeteer 无头浏览器来模拟用户访问所需要预渲染的地址;在访问完成之后,保存页面HTML到文件夹中。
流程如下:
更为详细的流程介绍如下(此部分枯燥乏味,非专业人士可以跳过。):
阶段1:创建渲染器实例
spa-prerender index.js:
1.创建puppeteer实例 @prerenderer/renderer-puppeteer/es6/renderer.js
2.创建server实例@prerenderer/prerenderer/es6/server.js
3.创建renderer实例,将1 2步的puppeteer和server注入this @@prerenderer/prerenderer/es6/index.js
阶段2:渲染器实例初始化:spa-prerender index.js:
1.server初始化 (设置路由:静态资源利用*.*映射到staticDir上,其他请求全部映射到index.html上。设置静态资源和index.html路径,modifyServer也在这个阶段。server 启动)@prerenderer/prerenderer/es6/server.js
2.puppeteer初始化(判断平台是否linux,如果是Linux需要设置一些启动参数;启动puppeteer)@prerenderer/renderer-puppeteer/es6/renderer.js
阶段3:开始访问路由并获取html
1.spa-prerender index.js->@prerenderer/prerenderer/es6/index.js -> @prerenderer/renderer-puppeteer/es6/renderer.js
2.开启一个限流器,每次最多渲染 n 条路由,避免内存崩溃
3.puppeteer开启一个新标签,判断是否有inject,如果有,注入到window上
4.拼接端口、设置viewport,拼接router,形成url,发起页面的请求
5.判断options中是否设置了renderAfterDocumentEvent,如果有,给页面添加一个事件监听器,当触发事件的时候,将__PRERENDER_STATUS属性设置为true
6.访问页面,等待加载完成(如何确定页面加载完成, waituntil: 'networkidle0'//在500ms内没有网络请求,这个设置可以通过puppeteerOptions.navigationOptions.waituntil修改)
等待捕捉,分为三种等待时机:
1.等待固定时间,renderAfterTime(利用settimeout结合promise实现)
2.等待抛出某个事件:renderAfterDocumentEvent,该事件需要事先在页面写好抛出的时机
3.等待某个元素出现:renderAfterElementExists
阶段4:保存html
spa-prerender index.js 遍历结果,拼接文件夹路径并保存html。
实践过程中的常见问题
1. 如果一个项目有10个页面,其中首页需要SEO,于是使用了预渲染,另外9个页面仍然是由js渲染。那么在访问其他9个页面的时候,刷新页面,会先显示首页的内容一闪而过。这种问题如何解决?
产生这种情况的原因在于:在单页应用中,实际上只有一个物理页面,那就是 index.html。我们访问的所有页面实际都是 index.html,先进入 index.html 然后再执行 js 构建 dom。那么此时如果我们首页是已经预渲染好的,那么就会有内容,在 js 构建出对应路由的内容之前,就会先出现首页的内容。
spa-prerender 考虑到了这种问题。在预渲染的过程中,会首先保留原来“纯净”的index.html,并重命名为“index-spa.html”。
而后,在 nginx 配置中,利用 try_files 指令的优先级配置特点,让用户在刷新的情况下,如果有对应物理文件则访问物理文件(预渲染生成的文件),如果没有对应物理文件则降级访问 index-spa.html,就可以解决上述问题。nginx 配置指令如下:
location /{ alias /Users/zks/code/xkw/xop/dist/; try_files $uri $uri/ /index-spa.html; }
此时预渲染生成的文件将被优先返回($uri),如果未匹配,才会交由 index-spa.html 处理。
2. 如果项目打包有前缀怎么办?
如果项目有publicPath,那么在 dist 目录下会多一层根目录。此时需要在预渲染配置中添加 basePath 的选项。此时 express 会从 dist/basePath 目录中去寻找 index.html。
配置如下:
const options = { staticDir: path.join(__dirname, 'dist'), basePath: 'base',//当项目有basePath的时候设置。同router中的base和publicPath。确保staticDir/basePath/index.html存在 routes: ['/','/exam', ], ... }
3. 如何控制渲染器开始进行HTML保存的时机?
我们可以通过 options 中三个参数来控制:
3.1.renderAfterTime:等待固定时间之后(从页面开始发起访问算起)
3.2.renderAfterDocumentEvent:等待抛出某个事件,该事件需要事先在页面定义好触发的时机,比如在 Vue 的 mounted 函数中定义:
new Vue({ router,render: h => h(App), mounted () { //在mounted之后触发custom-render-event // 预渲染器在收到这个事件之后将开始进行页面的保存工作 document.dispatchEvent(new Event('custom-render-event')) }}).$mount('#app')
3.3.renderAfterElementExists:等待某个元素出现。我们可以在异步 ajax 返回之后,增加某个元素。当渲染器检测到此元素出现之后进行页面保存,此时保存的页面就包含了 ajax 返回的数据。
4. 首页预渲染生成的 DOM 元素,会不会被 js 复用?还是删除重新构建?
仿照SSR的思路,我们可以通过在根节点上设置 data-server-rander="true",这样在客户端 js 会知道这个是已经渲染完成的 DOM,不会粗暴去替换它。而是执行一个“注水”的过程(也就是hydration)。可以充分复用预渲染生成的 DOM 元素。
点击下方卡片可以关注 查看全部
nodejs抓取动态网页 全面深入理解预渲染技术体系
在我们使用现代前端框架,比如Vue、React、Angular开发完毕前端项目之后,会发现这些页面输出的全是js,很不利于搜索引擎去爬取。在已经完成了单页应用(SPA)项目之后,如果要进行SEO优化的改造,这时候就可以使用预渲染技术体系。
下面将从适用场景、概念介绍、如何使用、底层原理几方面全面介绍预渲染技术的各项特性。适用场景在谈使用场景之前,首先需要明白以下几点:现代前端框架比如 Vue 在构建完成之后,页面加载的其实是一堆 js,再由 js 动态生成DOM。当我们访问页面,右键“显示网页源代码”的时候,看不到文字等内容百度、搜狗等爬虫在抓取页面的时候,不会执行页面的 js 源代码(谷歌爬虫可以执行“同步” js 来构建页面,因此 Vue 等框架开发的单页应用可以在谷歌搜索引擎中很好的被收录,这点我们不展开讨论)如果想要让百度、搜狗等收录索引我们的网站,就必须像静态 HTML 那样,让网页在右键查看源代码的时候,显示的是文字、图片等内容在这样的场景下,我们可以使用预渲染来解决此类问题。概念介绍
预渲染概念简单来讲是这样的:在项目构建阶段,我们会模拟访问项目的页面URL,这时候页面上的 js 将会执行并且形成真正的 HTML 片段;此时我们保存这个 HTML 文件到服务器硬盘上,下次不管是用户还是爬虫访问的时候,就直接返回这个物理文件,这样就可以有效解决 SEO 无法收录的问题。大体流程如下图:
可以看出,“预渲染”同“服务端渲染”最大的区别是,前者是在构建期间执行,后者在用户访问期间实时运行;前者在构建完成之后就不再需要 node服务,后者需要使用 node 作为运行时。预渲染也有它不适用的地方。正因为在构建阶段我们需要指明“需要构建的页面URL”,因此对于那些携带动态参数的页面(比如资料详情页),不适用于用预渲染去构建。这种场景下只能使用SSR。反之,一切静态官网、带数据的门户网站,只要是URL固定的,不管其中有没有动态数据,都可以使用预渲染。这里你可能会问一个问题:预渲染技术能否将 ajax 请求的内容也填充到页面上?答案是肯定的。虽然你 ajax 并非“同步执行”的 js,我们无法获知异步请求完成的时机。但通过控制监测页面上某个特定元素是否存在等手段,我们可以变相获知到数据返回的时机,从而进行预渲染。就可以达到“填充 ajax 数据”的效果(这可是谷歌爬虫也无法达到的效果哦)。如何使用预渲染技术有很多种实现方式。最常用的是使用 webpack 的一个插件: prerender-spa-plugin()。但是这个插件有很多局限性,最大的局限性在于必须结合 webpack 来使用,不够灵活,不易调试。也无法通过编程的方式使用。
比如我们的首页有动态的数据(非动态URL。是通过ajax获取的动态数据。)因此我们在使用了预渲染生成了静态首页之后,需要每间隔10分钟或者5分钟重新生成一个新的静态页,来更新数据。这就需要能够通过编程的方式调用渲染指令。在这样的情况下我基于这个插件的原理重新实现了一个包:@waitkafuka/spa-prerender(),可以通过 nodejs 通过编程的方式使用。
同时它剥离了 webpack 的依赖,剥离了对SPA页面的限制。只要有一个静态目录就可以工作。使用的方式非常简单,以 Vue 为例,在我们正常构建生成了 dist 目录之后,只需要编写以下脚本:
const SpaRenderer = require('@waitkafuka/spa-prerender');const path = require('path');<br />const options = {staticDir: path.join(__dirname, 'dist'),basePath: 'base',//可选,当项目有basePath的时候设置。同router中的base和publicPath。确保staticDir/basePath/index.html存在 routes: ['/','/exam', ],puppeteerOptions: {headless: true,maxConcurrentRoutes: 0,renderAfterDocumentEvent: 'render-event',skipThirdPartyRequests: true }};const spaRenderer = new SpaRenderer(options)spaRenderer.render().then(() => {console.log('预渲染完毕。');});
具体的参数解析可以查看 @waitkafuka/spa-prerender。底层原理在底层实现上,主要利用了 express 来驱动静态页面;然后利用 puppeteer 无头浏览器来模拟用户访问所需要预渲染的地址;在访问完成之后,保存页面HTML到文件夹中。
流程如下:
更为详细的流程介绍如下(此部分枯燥乏味,非专业人士可以跳过。):
阶段1:创建渲染器实例
spa-prerender index.js:
1.创建puppeteer实例 @prerenderer/renderer-puppeteer/es6/renderer.js
2.创建server实例@prerenderer/prerenderer/es6/server.js
3.创建renderer实例,将1 2步的puppeteer和server注入this @@prerenderer/prerenderer/es6/index.js
阶段2:渲染器实例初始化:spa-prerender index.js:
1.server初始化 (设置路由:静态资源利用*.*映射到staticDir上,其他请求全部映射到index.html上。设置静态资源和index.html路径,modifyServer也在这个阶段。server 启动)@prerenderer/prerenderer/es6/server.js
2.puppeteer初始化(判断平台是否linux,如果是Linux需要设置一些启动参数;启动puppeteer)@prerenderer/renderer-puppeteer/es6/renderer.js
阶段3:开始访问路由并获取html
1.spa-prerender index.js->@prerenderer/prerenderer/es6/index.js -> @prerenderer/renderer-puppeteer/es6/renderer.js
2.开启一个限流器,每次最多渲染 n 条路由,避免内存崩溃
3.puppeteer开启一个新标签,判断是否有inject,如果有,注入到window上
4.拼接端口、设置viewport,拼接router,形成url,发起页面的请求
5.判断options中是否设置了renderAfterDocumentEvent,如果有,给页面添加一个事件监听器,当触发事件的时候,将__PRERENDER_STATUS属性设置为true
6.访问页面,等待加载完成(如何确定页面加载完成, waituntil: 'networkidle0'//在500ms内没有网络请求,这个设置可以通过puppeteerOptions.navigationOptions.waituntil修改)
等待捕捉,分为三种等待时机:
1.等待固定时间,renderAfterTime(利用settimeout结合promise实现)
2.等待抛出某个事件:renderAfterDocumentEvent,该事件需要事先在页面写好抛出的时机
3.等待某个元素出现:renderAfterElementExists
阶段4:保存html
spa-prerender index.js 遍历结果,拼接文件夹路径并保存html。
实践过程中的常见问题
1. 如果一个项目有10个页面,其中首页需要SEO,于是使用了预渲染,另外9个页面仍然是由js渲染。那么在访问其他9个页面的时候,刷新页面,会先显示首页的内容一闪而过。这种问题如何解决?
产生这种情况的原因在于:在单页应用中,实际上只有一个物理页面,那就是 index.html。我们访问的所有页面实际都是 index.html,先进入 index.html 然后再执行 js 构建 dom。那么此时如果我们首页是已经预渲染好的,那么就会有内容,在 js 构建出对应路由的内容之前,就会先出现首页的内容。
spa-prerender 考虑到了这种问题。在预渲染的过程中,会首先保留原来“纯净”的index.html,并重命名为“index-spa.html”。
而后,在 nginx 配置中,利用 try_files 指令的优先级配置特点,让用户在刷新的情况下,如果有对应物理文件则访问物理文件(预渲染生成的文件),如果没有对应物理文件则降级访问 index-spa.html,就可以解决上述问题。nginx 配置指令如下:
location /{ alias /Users/zks/code/xkw/xop/dist/; try_files $uri $uri/ /index-spa.html; }
此时预渲染生成的文件将被优先返回($uri),如果未匹配,才会交由 index-spa.html 处理。
2. 如果项目打包有前缀怎么办?
如果项目有publicPath,那么在 dist 目录下会多一层根目录。此时需要在预渲染配置中添加 basePath 的选项。此时 express 会从 dist/basePath 目录中去寻找 index.html。
配置如下:
const options = { staticDir: path.join(__dirname, 'dist'), basePath: 'base',//当项目有basePath的时候设置。同router中的base和publicPath。确保staticDir/basePath/index.html存在 routes: ['/','/exam', ], ... }
3. 如何控制渲染器开始进行HTML保存的时机?
我们可以通过 options 中三个参数来控制:
3.1.renderAfterTime:等待固定时间之后(从页面开始发起访问算起)
3.2.renderAfterDocumentEvent:等待抛出某个事件,该事件需要事先在页面定义好触发的时机,比如在 Vue 的 mounted 函数中定义:
new Vue({ router,render: h => h(App), mounted () { //在mounted之后触发custom-render-event // 预渲染器在收到这个事件之后将开始进行页面的保存工作 document.dispatchEvent(new Event('custom-render-event')) }}).$mount('#app')
3.3.renderAfterElementExists:等待某个元素出现。我们可以在异步 ajax 返回之后,增加某个元素。当渲染器检测到此元素出现之后进行页面保存,此时保存的页面就包含了 ajax 返回的数据。
4. 首页预渲染生成的 DOM 元素,会不会被 js 复用?还是删除重新构建?
仿照SSR的思路,我们可以通过在根节点上设置 data-server-rander="true",这样在客户端 js 会知道这个是已经渲染完成的 DOM,不会粗暴去替换它。而是执行一个“注水”的过程(也就是hydration)。可以充分复用预渲染生成的 DOM 元素。
点击下方卡片可以关注
nodejs抓取动态网页 全面深入理解预渲染技术体系
网站优化 • 优采云 发表了文章 • 0 个评论 • 44 次浏览 • 2022-06-06 12:00
在我们使用现代前端框架,比如Vue、React、Angular开发完毕前端项目之后,会发现这些页面输出的全是js,很不利于搜索引擎去爬取。在已经完成了单页应用(SPA)项目之后,如果要进行SEO优化的改造,这时候就可以使用预渲染技术体系。
下面将从适用场景、概念介绍、如何使用、底层原理几方面全面介绍预渲染技术的各项特性。适用场景在谈使用场景之前,首先需要明白以下几点:现代前端框架比如 Vue 在构建完成之后,页面加载的其实是一堆 js,再由 js 动态生成DOM。当我们访问页面,右键“显示网页源代码”的时候,看不到文字等内容百度、搜狗等爬虫在抓取页面的时候,不会执行页面的 js 源代码(谷歌爬虫可以执行“同步” js 来构建页面,因此 Vue 等框架开发的单页应用可以在谷歌搜索引擎中很好的被收录,这点我们不展开讨论)如果想要让百度、搜狗等收录索引我们的网站,就必须像静态 HTML 那样,让网页在右键查看源代码的时候,显示的是文字、图片等内容在这样的场景下,我们可以使用预渲染来解决此类问题。概念介绍
预渲染概念简单来讲是这样的:在项目构建阶段,我们会模拟访问项目的页面URL,这时候页面上的 js 将会执行并且形成真正的 HTML 片段;此时我们保存这个 HTML 文件到服务器硬盘上,下次不管是用户还是爬虫访问的时候,就直接返回这个物理文件,这样就可以有效解决 SEO 无法收录的问题。大体流程如下图:
可以看出,“预渲染”同“服务端渲染”最大的区别是,前者是在构建期间执行,后者在用户访问期间实时运行;前者在构建完成之后就不再需要 node服务,后者需要使用 node 作为运行时。预渲染也有它不适用的地方。正因为在构建阶段我们需要指明“需要构建的页面URL”,因此对于那些携带动态参数的页面(比如资料详情页),不适用于用预渲染去构建。这种场景下只能使用SSR。反之,一切静态官网、带数据的门户网站,只要是URL固定的,不管其中有没有动态数据,都可以使用预渲染。这里你可能会问一个问题:预渲染技术能否将 ajax 请求的内容也填充到页面上?答案是肯定的。虽然你 ajax 并非“同步执行”的 js,我们无法获知异步请求完成的时机。但通过控制监测页面上某个特定元素是否存在等手段,我们可以变相获知到数据返回的时机,从而进行预渲染。就可以达到“填充 ajax 数据”的效果(这可是谷歌爬虫也无法达到的效果哦)。如何使用预渲染技术有很多种实现方式。最常用的是使用 webpack 的一个插件: prerender-spa-plugin()。但是这个插件有很多局限性,最大的局限性在于必须结合 webpack 来使用,不够灵活,不易调试。也无法通过编程的方式使用。
比如我们的首页有动态的数据(非动态URL。是通过ajax获取的动态数据。)因此我们在使用了预渲染生成了静态首页之后,需要每间隔10分钟或者5分钟重新生成一个新的静态页,来更新数据。这就需要能够通过编程的方式调用渲染指令。在这样的情况下我基于这个插件的原理重新实现了一个包:@waitkafuka/spa-prerender(),可以通过 nodejs 通过编程的方式使用。
同时它剥离了 webpack 的依赖,剥离了对SPA页面的限制。只要有一个静态目录就可以工作。使用的方式非常简单,以 Vue 为例,在我们正常构建生成了 dist 目录之后,只需要编写以下脚本:
const SpaRenderer = require('@waitkafuka/spa-prerender');const path = require('path');<br />const options = {staticDir: path.join(__dirname, 'dist'),basePath: 'base',//可选,当项目有basePath的时候设置。同router中的base和publicPath。确保staticDir/basePath/index.html存在 routes: ['/','/exam', ],puppeteerOptions: {headless: true,maxConcurrentRoutes: 0,renderAfterDocumentEvent: 'render-event',skipThirdPartyRequests: true }};const spaRenderer = new SpaRenderer(options)spaRenderer.render().then(() => {console.log('预渲染完毕。');});
具体的参数解析可以查看 @waitkafuka/spa-prerender。底层原理在底层实现上,主要利用了 express 来驱动静态页面;然后利用 puppeteer 无头浏览器来模拟用户访问所需要预渲染的地址;在访问完成之后,保存页面HTML到文件夹中。
流程如下:
更为详细的流程介绍如下(此部分枯燥乏味,非专业人士可以跳过。):
阶段1:创建渲染器实例
spa-prerender index.js:
1.创建puppeteer实例 @prerenderer/renderer-puppeteer/es6/renderer.js
2.创建server实例@prerenderer/prerenderer/es6/server.js
3.创建renderer实例,将1 2步的puppeteer和server注入this @@prerenderer/prerenderer/es6/index.js
阶段2:渲染器实例初始化:spa-prerender index.js:
1.server初始化 (设置路由:静态资源利用*.*映射到staticDir上,其他请求全部映射到index.html上。设置静态资源和index.html路径,modifyServer也在这个阶段。server 启动)@prerenderer/prerenderer/es6/server.js
2.puppeteer初始化(判断平台是否linux,如果是Linux需要设置一些启动参数;启动puppeteer)@prerenderer/renderer-puppeteer/es6/renderer.js
阶段3:开始访问路由并获取html
1.spa-prerender index.js->@prerenderer/prerenderer/es6/index.js -> @prerenderer/renderer-puppeteer/es6/renderer.js
2.开启一个限流器,每次最多渲染 n 条路由,避免内存崩溃
3.puppeteer开启一个新标签,判断是否有inject,如果有,注入到window上
4.拼接端口、设置viewport,拼接router,形成url,发起页面的请求
5.判断options中是否设置了renderAfterDocumentEvent,如果有,给页面添加一个事件监听器,当触发事件的时候,将__PRERENDER_STATUS属性设置为true
6.访问页面,等待加载完成(如何确定页面加载完成, waituntil: 'networkidle0'//在500ms内没有网络请求,这个设置可以通过puppeteerOptions.navigationOptions.waituntil修改)
等待捕捉,分为三种等待时机:
1.等待固定时间,renderAfterTime(利用settimeout结合promise实现)
2.等待抛出某个事件:renderAfterDocumentEvent,该事件需要事先在页面写好抛出的时机
3.等待某个元素出现:renderAfterElementExists
阶段4:保存html
spa-prerender index.js 遍历结果,拼接文件夹路径并保存html。
实践过程中的常见问题
1. 如果一个项目有10个页面,其中首页需要SEO,于是使用了预渲染,另外9个页面仍然是由js渲染。那么在访问其他9个页面的时候,刷新页面,会先显示首页的内容一闪而过。这种问题如何解决?
产生这种情况的原因在于:在单页应用中,实际上只有一个物理页面,那就是 index.html。我们访问的所有页面实际都是 index.html,先进入 index.html 然后再执行 js 构建 dom。那么此时如果我们首页是已经预渲染好的,那么就会有内容,在 js 构建出对应路由的内容之前,就会先出现首页的内容。
spa-prerender 考虑到了这种问题。在预渲染的过程中,会首先保留原来“纯净”的index.html,并重命名为“index-spa.html”。
而后,在 nginx 配置中,利用 try_files 指令的优先级配置特点,让用户在刷新的情况下,如果有对应物理文件则访问物理文件(预渲染生成的文件),如果没有对应物理文件则降级访问 index-spa.html,就可以解决上述问题。nginx 配置指令如下:
location /{ alias /Users/zks/code/xkw/xop/dist/; try_files $uri $uri/ /index-spa.html; }
此时预渲染生成的文件将被优先返回($uri),如果未匹配,才会交由 index-spa.html 处理。
2. 如果项目打包有前缀怎么办?
如果项目有publicPath,那么在 dist 目录下会多一层根目录。此时需要在预渲染配置中添加 basePath 的选项。此时 express 会从 dist/basePath 目录中去寻找 index.html。
配置如下:
const options = { staticDir: path.join(__dirname, 'dist'), basePath: 'base',//当项目有basePath的时候设置。同router中的base和publicPath。确保staticDir/basePath/index.html存在 routes: ['/','/exam', ], ... }
3. 如何控制渲染器开始进行HTML保存的时机?
我们可以通过 options 中三个参数来控制:
3.1.renderAfterTime:等待固定时间之后(从页面开始发起访问算起)
3.2.renderAfterDocumentEvent:等待抛出某个事件,该事件需要事先在页面定义好触发的时机,比如在 Vue 的 mounted 函数中定义:
new Vue({ router,render: h => h(App), mounted () { //在mounted之后触发custom-render-event // 预渲染器在收到这个事件之后将开始进行页面的保存工作 document.dispatchEvent(new Event('custom-render-event')) }}).$mount('#app')
3.3.renderAfterElementExists:等待某个元素出现。我们可以在异步 ajax 返回之后,增加某个元素。当渲染器检测到此元素出现之后进行页面保存,此时保存的页面就包含了 ajax 返回的数据。
4. 首页预渲染生成的 DOM 元素,会不会被 js 复用?还是删除重新构建?
仿照SSR的思路,我们可以通过在根节点上设置 data-server-rander="true",这样在客户端 js 会知道这个是已经渲染完成的 DOM,不会粗暴去替换它。而是执行一个“注水”的过程(也就是hydration)。可以充分复用预渲染生成的 DOM 元素。
点击下方卡片可以关注 查看全部
nodejs抓取动态网页 全面深入理解预渲染技术体系
在我们使用现代前端框架,比如Vue、React、Angular开发完毕前端项目之后,会发现这些页面输出的全是js,很不利于搜索引擎去爬取。在已经完成了单页应用(SPA)项目之后,如果要进行SEO优化的改造,这时候就可以使用预渲染技术体系。
下面将从适用场景、概念介绍、如何使用、底层原理几方面全面介绍预渲染技术的各项特性。适用场景在谈使用场景之前,首先需要明白以下几点:现代前端框架比如 Vue 在构建完成之后,页面加载的其实是一堆 js,再由 js 动态生成DOM。当我们访问页面,右键“显示网页源代码”的时候,看不到文字等内容百度、搜狗等爬虫在抓取页面的时候,不会执行页面的 js 源代码(谷歌爬虫可以执行“同步” js 来构建页面,因此 Vue 等框架开发的单页应用可以在谷歌搜索引擎中很好的被收录,这点我们不展开讨论)如果想要让百度、搜狗等收录索引我们的网站,就必须像静态 HTML 那样,让网页在右键查看源代码的时候,显示的是文字、图片等内容在这样的场景下,我们可以使用预渲染来解决此类问题。概念介绍
预渲染概念简单来讲是这样的:在项目构建阶段,我们会模拟访问项目的页面URL,这时候页面上的 js 将会执行并且形成真正的 HTML 片段;此时我们保存这个 HTML 文件到服务器硬盘上,下次不管是用户还是爬虫访问的时候,就直接返回这个物理文件,这样就可以有效解决 SEO 无法收录的问题。大体流程如下图:
可以看出,“预渲染”同“服务端渲染”最大的区别是,前者是在构建期间执行,后者在用户访问期间实时运行;前者在构建完成之后就不再需要 node服务,后者需要使用 node 作为运行时。预渲染也有它不适用的地方。正因为在构建阶段我们需要指明“需要构建的页面URL”,因此对于那些携带动态参数的页面(比如资料详情页),不适用于用预渲染去构建。这种场景下只能使用SSR。反之,一切静态官网、带数据的门户网站,只要是URL固定的,不管其中有没有动态数据,都可以使用预渲染。这里你可能会问一个问题:预渲染技术能否将 ajax 请求的内容也填充到页面上?答案是肯定的。虽然你 ajax 并非“同步执行”的 js,我们无法获知异步请求完成的时机。但通过控制监测页面上某个特定元素是否存在等手段,我们可以变相获知到数据返回的时机,从而进行预渲染。就可以达到“填充 ajax 数据”的效果(这可是谷歌爬虫也无法达到的效果哦)。如何使用预渲染技术有很多种实现方式。最常用的是使用 webpack 的一个插件: prerender-spa-plugin()。但是这个插件有很多局限性,最大的局限性在于必须结合 webpack 来使用,不够灵活,不易调试。也无法通过编程的方式使用。
比如我们的首页有动态的数据(非动态URL。是通过ajax获取的动态数据。)因此我们在使用了预渲染生成了静态首页之后,需要每间隔10分钟或者5分钟重新生成一个新的静态页,来更新数据。这就需要能够通过编程的方式调用渲染指令。在这样的情况下我基于这个插件的原理重新实现了一个包:@waitkafuka/spa-prerender(),可以通过 nodejs 通过编程的方式使用。
同时它剥离了 webpack 的依赖,剥离了对SPA页面的限制。只要有一个静态目录就可以工作。使用的方式非常简单,以 Vue 为例,在我们正常构建生成了 dist 目录之后,只需要编写以下脚本:
const SpaRenderer = require('@waitkafuka/spa-prerender');const path = require('path');<br />const options = {staticDir: path.join(__dirname, 'dist'),basePath: 'base',//可选,当项目有basePath的时候设置。同router中的base和publicPath。确保staticDir/basePath/index.html存在 routes: ['/','/exam', ],puppeteerOptions: {headless: true,maxConcurrentRoutes: 0,renderAfterDocumentEvent: 'render-event',skipThirdPartyRequests: true }};const spaRenderer = new SpaRenderer(options)spaRenderer.render().then(() => {console.log('预渲染完毕。');});
具体的参数解析可以查看 @waitkafuka/spa-prerender。底层原理在底层实现上,主要利用了 express 来驱动静态页面;然后利用 puppeteer 无头浏览器来模拟用户访问所需要预渲染的地址;在访问完成之后,保存页面HTML到文件夹中。
流程如下:
更为详细的流程介绍如下(此部分枯燥乏味,非专业人士可以跳过。):
阶段1:创建渲染器实例
spa-prerender index.js:
1.创建puppeteer实例 @prerenderer/renderer-puppeteer/es6/renderer.js
2.创建server实例@prerenderer/prerenderer/es6/server.js
3.创建renderer实例,将1 2步的puppeteer和server注入this @@prerenderer/prerenderer/es6/index.js
阶段2:渲染器实例初始化:spa-prerender index.js:
1.server初始化 (设置路由:静态资源利用*.*映射到staticDir上,其他请求全部映射到index.html上。设置静态资源和index.html路径,modifyServer也在这个阶段。server 启动)@prerenderer/prerenderer/es6/server.js
2.puppeteer初始化(判断平台是否linux,如果是Linux需要设置一些启动参数;启动puppeteer)@prerenderer/renderer-puppeteer/es6/renderer.js
阶段3:开始访问路由并获取html
1.spa-prerender index.js->@prerenderer/prerenderer/es6/index.js -> @prerenderer/renderer-puppeteer/es6/renderer.js
2.开启一个限流器,每次最多渲染 n 条路由,避免内存崩溃
3.puppeteer开启一个新标签,判断是否有inject,如果有,注入到window上
4.拼接端口、设置viewport,拼接router,形成url,发起页面的请求
5.判断options中是否设置了renderAfterDocumentEvent,如果有,给页面添加一个事件监听器,当触发事件的时候,将__PRERENDER_STATUS属性设置为true
6.访问页面,等待加载完成(如何确定页面加载完成, waituntil: 'networkidle0'//在500ms内没有网络请求,这个设置可以通过puppeteerOptions.navigationOptions.waituntil修改)
等待捕捉,分为三种等待时机:
1.等待固定时间,renderAfterTime(利用settimeout结合promise实现)
2.等待抛出某个事件:renderAfterDocumentEvent,该事件需要事先在页面写好抛出的时机
3.等待某个元素出现:renderAfterElementExists
阶段4:保存html
spa-prerender index.js 遍历结果,拼接文件夹路径并保存html。
实践过程中的常见问题
1. 如果一个项目有10个页面,其中首页需要SEO,于是使用了预渲染,另外9个页面仍然是由js渲染。那么在访问其他9个页面的时候,刷新页面,会先显示首页的内容一闪而过。这种问题如何解决?
产生这种情况的原因在于:在单页应用中,实际上只有一个物理页面,那就是 index.html。我们访问的所有页面实际都是 index.html,先进入 index.html 然后再执行 js 构建 dom。那么此时如果我们首页是已经预渲染好的,那么就会有内容,在 js 构建出对应路由的内容之前,就会先出现首页的内容。
spa-prerender 考虑到了这种问题。在预渲染的过程中,会首先保留原来“纯净”的index.html,并重命名为“index-spa.html”。
而后,在 nginx 配置中,利用 try_files 指令的优先级配置特点,让用户在刷新的情况下,如果有对应物理文件则访问物理文件(预渲染生成的文件),如果没有对应物理文件则降级访问 index-spa.html,就可以解决上述问题。nginx 配置指令如下:
location /{ alias /Users/zks/code/xkw/xop/dist/; try_files $uri $uri/ /index-spa.html; }
此时预渲染生成的文件将被优先返回($uri),如果未匹配,才会交由 index-spa.html 处理。
2. 如果项目打包有前缀怎么办?
如果项目有publicPath,那么在 dist 目录下会多一层根目录。此时需要在预渲染配置中添加 basePath 的选项。此时 express 会从 dist/basePath 目录中去寻找 index.html。
配置如下:
const options = { staticDir: path.join(__dirname, 'dist'), basePath: 'base',//当项目有basePath的时候设置。同router中的base和publicPath。确保staticDir/basePath/index.html存在 routes: ['/','/exam', ], ... }
3. 如何控制渲染器开始进行HTML保存的时机?
我们可以通过 options 中三个参数来控制:
3.1.renderAfterTime:等待固定时间之后(从页面开始发起访问算起)
3.2.renderAfterDocumentEvent:等待抛出某个事件,该事件需要事先在页面定义好触发的时机,比如在 Vue 的 mounted 函数中定义:
new Vue({ router,render: h => h(App), mounted () { //在mounted之后触发custom-render-event // 预渲染器在收到这个事件之后将开始进行页面的保存工作 document.dispatchEvent(new Event('custom-render-event')) }}).$mount('#app')
3.3.renderAfterElementExists:等待某个元素出现。我们可以在异步 ajax 返回之后,增加某个元素。当渲染器检测到此元素出现之后进行页面保存,此时保存的页面就包含了 ajax 返回的数据。
4. 首页预渲染生成的 DOM 元素,会不会被 js 复用?还是删除重新构建?
仿照SSR的思路,我们可以通过在根节点上设置 data-server-rander="true",这样在客户端 js 会知道这个是已经渲染完成的 DOM,不会粗暴去替换它。而是执行一个“注水”的过程(也就是hydration)。可以充分复用预渲染生成的 DOM 元素。
点击下方卡片可以关注
一文彻底搞懂 React 服务端渲染
网站优化 • 优采云 发表了文章 • 0 个评论 • 74 次浏览 • 2022-09-16 08:11
1、前言
在前端项目需要首屏渲染速度优化或SEO的场景下,大家或多或少都听过到过服务端渲染( SSR ),但大多数人对服务端渲染具体实现和底层原理还是比较陌生的。本文基于公司官网开发时做了服务端渲染改造基础上,系统理解和梳理这套体系的模式和逻辑,并写了一些笔记和Demo(文后链接)便于深入理解。这次我们来以React为例,把服务端渲染彻底讲弄明白。本文主要有以下内容:
1.1 什么是服务端渲染?
服务端渲染, SSR (Server-side Rendering) ,顾名思义,就是在浏览器发起页面请求后由服务端完成页面的HTML结构拼接,返回给浏览器解析后能直接构建出有内容的页面。
用 node 实现一个简单的 SSR
我们使用Koa框架来创建node服务:
// demo1<br />var Koa = require("koa");<br />var app = new Koa();<br /><br />// 对于任何请求,app将调用该函数处理请求:<br />app.use(async (ctx) => {<br /> // 将HTML字符串直接返回 <br /> ctx.body = `<br /> <br /> <br /> ssr<br /> <br /> <br /> <br /> hello server<br /> <p>word<br /> <br /> <br /> `;<br />});<br />//监听<br />app.listen(3001, () => {<br /> console.log("listen on 3001 port!");<br />});<br /></p>
启动服务后访问页面,查看网页源代码是这样:
npx create-react-app my-app<br />
上面的例子就是一个简单的服务端渲染,其服务侧直接输出了有内容的HTML,浏览器解析之后就能渲染出页面。与服务端渲染对应的是客户端渲染 ,CSR(Client Side Rendering),通俗的讲就是由客户端完成页面的渲染。其大致渲染流程是这样:在浏览器请求页面时,服务端先返回一个无具体内容的HTML,浏览器还需要再加载并执行JS,动态地将内容和数据渲染到页面中,才能完成页面具体内容的显示。目前主流的React ,Vue, Angular 等SPA页面未经特殊处理均采用客户端渲染。最常见脚手架create-react-app 生成的项目就是客户端渲染:
上面采用客户端渲染的HTML页面中中无内容,需在浏览器端加载并执行bundle.js后才能构建出有内容页面。
1.2 为什么用服务端渲染?1.2.1 服务端渲染的优势
相比于客户端渲染,服务端渲染有什么优势?我们可以从下图对比一下这两种不同的渲染模式。
首屏时间更短
采用客户端渲染的页面,要进行JS文件拉取和JS代码执行,动态创建 DOM 结构,客户端逻辑越重,初始化需要执行的 JS 越多,首屏性能就越慢;客户端渲染前置的第三方类库/框架、polyfill 等都会在一定程度上拖慢首屏性能。Code splitting、lazy-load等优化措施能够缓解一部分,但优化空间相对有限。相比而言,服务端渲染的页面直接拉取HTMl就能显示内容,更短的首屏时间创造更多的可能性。
利于SEO
在别人使用搜索引擎搜索相关的内容时,你的网页排行能靠得更前,这样你的流量就有越高,这就是SEO的意义所在。那为什么服务端渲染更利于爬虫爬你的页面呢?因为对于很多搜索引擎爬虫(非google)HTML返回是什么内容就爬什么内容,而不会动态执行JS代码内容。对客户端渲染的页面来说,简直无能为力,因为返回的HTML是一个空壳。而服务端渲染返回的HTML是有内容的。
SSR的出现,就是为了解决这些CSR的弊端。
1.2.2 权衡使用服务端渲染
并不是所有的WEB应用都必须使用SSR,这需要开发者来权衡,因为服务端渲染会带来以下问题:
代码复杂度增加。为了实现服务端渲染,应用代码中需要兼容服务端和客户端两种运行情况,部分代码只能在客户端运行,需要对其进行特殊处理,才能在服务器渲染应用程序中运行。
需要更多的服务器资源。由于服务器增加了渲染HTML的需求,使得原本只需要输出静态资源文件的nodejs服务,新增了数据获取的IO和渲染HTML的CPU占用,如果流量突然暴增,有可能导致服务器宕机,因此需要使用响应的缓存策略和准备相应的服务器负载。
涉及构建设置和部署的更多要求。与可以部署在任何静态文件服务器上的完全静态单页面应用程序 (SPA) 不同,服务器渲染应用程序,需要处于 Node.js server 运行环境。
因此,在使用服务端渲染SSR之前,需要考虑投入产出比:是否真的需要SEO,是否需要将首屏时间提升到极致。如果都没有,使用SSR反而小题大做了。
1.3 服务端渲染的发展史
其实服务端渲染并不是什么新奇的概念,前后端分层之前很长的一段时间里都是以服务端渲染为主(JSP、PHP),那时后端一把梭哈,在服务端生成完整的 HTML 页面。但那时的服务端渲染和现在还是有本质的区别,存在比较多的弊端,每一个请求都要动态生成HTML,存在大量的重复,服务器机器成本也相对比较高,前后端代码完全掺杂在一起,开发维护难。
随着业务不断发展变化,后端要写的JS逻辑也越发复杂,而且JS有很多潜在的坑使后端越发觉得这是块烫手山芋,于是逐渐出现了前后端分层。伴随AJAX的兴起,浏览器可以做到了不再重现请求页面就可更新局部视图。还可以利用客户端免费的计算资源,后端侧逐渐演变成了提供数据支持。jquery的兴起,良好的客户端兼容性使JS不再受困于各种版本浏览器兼容问题,一统了前端天下。
此后伴随node的兴起,前后端分离越演越烈。前端能摆脱后端的依赖单独起服务,三大框架vue,react,angular也迅势崛起,以操作数据就能更新视图,前端开发人员逐渐摆脱了与烦人的Dom操作打交道,能够专心的关注业务和数据逻辑。前端同时探索出了功能插件,UI库,组件等多种代码复用方案,形成了繁荣的前端生态。
但是三大框架采用客户端渲染模式,随着代码逻辑的加重,首屏时间成了一个很大的问题,同时开发人员也发现SEO也出了问题,大多搜索引擎根本不会去执行JS代码。但是也不可能再回头走老路,于是前端又探索出了一套服务端渲染的框架来解决掉这些问题。此时的服务端渲染是建立在成熟的组组件,模块生态之上,基于Node.js的同构方案成为最佳实践。
2、React服务端渲染的原理
2.1基本思路
React服务端渲染流程
React服务端渲染的基本思路,简单理解就是将组件或页面通过服务器生成html字符串,再发送到浏览器,最后将静态标记"混合"为客户端上完全交互的应用程序。因为要考虑React在服务端的运行情况,故相比之前讲的多了在浏览器端绑定状态与事件的过程。
我们可以结合下面的流程图来一览完整的 React服务端渲染的全貌:当浏览器去请求一个页面,前端服务器端接收到请求并执行 React组件代码,此时React代码中可能包含向后端服务器发起请求,待请求完成返回的数据后,前端服务器组装好有内容的HTML里返给浏览器,浏览器解析HTML后已具备展示内容,但页面并不具备交互能力。
下一阶段,在返回的HTMl中还有script链接,浏览器再拉取JS并执行其包含的React 代码,其能在浏览器端执行完整的生命周期,并通过相关API实现复用此前返回 HTML节点并添加事件的绑定,此时页面才就具备完全交互能力。总的来说,react服务端渲染包含有两个过程:服务端渲染 + 客户端 hydrate 渲染。服务端渲染在服务端渲染出了首屏内容;客户端 hydrate 渲染复用服务端返回的节点,进行一次类似于 render 的 hydrate 渲染过程,把交互事件绑上去(此时页面可交互),并接管页面。
服务端处理后返回的
客户端“浸泡”还原后的
核心思想(同构)
从上面的流程中可以看到,客户端和服务端都要执行React代码完成渲染,那是不是就要写两份代码,供双端使用? 当然不需要,也完全不合理。所谓同构,就是让一份React代码,既可以在服务端中执行,也可以在客户端中执行。
SSR技术栈
我们这里简单理了一下服务端渲染涉及到的技术栈:
知道了服务端渲染、同构的大概思路之后,下面从头开始,一步一步完成具体实践,深入理解其原理。
2.2 服务端如何渲染React组件?
按照之前流程的大概思路,我们首先需要将React组件在服务端转换成HTML字符串,那怎么做呢?React 提供的面向服务端的API(react-dom/server),提供了相关方法能够将 React 组件渲染成静态的(HTML)标签。下面我们简单了解下react-dom/server。
react-dom/server
react-dom/server有renderToString、renderToStaticMarkup,renderToNodeStream、renderToStaticNodeStream四个方法能够将 React 组件渲染成静态的(HTML)标签,前两者能在客户端和服务端运行,后两者只能在服务端运行。
renderToStaticMarkup VS renderToString:renderToString 方法会在 React 内部创建的额外 DOM 属性,例如 data-reactroot, 在相邻文本节点之间生成,这些属性是客户端执行hydrate复用节点的关键所在,data-reactroot属性是服务端渲染的标志之一。如果你希望把 React 当作静态页面生成器来使用,renderToStaticMarkup方法会非常有用,因为去除额外的属性可以节省一些字节。
// Home.jsx<br style="white-space:pre-wrap;margin: 0px;padding: 0px;max-width: 100%;overflow-wrap: break-word !important;box-sizing: border-box !important;color: rgb(171, 178, 191);font-family: 'Operator Mono', Consolas, Monaco, Menlo, monospace;font-size: 12px;font-style: normal;font-variant-ligatures: normal;font-variant-caps: normal;font-weight: 400;letter-spacing: normal;orphans: 2;text-align: left;text-indent: 0px;text-transform: none;widows: 2;word-spacing: 0px;-webkit-text-stroke-width: 0px;text-decoration-thickness: initial;text-decoration-style: initial;text-decoration-color: initial;" />import React from "react";<br style="white-space:pre-wrap;margin: 0px;padding: 0px;max-width: 100%;overflow-wrap: break-word !important;box-sizing: border-box !important;color: rgb(171, 178, 191);font-family: 'Operator Mono', Consolas, Monaco, Menlo, monospace;font-size: 12px;font-style: normal;font-variant-ligatures: normal;font-variant-caps: normal;font-weight: 400;letter-spacing: normal;orphans: 2;text-align: left;text-indent: 0px;text-transform: none;widows: 2;word-spacing: 0px;-webkit-text-stroke-width: 0px;text-decoration-thickness: initial;text-decoration-style: initial;text-decoration-color: initial;" />const Home = () => {<br style="white-space:pre-wrap;margin: 0px;padding: 0px;max-width: 100%;overflow-wrap: break-word !important;box-sizing: border-box !important;color: rgb(171, 178, 191);font-family: 'Operator Mono', Consolas, Monaco, Menlo, monospace;font-size: 12px;font-style: normal;font-variant-ligatures: normal;font-variant-caps: normal;font-weight: 400;letter-spacing: normal;orphans: 2;text-align: left;text-indent: 0px;text-transform: none;widows: 2;word-spacing: 0px;-webkit-text-stroke-width: 0px;text-decoration-thickness: initial;text-decoration-style: initial;text-decoration-color: initial;" /> return (<br style="white-space:pre-wrap;margin: 0px;padding: 0px;max-width: 100%;overflow-wrap: break-word !important;box-sizing: border-box !important;color: rgb(171, 178, 191);font-family: 'Operator Mono', Consolas, Monaco, Menlo, monospace;font-size: 12px;font-style: normal;font-variant-ligatures: normal;font-variant-caps: normal;font-weight: 400;letter-spacing: normal;orphans: 2;text-align: left;text-indent: 0px;text-transform: none;widows: 2;word-spacing: 0px;-webkit-text-stroke-width: 0px;text-decoration-thickness: initial;text-decoration-style: initial;text-decoration-color: initial;" /> <br style="white-space:pre-wrap;margin: 0px;padding: 0px;max-width: 100%;overflow-wrap: break-word !important;box-sizing: border-box !important;color: rgb(171, 178, 191);font-family: 'Operator Mono', Consolas, Monaco, Menlo, monospace;font-size: 12px;font-style: normal;font-variant-ligatures: normal;font-variant-caps: normal;font-weight: 400;letter-spacing: normal;orphans: 2;text-align: left;text-indent: 0px;text-transform: none;widows: 2;word-spacing: 0px;-webkit-text-stroke-width: 0px;text-decoration-thickness: initial;text-decoration-style: initial;text-decoration-color: initial;" /> console.log("hello")}>This is Home Page<br style="white-space:pre-wrap;margin: 0px;padding: 0px;max-width: 100%;overflow-wrap: break-word !important;box-sizing: border-box !important;color: rgb(171, 178, 191);font-family: 'Operator Mono', Consolas, Monaco, Menlo, monospace;font-size: 12px;font-style: normal;font-variant-ligatures: normal;font-variant-caps: normal;font-weight: 400;letter-spacing: normal;orphans: 2;text-align: left;text-indent: 0px;text-transform: none;widows: 2;word-spacing: 0px;-webkit-text-stroke-width: 0px;text-decoration-thickness: initial;text-decoration-style: initial;text-decoration-color: initial;" /> <p>Home is the page ..... more discribe<br style="white-space:pre-wrap;margin: 0px;padding: 0px;max-width: 100%;overflow-wrap: break-word !important;box-sizing: border-box !important;color: rgb(171, 178, 191);font-family: 'Operator Mono', Consolas, Monaco, Menlo, monospace;font-size: 12px;font-style: normal;font-variant-ligatures: normal;font-variant-caps: normal;font-weight: 400;letter-spacing: normal;orphans: 2;text-align: left;text-indent: 0px;text-transform: none;widows: 2;word-spacing: 0px;-webkit-text-stroke-width: 0px;text-decoration-thickness: initial;text-decoration-style: initial;text-decoration-color: initial;" /> <br style="white-space:pre-wrap;margin: 0px;padding: 0px;max-width: 100%;overflow-wrap: break-word !important;box-sizing: border-box !important;color: rgb(171, 178, 191);font-family: 'Operator Mono', Consolas, Monaco, Menlo, monospace;font-size: 12px;font-style: normal;font-variant-ligatures: normal;font-variant-caps: normal;font-weight: 400;letter-spacing: normal;orphans: 2;text-align: left;text-indent: 0px;text-transform: none;widows: 2;word-spacing: 0px;-webkit-text-stroke-width: 0px;text-decoration-thickness: initial;text-decoration-style: initial;text-decoration-color: initial;" /> );<br style="white-space:pre-wrap;margin: 0px;padding: 0px;max-width: 100%;overflow-wrap: break-word !important;box-sizing: border-box !important;color: rgb(171, 178, 191);font-family: 'Operator Mono', Consolas, Monaco, Menlo, monospace;font-size: 12px;font-style: normal;font-variant-ligatures: normal;font-variant-caps: normal;font-weight: 400;letter-spacing: normal;orphans: 2;text-align: left;text-indent: 0px;text-transform: none;widows: 2;word-spacing: 0px;-webkit-text-stroke-width: 0px;text-decoration-thickness: initial;text-decoration-style: initial;text-decoration-color: initial;" />};<br style="white-space:pre-wrap;margin: 0px;padding: 0px;max-width: 100%;overflow-wrap: break-word !important;box-sizing: border-box !important;color: rgb(171, 178, 191);font-family: 'Operator Mono', Consolas, Monaco, Menlo, monospace;font-size: 12px;font-style: normal;font-variant-ligatures: normal;font-variant-caps: normal;font-weight: 400;letter-spacing: normal;orphans: 2;text-align: left;text-indent: 0px;text-transform: none;widows: 2;word-spacing: 0px;-webkit-text-stroke-width: 0px;text-decoration-thickness: initial;text-decoration-style: initial;text-decoration-color: initial;" />export default Home;</p>
我们使用React-dom/server下提供的renderToString方法,在服务端将其转换为html字符串:
// server.js<br />import Koa from "koa";<br />import React from "react";<br />import { renderToString } from "react-dom/server";<br />import Home from "./containers/Home";<br /><br />const app = new Koa();<br />app.use(async (ctx) => {<br /> // 核心api renderToString 将react组件转化成html字符串<br /> const content = renderToString();<br /> ctx.body = `<br /> <br /> <br /> ssr<br /> <br /> <br /> ${content}<br /> <br /> <br /> `;<br />});<br />app.listen(3002, () => {<br /> console.log("listen:3002");<br />});<br />
可以看到上面代码里有ES6的import 和jsx语法,不能直接运行在node环境,需要借助webpack打包, 构建目标是commonjs。新建webpack.server.js具体配置如下:
// webpack.server.js<br style="white-space:pre-wrap;margin: 0px;padding: 0px;max-width: 100%;overflow-wrap: break-word !important;box-sizing: border-box !important;color: rgb(171, 178, 191);font-family: 'Operator Mono', Consolas, Monaco, Menlo, monospace;font-size: 12px;font-style: normal;font-variant-ligatures: normal;font-variant-caps: normal;font-weight: 400;letter-spacing: normal;orphans: 2;text-align: left;text-indent: 0px;text-transform: none;widows: 2;word-spacing: 0px;-webkit-text-stroke-width: 0px;text-decoration-thickness: initial;text-decoration-style: initial;text-decoration-color: initial;" />const path = require("path");<br style="white-space:pre-wrap;margin: 0px;padding: 0px;max-width: 100%;overflow-wrap: break-word !important;box-sizing: border-box !important;color: rgb(171, 178, 191);font-family: 'Operator Mono', Consolas, Monaco, Menlo, monospace;font-size: 12px;font-style: normal;font-variant-ligatures: normal;font-variant-caps: normal;font-weight: 400;letter-spacing: normal;orphans: 2;text-align: left;text-indent: 0px;text-transform: none;widows: 2;word-spacing: 0px;-webkit-text-stroke-width: 0px;text-decoration-thickness: initial;text-decoration-style: initial;text-decoration-color: initial;" />const nodeExternals = require("webpack-node-externals");<br style="white-space:pre-wrap;margin: 0px;padding: 0px;max-width: 100%;overflow-wrap: break-word !important;box-sizing: border-box !important;color: rgb(171, 178, 191);font-family: 'Operator Mono', Consolas, Monaco, Menlo, monospace;font-size: 12px;font-style: normal;font-variant-ligatures: normal;font-variant-caps: normal;font-weight: 400;letter-spacing: normal;orphans: 2;text-align: left;text-indent: 0px;text-transform: none;widows: 2;word-spacing: 0px;-webkit-text-stroke-width: 0px;text-decoration-thickness: initial;text-decoration-style: initial;text-decoration-color: initial;" />module.exports = {<br style="white-space:pre-wrap;margin: 0px;padding: 0px;max-width: 100%;overflow-wrap: break-word !important;box-sizing: border-box !important;color: rgb(171, 178, 191);font-family: 'Operator Mono', Consolas, Monaco, Menlo, monospace;font-size: 12px;font-style: normal;font-variant-ligatures: normal;font-variant-caps: normal;font-weight: 400;letter-spacing: normal;orphans: 2;text-align: left;text-indent: 0px;text-transform: none;widows: 2;word-spacing: 0px;-webkit-text-stroke-width: 0px;text-decoration-thickness: initial;text-decoration-style: initial;text-decoration-color: initial;" /> mode: "development",<br style="white-space:pre-wrap;margin: 0px;padding: 0px;max-width: 100%;overflow-wrap: break-word !important;box-sizing: border-box !important;color: rgb(171, 178, 191);font-family: 'Operator Mono', Consolas, Monaco, Menlo, monospace;font-size: 12px;font-style: normal;font-variant-ligatures: normal;font-variant-caps: normal;font-weight: 400;letter-spacing: normal;orphans: 2;text-align: left;text-indent: 0px;text-transform: none;widows: 2;word-spacing: 0px;-webkit-text-stroke-width: 0px;text-decoration-thickness: initial;text-decoration-style: initial;text-decoration-color: initial;" /> target: "node",<br style="white-space:pre-wrap;margin: 0px;padding: 0px;max-width: 100%;overflow-wrap: break-word !important;box-sizing: border-box !important;color: rgb(171, 178, 191);font-family: 'Operator Mono', Consolas, Monaco, Menlo, monospace;font-size: 12px;font-style: normal;font-variant-ligatures: normal;font-variant-caps: normal;font-weight: 400;letter-spacing: normal;orphans: 2;text-align: left;text-indent: 0px;text-transform: none;widows: 2;word-spacing: 0px;-webkit-text-stroke-width: 0px;text-decoration-thickness: initial;text-decoration-style: initial;text-decoration-color: initial;" /> entry: "./server.js",<br style="white-space:pre-wrap;margin: 0px;padding: 0px;max-width: 100%;overflow-wrap: break-word !important;box-sizing: border-box !important;color: rgb(171, 178, 191);font-family: 'Operator Mono', Consolas, Monaco, Menlo, monospace;font-size: 12px;font-style: normal;font-variant-ligatures: normal;font-variant-caps: normal;font-weight: 400;letter-spacing: normal;orphans: 2;text-align: left;text-indent: 0px;text-transform: none;widows: 2;word-spacing: 0px;-webkit-text-stroke-width: 0px;text-decoration-thickness: initial;text-decoration-style: initial;text-decoration-color: initial;" /> resolve: {<br style="white-space:pre-wrap;margin: 0px;padding: 0px;max-width: 100%;overflow-wrap: break-word !important;box-sizing: border-box !important;color: rgb(171, 178, 191);font-family: 'Operator Mono', Consolas, Monaco, Menlo, monospace;font-size: 12px;font-style: normal;font-variant-ligatures: normal;font-variant-caps: normal;font-weight: 400;letter-spacing: normal;orphans: 2;text-align: left;text-indent: 0px;text-transform: none;widows: 2;word-spacing: 0px;-webkit-text-stroke-width: 0px;text-decoration-thickness: initial;text-decoration-style: initial;text-decoration-color: initial;" /> extensions: [".jsx", ".js", ".tsx", ".ts"],<br style="white-space:pre-wrap;margin: 0px;padding: 0px;max-width: 100%;overflow-wrap: break-word !important;box-sizing: border-box !important;color: rgb(171, 178, 191);font-family: 'Operator Mono', Consolas, Monaco, Menlo, monospace;font-size: 12px;font-style: normal;font-variant-ligatures: normal;font-variant-caps: normal;font-weight: 400;letter-spacing: normal;orphans: 2;text-align: left;text-indent: 0px;text-transform: none;widows: 2;word-spacing: 0px;-webkit-text-stroke-width: 0px;text-decoration-thickness: initial;text-decoration-style: initial;text-decoration-color: initial;" /> },<br style="white-space:pre-wrap;margin: 0px;padding: 0px;max-width: 100%;overflow-wrap: break-word !important;box-sizing: border-box !important;color: rgb(171, 178, 191);font-family: 'Operator Mono', Consolas, Monaco, Menlo, monospace;font-size: 12px;font-style: normal;font-variant-ligatures: normal;font-variant-caps: normal;font-weight: 400;letter-spacing: normal;orphans: 2;text-align: left;text-indent: 0px;text-transform: none;widows: 2;word-spacing: 0px;-webkit-text-stroke-width: 0px;text-decoration-thickness: initial;text-decoration-style: initial;text-decoration-color: initial;" /> module: {<br style="white-space:pre-wrap;margin: 0px;padding: 0px;max-width: 100%;overflow-wrap: break-word !important;box-sizing: border-box !important;color: rgb(171, 178, 191);font-family: 'Operator Mono', Consolas, Monaco, Menlo, monospace;font-size: 12px;font-style: normal;font-variant-ligatures: normal;font-variant-caps: normal;font-weight: 400;letter-spacing: normal;orphans: 2;text-align: left;text-indent: 0px;text-transform: none;widows: 2;word-spacing: 0px;-webkit-text-stroke-width: 0px;text-decoration-thickness: initial;text-decoration-style: initial;text-decoration-color: initial;" /> rules: [<br style="white-space:pre-wrap;margin: 0px;padding: 0px;max-width: 100%;overflow-wrap: break-word !important;box-sizing: border-box !important;color: rgb(171, 178, 191);font-family: 'Operator Mono', Consolas, Monaco, Menlo, monospace;font-size: 12px;font-style: normal;font-variant-ligatures: normal;font-variant-caps: normal;font-weight: 400;letter-spacing: normal;orphans: 2;text-align: left;text-indent: 0px;text-transform: none;widows: 2;word-spacing: 0px;-webkit-text-stroke-width: 0px;text-decoration-thickness: initial;text-decoration-style: initial;text-decoration-color: initial;" /> {<br style="white-space:pre-wrap;margin: 0px;padding: 0px;max-width: 100%;overflow-wrap: break-word !important;box-sizing: border-box !important;color: rgb(171, 178, 191);font-family: 'Operator Mono', Consolas, Monaco, Menlo, monospace;font-size: 12px;font-style: normal;font-variant-ligatures: normal;font-variant-caps: normal;font-weight: 400;letter-spacing: normal;orphans: 2;text-align: left;text-indent: 0px;text-transform: none;widows: 2;word-spacing: 0px;-webkit-text-stroke-width: 0px;text-decoration-thickness: initial;text-decoration-style: initial;text-decoration-color: initial;" /> test: /\.jsx?$/,<br style="white-space:pre-wrap;margin: 0px;padding: 0px;max-width: 100%;overflow-wrap: break-word !important;box-sizing: border-box !important;color: rgb(171, 178, 191);font-family: 'Operator Mono', Consolas, Monaco, Menlo, monospace;font-size: 12px;font-style: normal;font-variant-ligatures: normal;font-variant-caps: normal;font-weight: 400;letter-spacing: normal;orphans: 2;text-align: left;text-indent: 0px;text-transform: none;widows: 2;word-spacing: 0px;-webkit-text-stroke-width: 0px;text-decoration-thickness: initial;text-decoration-style: initial;text-decoration-color: initial;" /> loader: "babel-loader",<br style="white-space:pre-wrap;margin: 0px;padding: 0px;max-width: 100%;overflow-wrap: break-word !important;box-sizing: border-box !important;color: rgb(171, 178, 191);font-family: 'Operator Mono', Consolas, Monaco, Menlo, monospace;font-size: 12px;font-style: normal;font-variant-ligatures: normal;font-variant-caps: normal;font-weight: 400;letter-spacing: normal;orphans: 2;text-align: left;text-indent: 0px;text-transform: none;widows: 2;word-spacing: 0px;-webkit-text-stroke-width: 0px;text-decoration-thickness: initial;text-decoration-style: initial;text-decoration-color: initial;" /> exclude: /node_modules/,<br style="white-space:pre-wrap;margin: 0px;padding: 0px;max-width: 100%;overflow-wrap: break-word !important;box-sizing: border-box !important;color: rgb(171, 178, 191);font-family: 'Operator Mono', Consolas, Monaco, Menlo, monospace;font-size: 12px;font-style: normal;font-variant-ligatures: normal;font-variant-caps: normal;font-weight: 400;letter-spacing: normal;orphans: 2;text-align: left;text-indent: 0px;text-transform: none;widows: 2;word-spacing: 0px;-webkit-text-stroke-width: 0px;text-decoration-thickness: initial;text-decoration-style: initial;text-decoration-color: initial;" /> options: {<br style="white-space:pre-wrap;margin: 0px;padding: 0px;max-width: 100%;overflow-wrap: break-word !important;box-sizing: border-box !important;color: rgb(171, 178, 191);font-family: 'Operator Mono', Consolas, Monaco, Menlo, monospace;font-size: 12px;font-style: normal;font-variant-ligatures: normal;font-variant-caps: normal;font-weight: 400;letter-spacing: normal;orphans: 2;text-align: left;text-indent: 0px;text-transform: none;widows: 2;word-spacing: 0px;-webkit-text-stroke-width: 0px;text-decoration-thickness: initial;text-decoration-style: initial;text-decoration-color: initial;" /> presets: ["@babel/preset-react", "@babel/preset-env"],<br style="white-space:pre-wrap;margin: 0px;padding: 0px;max-width: 100%;overflow-wrap: break-word !important;box-sizing: border-box !important;color: rgb(171, 178, 191);font-family: 'Operator Mono', Consolas, Monaco, Menlo, monospace;font-size: 12px;font-style: normal;font-variant-ligatures: normal;font-variant-caps: normal;font-weight: 400;letter-spacing: normal;orphans: 2;text-align: left;text-indent: 0px;text-transform: none;widows: 2;word-spacing: 0px;-webkit-text-stroke-width: 0px;text-decoration-thickness: initial;text-decoration-style: initial;text-decoration-color: initial;" /> plugins: [<br style="white-space:pre-wrap;margin: 0px;padding: 0px;max-width: 100%;overflow-wrap: break-word !important;box-sizing: border-box !important;color: rgb(171, 178, 191);font-family: 'Operator Mono', Consolas, Monaco, Menlo, monospace;font-size: 12px;font-style: normal;font-variant-ligatures: normal;font-variant-caps: normal;font-weight: 400;letter-spacing: normal;orphans: 2;text-align: left;text-indent: 0px;text-transform: none;widows: 2;word-spacing: 0px;-webkit-text-stroke-width: 0px;text-decoration-thickness: initial;text-decoration-style: initial;text-decoration-color: initial;" /> [<br style="white-space:pre-wrap;margin: 0px;padding: 0px;max-width: 100%;overflow-wrap: break-word !important;box-sizing: border-box !important;color: rgb(171, 178, 191);font-family: 'Operator Mono', Consolas, Monaco, Menlo, monospace;font-size: 12px;font-style: normal;font-variant-ligatures: normal;font-variant-caps: normal;font-weight: 400;letter-spacing: normal;orphans: 2;text-align: left;text-indent: 0px;text-transform: none;widows: 2;word-spacing: 0px;-webkit-text-stroke-width: 0px;text-decoration-thickness: initial;text-decoration-style: initial;text-decoration-color: initial;" /> "@babel/plugin-transform-runtime",<br style="white-space:pre-wrap;margin: 0px;padding: 0px;max-width: 100%;overflow-wrap: break-word !important;box-sizing: border-box !important;color: rgb(171, 178, 191);font-family: 'Operator Mono', Consolas, Monaco, Menlo, monospace;font-size: 12px;font-style: normal;font-variant-ligatures: normal;font-variant-caps: normal;font-weight: 400;letter-spacing: normal;orphans: 2;text-align: left;text-indent: 0px;text-transform: none;widows: 2;word-spacing: 0px;-webkit-text-stroke-width: 0px;text-decoration-thickness: initial;text-decoration-style: initial;text-decoration-color: initial;" /> {<br style="white-space:pre-wrap;margin: 0px;padding: 0px;max-width: 100%;overflow-wrap: break-word !important;box-sizing: border-box !important;color: rgb(171, 178, 191);font-family: 'Operator Mono', Consolas, Monaco, Menlo, monospace;font-size: 12px;font-style: normal;font-variant-ligatures: normal;font-variant-caps: normal;font-weight: 400;letter-spacing: normal;orphans: 2;text-align: left;text-indent: 0px;text-transform: none;widows: 2;word-spacing: 0px;-webkit-text-stroke-width: 0px;text-decoration-thickness: initial;text-decoration-style: initial;text-decoration-color: initial;" /> absoluteRuntime: false,<br style="white-space:pre-wrap;margin: 0px;padding: 0px;max-width: 100%;overflow-wrap: break-word !important;box-sizing: border-box !important;color: rgb(171, 178, 191);font-family: 'Operator Mono', Consolas, Monaco, Menlo, monospace;font-size: 12px;font-style: normal;font-variant-ligatures: normal;font-variant-caps: normal;font-weight: 400;letter-spacing: normal;orphans: 2;text-align: left;text-indent: 0px;text-transform: none;widows: 2;word-spacing: 0px;-webkit-text-stroke-width: 0px;text-decoration-thickness: initial;text-decoration-style: initial;text-decoration-color: initial;" /> corejs: false,<br style="white-space:pre-wrap;margin: 0px;padding: 0px;max-width: 100%;overflow-wrap: break-word !important;box-sizing: border-box !important;color: rgb(171, 178, 191);font-family: 'Operator Mono', Consolas, Monaco, Menlo, monospace;font-size: 12px;font-style: normal;font-variant-ligatures: normal;font-variant-caps: normal;font-weight: 400;letter-spacing: normal;orphans: 2;text-align: left;text-indent: 0px;text-transform: none;widows: 2;word-spacing: 0px;-webkit-text-stroke-width: 0px;text-decoration-thickness: initial;text-decoration-style: initial;text-decoration-color: initial;" /> helpers: true,<br style="white-space:pre-wrap;margin: 0px;padding: 0px;max-width: 100%;overflow-wrap: break-word !important;box-sizing: border-box !important;color: rgb(171, 178, 191);font-family: 'Operator Mono', Consolas, Monaco, Menlo, monospace;font-size: 12px;font-style: normal;font-variant-ligatures: normal;font-variant-caps: normal;font-weight: 400;letter-spacing: normal;orphans: 2;text-align: left;text-indent: 0px;text-transform: none;widows: 2;word-spacing: 0px;-webkit-text-stroke-width: 0px;text-decoration-thickness: initial;text-decoration-style: initial;text-decoration-color: initial;" /> regenerator: true,<br style="white-space:pre-wrap;margin: 0px;padding: 0px;max-width: 100%;overflow-wrap: break-word !important;box-sizing: border-box !important;color: rgb(171, 178, 191);font-family: 'Operator Mono', Consolas, Monaco, Menlo, monospace;font-size: 12px;font-style: normal;font-variant-ligatures: normal;font-variant-caps: normal;font-weight: 400;letter-spacing: normal;orphans: 2;text-align: left;text-indent: 0px;text-transform: none;widows: 2;word-spacing: 0px;-webkit-text-stroke-width: 0px;text-decoration-thickness: initial;text-decoration-style: initial;text-decoration-color: initial;" /> version: "7.0.0-beta.0",<br style="white-space:pre-wrap;margin: 0px;padding: 0px;max-width: 100%;overflow-wrap: break-word !important;box-sizing: border-box !important;color: rgb(171, 178, 191);font-family: 'Operator Mono', Consolas, Monaco, Menlo, monospace;font-size: 12px;font-style: normal;font-variant-ligatures: normal;font-variant-caps: normal;font-weight: 400;letter-spacing: normal;orphans: 2;text-align: left;text-indent: 0px;text-transform: none;widows: 2;word-spacing: 0px;-webkit-text-stroke-width: 0px;text-decoration-thickness: initial;text-decoration-style: initial;text-decoration-color: initial;" /> },<br style="white-space:pre-wrap;margin: 0px;padding: 0px;max-width: 100%;overflow-wrap: break-word !important;box-sizing: border-box !important;color: rgb(171, 178, 191);font-family: 'Operator Mono', Consolas, Monaco, Menlo, monospace;font-size: 12px;font-style: normal;font-variant-ligatures: normal;font-variant-caps: normal;font-weight: 400;letter-spacing: normal;orphans: 2;text-align: left;text-indent: 0px;text-transform: none;widows: 2;word-spacing: 0px;-webkit-text-stroke-width: 0px;text-decoration-thickness: initial;text-decoration-style: initial;text-decoration-color: initial;" /> ],<br style="white-space:pre-wrap;margin: 0px;padding: 0px;max-width: 100%;overflow-wrap: break-word !important;box-sizing: border-box !important;color: rgb(171, 178, 191);font-family: 'Operator Mono', Consolas, Monaco, Menlo, monospace;font-size: 12px;font-style: normal;font-variant-ligatures: normal;font-variant-caps: normal;font-weight: 400;letter-spacing: normal;orphans: 2;text-align: left;text-indent: 0px;text-transform: none;widows: 2;word-spacing: 0px;-webkit-text-stroke-width: 0px;text-decoration-thickness: initial;text-decoration-style: initial;text-decoration-color: initial;" /> ],<br style="white-space:pre-wrap;margin: 0px;padding: 0px;max-width: 100%;overflow-wrap: break-word !important;box-sizing: border-box !important;color: rgb(171, 178, 191);font-family: 'Operator Mono', Consolas, Monaco, Menlo, monospace;font-size: 12px;font-style: normal;font-variant-ligatures: normal;font-variant-caps: normal;font-weight: 400;letter-spacing: normal;orphans: 2;text-align: left;text-indent: 0px;text-transform: none;widows: 2;word-spacing: 0px;-webkit-text-stroke-width: 0px;text-decoration-thickness: initial;text-decoration-style: initial;text-decoration-color: initial;" /> },<br style="white-space:pre-wrap;margin: 0px;padding: 0px;max-width: 100%;overflow-wrap: break-word !important;box-sizing: border-box !important;color: rgb(171, 178, 191);font-family: 'Operator Mono', Consolas, Monaco, Menlo, monospace;font-size: 12px;font-style: normal;font-variant-ligatures: normal;font-variant-caps: normal;font-weight: 400;letter-spacing: normal;orphans: 2;text-align: left;text-indent: 0px;text-transform: none;widows: 2;word-spacing: 0px;-webkit-text-stroke-width: 0px;text-decoration-thickness: initial;text-decoration-style: initial;text-decoration-color: initial;" /> },<br style="white-space:pre-wrap;margin: 0px;padding: 0px;max-width: 100%;overflow-wrap: break-word !important;box-sizing: border-box !important;color: rgb(171, 178, 191);font-family: 'Operator Mono', Consolas, Monaco, Menlo, monospace;font-size: 12px;font-style: normal;font-variant-ligatures: normal;font-variant-caps: normal;font-weight: 400;letter-spacing: normal;orphans: 2;text-align: left;text-indent: 0px;text-transform: none;widows: 2;word-spacing: 0px;-webkit-text-stroke-width: 0px;text-decoration-thickness: initial;text-decoration-style: initial;text-decoration-color: initial;" /> ],<br style="white-space:pre-wrap;margin: 0px;padding: 0px;max-width: 100%;overflow-wrap: break-word !important;box-sizing: border-box !important;color: rgb(171, 178, 191);font-family: 'Operator Mono', Consolas, Monaco, Menlo, monospace;font-size: 12px;font-style: normal;font-variant-ligatures: normal;font-variant-caps: normal;font-weight: 400;letter-spacing: normal;orphans: 2;text-align: left;text-indent: 0px;text-transform: none;widows: 2;word-spacing: 0px;-webkit-text-stroke-width: 0px;text-decoration-thickness: initial;text-decoration-style: initial;text-decoration-color: initial;" /> },<br style="white-space:pre-wrap;margin: 0px;padding: 0px;max-width: 100%;overflow-wrap: break-word !important;box-sizing: border-box !important;color: rgb(171, 178, 191);font-family: 'Operator Mono', Consolas, Monaco, Menlo, monospace;font-size: 12px;font-style: normal;font-variant-ligatures: normal;font-variant-caps: normal;font-weight: 400;letter-spacing: normal;orphans: 2;text-align: left;text-indent: 0px;text-transform: none;widows: 2;word-spacing: 0px;-webkit-text-stroke-width: 0px;text-decoration-thickness: initial;text-decoration-style: initial;text-decoration-color: initial;" /> output: {<br style="white-space:pre-wrap;margin: 0px;padding: 0px;max-width: 100%;overflow-wrap: break-word !important;box-sizing: border-box !important;color: rgb(171, 178, 191);font-family: 'Operator Mono', Consolas, Monaco, Menlo, monospace;font-size: 12px;font-style: normal;font-variant-ligatures: normal;font-variant-caps: normal;font-weight: 400;letter-spacing: normal;orphans: 2;text-align: left;text-indent: 0px;text-transform: none;widows: 2;word-spacing: 0px;-webkit-text-stroke-width: 0px;text-decoration-thickness: initial;text-decoration-style: initial;text-decoration-color: initial;" /> filename: "bundle.js",<br style="white-space:pre-wrap;margin: 0px;padding: 0px;max-width: 100%;overflow-wrap: break-word !important;box-sizing: border-box !important;color: rgb(171, 178, 191);font-family: 'Operator Mono', Consolas, Monaco, Menlo, monospace;font-size: 12px;font-style: normal;font-variant-ligatures: normal;font-variant-caps: normal;font-weight: 400;letter-spacing: normal;orphans: 2;text-align: left;text-indent: 0px;text-transform: none;widows: 2;word-spacing: 0px;-webkit-text-stroke-width: 0px;text-decoration-thickness: initial;text-decoration-style: initial;text-decoration-color: initial;" /> path: path.resolve(__dirname, "build"),<br style="white-space:pre-wrap;margin: 0px;padding: 0px;max-width: 100%;overflow-wrap: break-word !important;box-sizing: border-box !important;color: rgb(171, 178, 191);font-family: 'Operator Mono', Consolas, Monaco, Menlo, monospace;font-size: 12px;font-style: normal;font-variant-ligatures: normal;font-variant-caps: normal;font-weight: 400;letter-spacing: normal;orphans: 2;text-align: left;text-indent: 0px;text-transform: none;widows: 2;word-spacing: 0px;-webkit-text-stroke-width: 0px;text-decoration-thickness: initial;text-decoration-style: initial;text-decoration-color: initial;" /> },<br style="white-space:pre-wrap;margin: 0px;padding: 0px;max-width: 100%;overflow-wrap: break-word !important;box-sizing: border-box !important;color: rgb(171, 178, 191);font-family: 'Operator Mono', Consolas, Monaco, Menlo, monospace;font-size: 12px;font-style: normal;font-variant-ligatures: normal;font-variant-caps: normal;font-weight: 400;letter-spacing: normal;orphans: 2;text-align: left;text-indent: 0px;text-transform: none;widows: 2;word-spacing: 0px;-webkit-text-stroke-width: 0px;text-decoration-thickness: initial;text-decoration-style: initial;text-decoration-color: initial;" /> externals: [nodeExternals()],<br style="white-space:pre-wrap;margin: 0px;padding: 0px;max-width: 100%;overflow-wrap: break-word !important;box-sizing: border-box !important;color: rgb(171, 178, 191);font-family: 'Operator Mono', Consolas, Monaco, Menlo, monospace;font-size: 12px;font-style: normal;font-variant-ligatures: normal;font-variant-caps: normal;font-weight: 400;letter-spacing: normal;orphans: 2;text-align: left;text-indent: 0px;text-transform: none;widows: 2;word-spacing: 0px;-webkit-text-stroke-width: 0px;text-decoration-thickness: initial;text-decoration-style: initial;text-decoration-color: initial;" />};
在webpack构建完成后,可在Node环境运行build/bundle.js,访问页面后查看网页源代码,可以看到,React组件中的内容已经完整地包含在服务端返回到html里面。我们成功迈出了服务端渲染第一步。此时,我们也有必要再深入了解renderToString 到底做了什么,提前踩坑!
renderToString
除了将React组件转换成html字符串外,renderToString还有做了下面这些:
1. 会执行传入的React组件的代码,但是其只执行到React生命周期初始化过程的render及之前,即下面红框的部分,其余大部分生命周期函数在服务端都不执行;这也是服务端渲染的坑点之一。
2.renderToString 生成的产物中会包含一些额外生成特殊标记,代码体积会有所增大,其中属性data-reactroot是服务端渲染的标志,便于后续客户端通过hydrate复用HTML节点。在React16前后其产物也有差距:在React 16 之前,服务端渲染采用的是基于字符串校验和(string checksum)的 HTML 节点复用方式, 会额外生成生成data-reactid、data-react-checksum等属性;React 16 改用单节点校验来复用(服务端返回的)HTML 节点,不再生成data-reactid、data-react-checksum等体积占用大户,只在空白节点间多了 这样的标记。
renderToString react16前<br style="white-space:pre-wrap;margin: 0px;padding: 0px;max-width: 100%;overflow-wrap: break-word !important;box-sizing: border-box !important;color: rgb(171, 178, 191);font-family: 'Operator Mono', Consolas, Monaco, Menlo, monospace;font-size: 12px;font-style: normal;font-variant-ligatures: normal;font-variant-caps: normal;font-weight: 400;letter-spacing: normal;orphans: 2;text-align: left;text-indent: 0px;text-transform: none;widows: 2;word-spacing: 0px;-webkit-text-stroke-width: 0px;text-decoration-thickness: initial;text-decoration-style: initial;text-decoration-color: initial;" /><br style="white-space:pre-wrap;margin: 0px;padding: 0px;max-width: 100%;overflow-wrap: break-word !important;box-sizing: border-box !important;color: rgb(171, 178, 191);font-family: 'Operator Mono', Consolas, Monaco, Menlo, monospace;font-size: 12px;font-style: normal;font-variant-ligatures: normal;font-variant-caps: normal;font-weight: 400;letter-spacing: normal;orphans: 2;text-align: left;text-indent: 0px;text-transform: none;widows: 2;word-spacing: 0px;-webkit-text-stroke-width: 0px;text-decoration-thickness: initial;text-decoration-style: initial;text-decoration-color: initial;" /> Welcome to React SSR! <br style="white-space:pre-wrap;margin: 0px;padding: 0px;max-width: 100%;overflow-wrap: break-word !important;box-sizing: border-box !important;color: rgb(171, 178, 191);font-family: 'Operator Mono', Consolas, Monaco, Menlo, monospace;font-size: 12px;font-style: normal;font-variant-ligatures: normal;font-variant-caps: normal;font-weight: 400;letter-spacing: normal;orphans: 2;text-align: left;text-indent: 0px;text-transform: none;widows: 2;word-spacing: 0px;-webkit-text-stroke-width: 0px;text-decoration-thickness: initial;text-decoration-style: initial;text-decoration-color: initial;" /> Hello There! <br style="white-space:pre-wrap;margin: 0px;padding: 0px;max-width: 100%;overflow-wrap: break-word !important;box-sizing: border-box !important;color: rgb(171, 178, 191);font-family: 'Operator Mono', Consolas, Monaco, Menlo, monospace;font-size: 12px;font-style: normal;font-variant-ligatures: normal;font-variant-caps: normal;font-weight: 400;letter-spacing: normal;orphans: 2;text-align: left;text-indent: 0px;text-transform: none;widows: 2;word-spacing: 0px;-webkit-text-stroke-width: 0px;text-decoration-thickness: initial;text-decoration-style: initial;text-decoration-color: initial;" /><br style="white-space:pre-wrap;margin: 0px;padding: 0px;max-width: 100%;overflow-wrap: break-word !important;box-sizing: border-box !important;color: rgb(171, 178, 191);font-family: 'Operator Mono', Consolas, Monaco, Menlo, monospace;font-size: 12px;font-style: normal;font-variant-ligatures: normal;font-variant-caps: normal;font-weight: 400;letter-spacing: normal;orphans: 2;text-align: left;text-indent: 0px;text-transform: none;widows: 2;word-spacing: 0px;-webkit-text-stroke-width: 0px;text-decoration-thickness: initial;text-decoration-style: initial;text-decoration-color: initial;" /><br style="white-space:pre-wrap;margin: 0px;padding: 0px;max-width: 100%;overflow-wrap: break-word !important;box-sizing: border-box !important;color: rgb(171, 178, 191);font-family: 'Operator Mono', Consolas, Monaco, Menlo, monospace;font-size: 12px;font-style: normal;font-variant-ligatures: normal;font-variant-caps: normal;font-weight: 400;letter-spacing: normal;orphans: 2;text-align: left;text-indent: 0px;text-transform: none;widows: 2;word-spacing: 0px;-webkit-text-stroke-width: 0px;text-decoration-thickness: initial;text-decoration-style: initial;text-decoration-color: initial;" />// renderToString react16<br style="white-space:pre-wrap;margin: 0px;padding: 0px;max-width: 100%;overflow-wrap: break-word !important;box-sizing: border-box !important;color: rgb(171, 178, 191);font-family: 'Operator Mono', Consolas, Monaco, Menlo, monospace;font-size: 12px;font-style: normal;font-variant-ligatures: normal;font-variant-caps: normal;font-weight: 400;letter-spacing: normal;orphans: 2;text-align: left;text-indent: 0px;text-transform: none;widows: 2;word-spacing: 0px;-webkit-text-stroke-width: 0px;text-decoration-thickness: initial;text-decoration-style: initial;text-decoration-color: initial;" />Welcome to React SSR! Hello There!
3.会被故意忽略掉的on开头的的属性,也就忽略掉了react代码中事件处理,这是也是坑点之一。服务端返回的html里没有处理事件点击,需要靠后续客户端js执行绑定事件。
function shouldIgnoreAttribute(<br /> name: string,<br /> propertyInfo: PropertyInfo | null,<br /> isCustomComponentTag: boolean,<br />): boolean {<br /> if (propertyInfo !== null) {<br /> return propertyInfo.type === RESERVED;<br /> }<br /> if (isCustomComponentTag) {<br /> return false;<br /> }<br /> if (<br /> name.length > 2 &&<br /> (name[0] === 'o' || name[0] === 'O') &&<br /> (name[1] === 'n' || name[1] === 'N')<br /> ) {<br /> return true;<br /> }<br /> return false;<br />}<br />
上面的例子我们可以看到React的代码里有点击事件,但点击后没有反应。需要靠后续客户端js执行绑定事件。如何实现?这就需要同构了。
2.3 实现基础的同构
前文已经大概讲了同构的概念,那为什么需要同构?之前的服务端代码在处理点击事件时故意忽略掉了这类属性,在服务端执行的生命周期也是不完整的,此时的页面是不具备交互能力的。同构,正是解决这些问题的关键,React代码在服务器上执行一遍之后,浏览器再去加载JS后又运行了一遍React代码,完成事件绑定和完整生命周期的执行,从而才能成为完全可交互页面。
react-dom:hydrate
实现同构的另一个核心API是React-dom下的hydrate,该方法能在客户端初次渲染的时候去复用服务端返回的原本已经存在的 DOM 节点,于渲染过程中为其附加交互行为(事件监听等),而不是重新创建 DOM 节点。需要注意是,服务端返回的 HTML 与客户端渲染结果不一致时,出于性能考虑,hydrate可以弥补文本内容的差异,但并不能保证修补属性的差异,而是将错就错;只在development模式下对这些不一致的问题报 Warning,因此必须重视 SSR HydrationWarning,要当 Error 逐个解决。
那具体实现同构?
上面这里我们提供了一个基本的架构图,可以看到,服务端运行React生成html代码我们已经基本实现,目前需要做的就是生产出客户端执行的index.js,那么这个index.js我们如何生产出来呢?
具体实践
首先新建客户端代码client.js,引入React组件,通过ReactDom.hydrate处理挂载到Dom节点, hydrate是实现复用的关键。
// client.js<br style="white-space:pre-wrap;margin: 0px;padding: 0px;max-width: 100%;overflow-wrap: break-word !important;box-sizing: border-box !important;color: rgb(171, 178, 191);font-family: 'Operator Mono', Consolas, Monaco, Menlo, monospace;font-size: 12px;font-style: normal;font-variant-ligatures: normal;font-variant-caps: normal;font-weight: 400;letter-spacing: normal;orphans: 2;text-align: left;text-indent: 0px;text-transform: none;widows: 2;word-spacing: 0px;-webkit-text-stroke-width: 0px;text-decoration-thickness: initial;text-decoration-style: initial;text-decoration-color: initial;" />import React from "react";<br style="white-space:pre-wrap;margin: 0px;padding: 0px;max-width: 100%;overflow-wrap: break-word !important;box-sizing: border-box !important;color: rgb(171, 178, 191);font-family: 'Operator Mono', Consolas, Monaco, Menlo, monospace;font-size: 12px;font-style: normal;font-variant-ligatures: normal;font-variant-caps: normal;font-weight: 400;letter-spacing: normal;orphans: 2;text-align: left;text-indent: 0px;text-transform: none;widows: 2;word-spacing: 0px;-webkit-text-stroke-width: 0px;text-decoration-thickness: initial;text-decoration-style: initial;text-decoration-color: initial;" />import ReactDom from "react-dom";<br style="white-space:pre-wrap;margin: 0px;padding: 0px;max-width: 100%;overflow-wrap: break-word !important;box-sizing: border-box !important;color: rgb(171, 178, 191);font-family: 'Operator Mono', Consolas, Monaco, Menlo, monospace;font-size: 12px;font-style: normal;font-variant-ligatures: normal;font-variant-caps: normal;font-weight: 400;letter-spacing: normal;orphans: 2;text-align: left;text-indent: 0px;text-transform: none;widows: 2;word-spacing: 0px;-webkit-text-stroke-width: 0px;text-decoration-thickness: initial;text-decoration-style: initial;text-decoration-color: initial;" />import Home from "./containers/Home";<br style="white-space:pre-wrap;margin: 0px;padding: 0px;max-width: 100%;overflow-wrap: break-word !important;box-sizing: border-box !important;color: rgb(171, 178, 191);font-family: 'Operator Mono', Consolas, Monaco, Menlo, monospace;font-size: 12px;font-style: normal;font-variant-ligatures: normal;font-variant-caps: normal;font-weight: 400;letter-spacing: normal;orphans: 2;text-align: left;text-indent: 0px;text-transform: none;widows: 2;word-spacing: 0px;-webkit-text-stroke-width: 0px;text-decoration-thickness: initial;text-decoration-style: initial;text-decoration-color: initial;" /><br style="white-space:pre-wrap;margin: 0px;padding: 0px;max-width: 100%;overflow-wrap: break-word !important;box-sizing: border-box !important;color: rgb(171, 178, 191);font-family: 'Operator Mono', Consolas, Monaco, Menlo, monospace;font-size: 12px;font-style: normal;font-variant-ligatures: normal;font-variant-caps: normal;font-weight: 400;letter-spacing: normal;orphans: 2;text-align: left;text-indent: 0px;text-transform: none;widows: 2;word-spacing: 0px;-webkit-text-stroke-width: 0px;text-decoration-thickness: initial;text-decoration-style: initial;text-decoration-color: initial;" />const App = () => {<br style="white-space:pre-wrap;margin: 0px;padding: 0px;max-width: 100%;overflow-wrap: break-word !important;box-sizing: border-box !important;color: rgb(171, 178, 191);font-family: 'Operator Mono', Consolas, Monaco, Menlo, monospace;font-size: 12px;font-style: normal;font-variant-ligatures: normal;font-variant-caps: normal;font-weight: 400;letter-spacing: normal;orphans: 2;text-align: left;text-indent: 0px;text-transform: none;widows: 2;word-spacing: 0px;-webkit-text-stroke-width: 0px;text-decoration-thickness: initial;text-decoration-style: initial;text-decoration-color: initial;" /> return ;<br style="white-space:pre-wrap;margin: 0px;padding: 0px;max-width: 100%;overflow-wrap: break-word !important;box-sizing: border-box !important;color: rgb(171, 178, 191);font-family: 'Operator Mono', Consolas, Monaco, Menlo, monospace;font-size: 12px;font-style: normal;font-variant-ligatures: normal;font-variant-caps: normal;font-weight: 400;letter-spacing: normal;orphans: 2;text-align: left;text-indent: 0px;text-transform: none;widows: 2;word-spacing: 0px;-webkit-text-stroke-width: 0px;text-decoration-thickness: initial;text-decoration-style: initial;text-decoration-color: initial;" />};<br style="white-space:pre-wrap;margin: 0px;padding: 0px;max-width: 100%;overflow-wrap: break-word !important;box-sizing: border-box !important;color: rgb(171, 178, 191);font-family: 'Operator Mono', Consolas, Monaco, Menlo, monospace;font-size: 12px;font-style: normal;font-variant-ligatures: normal;font-variant-caps: normal;font-weight: 400;letter-spacing: normal;orphans: 2;text-align: left;text-indent: 0px;text-transform: none;widows: 2;word-spacing: 0px;-webkit-text-stroke-width: 0px;text-decoration-thickness: initial;text-decoration-style: initial;text-decoration-color: initial;" /><br style="white-space:pre-wrap;margin: 0px;padding: 0px;max-width: 100%;overflow-wrap: break-word !important;box-sizing: border-box !important;color: rgb(171, 178, 191);font-family: 'Operator Mono', Consolas, Monaco, Menlo, monospace;font-size: 12px;font-style: normal;font-variant-ligatures: normal;font-variant-caps: normal;font-weight: 400;letter-spacing: normal;orphans: 2;text-align: left;text-indent: 0px;text-transform: none;widows: 2;word-spacing: 0px;-webkit-text-stroke-width: 0px;text-decoration-thickness: initial;text-decoration-style: initial;text-decoration-color: initial;" />ReactDom.hydrate(, document.getElementById("root"));
客户端代码也需要webpack打包处理,新建webpack.client.js具体配置如下,需要注意打包输出在public目录下,后续的静态资源服务也起在了这个目录下。
// webpack.client.js<br style="white-space:pre-wrap;margin: 0px;padding: 0px;max-width: 100%;overflow-wrap: break-word !important;box-sizing: border-box !important;color: rgb(171, 178, 191);font-family: 'Operator Mono', Consolas, Monaco, Menlo, monospace;font-size: 12px;font-style: normal;font-variant-ligatures: normal;font-variant-caps: normal;font-weight: 400;letter-spacing: normal;orphans: 2;text-align: left;text-indent: 0px;text-transform: none;widows: 2;word-spacing: 0px;-webkit-text-stroke-width: 0px;text-decoration-thickness: initial;text-decoration-style: initial;text-decoration-color: initial;" />const path = require("path");<br style="white-space:pre-wrap;margin: 0px;padding: 0px;max-width: 100%;overflow-wrap: break-word !important;box-sizing: border-box !important;color: rgb(171, 178, 191);font-family: 'Operator Mono', Consolas, Monaco, Menlo, monospace;font-size: 12px;font-style: normal;font-variant-ligatures: normal;font-variant-caps: normal;font-weight: 400;letter-spacing: normal;orphans: 2;text-align: left;text-indent: 0px;text-transform: none;widows: 2;word-spacing: 0px;-webkit-text-stroke-width: 0px;text-decoration-thickness: initial;text-decoration-style: initial;text-decoration-color: initial;" />const resolve = (dir) => path.resolve(__dirname, "./src", dir);<br style="white-space:pre-wrap;margin: 0px;padding: 0px;max-width: 100%;overflow-wrap: break-word !important;box-sizing: border-box !important;color: rgb(171, 178, 191);font-family: 'Operator Mono', Consolas, Monaco, Menlo, monospace;font-size: 12px;font-style: normal;font-variant-ligatures: normal;font-variant-caps: normal;font-weight: 400;letter-spacing: normal;orphans: 2;text-align: left;text-indent: 0px;text-transform: none;widows: 2;word-spacing: 0px;-webkit-text-stroke-width: 0px;text-decoration-thickness: initial;text-decoration-style: initial;text-decoration-color: initial;" />module.exports = {<br style="white-space:pre-wrap;margin: 0px;padding: 0px;max-width: 100%;overflow-wrap: break-word !important;box-sizing: border-box !important;color: rgb(171, 178, 191);font-family: 'Operator Mono', Consolas, Monaco, Menlo, monospace;font-size: 12px;font-style: normal;font-variant-ligatures: normal;font-variant-caps: normal;font-weight: 400;letter-spacing: normal;orphans: 2;text-align: left;text-indent: 0px;text-transform: none;widows: 2;word-spacing: 0px;-webkit-text-stroke-width: 0px;text-decoration-thickness: initial;text-decoration-style: initial;text-decoration-color: initial;" /> mode: "development",<br style="white-space:pre-wrap;margin: 0px;padding: 0px;max-width: 100%;overflow-wrap: break-word !important;box-sizing: border-box !important;color: rgb(171, 178, 191);font-family: 'Operator Mono', Consolas, Monaco, Menlo, monospace;font-size: 12px;font-style: normal;font-variant-ligatures: normal;font-variant-caps: normal;font-weight: 400;letter-spacing: normal;orphans: 2;text-align: left;text-indent: 0px;text-transform: none;widows: 2;word-spacing: 0px;-webkit-text-stroke-width: 0px;text-decoration-thickness: initial;text-decoration-style: initial;text-decoration-color: initial;" /> entry: "./client.js",<br style="white-space:pre-wrap;margin: 0px;padding: 0px;max-width: 100%;overflow-wrap: break-word !important;box-sizing: border-box !important;color: rgb(171, 178, 191);font-family: 'Operator Mono', Consolas, Monaco, Menlo, monospace;font-size: 12px;font-style: normal;font-variant-ligatures: normal;font-variant-caps: normal;font-weight: 400;letter-spacing: normal;orphans: 2;text-align: left;text-indent: 0px;text-transform: none;widows: 2;word-spacing: 0px;-webkit-text-stroke-width: 0px;text-decoration-thickness: initial;text-decoration-style: initial;text-decoration-color: initial;" /> output: {<br style="white-space:pre-wrap;margin: 0px;padding: 0px;max-width: 100%;overflow-wrap: break-word !important;box-sizing: border-box !important;color: rgb(171, 178, 191);font-family: 'Operator Mono', Consolas, Monaco, Menlo, monospace;font-size: 12px;font-style: normal;font-variant-ligatures: normal;font-variant-caps: normal;font-weight: 400;letter-spacing: normal;orphans: 2;text-align: left;text-indent: 0px;text-transform: none;widows: 2;word-spacing: 0px;-webkit-text-stroke-width: 0px;text-decoration-thickness: initial;text-decoration-style: initial;text-decoration-color: initial;" /> filename: "index.js",<br style="white-space:pre-wrap;margin: 0px;padding: 0px;max-width: 100%;overflow-wrap: break-word !important;box-sizing: border-box !important;color: rgb(171, 178, 191);font-family: 'Operator Mono', Consolas, Monaco, Menlo, monospace;font-size: 12px;font-style: normal;font-variant-ligatures: normal;font-variant-caps: normal;font-weight: 400;letter-spacing: normal;orphans: 2;text-align: left;text-indent: 0px;text-transform: none;widows: 2;word-spacing: 0px;-webkit-text-stroke-width: 0px;text-decoration-thickness: initial;text-decoration-style: initial;text-decoration-color: initial;" /> path: path.resolve(__dirname, "public"),<br style="white-space:pre-wrap;margin: 0px;padding: 0px;max-width: 100%;overflow-wrap: break-word !important;box-sizing: border-box !important;color: rgb(171, 178, 191);font-family: 'Operator Mono', Consolas, Monaco, Menlo, monospace;font-size: 12px;font-style: normal;font-variant-ligatures: normal;font-variant-caps: normal;font-weight: 400;letter-spacing: normal;orphans: 2;text-align: left;text-indent: 0px;text-transform: none;widows: 2;word-spacing: 0px;-webkit-text-stroke-width: 0px;text-decoration-thickness: initial;text-decoration-style: initial;text-decoration-color: initial;" /> },<br style="white-space:pre-wrap;margin: 0px;padding: 0px;max-width: 100%;overflow-wrap: break-word !important;box-sizing: border-box !important;color: rgb(171, 178, 191);font-family: 'Operator Mono', Consolas, Monaco, Menlo, monospace;font-size: 12px;font-style: normal;font-variant-ligatures: normal;font-variant-caps: normal;font-weight: 400;letter-spacing: normal;orphans: 2;text-align: left;text-indent: 0px;text-transform: none;widows: 2;word-spacing: 0px;-webkit-text-stroke-width: 0px;text-decoration-thickness: initial;text-decoration-style: initial;text-decoration-color: initial;" /> module 查看全部
一文彻底搞懂 React 服务端渲染
1、前言
在前端项目需要首屏渲染速度优化或SEO的场景下,大家或多或少都听过到过服务端渲染( SSR ),但大多数人对服务端渲染具体实现和底层原理还是比较陌生的。本文基于公司官网开发时做了服务端渲染改造基础上,系统理解和梳理这套体系的模式和逻辑,并写了一些笔记和Demo(文后链接)便于深入理解。这次我们来以React为例,把服务端渲染彻底讲弄明白。本文主要有以下内容:
1.1 什么是服务端渲染?
服务端渲染, SSR (Server-side Rendering) ,顾名思义,就是在浏览器发起页面请求后由服务端完成页面的HTML结构拼接,返回给浏览器解析后能直接构建出有内容的页面。
用 node 实现一个简单的 SSR
我们使用Koa框架来创建node服务:
// demo1<br />var Koa = require("koa");<br />var app = new Koa();<br /><br />// 对于任何请求,app将调用该函数处理请求:<br />app.use(async (ctx) => {<br /> // 将HTML字符串直接返回 <br /> ctx.body = `<br /> <br /> <br /> ssr<br /> <br /> <br /> <br /> hello server<br /> <p>word<br /> <br /> <br /> `;<br />});<br />//监听<br />app.listen(3001, () => {<br /> console.log("listen on 3001 port!");<br />});<br /></p>
启动服务后访问页面,查看网页源代码是这样:
npx create-react-app my-app<br />
上面的例子就是一个简单的服务端渲染,其服务侧直接输出了有内容的HTML,浏览器解析之后就能渲染出页面。与服务端渲染对应的是客户端渲染 ,CSR(Client Side Rendering),通俗的讲就是由客户端完成页面的渲染。其大致渲染流程是这样:在浏览器请求页面时,服务端先返回一个无具体内容的HTML,浏览器还需要再加载并执行JS,动态地将内容和数据渲染到页面中,才能完成页面具体内容的显示。目前主流的React ,Vue, Angular 等SPA页面未经特殊处理均采用客户端渲染。最常见脚手架create-react-app 生成的项目就是客户端渲染:
上面采用客户端渲染的HTML页面中中无内容,需在浏览器端加载并执行bundle.js后才能构建出有内容页面。
1.2 为什么用服务端渲染?1.2.1 服务端渲染的优势
相比于客户端渲染,服务端渲染有什么优势?我们可以从下图对比一下这两种不同的渲染模式。
首屏时间更短
采用客户端渲染的页面,要进行JS文件拉取和JS代码执行,动态创建 DOM 结构,客户端逻辑越重,初始化需要执行的 JS 越多,首屏性能就越慢;客户端渲染前置的第三方类库/框架、polyfill 等都会在一定程度上拖慢首屏性能。Code splitting、lazy-load等优化措施能够缓解一部分,但优化空间相对有限。相比而言,服务端渲染的页面直接拉取HTMl就能显示内容,更短的首屏时间创造更多的可能性。
利于SEO
在别人使用搜索引擎搜索相关的内容时,你的网页排行能靠得更前,这样你的流量就有越高,这就是SEO的意义所在。那为什么服务端渲染更利于爬虫爬你的页面呢?因为对于很多搜索引擎爬虫(非google)HTML返回是什么内容就爬什么内容,而不会动态执行JS代码内容。对客户端渲染的页面来说,简直无能为力,因为返回的HTML是一个空壳。而服务端渲染返回的HTML是有内容的。
SSR的出现,就是为了解决这些CSR的弊端。
1.2.2 权衡使用服务端渲染
并不是所有的WEB应用都必须使用SSR,这需要开发者来权衡,因为服务端渲染会带来以下问题:
代码复杂度增加。为了实现服务端渲染,应用代码中需要兼容服务端和客户端两种运行情况,部分代码只能在客户端运行,需要对其进行特殊处理,才能在服务器渲染应用程序中运行。
需要更多的服务器资源。由于服务器增加了渲染HTML的需求,使得原本只需要输出静态资源文件的nodejs服务,新增了数据获取的IO和渲染HTML的CPU占用,如果流量突然暴增,有可能导致服务器宕机,因此需要使用响应的缓存策略和准备相应的服务器负载。
涉及构建设置和部署的更多要求。与可以部署在任何静态文件服务器上的完全静态单页面应用程序 (SPA) 不同,服务器渲染应用程序,需要处于 Node.js server 运行环境。
因此,在使用服务端渲染SSR之前,需要考虑投入产出比:是否真的需要SEO,是否需要将首屏时间提升到极致。如果都没有,使用SSR反而小题大做了。
1.3 服务端渲染的发展史
其实服务端渲染并不是什么新奇的概念,前后端分层之前很长的一段时间里都是以服务端渲染为主(JSP、PHP),那时后端一把梭哈,在服务端生成完整的 HTML 页面。但那时的服务端渲染和现在还是有本质的区别,存在比较多的弊端,每一个请求都要动态生成HTML,存在大量的重复,服务器机器成本也相对比较高,前后端代码完全掺杂在一起,开发维护难。
随着业务不断发展变化,后端要写的JS逻辑也越发复杂,而且JS有很多潜在的坑使后端越发觉得这是块烫手山芋,于是逐渐出现了前后端分层。伴随AJAX的兴起,浏览器可以做到了不再重现请求页面就可更新局部视图。还可以利用客户端免费的计算资源,后端侧逐渐演变成了提供数据支持。jquery的兴起,良好的客户端兼容性使JS不再受困于各种版本浏览器兼容问题,一统了前端天下。
此后伴随node的兴起,前后端分离越演越烈。前端能摆脱后端的依赖单独起服务,三大框架vue,react,angular也迅势崛起,以操作数据就能更新视图,前端开发人员逐渐摆脱了与烦人的Dom操作打交道,能够专心的关注业务和数据逻辑。前端同时探索出了功能插件,UI库,组件等多种代码复用方案,形成了繁荣的前端生态。
但是三大框架采用客户端渲染模式,随着代码逻辑的加重,首屏时间成了一个很大的问题,同时开发人员也发现SEO也出了问题,大多搜索引擎根本不会去执行JS代码。但是也不可能再回头走老路,于是前端又探索出了一套服务端渲染的框架来解决掉这些问题。此时的服务端渲染是建立在成熟的组组件,模块生态之上,基于Node.js的同构方案成为最佳实践。
2、React服务端渲染的原理
2.1基本思路
React服务端渲染流程
React服务端渲染的基本思路,简单理解就是将组件或页面通过服务器生成html字符串,再发送到浏览器,最后将静态标记"混合"为客户端上完全交互的应用程序。因为要考虑React在服务端的运行情况,故相比之前讲的多了在浏览器端绑定状态与事件的过程。
我们可以结合下面的流程图来一览完整的 React服务端渲染的全貌:当浏览器去请求一个页面,前端服务器端接收到请求并执行 React组件代码,此时React代码中可能包含向后端服务器发起请求,待请求完成返回的数据后,前端服务器组装好有内容的HTML里返给浏览器,浏览器解析HTML后已具备展示内容,但页面并不具备交互能力。
下一阶段,在返回的HTMl中还有script链接,浏览器再拉取JS并执行其包含的React 代码,其能在浏览器端执行完整的生命周期,并通过相关API实现复用此前返回 HTML节点并添加事件的绑定,此时页面才就具备完全交互能力。总的来说,react服务端渲染包含有两个过程:服务端渲染 + 客户端 hydrate 渲染。服务端渲染在服务端渲染出了首屏内容;客户端 hydrate 渲染复用服务端返回的节点,进行一次类似于 render 的 hydrate 渲染过程,把交互事件绑上去(此时页面可交互),并接管页面。
服务端处理后返回的
客户端“浸泡”还原后的
核心思想(同构)
从上面的流程中可以看到,客户端和服务端都要执行React代码完成渲染,那是不是就要写两份代码,供双端使用? 当然不需要,也完全不合理。所谓同构,就是让一份React代码,既可以在服务端中执行,也可以在客户端中执行。
SSR技术栈
我们这里简单理了一下服务端渲染涉及到的技术栈:
知道了服务端渲染、同构的大概思路之后,下面从头开始,一步一步完成具体实践,深入理解其原理。
2.2 服务端如何渲染React组件?
按照之前流程的大概思路,我们首先需要将React组件在服务端转换成HTML字符串,那怎么做呢?React 提供的面向服务端的API(react-dom/server),提供了相关方法能够将 React 组件渲染成静态的(HTML)标签。下面我们简单了解下react-dom/server。
react-dom/server
react-dom/server有renderToString、renderToStaticMarkup,renderToNodeStream、renderToStaticNodeStream四个方法能够将 React 组件渲染成静态的(HTML)标签,前两者能在客户端和服务端运行,后两者只能在服务端运行。
renderToStaticMarkup VS renderToString:renderToString 方法会在 React 内部创建的额外 DOM 属性,例如 data-reactroot, 在相邻文本节点之间生成,这些属性是客户端执行hydrate复用节点的关键所在,data-reactroot属性是服务端渲染的标志之一。如果你希望把 React 当作静态页面生成器来使用,renderToStaticMarkup方法会非常有用,因为去除额外的属性可以节省一些字节。
// Home.jsx<br style="white-space:pre-wrap;margin: 0px;padding: 0px;max-width: 100%;overflow-wrap: break-word !important;box-sizing: border-box !important;color: rgb(171, 178, 191);font-family: 'Operator Mono', Consolas, Monaco, Menlo, monospace;font-size: 12px;font-style: normal;font-variant-ligatures: normal;font-variant-caps: normal;font-weight: 400;letter-spacing: normal;orphans: 2;text-align: left;text-indent: 0px;text-transform: none;widows: 2;word-spacing: 0px;-webkit-text-stroke-width: 0px;text-decoration-thickness: initial;text-decoration-style: initial;text-decoration-color: initial;" />import React from "react";<br style="white-space:pre-wrap;margin: 0px;padding: 0px;max-width: 100%;overflow-wrap: break-word !important;box-sizing: border-box !important;color: rgb(171, 178, 191);font-family: 'Operator Mono', Consolas, Monaco, Menlo, monospace;font-size: 12px;font-style: normal;font-variant-ligatures: normal;font-variant-caps: normal;font-weight: 400;letter-spacing: normal;orphans: 2;text-align: left;text-indent: 0px;text-transform: none;widows: 2;word-spacing: 0px;-webkit-text-stroke-width: 0px;text-decoration-thickness: initial;text-decoration-style: initial;text-decoration-color: initial;" />const Home = () => {<br style="white-space:pre-wrap;margin: 0px;padding: 0px;max-width: 100%;overflow-wrap: break-word !important;box-sizing: border-box !important;color: rgb(171, 178, 191);font-family: 'Operator Mono', Consolas, Monaco, Menlo, monospace;font-size: 12px;font-style: normal;font-variant-ligatures: normal;font-variant-caps: normal;font-weight: 400;letter-spacing: normal;orphans: 2;text-align: left;text-indent: 0px;text-transform: none;widows: 2;word-spacing: 0px;-webkit-text-stroke-width: 0px;text-decoration-thickness: initial;text-decoration-style: initial;text-decoration-color: initial;" /> return (<br style="white-space:pre-wrap;margin: 0px;padding: 0px;max-width: 100%;overflow-wrap: break-word !important;box-sizing: border-box !important;color: rgb(171, 178, 191);font-family: 'Operator Mono', Consolas, Monaco, Menlo, monospace;font-size: 12px;font-style: normal;font-variant-ligatures: normal;font-variant-caps: normal;font-weight: 400;letter-spacing: normal;orphans: 2;text-align: left;text-indent: 0px;text-transform: none;widows: 2;word-spacing: 0px;-webkit-text-stroke-width: 0px;text-decoration-thickness: initial;text-decoration-style: initial;text-decoration-color: initial;" /> <br style="white-space:pre-wrap;margin: 0px;padding: 0px;max-width: 100%;overflow-wrap: break-word !important;box-sizing: border-box !important;color: rgb(171, 178, 191);font-family: 'Operator Mono', Consolas, Monaco, Menlo, monospace;font-size: 12px;font-style: normal;font-variant-ligatures: normal;font-variant-caps: normal;font-weight: 400;letter-spacing: normal;orphans: 2;text-align: left;text-indent: 0px;text-transform: none;widows: 2;word-spacing: 0px;-webkit-text-stroke-width: 0px;text-decoration-thickness: initial;text-decoration-style: initial;text-decoration-color: initial;" /> console.log("hello")}>This is Home Page<br style="white-space:pre-wrap;margin: 0px;padding: 0px;max-width: 100%;overflow-wrap: break-word !important;box-sizing: border-box !important;color: rgb(171, 178, 191);font-family: 'Operator Mono', Consolas, Monaco, Menlo, monospace;font-size: 12px;font-style: normal;font-variant-ligatures: normal;font-variant-caps: normal;font-weight: 400;letter-spacing: normal;orphans: 2;text-align: left;text-indent: 0px;text-transform: none;widows: 2;word-spacing: 0px;-webkit-text-stroke-width: 0px;text-decoration-thickness: initial;text-decoration-style: initial;text-decoration-color: initial;" /> <p>Home is the page ..... more discribe<br style="white-space:pre-wrap;margin: 0px;padding: 0px;max-width: 100%;overflow-wrap: break-word !important;box-sizing: border-box !important;color: rgb(171, 178, 191);font-family: 'Operator Mono', Consolas, Monaco, Menlo, monospace;font-size: 12px;font-style: normal;font-variant-ligatures: normal;font-variant-caps: normal;font-weight: 400;letter-spacing: normal;orphans: 2;text-align: left;text-indent: 0px;text-transform: none;widows: 2;word-spacing: 0px;-webkit-text-stroke-width: 0px;text-decoration-thickness: initial;text-decoration-style: initial;text-decoration-color: initial;" /> <br style="white-space:pre-wrap;margin: 0px;padding: 0px;max-width: 100%;overflow-wrap: break-word !important;box-sizing: border-box !important;color: rgb(171, 178, 191);font-family: 'Operator Mono', Consolas, Monaco, Menlo, monospace;font-size: 12px;font-style: normal;font-variant-ligatures: normal;font-variant-caps: normal;font-weight: 400;letter-spacing: normal;orphans: 2;text-align: left;text-indent: 0px;text-transform: none;widows: 2;word-spacing: 0px;-webkit-text-stroke-width: 0px;text-decoration-thickness: initial;text-decoration-style: initial;text-decoration-color: initial;" /> );<br style="white-space:pre-wrap;margin: 0px;padding: 0px;max-width: 100%;overflow-wrap: break-word !important;box-sizing: border-box !important;color: rgb(171, 178, 191);font-family: 'Operator Mono', Consolas, Monaco, Menlo, monospace;font-size: 12px;font-style: normal;font-variant-ligatures: normal;font-variant-caps: normal;font-weight: 400;letter-spacing: normal;orphans: 2;text-align: left;text-indent: 0px;text-transform: none;widows: 2;word-spacing: 0px;-webkit-text-stroke-width: 0px;text-decoration-thickness: initial;text-decoration-style: initial;text-decoration-color: initial;" />};<br style="white-space:pre-wrap;margin: 0px;padding: 0px;max-width: 100%;overflow-wrap: break-word !important;box-sizing: border-box !important;color: rgb(171, 178, 191);font-family: 'Operator Mono', Consolas, Monaco, Menlo, monospace;font-size: 12px;font-style: normal;font-variant-ligatures: normal;font-variant-caps: normal;font-weight: 400;letter-spacing: normal;orphans: 2;text-align: left;text-indent: 0px;text-transform: none;widows: 2;word-spacing: 0px;-webkit-text-stroke-width: 0px;text-decoration-thickness: initial;text-decoration-style: initial;text-decoration-color: initial;" />export default Home;</p>
我们使用React-dom/server下提供的renderToString方法,在服务端将其转换为html字符串:
// server.js<br />import Koa from "koa";<br />import React from "react";<br />import { renderToString } from "react-dom/server";<br />import Home from "./containers/Home";<br /><br />const app = new Koa();<br />app.use(async (ctx) => {<br /> // 核心api renderToString 将react组件转化成html字符串<br /> const content = renderToString();<br /> ctx.body = `<br /> <br /> <br /> ssr<br /> <br /> <br /> ${content}<br /> <br /> <br /> `;<br />});<br />app.listen(3002, () => {<br /> console.log("listen:3002");<br />});<br />
可以看到上面代码里有ES6的import 和jsx语法,不能直接运行在node环境,需要借助webpack打包, 构建目标是commonjs。新建webpack.server.js具体配置如下:
// webpack.server.js<br style="white-space:pre-wrap;margin: 0px;padding: 0px;max-width: 100%;overflow-wrap: break-word !important;box-sizing: border-box !important;color: rgb(171, 178, 191);font-family: 'Operator Mono', Consolas, Monaco, Menlo, monospace;font-size: 12px;font-style: normal;font-variant-ligatures: normal;font-variant-caps: normal;font-weight: 400;letter-spacing: normal;orphans: 2;text-align: left;text-indent: 0px;text-transform: none;widows: 2;word-spacing: 0px;-webkit-text-stroke-width: 0px;text-decoration-thickness: initial;text-decoration-style: initial;text-decoration-color: initial;" />const path = require("path");<br style="white-space:pre-wrap;margin: 0px;padding: 0px;max-width: 100%;overflow-wrap: break-word !important;box-sizing: border-box !important;color: rgb(171, 178, 191);font-family: 'Operator Mono', Consolas, Monaco, Menlo, monospace;font-size: 12px;font-style: normal;font-variant-ligatures: normal;font-variant-caps: normal;font-weight: 400;letter-spacing: normal;orphans: 2;text-align: left;text-indent: 0px;text-transform: none;widows: 2;word-spacing: 0px;-webkit-text-stroke-width: 0px;text-decoration-thickness: initial;text-decoration-style: initial;text-decoration-color: initial;" />const nodeExternals = require("webpack-node-externals");<br style="white-space:pre-wrap;margin: 0px;padding: 0px;max-width: 100%;overflow-wrap: break-word !important;box-sizing: border-box !important;color: rgb(171, 178, 191);font-family: 'Operator Mono', Consolas, Monaco, Menlo, monospace;font-size: 12px;font-style: normal;font-variant-ligatures: normal;font-variant-caps: normal;font-weight: 400;letter-spacing: normal;orphans: 2;text-align: left;text-indent: 0px;text-transform: none;widows: 2;word-spacing: 0px;-webkit-text-stroke-width: 0px;text-decoration-thickness: initial;text-decoration-style: initial;text-decoration-color: initial;" />module.exports = {<br style="white-space:pre-wrap;margin: 0px;padding: 0px;max-width: 100%;overflow-wrap: break-word !important;box-sizing: border-box !important;color: rgb(171, 178, 191);font-family: 'Operator Mono', Consolas, Monaco, Menlo, monospace;font-size: 12px;font-style: normal;font-variant-ligatures: normal;font-variant-caps: normal;font-weight: 400;letter-spacing: normal;orphans: 2;text-align: left;text-indent: 0px;text-transform: none;widows: 2;word-spacing: 0px;-webkit-text-stroke-width: 0px;text-decoration-thickness: initial;text-decoration-style: initial;text-decoration-color: initial;" /> mode: "development",<br style="white-space:pre-wrap;margin: 0px;padding: 0px;max-width: 100%;overflow-wrap: break-word !important;box-sizing: border-box !important;color: rgb(171, 178, 191);font-family: 'Operator Mono', Consolas, Monaco, Menlo, monospace;font-size: 12px;font-style: normal;font-variant-ligatures: normal;font-variant-caps: normal;font-weight: 400;letter-spacing: normal;orphans: 2;text-align: left;text-indent: 0px;text-transform: none;widows: 2;word-spacing: 0px;-webkit-text-stroke-width: 0px;text-decoration-thickness: initial;text-decoration-style: initial;text-decoration-color: initial;" /> target: "node",<br style="white-space:pre-wrap;margin: 0px;padding: 0px;max-width: 100%;overflow-wrap: break-word !important;box-sizing: border-box !important;color: rgb(171, 178, 191);font-family: 'Operator Mono', Consolas, Monaco, Menlo, monospace;font-size: 12px;font-style: normal;font-variant-ligatures: normal;font-variant-caps: normal;font-weight: 400;letter-spacing: normal;orphans: 2;text-align: left;text-indent: 0px;text-transform: none;widows: 2;word-spacing: 0px;-webkit-text-stroke-width: 0px;text-decoration-thickness: initial;text-decoration-style: initial;text-decoration-color: initial;" /> entry: "./server.js",<br style="white-space:pre-wrap;margin: 0px;padding: 0px;max-width: 100%;overflow-wrap: break-word !important;box-sizing: border-box !important;color: rgb(171, 178, 191);font-family: 'Operator Mono', Consolas, Monaco, Menlo, monospace;font-size: 12px;font-style: normal;font-variant-ligatures: normal;font-variant-caps: normal;font-weight: 400;letter-spacing: normal;orphans: 2;text-align: left;text-indent: 0px;text-transform: none;widows: 2;word-spacing: 0px;-webkit-text-stroke-width: 0px;text-decoration-thickness: initial;text-decoration-style: initial;text-decoration-color: initial;" /> resolve: {<br style="white-space:pre-wrap;margin: 0px;padding: 0px;max-width: 100%;overflow-wrap: break-word !important;box-sizing: border-box !important;color: rgb(171, 178, 191);font-family: 'Operator Mono', Consolas, Monaco, Menlo, monospace;font-size: 12px;font-style: normal;font-variant-ligatures: normal;font-variant-caps: normal;font-weight: 400;letter-spacing: normal;orphans: 2;text-align: left;text-indent: 0px;text-transform: none;widows: 2;word-spacing: 0px;-webkit-text-stroke-width: 0px;text-decoration-thickness: initial;text-decoration-style: initial;text-decoration-color: initial;" /> extensions: [".jsx", ".js", ".tsx", ".ts"],<br style="white-space:pre-wrap;margin: 0px;padding: 0px;max-width: 100%;overflow-wrap: break-word !important;box-sizing: border-box !important;color: rgb(171, 178, 191);font-family: 'Operator Mono', Consolas, Monaco, Menlo, monospace;font-size: 12px;font-style: normal;font-variant-ligatures: normal;font-variant-caps: normal;font-weight: 400;letter-spacing: normal;orphans: 2;text-align: left;text-indent: 0px;text-transform: none;widows: 2;word-spacing: 0px;-webkit-text-stroke-width: 0px;text-decoration-thickness: initial;text-decoration-style: initial;text-decoration-color: initial;" /> },<br style="white-space:pre-wrap;margin: 0px;padding: 0px;max-width: 100%;overflow-wrap: break-word !important;box-sizing: border-box !important;color: rgb(171, 178, 191);font-family: 'Operator Mono', Consolas, Monaco, Menlo, monospace;font-size: 12px;font-style: normal;font-variant-ligatures: normal;font-variant-caps: normal;font-weight: 400;letter-spacing: normal;orphans: 2;text-align: left;text-indent: 0px;text-transform: none;widows: 2;word-spacing: 0px;-webkit-text-stroke-width: 0px;text-decoration-thickness: initial;text-decoration-style: initial;text-decoration-color: initial;" /> module: {<br style="white-space:pre-wrap;margin: 0px;padding: 0px;max-width: 100%;overflow-wrap: break-word !important;box-sizing: border-box !important;color: rgb(171, 178, 191);font-family: 'Operator Mono', Consolas, Monaco, Menlo, monospace;font-size: 12px;font-style: normal;font-variant-ligatures: normal;font-variant-caps: normal;font-weight: 400;letter-spacing: normal;orphans: 2;text-align: left;text-indent: 0px;text-transform: none;widows: 2;word-spacing: 0px;-webkit-text-stroke-width: 0px;text-decoration-thickness: initial;text-decoration-style: initial;text-decoration-color: initial;" /> rules: [<br style="white-space:pre-wrap;margin: 0px;padding: 0px;max-width: 100%;overflow-wrap: break-word !important;box-sizing: border-box !important;color: rgb(171, 178, 191);font-family: 'Operator Mono', Consolas, Monaco, Menlo, monospace;font-size: 12px;font-style: normal;font-variant-ligatures: normal;font-variant-caps: normal;font-weight: 400;letter-spacing: normal;orphans: 2;text-align: left;text-indent: 0px;text-transform: none;widows: 2;word-spacing: 0px;-webkit-text-stroke-width: 0px;text-decoration-thickness: initial;text-decoration-style: initial;text-decoration-color: initial;" /> {<br style="white-space:pre-wrap;margin: 0px;padding: 0px;max-width: 100%;overflow-wrap: break-word !important;box-sizing: border-box !important;color: rgb(171, 178, 191);font-family: 'Operator Mono', Consolas, Monaco, Menlo, monospace;font-size: 12px;font-style: normal;font-variant-ligatures: normal;font-variant-caps: normal;font-weight: 400;letter-spacing: normal;orphans: 2;text-align: left;text-indent: 0px;text-transform: none;widows: 2;word-spacing: 0px;-webkit-text-stroke-width: 0px;text-decoration-thickness: initial;text-decoration-style: initial;text-decoration-color: initial;" /> test: /\.jsx?$/,<br style="white-space:pre-wrap;margin: 0px;padding: 0px;max-width: 100%;overflow-wrap: break-word !important;box-sizing: border-box !important;color: rgb(171, 178, 191);font-family: 'Operator Mono', Consolas, Monaco, Menlo, monospace;font-size: 12px;font-style: normal;font-variant-ligatures: normal;font-variant-caps: normal;font-weight: 400;letter-spacing: normal;orphans: 2;text-align: left;text-indent: 0px;text-transform: none;widows: 2;word-spacing: 0px;-webkit-text-stroke-width: 0px;text-decoration-thickness: initial;text-decoration-style: initial;text-decoration-color: initial;" /> loader: "babel-loader",<br style="white-space:pre-wrap;margin: 0px;padding: 0px;max-width: 100%;overflow-wrap: break-word !important;box-sizing: border-box !important;color: rgb(171, 178, 191);font-family: 'Operator Mono', Consolas, Monaco, Menlo, monospace;font-size: 12px;font-style: normal;font-variant-ligatures: normal;font-variant-caps: normal;font-weight: 400;letter-spacing: normal;orphans: 2;text-align: left;text-indent: 0px;text-transform: none;widows: 2;word-spacing: 0px;-webkit-text-stroke-width: 0px;text-decoration-thickness: initial;text-decoration-style: initial;text-decoration-color: initial;" /> exclude: /node_modules/,<br style="white-space:pre-wrap;margin: 0px;padding: 0px;max-width: 100%;overflow-wrap: break-word !important;box-sizing: border-box !important;color: rgb(171, 178, 191);font-family: 'Operator Mono', Consolas, Monaco, Menlo, monospace;font-size: 12px;font-style: normal;font-variant-ligatures: normal;font-variant-caps: normal;font-weight: 400;letter-spacing: normal;orphans: 2;text-align: left;text-indent: 0px;text-transform: none;widows: 2;word-spacing: 0px;-webkit-text-stroke-width: 0px;text-decoration-thickness: initial;text-decoration-style: initial;text-decoration-color: initial;" /> options: {<br style="white-space:pre-wrap;margin: 0px;padding: 0px;max-width: 100%;overflow-wrap: break-word !important;box-sizing: border-box !important;color: rgb(171, 178, 191);font-family: 'Operator Mono', Consolas, Monaco, Menlo, monospace;font-size: 12px;font-style: normal;font-variant-ligatures: normal;font-variant-caps: normal;font-weight: 400;letter-spacing: normal;orphans: 2;text-align: left;text-indent: 0px;text-transform: none;widows: 2;word-spacing: 0px;-webkit-text-stroke-width: 0px;text-decoration-thickness: initial;text-decoration-style: initial;text-decoration-color: initial;" /> presets: ["@babel/preset-react", "@babel/preset-env"],<br style="white-space:pre-wrap;margin: 0px;padding: 0px;max-width: 100%;overflow-wrap: break-word !important;box-sizing: border-box !important;color: rgb(171, 178, 191);font-family: 'Operator Mono', Consolas, Monaco, Menlo, monospace;font-size: 12px;font-style: normal;font-variant-ligatures: normal;font-variant-caps: normal;font-weight: 400;letter-spacing: normal;orphans: 2;text-align: left;text-indent: 0px;text-transform: none;widows: 2;word-spacing: 0px;-webkit-text-stroke-width: 0px;text-decoration-thickness: initial;text-decoration-style: initial;text-decoration-color: initial;" /> plugins: [<br style="white-space:pre-wrap;margin: 0px;padding: 0px;max-width: 100%;overflow-wrap: break-word !important;box-sizing: border-box !important;color: rgb(171, 178, 191);font-family: 'Operator Mono', Consolas, Monaco, Menlo, monospace;font-size: 12px;font-style: normal;font-variant-ligatures: normal;font-variant-caps: normal;font-weight: 400;letter-spacing: normal;orphans: 2;text-align: left;text-indent: 0px;text-transform: none;widows: 2;word-spacing: 0px;-webkit-text-stroke-width: 0px;text-decoration-thickness: initial;text-decoration-style: initial;text-decoration-color: initial;" /> [<br style="white-space:pre-wrap;margin: 0px;padding: 0px;max-width: 100%;overflow-wrap: break-word !important;box-sizing: border-box !important;color: rgb(171, 178, 191);font-family: 'Operator Mono', Consolas, Monaco, Menlo, monospace;font-size: 12px;font-style: normal;font-variant-ligatures: normal;font-variant-caps: normal;font-weight: 400;letter-spacing: normal;orphans: 2;text-align: left;text-indent: 0px;text-transform: none;widows: 2;word-spacing: 0px;-webkit-text-stroke-width: 0px;text-decoration-thickness: initial;text-decoration-style: initial;text-decoration-color: initial;" /> "@babel/plugin-transform-runtime",<br style="white-space:pre-wrap;margin: 0px;padding: 0px;max-width: 100%;overflow-wrap: break-word !important;box-sizing: border-box !important;color: rgb(171, 178, 191);font-family: 'Operator Mono', Consolas, Monaco, Menlo, monospace;font-size: 12px;font-style: normal;font-variant-ligatures: normal;font-variant-caps: normal;font-weight: 400;letter-spacing: normal;orphans: 2;text-align: left;text-indent: 0px;text-transform: none;widows: 2;word-spacing: 0px;-webkit-text-stroke-width: 0px;text-decoration-thickness: initial;text-decoration-style: initial;text-decoration-color: initial;" /> {<br style="white-space:pre-wrap;margin: 0px;padding: 0px;max-width: 100%;overflow-wrap: break-word !important;box-sizing: border-box !important;color: rgb(171, 178, 191);font-family: 'Operator Mono', Consolas, Monaco, Menlo, monospace;font-size: 12px;font-style: normal;font-variant-ligatures: normal;font-variant-caps: normal;font-weight: 400;letter-spacing: normal;orphans: 2;text-align: left;text-indent: 0px;text-transform: none;widows: 2;word-spacing: 0px;-webkit-text-stroke-width: 0px;text-decoration-thickness: initial;text-decoration-style: initial;text-decoration-color: initial;" /> absoluteRuntime: false,<br style="white-space:pre-wrap;margin: 0px;padding: 0px;max-width: 100%;overflow-wrap: break-word !important;box-sizing: border-box !important;color: rgb(171, 178, 191);font-family: 'Operator Mono', Consolas, Monaco, Menlo, monospace;font-size: 12px;font-style: normal;font-variant-ligatures: normal;font-variant-caps: normal;font-weight: 400;letter-spacing: normal;orphans: 2;text-align: left;text-indent: 0px;text-transform: none;widows: 2;word-spacing: 0px;-webkit-text-stroke-width: 0px;text-decoration-thickness: initial;text-decoration-style: initial;text-decoration-color: initial;" /> corejs: false,<br style="white-space:pre-wrap;margin: 0px;padding: 0px;max-width: 100%;overflow-wrap: break-word !important;box-sizing: border-box !important;color: rgb(171, 178, 191);font-family: 'Operator Mono', Consolas, Monaco, Menlo, monospace;font-size: 12px;font-style: normal;font-variant-ligatures: normal;font-variant-caps: normal;font-weight: 400;letter-spacing: normal;orphans: 2;text-align: left;text-indent: 0px;text-transform: none;widows: 2;word-spacing: 0px;-webkit-text-stroke-width: 0px;text-decoration-thickness: initial;text-decoration-style: initial;text-decoration-color: initial;" /> helpers: true,<br style="white-space:pre-wrap;margin: 0px;padding: 0px;max-width: 100%;overflow-wrap: break-word !important;box-sizing: border-box !important;color: rgb(171, 178, 191);font-family: 'Operator Mono', Consolas, Monaco, Menlo, monospace;font-size: 12px;font-style: normal;font-variant-ligatures: normal;font-variant-caps: normal;font-weight: 400;letter-spacing: normal;orphans: 2;text-align: left;text-indent: 0px;text-transform: none;widows: 2;word-spacing: 0px;-webkit-text-stroke-width: 0px;text-decoration-thickness: initial;text-decoration-style: initial;text-decoration-color: initial;" /> regenerator: true,<br style="white-space:pre-wrap;margin: 0px;padding: 0px;max-width: 100%;overflow-wrap: break-word !important;box-sizing: border-box !important;color: rgb(171, 178, 191);font-family: 'Operator Mono', Consolas, Monaco, Menlo, monospace;font-size: 12px;font-style: normal;font-variant-ligatures: normal;font-variant-caps: normal;font-weight: 400;letter-spacing: normal;orphans: 2;text-align: left;text-indent: 0px;text-transform: none;widows: 2;word-spacing: 0px;-webkit-text-stroke-width: 0px;text-decoration-thickness: initial;text-decoration-style: initial;text-decoration-color: initial;" /> version: "7.0.0-beta.0",<br style="white-space:pre-wrap;margin: 0px;padding: 0px;max-width: 100%;overflow-wrap: break-word !important;box-sizing: border-box !important;color: rgb(171, 178, 191);font-family: 'Operator Mono', Consolas, Monaco, Menlo, monospace;font-size: 12px;font-style: normal;font-variant-ligatures: normal;font-variant-caps: normal;font-weight: 400;letter-spacing: normal;orphans: 2;text-align: left;text-indent: 0px;text-transform: none;widows: 2;word-spacing: 0px;-webkit-text-stroke-width: 0px;text-decoration-thickness: initial;text-decoration-style: initial;text-decoration-color: initial;" /> },<br style="white-space:pre-wrap;margin: 0px;padding: 0px;max-width: 100%;overflow-wrap: break-word !important;box-sizing: border-box !important;color: rgb(171, 178, 191);font-family: 'Operator Mono', Consolas, Monaco, Menlo, monospace;font-size: 12px;font-style: normal;font-variant-ligatures: normal;font-variant-caps: normal;font-weight: 400;letter-spacing: normal;orphans: 2;text-align: left;text-indent: 0px;text-transform: none;widows: 2;word-spacing: 0px;-webkit-text-stroke-width: 0px;text-decoration-thickness: initial;text-decoration-style: initial;text-decoration-color: initial;" /> ],<br style="white-space:pre-wrap;margin: 0px;padding: 0px;max-width: 100%;overflow-wrap: break-word !important;box-sizing: border-box !important;color: rgb(171, 178, 191);font-family: 'Operator Mono', Consolas, Monaco, Menlo, monospace;font-size: 12px;font-style: normal;font-variant-ligatures: normal;font-variant-caps: normal;font-weight: 400;letter-spacing: normal;orphans: 2;text-align: left;text-indent: 0px;text-transform: none;widows: 2;word-spacing: 0px;-webkit-text-stroke-width: 0px;text-decoration-thickness: initial;text-decoration-style: initial;text-decoration-color: initial;" /> ],<br style="white-space:pre-wrap;margin: 0px;padding: 0px;max-width: 100%;overflow-wrap: break-word !important;box-sizing: border-box !important;color: rgb(171, 178, 191);font-family: 'Operator Mono', Consolas, Monaco, Menlo, monospace;font-size: 12px;font-style: normal;font-variant-ligatures: normal;font-variant-caps: normal;font-weight: 400;letter-spacing: normal;orphans: 2;text-align: left;text-indent: 0px;text-transform: none;widows: 2;word-spacing: 0px;-webkit-text-stroke-width: 0px;text-decoration-thickness: initial;text-decoration-style: initial;text-decoration-color: initial;" /> },<br style="white-space:pre-wrap;margin: 0px;padding: 0px;max-width: 100%;overflow-wrap: break-word !important;box-sizing: border-box !important;color: rgb(171, 178, 191);font-family: 'Operator Mono', Consolas, Monaco, Menlo, monospace;font-size: 12px;font-style: normal;font-variant-ligatures: normal;font-variant-caps: normal;font-weight: 400;letter-spacing: normal;orphans: 2;text-align: left;text-indent: 0px;text-transform: none;widows: 2;word-spacing: 0px;-webkit-text-stroke-width: 0px;text-decoration-thickness: initial;text-decoration-style: initial;text-decoration-color: initial;" /> },<br style="white-space:pre-wrap;margin: 0px;padding: 0px;max-width: 100%;overflow-wrap: break-word !important;box-sizing: border-box !important;color: rgb(171, 178, 191);font-family: 'Operator Mono', Consolas, Monaco, Menlo, monospace;font-size: 12px;font-style: normal;font-variant-ligatures: normal;font-variant-caps: normal;font-weight: 400;letter-spacing: normal;orphans: 2;text-align: left;text-indent: 0px;text-transform: none;widows: 2;word-spacing: 0px;-webkit-text-stroke-width: 0px;text-decoration-thickness: initial;text-decoration-style: initial;text-decoration-color: initial;" /> ],<br style="white-space:pre-wrap;margin: 0px;padding: 0px;max-width: 100%;overflow-wrap: break-word !important;box-sizing: border-box !important;color: rgb(171, 178, 191);font-family: 'Operator Mono', Consolas, Monaco, Menlo, monospace;font-size: 12px;font-style: normal;font-variant-ligatures: normal;font-variant-caps: normal;font-weight: 400;letter-spacing: normal;orphans: 2;text-align: left;text-indent: 0px;text-transform: none;widows: 2;word-spacing: 0px;-webkit-text-stroke-width: 0px;text-decoration-thickness: initial;text-decoration-style: initial;text-decoration-color: initial;" /> },<br style="white-space:pre-wrap;margin: 0px;padding: 0px;max-width: 100%;overflow-wrap: break-word !important;box-sizing: border-box !important;color: rgb(171, 178, 191);font-family: 'Operator Mono', Consolas, Monaco, Menlo, monospace;font-size: 12px;font-style: normal;font-variant-ligatures: normal;font-variant-caps: normal;font-weight: 400;letter-spacing: normal;orphans: 2;text-align: left;text-indent: 0px;text-transform: none;widows: 2;word-spacing: 0px;-webkit-text-stroke-width: 0px;text-decoration-thickness: initial;text-decoration-style: initial;text-decoration-color: initial;" /> output: {<br style="white-space:pre-wrap;margin: 0px;padding: 0px;max-width: 100%;overflow-wrap: break-word !important;box-sizing: border-box !important;color: rgb(171, 178, 191);font-family: 'Operator Mono', Consolas, Monaco, Menlo, monospace;font-size: 12px;font-style: normal;font-variant-ligatures: normal;font-variant-caps: normal;font-weight: 400;letter-spacing: normal;orphans: 2;text-align: left;text-indent: 0px;text-transform: none;widows: 2;word-spacing: 0px;-webkit-text-stroke-width: 0px;text-decoration-thickness: initial;text-decoration-style: initial;text-decoration-color: initial;" /> filename: "bundle.js",<br style="white-space:pre-wrap;margin: 0px;padding: 0px;max-width: 100%;overflow-wrap: break-word !important;box-sizing: border-box !important;color: rgb(171, 178, 191);font-family: 'Operator Mono', Consolas, Monaco, Menlo, monospace;font-size: 12px;font-style: normal;font-variant-ligatures: normal;font-variant-caps: normal;font-weight: 400;letter-spacing: normal;orphans: 2;text-align: left;text-indent: 0px;text-transform: none;widows: 2;word-spacing: 0px;-webkit-text-stroke-width: 0px;text-decoration-thickness: initial;text-decoration-style: initial;text-decoration-color: initial;" /> path: path.resolve(__dirname, "build"),<br style="white-space:pre-wrap;margin: 0px;padding: 0px;max-width: 100%;overflow-wrap: break-word !important;box-sizing: border-box !important;color: rgb(171, 178, 191);font-family: 'Operator Mono', Consolas, Monaco, Menlo, monospace;font-size: 12px;font-style: normal;font-variant-ligatures: normal;font-variant-caps: normal;font-weight: 400;letter-spacing: normal;orphans: 2;text-align: left;text-indent: 0px;text-transform: none;widows: 2;word-spacing: 0px;-webkit-text-stroke-width: 0px;text-decoration-thickness: initial;text-decoration-style: initial;text-decoration-color: initial;" /> },<br style="white-space:pre-wrap;margin: 0px;padding: 0px;max-width: 100%;overflow-wrap: break-word !important;box-sizing: border-box !important;color: rgb(171, 178, 191);font-family: 'Operator Mono', Consolas, Monaco, Menlo, monospace;font-size: 12px;font-style: normal;font-variant-ligatures: normal;font-variant-caps: normal;font-weight: 400;letter-spacing: normal;orphans: 2;text-align: left;text-indent: 0px;text-transform: none;widows: 2;word-spacing: 0px;-webkit-text-stroke-width: 0px;text-decoration-thickness: initial;text-decoration-style: initial;text-decoration-color: initial;" /> externals: [nodeExternals()],<br style="white-space:pre-wrap;margin: 0px;padding: 0px;max-width: 100%;overflow-wrap: break-word !important;box-sizing: border-box !important;color: rgb(171, 178, 191);font-family: 'Operator Mono', Consolas, Monaco, Menlo, monospace;font-size: 12px;font-style: normal;font-variant-ligatures: normal;font-variant-caps: normal;font-weight: 400;letter-spacing: normal;orphans: 2;text-align: left;text-indent: 0px;text-transform: none;widows: 2;word-spacing: 0px;-webkit-text-stroke-width: 0px;text-decoration-thickness: initial;text-decoration-style: initial;text-decoration-color: initial;" />};
在webpack构建完成后,可在Node环境运行build/bundle.js,访问页面后查看网页源代码,可以看到,React组件中的内容已经完整地包含在服务端返回到html里面。我们成功迈出了服务端渲染第一步。此时,我们也有必要再深入了解renderToString 到底做了什么,提前踩坑!
renderToString
除了将React组件转换成html字符串外,renderToString还有做了下面这些:
1. 会执行传入的React组件的代码,但是其只执行到React生命周期初始化过程的render及之前,即下面红框的部分,其余大部分生命周期函数在服务端都不执行;这也是服务端渲染的坑点之一。
2.renderToString 生成的产物中会包含一些额外生成特殊标记,代码体积会有所增大,其中属性data-reactroot是服务端渲染的标志,便于后续客户端通过hydrate复用HTML节点。在React16前后其产物也有差距:在React 16 之前,服务端渲染采用的是基于字符串校验和(string checksum)的 HTML 节点复用方式, 会额外生成生成data-reactid、data-react-checksum等属性;React 16 改用单节点校验来复用(服务端返回的)HTML 节点,不再生成data-reactid、data-react-checksum等体积占用大户,只在空白节点间多了 这样的标记。
renderToString react16前<br style="white-space:pre-wrap;margin: 0px;padding: 0px;max-width: 100%;overflow-wrap: break-word !important;box-sizing: border-box !important;color: rgb(171, 178, 191);font-family: 'Operator Mono', Consolas, Monaco, Menlo, monospace;font-size: 12px;font-style: normal;font-variant-ligatures: normal;font-variant-caps: normal;font-weight: 400;letter-spacing: normal;orphans: 2;text-align: left;text-indent: 0px;text-transform: none;widows: 2;word-spacing: 0px;-webkit-text-stroke-width: 0px;text-decoration-thickness: initial;text-decoration-style: initial;text-decoration-color: initial;" /><br style="white-space:pre-wrap;margin: 0px;padding: 0px;max-width: 100%;overflow-wrap: break-word !important;box-sizing: border-box !important;color: rgb(171, 178, 191);font-family: 'Operator Mono', Consolas, Monaco, Menlo, monospace;font-size: 12px;font-style: normal;font-variant-ligatures: normal;font-variant-caps: normal;font-weight: 400;letter-spacing: normal;orphans: 2;text-align: left;text-indent: 0px;text-transform: none;widows: 2;word-spacing: 0px;-webkit-text-stroke-width: 0px;text-decoration-thickness: initial;text-decoration-style: initial;text-decoration-color: initial;" /> Welcome to React SSR! <br style="white-space:pre-wrap;margin: 0px;padding: 0px;max-width: 100%;overflow-wrap: break-word !important;box-sizing: border-box !important;color: rgb(171, 178, 191);font-family: 'Operator Mono', Consolas, Monaco, Menlo, monospace;font-size: 12px;font-style: normal;font-variant-ligatures: normal;font-variant-caps: normal;font-weight: 400;letter-spacing: normal;orphans: 2;text-align: left;text-indent: 0px;text-transform: none;widows: 2;word-spacing: 0px;-webkit-text-stroke-width: 0px;text-decoration-thickness: initial;text-decoration-style: initial;text-decoration-color: initial;" /> Hello There! <br style="white-space:pre-wrap;margin: 0px;padding: 0px;max-width: 100%;overflow-wrap: break-word !important;box-sizing: border-box !important;color: rgb(171, 178, 191);font-family: 'Operator Mono', Consolas, Monaco, Menlo, monospace;font-size: 12px;font-style: normal;font-variant-ligatures: normal;font-variant-caps: normal;font-weight: 400;letter-spacing: normal;orphans: 2;text-align: left;text-indent: 0px;text-transform: none;widows: 2;word-spacing: 0px;-webkit-text-stroke-width: 0px;text-decoration-thickness: initial;text-decoration-style: initial;text-decoration-color: initial;" /><br style="white-space:pre-wrap;margin: 0px;padding: 0px;max-width: 100%;overflow-wrap: break-word !important;box-sizing: border-box !important;color: rgb(171, 178, 191);font-family: 'Operator Mono', Consolas, Monaco, Menlo, monospace;font-size: 12px;font-style: normal;font-variant-ligatures: normal;font-variant-caps: normal;font-weight: 400;letter-spacing: normal;orphans: 2;text-align: left;text-indent: 0px;text-transform: none;widows: 2;word-spacing: 0px;-webkit-text-stroke-width: 0px;text-decoration-thickness: initial;text-decoration-style: initial;text-decoration-color: initial;" /><br style="white-space:pre-wrap;margin: 0px;padding: 0px;max-width: 100%;overflow-wrap: break-word !important;box-sizing: border-box !important;color: rgb(171, 178, 191);font-family: 'Operator Mono', Consolas, Monaco, Menlo, monospace;font-size: 12px;font-style: normal;font-variant-ligatures: normal;font-variant-caps: normal;font-weight: 400;letter-spacing: normal;orphans: 2;text-align: left;text-indent: 0px;text-transform: none;widows: 2;word-spacing: 0px;-webkit-text-stroke-width: 0px;text-decoration-thickness: initial;text-decoration-style: initial;text-decoration-color: initial;" />// renderToString react16<br style="white-space:pre-wrap;margin: 0px;padding: 0px;max-width: 100%;overflow-wrap: break-word !important;box-sizing: border-box !important;color: rgb(171, 178, 191);font-family: 'Operator Mono', Consolas, Monaco, Menlo, monospace;font-size: 12px;font-style: normal;font-variant-ligatures: normal;font-variant-caps: normal;font-weight: 400;letter-spacing: normal;orphans: 2;text-align: left;text-indent: 0px;text-transform: none;widows: 2;word-spacing: 0px;-webkit-text-stroke-width: 0px;text-decoration-thickness: initial;text-decoration-style: initial;text-decoration-color: initial;" />Welcome to React SSR! Hello There!
3.会被故意忽略掉的on开头的的属性,也就忽略掉了react代码中事件处理,这是也是坑点之一。服务端返回的html里没有处理事件点击,需要靠后续客户端js执行绑定事件。
function shouldIgnoreAttribute(<br /> name: string,<br /> propertyInfo: PropertyInfo | null,<br /> isCustomComponentTag: boolean,<br />): boolean {<br /> if (propertyInfo !== null) {<br /> return propertyInfo.type === RESERVED;<br /> }<br /> if (isCustomComponentTag) {<br /> return false;<br /> }<br /> if (<br /> name.length > 2 &&<br /> (name[0] === 'o' || name[0] === 'O') &&<br /> (name[1] === 'n' || name[1] === 'N')<br /> ) {<br /> return true;<br /> }<br /> return false;<br />}<br />
上面的例子我们可以看到React的代码里有点击事件,但点击后没有反应。需要靠后续客户端js执行绑定事件。如何实现?这就需要同构了。
2.3 实现基础的同构
前文已经大概讲了同构的概念,那为什么需要同构?之前的服务端代码在处理点击事件时故意忽略掉了这类属性,在服务端执行的生命周期也是不完整的,此时的页面是不具备交互能力的。同构,正是解决这些问题的关键,React代码在服务器上执行一遍之后,浏览器再去加载JS后又运行了一遍React代码,完成事件绑定和完整生命周期的执行,从而才能成为完全可交互页面。
react-dom:hydrate
实现同构的另一个核心API是React-dom下的hydrate,该方法能在客户端初次渲染的时候去复用服务端返回的原本已经存在的 DOM 节点,于渲染过程中为其附加交互行为(事件监听等),而不是重新创建 DOM 节点。需要注意是,服务端返回的 HTML 与客户端渲染结果不一致时,出于性能考虑,hydrate可以弥补文本内容的差异,但并不能保证修补属性的差异,而是将错就错;只在development模式下对这些不一致的问题报 Warning,因此必须重视 SSR HydrationWarning,要当 Error 逐个解决。
那具体实现同构?
上面这里我们提供了一个基本的架构图,可以看到,服务端运行React生成html代码我们已经基本实现,目前需要做的就是生产出客户端执行的index.js,那么这个index.js我们如何生产出来呢?
具体实践
首先新建客户端代码client.js,引入React组件,通过ReactDom.hydrate处理挂载到Dom节点, hydrate是实现复用的关键。
// client.js<br style="white-space:pre-wrap;margin: 0px;padding: 0px;max-width: 100%;overflow-wrap: break-word !important;box-sizing: border-box !important;color: rgb(171, 178, 191);font-family: 'Operator Mono', Consolas, Monaco, Menlo, monospace;font-size: 12px;font-style: normal;font-variant-ligatures: normal;font-variant-caps: normal;font-weight: 400;letter-spacing: normal;orphans: 2;text-align: left;text-indent: 0px;text-transform: none;widows: 2;word-spacing: 0px;-webkit-text-stroke-width: 0px;text-decoration-thickness: initial;text-decoration-style: initial;text-decoration-color: initial;" />import React from "react";<br style="white-space:pre-wrap;margin: 0px;padding: 0px;max-width: 100%;overflow-wrap: break-word !important;box-sizing: border-box !important;color: rgb(171, 178, 191);font-family: 'Operator Mono', Consolas, Monaco, Menlo, monospace;font-size: 12px;font-style: normal;font-variant-ligatures: normal;font-variant-caps: normal;font-weight: 400;letter-spacing: normal;orphans: 2;text-align: left;text-indent: 0px;text-transform: none;widows: 2;word-spacing: 0px;-webkit-text-stroke-width: 0px;text-decoration-thickness: initial;text-decoration-style: initial;text-decoration-color: initial;" />import ReactDom from "react-dom";<br style="white-space:pre-wrap;margin: 0px;padding: 0px;max-width: 100%;overflow-wrap: break-word !important;box-sizing: border-box !important;color: rgb(171, 178, 191);font-family: 'Operator Mono', Consolas, Monaco, Menlo, monospace;font-size: 12px;font-style: normal;font-variant-ligatures: normal;font-variant-caps: normal;font-weight: 400;letter-spacing: normal;orphans: 2;text-align: left;text-indent: 0px;text-transform: none;widows: 2;word-spacing: 0px;-webkit-text-stroke-width: 0px;text-decoration-thickness: initial;text-decoration-style: initial;text-decoration-color: initial;" />import Home from "./containers/Home";<br style="white-space:pre-wrap;margin: 0px;padding: 0px;max-width: 100%;overflow-wrap: break-word !important;box-sizing: border-box !important;color: rgb(171, 178, 191);font-family: 'Operator Mono', Consolas, Monaco, Menlo, monospace;font-size: 12px;font-style: normal;font-variant-ligatures: normal;font-variant-caps: normal;font-weight: 400;letter-spacing: normal;orphans: 2;text-align: left;text-indent: 0px;text-transform: none;widows: 2;word-spacing: 0px;-webkit-text-stroke-width: 0px;text-decoration-thickness: initial;text-decoration-style: initial;text-decoration-color: initial;" /><br style="white-space:pre-wrap;margin: 0px;padding: 0px;max-width: 100%;overflow-wrap: break-word !important;box-sizing: border-box !important;color: rgb(171, 178, 191);font-family: 'Operator Mono', Consolas, Monaco, Menlo, monospace;font-size: 12px;font-style: normal;font-variant-ligatures: normal;font-variant-caps: normal;font-weight: 400;letter-spacing: normal;orphans: 2;text-align: left;text-indent: 0px;text-transform: none;widows: 2;word-spacing: 0px;-webkit-text-stroke-width: 0px;text-decoration-thickness: initial;text-decoration-style: initial;text-decoration-color: initial;" />const App = () => {<br style="white-space:pre-wrap;margin: 0px;padding: 0px;max-width: 100%;overflow-wrap: break-word !important;box-sizing: border-box !important;color: rgb(171, 178, 191);font-family: 'Operator Mono', Consolas, Monaco, Menlo, monospace;font-size: 12px;font-style: normal;font-variant-ligatures: normal;font-variant-caps: normal;font-weight: 400;letter-spacing: normal;orphans: 2;text-align: left;text-indent: 0px;text-transform: none;widows: 2;word-spacing: 0px;-webkit-text-stroke-width: 0px;text-decoration-thickness: initial;text-decoration-style: initial;text-decoration-color: initial;" /> return ;<br style="white-space:pre-wrap;margin: 0px;padding: 0px;max-width: 100%;overflow-wrap: break-word !important;box-sizing: border-box !important;color: rgb(171, 178, 191);font-family: 'Operator Mono', Consolas, Monaco, Menlo, monospace;font-size: 12px;font-style: normal;font-variant-ligatures: normal;font-variant-caps: normal;font-weight: 400;letter-spacing: normal;orphans: 2;text-align: left;text-indent: 0px;text-transform: none;widows: 2;word-spacing: 0px;-webkit-text-stroke-width: 0px;text-decoration-thickness: initial;text-decoration-style: initial;text-decoration-color: initial;" />};<br style="white-space:pre-wrap;margin: 0px;padding: 0px;max-width: 100%;overflow-wrap: break-word !important;box-sizing: border-box !important;color: rgb(171, 178, 191);font-family: 'Operator Mono', Consolas, Monaco, Menlo, monospace;font-size: 12px;font-style: normal;font-variant-ligatures: normal;font-variant-caps: normal;font-weight: 400;letter-spacing: normal;orphans: 2;text-align: left;text-indent: 0px;text-transform: none;widows: 2;word-spacing: 0px;-webkit-text-stroke-width: 0px;text-decoration-thickness: initial;text-decoration-style: initial;text-decoration-color: initial;" /><br style="white-space:pre-wrap;margin: 0px;padding: 0px;max-width: 100%;overflow-wrap: break-word !important;box-sizing: border-box !important;color: rgb(171, 178, 191);font-family: 'Operator Mono', Consolas, Monaco, Menlo, monospace;font-size: 12px;font-style: normal;font-variant-ligatures: normal;font-variant-caps: normal;font-weight: 400;letter-spacing: normal;orphans: 2;text-align: left;text-indent: 0px;text-transform: none;widows: 2;word-spacing: 0px;-webkit-text-stroke-width: 0px;text-decoration-thickness: initial;text-decoration-style: initial;text-decoration-color: initial;" />ReactDom.hydrate(, document.getElementById("root"));
客户端代码也需要webpack打包处理,新建webpack.client.js具体配置如下,需要注意打包输出在public目录下,后续的静态资源服务也起在了这个目录下。
// webpack.client.js<br style="white-space:pre-wrap;margin: 0px;padding: 0px;max-width: 100%;overflow-wrap: break-word !important;box-sizing: border-box !important;color: rgb(171, 178, 191);font-family: 'Operator Mono', Consolas, Monaco, Menlo, monospace;font-size: 12px;font-style: normal;font-variant-ligatures: normal;font-variant-caps: normal;font-weight: 400;letter-spacing: normal;orphans: 2;text-align: left;text-indent: 0px;text-transform: none;widows: 2;word-spacing: 0px;-webkit-text-stroke-width: 0px;text-decoration-thickness: initial;text-decoration-style: initial;text-decoration-color: initial;" />const path = require("path");<br style="white-space:pre-wrap;margin: 0px;padding: 0px;max-width: 100%;overflow-wrap: break-word !important;box-sizing: border-box !important;color: rgb(171, 178, 191);font-family: 'Operator Mono', Consolas, Monaco, Menlo, monospace;font-size: 12px;font-style: normal;font-variant-ligatures: normal;font-variant-caps: normal;font-weight: 400;letter-spacing: normal;orphans: 2;text-align: left;text-indent: 0px;text-transform: none;widows: 2;word-spacing: 0px;-webkit-text-stroke-width: 0px;text-decoration-thickness: initial;text-decoration-style: initial;text-decoration-color: initial;" />const resolve = (dir) => path.resolve(__dirname, "./src", dir);<br style="white-space:pre-wrap;margin: 0px;padding: 0px;max-width: 100%;overflow-wrap: break-word !important;box-sizing: border-box !important;color: rgb(171, 178, 191);font-family: 'Operator Mono', Consolas, Monaco, Menlo, monospace;font-size: 12px;font-style: normal;font-variant-ligatures: normal;font-variant-caps: normal;font-weight: 400;letter-spacing: normal;orphans: 2;text-align: left;text-indent: 0px;text-transform: none;widows: 2;word-spacing: 0px;-webkit-text-stroke-width: 0px;text-decoration-thickness: initial;text-decoration-style: initial;text-decoration-color: initial;" />module.exports = {<br style="white-space:pre-wrap;margin: 0px;padding: 0px;max-width: 100%;overflow-wrap: break-word !important;box-sizing: border-box !important;color: rgb(171, 178, 191);font-family: 'Operator Mono', Consolas, Monaco, Menlo, monospace;font-size: 12px;font-style: normal;font-variant-ligatures: normal;font-variant-caps: normal;font-weight: 400;letter-spacing: normal;orphans: 2;text-align: left;text-indent: 0px;text-transform: none;widows: 2;word-spacing: 0px;-webkit-text-stroke-width: 0px;text-decoration-thickness: initial;text-decoration-style: initial;text-decoration-color: initial;" /> mode: "development",<br style="white-space:pre-wrap;margin: 0px;padding: 0px;max-width: 100%;overflow-wrap: break-word !important;box-sizing: border-box !important;color: rgb(171, 178, 191);font-family: 'Operator Mono', Consolas, Monaco, Menlo, monospace;font-size: 12px;font-style: normal;font-variant-ligatures: normal;font-variant-caps: normal;font-weight: 400;letter-spacing: normal;orphans: 2;text-align: left;text-indent: 0px;text-transform: none;widows: 2;word-spacing: 0px;-webkit-text-stroke-width: 0px;text-decoration-thickness: initial;text-decoration-style: initial;text-decoration-color: initial;" /> entry: "./client.js",<br style="white-space:pre-wrap;margin: 0px;padding: 0px;max-width: 100%;overflow-wrap: break-word !important;box-sizing: border-box !important;color: rgb(171, 178, 191);font-family: 'Operator Mono', Consolas, Monaco, Menlo, monospace;font-size: 12px;font-style: normal;font-variant-ligatures: normal;font-variant-caps: normal;font-weight: 400;letter-spacing: normal;orphans: 2;text-align: left;text-indent: 0px;text-transform: none;widows: 2;word-spacing: 0px;-webkit-text-stroke-width: 0px;text-decoration-thickness: initial;text-decoration-style: initial;text-decoration-color: initial;" /> output: {<br style="white-space:pre-wrap;margin: 0px;padding: 0px;max-width: 100%;overflow-wrap: break-word !important;box-sizing: border-box !important;color: rgb(171, 178, 191);font-family: 'Operator Mono', Consolas, Monaco, Menlo, monospace;font-size: 12px;font-style: normal;font-variant-ligatures: normal;font-variant-caps: normal;font-weight: 400;letter-spacing: normal;orphans: 2;text-align: left;text-indent: 0px;text-transform: none;widows: 2;word-spacing: 0px;-webkit-text-stroke-width: 0px;text-decoration-thickness: initial;text-decoration-style: initial;text-decoration-color: initial;" /> filename: "index.js",<br style="white-space:pre-wrap;margin: 0px;padding: 0px;max-width: 100%;overflow-wrap: break-word !important;box-sizing: border-box !important;color: rgb(171, 178, 191);font-family: 'Operator Mono', Consolas, Monaco, Menlo, monospace;font-size: 12px;font-style: normal;font-variant-ligatures: normal;font-variant-caps: normal;font-weight: 400;letter-spacing: normal;orphans: 2;text-align: left;text-indent: 0px;text-transform: none;widows: 2;word-spacing: 0px;-webkit-text-stroke-width: 0px;text-decoration-thickness: initial;text-decoration-style: initial;text-decoration-color: initial;" /> path: path.resolve(__dirname, "public"),<br style="white-space:pre-wrap;margin: 0px;padding: 0px;max-width: 100%;overflow-wrap: break-word !important;box-sizing: border-box !important;color: rgb(171, 178, 191);font-family: 'Operator Mono', Consolas, Monaco, Menlo, monospace;font-size: 12px;font-style: normal;font-variant-ligatures: normal;font-variant-caps: normal;font-weight: 400;letter-spacing: normal;orphans: 2;text-align: left;text-indent: 0px;text-transform: none;widows: 2;word-spacing: 0px;-webkit-text-stroke-width: 0px;text-decoration-thickness: initial;text-decoration-style: initial;text-decoration-color: initial;" /> },<br style="white-space:pre-wrap;margin: 0px;padding: 0px;max-width: 100%;overflow-wrap: break-word !important;box-sizing: border-box !important;color: rgb(171, 178, 191);font-family: 'Operator Mono', Consolas, Monaco, Menlo, monospace;font-size: 12px;font-style: normal;font-variant-ligatures: normal;font-variant-caps: normal;font-weight: 400;letter-spacing: normal;orphans: 2;text-align: left;text-indent: 0px;text-transform: none;widows: 2;word-spacing: 0px;-webkit-text-stroke-width: 0px;text-decoration-thickness: initial;text-decoration-style: initial;text-decoration-color: initial;" /> module
vb和java的集成开发环境-visualstudiovisualstudiovs2013以上可以基本学会写些小程序
网站优化 • 优采云 发表了文章 • 0 个评论 • 73 次浏览 • 2022-09-13 07:00
nodejs抓取动态网页:(可以编译为zlib或coffeescript),网站编译前就定义好各种方法、规则,如果你抓取的是静态网页,那就是固定的各种方法,如果是动态网页,那就需要写一些模拟http请求的逻辑代码。webpack模块的引入(就是写http请求逻辑就好),各种http的配置,处理请求的逻辑(不同情况要去写不同的代码),跨域问题(跨域的代码处理,编译后的.babelrc配置,随时可以修改)。
最好先熟悉掌握javascript最基本的语法::比如:正则表达式、lambda表达式、map、apply、asyncfunction、es6的语法等等;php也是可以的;c#也是可以的;java也是可以的;学习一下进阶知识:nodejs;c#,java也是可以的;vb也是可以的;javascript了解下vb和java的集成开发环境-visualstudiovisualstudiovs2013以上可以基本学会写些小程序了,在vs工作室上手也不困难;别想着学java,php,c#了,这些已经没那么容易上手的,先熟悉javascript,然后慢慢向后学习。可以参考这个帖子,学习学习:如何用javascript编写web服务器端的应用程序?。
学习“先易后难”的学习路线,最好跟着做一些小demo,对web开发感兴趣的话,可以先从easywebengine开始。如果你对javascript的知识没有底,可以从jquery开始学习。 查看全部
vb和java的集成开发环境-visualstudiovisualstudiovs2013以上可以基本学会写些小程序
nodejs抓取动态网页:(可以编译为zlib或coffeescript),网站编译前就定义好各种方法、规则,如果你抓取的是静态网页,那就是固定的各种方法,如果是动态网页,那就需要写一些模拟http请求的逻辑代码。webpack模块的引入(就是写http请求逻辑就好),各种http的配置,处理请求的逻辑(不同情况要去写不同的代码),跨域问题(跨域的代码处理,编译后的.babelrc配置,随时可以修改)。
最好先熟悉掌握javascript最基本的语法::比如:正则表达式、lambda表达式、map、apply、asyncfunction、es6的语法等等;php也是可以的;c#也是可以的;java也是可以的;学习一下进阶知识:nodejs;c#,java也是可以的;vb也是可以的;javascript了解下vb和java的集成开发环境-visualstudiovisualstudiovs2013以上可以基本学会写些小程序了,在vs工作室上手也不困难;别想着学java,php,c#了,这些已经没那么容易上手的,先熟悉javascript,然后慢慢向后学习。可以参考这个帖子,学习学习:如何用javascript编写web服务器端的应用程序?。
学习“先易后难”的学习路线,最好跟着做一些小demo,对web开发感兴趣的话,可以先从easywebengine开始。如果你对javascript的知识没有底,可以从jquery开始学习。
nodejs抓取动态网页不推荐gzip压缩,原因有二:一.可读性不高
网站优化 • 优采云 发表了文章 • 0 个评论 • 114 次浏览 • 2022-09-11 01:10
nodejs抓取动态网页不推荐gzip压缩,原因有二:一.可读性不高,不利于看后文,增加读者压力,体验不好二.还是不利于压缩,比如压缩后数据小了20%,后面你得抽取数据的时候需要抽取20%的数据如果是上传图片的话,并且是静态的,推荐用php代码生成,
php
nodejs。
我推荐用nodejs抓取。题主要求动态,那我就帮你设置一下:设置重定向,你可以上传文件的时候参考抓取动态http请求。可以使用express或者rewrite等框架。php可以自己写smartjs的扩展。
还有php+mysql什么的!话说php确实不好啊,php是世界上最好的语言不过是php爱好者的美化罢了...php的性能太差了!可能是你没接触php导致的,
学点python
动态网页就ajax抓取
不推荐php(除非你是个php专门学校出来的学生)(当然如果你是php黑的话当我没说)题主要求不高,推荐用express。语言有点像nodejs但性能更好,性能是很多是express的大问题。但是express技术栈十分成熟,已经迭代了很多版本,网上教程一大堆。重在掌握框架的使用,目前express已经非常容易上手了。
php需要学习javascript+html+css+一点点mysql。nodejs不用了,前期你只是用到nodejs的很少, 查看全部
nodejs抓取动态网页不推荐gzip压缩,原因有二:一.可读性不高
nodejs抓取动态网页不推荐gzip压缩,原因有二:一.可读性不高,不利于看后文,增加读者压力,体验不好二.还是不利于压缩,比如压缩后数据小了20%,后面你得抽取数据的时候需要抽取20%的数据如果是上传图片的话,并且是静态的,推荐用php代码生成,
php
nodejs。
我推荐用nodejs抓取。题主要求动态,那我就帮你设置一下:设置重定向,你可以上传文件的时候参考抓取动态http请求。可以使用express或者rewrite等框架。php可以自己写smartjs的扩展。
还有php+mysql什么的!话说php确实不好啊,php是世界上最好的语言不过是php爱好者的美化罢了...php的性能太差了!可能是你没接触php导致的,
学点python
动态网页就ajax抓取
不推荐php(除非你是个php专门学校出来的学生)(当然如果你是php黑的话当我没说)题主要求不高,推荐用express。语言有点像nodejs但性能更好,性能是很多是express的大问题。但是express技术栈十分成熟,已经迭代了很多版本,网上教程一大堆。重在掌握框架的使用,目前express已经非常容易上手了。
php需要学习javascript+html+css+一点点mysql。nodejs不用了,前期你只是用到nodejs的很少,
nodejs抓取动态网页过程中采用数据包的方式压缩操作
网站优化 • 优采云 发表了文章 • 0 个评论 • 64 次浏览 • 2022-08-14 02:00
nodejs抓取动态网页过程中采用数据包的方式压缩的数据。所以postgetputpatch都是从两个方面取数据包压缩解压操作。那么不同的方式带来的差异非常明显,首先客户端渲染全局控制图片的时候经常会带上屏幕图片(这个正常不可控,自己优化),然后全局控制带来的问题是不能对querystring返回的数据进行任何编码(比如javascript)。
querystring没法设置和编码。然后就是post的方式包走的是websocket,post操作当然可以保证数据不丢失(flash,flashplayer),然后包走websocket的话,会通过异步onsocket发送到远程,对远程的数据进行编码压缩解码,于是在渲染的时候就会有明显的问题,例如你的需求就是html代码片段拼成两张图片,压缩编码之后html代码数据量(2gb)增加了很多,还不如不压缩。
解决办法就是用python处理localstorage上的数据(不存在post)转换成websocket压缩数据,然后处理成完整的静态页面。
-谢邀。针对这个问题,本人在某些情况下用google,但必须要有分析和使用过程。首先获取过程可能需要几个步骤:分析googlescholar服务器上各论文的图片brief(例如html标签或者你自己定义的html代码)存储成文本txt文件存储成google提供的htmljson代码和js代码(这两个代码可以直接通过javascript获取而不用我教你编译)转换json代码,方便raw处理-参见thegooglescholarreader教程其中都用到了cookie来传递信息。 查看全部
nodejs抓取动态网页过程中采用数据包的方式压缩操作
nodejs抓取动态网页过程中采用数据包的方式压缩的数据。所以postgetputpatch都是从两个方面取数据包压缩解压操作。那么不同的方式带来的差异非常明显,首先客户端渲染全局控制图片的时候经常会带上屏幕图片(这个正常不可控,自己优化),然后全局控制带来的问题是不能对querystring返回的数据进行任何编码(比如javascript)。
querystring没法设置和编码。然后就是post的方式包走的是websocket,post操作当然可以保证数据不丢失(flash,flashplayer),然后包走websocket的话,会通过异步onsocket发送到远程,对远程的数据进行编码压缩解码,于是在渲染的时候就会有明显的问题,例如你的需求就是html代码片段拼成两张图片,压缩编码之后html代码数据量(2gb)增加了很多,还不如不压缩。
解决办法就是用python处理localstorage上的数据(不存在post)转换成websocket压缩数据,然后处理成完整的静态页面。
-谢邀。针对这个问题,本人在某些情况下用google,但必须要有分析和使用过程。首先获取过程可能需要几个步骤:分析googlescholar服务器上各论文的图片brief(例如html标签或者你自己定义的html代码)存储成文本txt文件存储成google提供的htmljson代码和js代码(这两个代码可以直接通过javascript获取而不用我教你编译)转换json代码,方便raw处理-参见thegooglescholarreader教程其中都用到了cookie来传递信息。
谷歌抓取动态网页代码步骤(一)_谷歌搜索
网站优化 • 优采云 发表了文章 • 0 个评论 • 81 次浏览 • 2022-07-21 05:01
nodejs抓取动态网页代码步骤1:进入网页所有的页面,并在dom上右键查看domelement,找到result,并点击add2:在result内部会发现neededfrom,而找到了android_game这个方法:此方法来源于谷歌搜索:android自定义工具的工作机制-google。我们从网上查找找到了以下几种方法:browsertoolbargoogle/androidnativeandroidstarter以及pkredurlcheck等等,要学习怎么编写android_game方法首先要了解关于android_game方法的概念:并列一下urlcheck方法的一些内容:至于怎么编写,这里只是简单写下不是很精确(因为不是专业的人写)。
创建工程搜索文档browsertoolbar,browser(浏览器),browsertoolbar,android_game,android_game是一个指令,在主工程contentprovider中创建。目前我通过用户控制台创建的:user_data_manager工程:在build.gradle文件中加入修改如下:{"template":{"platform":"android","plugins":["google_apk_source_resource"]}}生成resres需要存储在文件pages下,搜索资料问题来源于github,百度不到答案,去翻了开源项目jakexlove/monkey_example,参考后。
不过首先得在该项目名下建立工程,需要建立工程,重要说明,这只是个学习,上面这个仅仅是个学习,并不算项目主体,无论你用revit出具施工图也好,做一些其他小的插件也好,只要有详细文档设计与编写。此处为了阐述方便以及便于以后做工程项目。
1)点击开始建设,首先选择你的项目。如果你想自己做,也可以用github,
2)我选择模板点击从buildversion选择对应的版本名platform:不仅需要为cordova开发工程,
3)确定版本名googletemplate:apkbuildandroidx-developmentfilejakexlove/monkey_example
4)在platform下在文件目录创建cordova开发工程把以上文件打包成bundle.gradle
5)打包port指令给一个distutils,
6)登录你的branch:-added/port指令,这时进入nodejs,我使用git,也可以用yarn:bash/cdport添加了对port的调用,等待进度条下来就可以了。
7)创建example资源path目录
8)创建res存储template:在monkey_example/res目录创建example项目资源存储表及入口文件,也就是base.example模板文件,
9)创建actiontest:使用github,文档中的actiontest方法, 查看全部
谷歌抓取动态网页代码步骤(一)_谷歌搜索
nodejs抓取动态网页代码步骤1:进入网页所有的页面,并在dom上右键查看domelement,找到result,并点击add2:在result内部会发现neededfrom,而找到了android_game这个方法:此方法来源于谷歌搜索:android自定义工具的工作机制-google。我们从网上查找找到了以下几种方法:browsertoolbargoogle/androidnativeandroidstarter以及pkredurlcheck等等,要学习怎么编写android_game方法首先要了解关于android_game方法的概念:并列一下urlcheck方法的一些内容:至于怎么编写,这里只是简单写下不是很精确(因为不是专业的人写)。
创建工程搜索文档browsertoolbar,browser(浏览器),browsertoolbar,android_game,android_game是一个指令,在主工程contentprovider中创建。目前我通过用户控制台创建的:user_data_manager工程:在build.gradle文件中加入修改如下:{"template":{"platform":"android","plugins":["google_apk_source_resource"]}}生成resres需要存储在文件pages下,搜索资料问题来源于github,百度不到答案,去翻了开源项目jakexlove/monkey_example,参考后。
不过首先得在该项目名下建立工程,需要建立工程,重要说明,这只是个学习,上面这个仅仅是个学习,并不算项目主体,无论你用revit出具施工图也好,做一些其他小的插件也好,只要有详细文档设计与编写。此处为了阐述方便以及便于以后做工程项目。
1)点击开始建设,首先选择你的项目。如果你想自己做,也可以用github,
2)我选择模板点击从buildversion选择对应的版本名platform:不仅需要为cordova开发工程,
3)确定版本名googletemplate:apkbuildandroidx-developmentfilejakexlove/monkey_example
4)在platform下在文件目录创建cordova开发工程把以上文件打包成bundle.gradle
5)打包port指令给一个distutils,
6)登录你的branch:-added/port指令,这时进入nodejs,我使用git,也可以用yarn:bash/cdport添加了对port的调用,等待进度条下来就可以了。
7)创建example资源path目录
8)创建res存储template:在monkey_example/res目录创建example项目资源存储表及入口文件,也就是base.example模板文件,
9)创建actiontest:使用github,文档中的actiontest方法,
动态网页一般用动态化不太好,先用lazyload吗?
网站优化 • 优采云 发表了文章 • 0 个评论 • 56 次浏览 • 2022-07-08 06:02
nodejs抓取动态网页一般用动态化前端框架比如requirejs,async/await+lazyload等,后端一般用for循环。如果动态化不太好,先用lazyload方法,
javascript也是程序,
为什么不能是javascript,调用lazyload来分析抓取的内容呢。
可以用一个lazyload的库lazyload
可以试试momentjs里面有一个user.html,可以用普通的html页面的代码调用动态的html页面。并且支持直接分析出body的dom和htmlfooter的img属性值。应该是可以的。
不是用js实现,动态html的编写,建议用动态代理,用asyncawait吧。
动态代理。vue.js是可以用动态代理,express和angular2也可以用动态代理如果觉得不放心。
首先我想说,我要是没记错第三方的也是没有registeranotherwebapplicationservice功能的啊。如果是在其他application里面用动态代理来调取动态的页面肯定是行不通的。其次,如果只是想要一个js引擎实现这些,也不要用第三方库,直接for或者iife都可以。
你用angular2吗?可以用uiwebview加lazyload
调用api可以获取。apimutation中也有一些基础promise。 查看全部
动态网页一般用动态化不太好,先用lazyload吗?
nodejs抓取动态网页一般用动态化前端框架比如requirejs,async/await+lazyload等,后端一般用for循环。如果动态化不太好,先用lazyload方法,
javascript也是程序,
为什么不能是javascript,调用lazyload来分析抓取的内容呢。
可以用一个lazyload的库lazyload
可以试试momentjs里面有一个user.html,可以用普通的html页面的代码调用动态的html页面。并且支持直接分析出body的dom和htmlfooter的img属性值。应该是可以的。
不是用js实现,动态html的编写,建议用动态代理,用asyncawait吧。
动态代理。vue.js是可以用动态代理,express和angular2也可以用动态代理如果觉得不放心。
首先我想说,我要是没记错第三方的也是没有registeranotherwebapplicationservice功能的啊。如果是在其他application里面用动态代理来调取动态的页面肯定是行不通的。其次,如果只是想要一个js引擎实现这些,也不要用第三方库,直接for或者iife都可以。
你用angular2吗?可以用uiwebview加lazyload
调用api可以获取。apimutation中也有一些基础promise。
这⼀次彻底弄懂:React 服务端渲染
网站优化 • 优采云 发表了文章 • 0 个评论 • 139 次浏览 • 2022-07-01 13:17
本文字数:21279字
预计阅读时间:54分钟
1、前言
在前端项目需要首屏渲染速度优化或SEO的场景下,大家或多或少都听过到过服务端渲染( SSR ),但大多数人对服务端渲染具体实现和底层原理还是比较陌生的。本文基于公司官网开发时做了服务端渲染改造基础上,系统理解和梳理这套体系的模式和逻辑,并写了一些笔记和Demo(文后链接)便于深入理解。这次我们来以React为例,把服务端渲染彻底讲弄明白。本文主要有以下内容:
1.1 什么是服务端渲染?
服务端渲染, SSR (Server-side Rendering) ,顾名思义,就是在浏览器发起页面请求后由服务端完成页面的HTML结构拼接,返回给浏览器解析后能直接构建出有内容的页面。
用 node 实现一个简单的 SSR
我们使用Koa框架来创建node服务:
// demo1<br />var Koa = require("koa");<br />var app = new Koa();<br /><br />// 对于任何请求,app将调用该函数处理请求:<br />app.use(async (ctx) => {<br /> // 将HTML字符串直接返回 <br /> ctx.body = `<br /> <br /> <br /> ssr<br /> <br /> <br /> <br /> hello server<br /> <p>word<br /> <br /> <br /> `;<br />});<br />//监听<br />app.listen(3001, () => {<br /> console.log("listen on 3001 port!");<br />});<br /></p>
启动服务后访问页面,查看网页源代码是这样:
npx create-react-app my-app<br />
上面的例子就是一个简单的服务端渲染,其服务侧直接输出了有内容的HTML,浏览器解析之后就能渲染出页面。与服务端渲染对应的是客户端渲染 ,CSR(Client Side Rendering),通俗的讲就是由客户端完成页面的渲染。其大致渲染流程是这样:在浏览器请求页面时,服务端先返回一个无具体内容的HTML,浏览器还需要再加载并执行JS,动态地将内容和数据渲染到页面中,才能完成页面具体内容的显示。目前主流的React ,Vue, Angular 等SPA页面未经特殊处理均采用客户端渲染。最常见脚手架create-react-app 生成的项目就是客户端渲染:
上面采用客户端渲染的HTML页面中中无内容,需在浏览器端加载并执行bundle.js后才能构建出有内容页面。
1.2 为什么用服务端渲染?1.2.1 服务端渲染的优势
相比于客户端渲染,服务端渲染有什么优势?我们可以从下图对比一下这两种不同的渲染模式。
首屏时间更短
采用客户端渲染的页面,要进行JS文件拉取和JS代码执行,动态创建 DOM 结构,客户端逻辑越重,初始化需要执行的 JS 越多,首屏性能就越慢;客户端渲染前置的第三方类库/框架、polyfill 等都会在一定程度上拖慢首屏性能。Code splitting、lazy-load等优化措施能够缓解一部分,但优化空间相对有限。相比而言,服务端渲染的页面直接拉取HTMl就能显示内容,更短的首屏时间创造更多的可能性。
利于SEO
在别人使用搜索引擎搜索相关的内容时,你的网页排行能靠得更前,这样你的流量就有越高,这就是SEO的意义所在。那为什么服务端渲染更利于爬虫爬你的页面呢?因为对于很多搜索引擎爬虫(非google)HTML返回是什么内容就爬什么内容,而不会动态执行JS代码内容。对客户端渲染的页面来说,简直无能为力,因为返回的HTML是一个空壳。而服务端渲染返回的HTML是有内容的。
SSR的出现,就是为了解决这些CSR的弊端。
1.2.2 权衡使用服务端渲染
并不是所有的WEB应用都必须使用SSR,这需要开发者来权衡,因为服务端渲染会带来以下问题:
代码复杂度增加。为了实现服务端渲染,应用代码中需要兼容服务端和客户端两种运行情况,部分代码只能在客户端运行,需要对其进行特殊处理,才能在服务器渲染应用程序中运行。
需要更多的服务器资源。由于服务器增加了渲染HTML的需求,使得原本只需要输出静态资源文件的nodejs服务,新增了数据获取的IO和渲染HTML的CPU占用,如果流量突然暴增,有可能导致服务器宕机,因此需要使用响应的缓存策略和准备相应的服务器负载。
涉及构建设置和部署的更多要求。与可以部署在任何静态文件服务器上的完全静态单页面应用程序 (SPA) 不同,服务器渲染应用程序,需要处于 Node.js server 运行环境。
因此,在使用服务端渲染SSR之前,需要考虑投入产出比:是否真的需要SEO,是否需要将首屏时间提升到极致。如果都没有,使用SSR反而小题大做了。
1.3 服务端渲染的发展史
其实服务端渲染并不是什么新奇的概念,前后端分层之前很长的一段时间里都是以服务端渲染为主(JSP、PHP),那时后端一把梭哈,在服务端生成完整的 HTML 页面。但那时的服务端渲染和现在还是有本质的区别,存在比较多的弊端,每一个请求都要动态生成HTML,存在大量的重复,服务器机器成本也相对比较高,前后端代码完全掺杂在一起,开发维护难。
随着业务不断发展变化,后端要写的JS逻辑也越发复杂,而且JS有很多潜在的坑使后端越发觉得这是块烫手山芋,于是逐渐出现了前后端分层。伴随AJAX的兴起,浏览器可以做到了不再重现请求页面就可更新局部视图。还可以利用客户端免费的计算资源,后端侧逐渐演变成了提供数据支持。jquery的兴起,良好的客户端兼容性使JS不再受困于各种版本浏览器兼容问题,一统了前端天下。
此后伴随node的兴起,前后端分离越演越烈。前端能摆脱后端的依赖单独起服务,三大框架vue,react,angular也迅势崛起,以操作数据就能更新视图,前端开发人员逐渐摆脱了与烦人的Dom操作打交道,能够专心的关注业务和数据逻辑。前端同时探索出了功能插件,UI库,组件等多种代码复用方案,形成了繁荣的前端生态。
但是三大框架采用客户端渲染模式,随着代码逻辑的加重,首屏时间成了一个很大的问题,同时开发人员也发现SEO也出了问题,大多搜索引擎根本不会去执行JS代码。但是也不可能再回头走老路,于是前端又探索出了一套服务端渲染的框架来解决掉这些问题。此时的服务端渲染是建立在成熟的组组件,模块生态之上,基于Node.js的同构方案成为最佳实践。
2、React服务端渲染的原理
2.1基本思路
React服务端渲染流程
React服务端渲染的基本思路,简单理解就是将组件或页面通过服务器生成html字符串,再发送到浏览器,最后将静态标记"混合"为客户端上完全交互的应用程序。因为要考虑React在服务端的运行情况,故相比之前讲的多了在浏览器端绑定状态与事件的过程。
我们可以结合下面的流程图来一览完整的 React服务端渲染的全貌:当浏览器去请求一个页面,前端服务器端接收到请求并执行 React组件代码,此时React代码中可能包含向后端服务器发起请求,待请求完成返回的数据后,前端服务器组装好有内容的HTML里返给浏览器,浏览器解析HTML后已具备展示内容,但页面并不具备交互能力。
下一阶段,在返回的HTMl中还有script链接,浏览器再拉取JS并执行其包含的React 代码,其能在浏览器端执行完整的生命周期,并通过相关API实现复用此前返回 HTML节点并添加事件的绑定,此时页面才就具备完全交互能力。总的来说,react服务端渲染包含有两个过程:服务端渲染 + 客户端 hydrate 渲染。服务端渲染在服务端渲染出了首屏内容;客户端 hydrate 渲染复用服务端返回的节点,进行一次类似于 render 的 hydrate 渲染过程,把交互事件绑上去(此时页面可交互),并接管页面。
服务端处理后返回的
客户端“浸泡”还原后的
核心思想(同构)
从上面的流程中可以看到,客户端和服务端都要执行React代码完成渲染,那是不是就要写两份代码,供双端使用? 当然不需要,也完全不合理。所谓同构,就是让一份React代码,既可以在服务端中执行,也可以在客户端中执行。
SSR技术栈
我们这里简单理了一下服务端渲染涉及到的技术栈:
知道了服务端渲染、同构的大概思路之后,下面从头开始,一步一步完成具体实践,深入理解其原理。
2.2 服务端如何渲染React组件?
按照之前流程的大概思路,我们首先需要将React组件在服务端转换成HTML字符串,那怎么做呢?React 提供的面向服务端的API(react-dom/server),提供了相关方法能够将 React 组件渲染成静态的(HTML)标签。下面我们简单了解下react-dom/server。
react-dom/server
react-dom/server有renderToString、renderToStaticMarkup,renderToNodeStream、renderToStaticNodeStream四个方法能够将 React 组件渲染成静态的(HTML)标签,前两者能在客户端和服务端运行,后两者只能在服务端运行。
renderToStaticMarkup VS renderToString:renderToString 方法会在 React 内部创建的额外 DOM 属性,例如 data-reactroot, 在相邻文本节点之间生成,这些属性是客户端执行hydrate复用节点的关键所在,data-reactroot属性是服务端渲染的标志之一。如果你希望把 React 当作静态页面生成器来使用,renderToStaticMarkup方法会非常有用,因为去除额外的属性可以节省一些字节。
// Home.jsx<br style="white-space:pre-wrap;margin: 0px;padding: 0px;max-width: 100%;overflow-wrap: break-word !important;box-sizing: border-box !important;color: rgb(171, 178, 191);font-family: "Operator Mono", Consolas, Monaco, Menlo, monospace;font-size: 12px;font-style: normal;font-variant-ligatures: normal;font-variant-caps: normal;font-weight: 400;letter-spacing: normal;orphans: 2;text-align: left;text-indent: 0px;text-transform: none;widows: 2;word-spacing: 0px;-webkit-text-stroke-width: 0px;text-decoration-thickness: initial;text-decoration-style: initial;text-decoration-color: initial;" />import React from "react";<br style="white-space:pre-wrap;margin: 0px;padding: 0px;max-width: 100%;overflow-wrap: break-word !important;box-sizing: border-box !important;color: rgb(171, 178, 191);font-family: "Operator Mono", Consolas, Monaco, Menlo, monospace;font-size: 12px;font-style: normal;font-variant-ligatures: normal;font-variant-caps: normal;font-weight: 400;letter-spacing: normal;orphans: 2;text-align: left;text-indent: 0px;text-transform: none;widows: 2;word-spacing: 0px;-webkit-text-stroke-width: 0px;text-decoration-thickness: initial;text-decoration-style: initial;text-decoration-color: initial;" />const Home = () => {<br style="white-space:pre-wrap;margin: 0px;padding: 0px;max-width: 100%;overflow-wrap: break-word !important;box-sizing: border-box !important;color: rgb(171, 178, 191);font-family: "Operator Mono", Consolas, Monaco, Menlo, monospace;font-size: 12px;font-style: normal;font-variant-ligatures: normal;font-variant-caps: normal;font-weight: 400;letter-spacing: normal;orphans: 2;text-align: left;text-indent: 0px;text-transform: none;widows: 2;word-spacing: 0px;-webkit-text-stroke-width: 0px;text-decoration-thickness: initial;text-decoration-style: initial;text-decoration-color: initial;" /> return (<br style="white-space:pre-wrap;margin: 0px;padding: 0px;max-width: 100%;overflow-wrap: break-word !important;box-sizing: border-box !important;color: rgb(171, 178, 191);font-family: "Operator Mono", Consolas, Monaco, Menlo, monospace;font-size: 12px;font-style: normal;font-variant-ligatures: normal;font-variant-caps: normal;font-weight: 400;letter-spacing: normal;orphans: 2;text-align: left;text-indent: 0px;text-transform: none;widows: 2;word-spacing: 0px;-webkit-text-stroke-width: 0px;text-decoration-thickness: initial;text-decoration-style: initial;text-decoration-color: initial;" /> <br style="white-space:pre-wrap;margin: 0px;padding: 0px;max-width: 100%;overflow-wrap: break-word !important;box-sizing: border-box !important;color: rgb(171, 178, 191);font-family: "Operator Mono", Consolas, Monaco, Menlo, monospace;font-size: 12px;font-style: normal;font-variant-ligatures: normal;font-variant-caps: normal;font-weight: 400;letter-spacing: normal;orphans: 2;text-align: left;text-indent: 0px;text-transform: none;widows: 2;word-spacing: 0px;-webkit-text-stroke-width: 0px;text-decoration-thickness: initial;text-decoration-style: initial;text-decoration-color: initial;" /> console.log("hello")}>This is Home Page<br style="white-space:pre-wrap;margin: 0px;padding: 0px;max-width: 100%;overflow-wrap: break-word !important;box-sizing: border-box !important;color: rgb(171, 178, 191);font-family: "Operator Mono", Consolas, Monaco, Menlo, monospace;font-size: 12px;font-style: normal;font-variant-ligatures: normal;font-variant-caps: normal;font-weight: 400;letter-spacing: normal;orphans: 2;text-align: left;text-indent: 0px;text-transform: none;widows: 2;word-spacing: 0px;-webkit-text-stroke-width: 0px;text-decoration-thickness: initial;text-decoration-style: initial;text-decoration-color: initial;" /> <p>Home is the page ..... more discribe<br style="white-space:pre-wrap;margin: 0px;padding: 0px;max-width: 100%;overflow-wrap: break-word !important;box-sizing: border-box !important;color: rgb(171, 178, 191);font-family: "Operator Mono", Consolas, Monaco, Menlo, monospace;font-size: 12px;font-style: normal;font-variant-ligatures: normal;font-variant-caps: normal;font-weight: 400;letter-spacing: normal;orphans: 2;text-align: left;text-indent: 0px;text-transform: none;widows: 2;word-spacing: 0px;-webkit-text-stroke-width: 0px;text-decoration-thickness: initial;text-decoration-style: initial;text-decoration-color: initial;" /> <br style="white-space:pre-wrap;margin: 0px;padding: 0px;max-width: 100%;overflow-wrap: break-word !important;box-sizing: border-box !important;color: rgb(171, 178, 191);font-family: "Operator Mono", Consolas, Monaco, Menlo, monospace;font-size: 12px;font-style: normal;font-variant-ligatures: normal;font-variant-caps: normal;font-weight: 400;letter-spacing: normal;orphans: 2;text-align: left;text-indent: 0px;text-transform: none;widows: 2;word-spacing: 0px;-webkit-text-stroke-width: 0px;text-decoration-thickness: initial;text-decoration-style: initial;text-decoration-color: initial;" /> );<br style="white-space:pre-wrap;margin: 0px;padding: 0px;max-width: 100%;overflow-wrap: break-word !important;box-sizing: border-box !important;color: rgb(171, 178, 191);font-family: "Operator Mono", Consolas, Monaco, Menlo, monospace;font-size: 12px;font-style: normal;font-variant-ligatures: normal;font-variant-caps: normal;font-weight: 400;letter-spacing: normal;orphans: 2;text-align: left;text-indent: 0px;text-transform: none;widows: 2;word-spacing: 0px;-webkit-text-stroke-width: 0px;text-decoration-thickness: initial;text-decoration-style: initial;text-decoration-color: initial;" />};<br style="white-space:pre-wrap;margin: 0px;padding: 0px;max-width: 100%;overflow-wrap: break-word !important;box-sizing: border-box !important;color: rgb(171, 178, 191);font-family: "Operator Mono", Consolas, Monaco, Menlo, monospace;font-size: 12px;font-style: normal;font-variant-ligatures: normal;font-variant-caps: normal;font-weight: 400;letter-spacing: normal;orphans: 2;text-align: left;text-indent: 0px;text-transform: none;widows: 2;word-spacing: 0px;-webkit-text-stroke-width: 0px;text-decoration-thickness: initial;text-decoration-style: initial;text-decoration-color: initial;" />export default Home;</p>
我们使用React-dom/server下提供的renderToString方法,在服务端将其转换为html字符串:
// server.js<br />import Koa from "koa";<br />import React from "react";<br />import { renderToString } from "react-dom/server";<br />import Home from "./containers/Home";<br /><br />const app = new Koa();<br />app.use(async (ctx) => {<br /> // 核心api renderToString 将react组件转化成html字符串<br /> const content = renderToString();<br /> ctx.body = `<br /> <br /> <br /> ssr<br /> <br /> <br /> ${content}<br /> <br /> <br /> `;<br />});<br />app.listen(3002, () => {<br /> console.log("listen:3002");<br />});<br />
可以看到上面代码里有ES6的import 和jsx语法,不能直接运行在node环境,需要借助webpack打包, 构建目标是commonjs。新建webpack.server.js具体配置如下:
// webpack.server.js<br style="white-space:pre-wrap;margin: 0px;padding: 0px;max-width: 100%;overflow-wrap: break-word !important;box-sizing: border-box !important;color: rgb(171, 178, 191);font-family: "Operator Mono", Consolas, Monaco, Menlo, monospace;font-size: 12px;font-style: normal;font-variant-ligatures: normal;font-variant-caps: normal;font-weight: 400;letter-spacing: normal;orphans: 2;text-align: left;text-indent: 0px;text-transform: none;widows: 2;word-spacing: 0px;-webkit-text-stroke-width: 0px;text-decoration-thickness: initial;text-decoration-style: initial;text-decoration-color: initial;" />const path = require("path");<br style="white-space:pre-wrap;margin: 0px;padding: 0px;max-width: 100%;overflow-wrap: break-word !important;box-sizing: border-box !important;color: rgb(171, 178, 191);font-family: "Operator Mono", Consolas, Monaco, Menlo, monospace;font-size: 12px;font-style: normal;font-variant-ligatures: normal;font-variant-caps: normal;font-weight: 400;letter-spacing: normal;orphans: 2;text-align: left;text-indent: 0px;text-transform: none;widows: 2;word-spacing: 0px;-webkit-text-stroke-width: 0px;text-decoration-thickness: initial;text-decoration-style: initial;text-decoration-color: initial;" />const nodeExternals = require("webpack-node-externals");<br style="white-space:pre-wrap;margin: 0px;padding: 0px;max-width: 100%;overflow-wrap: break-word !important;box-sizing: border-box !important;color: rgb(171, 178, 191);font-family: "Operator Mono", Consolas, Monaco, Menlo, monospace;font-size: 12px;font-style: normal;font-variant-ligatures: normal;font-variant-caps: normal;font-weight: 400;letter-spacing: normal;orphans: 2;text-align: left;text-indent: 0px;text-transform: none;widows: 2;word-spacing: 0px;-webkit-text-stroke-width: 0px;text-decoration-thickness: initial;text-decoration-style: initial;text-decoration-color: initial;" />module.exports = {<br style="white-space:pre-wrap;margin: 0px;padding: 0px;max-width: 100%;overflow-wrap: break-word !important;box-sizing: border-box !important;color: rgb(171, 178, 191);font-family: "Operator Mono", Consolas, Monaco, Menlo, monospace;font-size: 12px;font-style: normal;font-variant-ligatures: normal;font-variant-caps: normal;font-weight: 400;letter-spacing: normal;orphans: 2;text-align: left;text-indent: 0px;text-transform: none;widows: 2;word-spacing: 0px;-webkit-text-stroke-width: 0px;text-decoration-thickness: initial;text-decoration-style: initial;text-decoration-color: initial;" /> mode: "development",<br style="white-space:pre-wrap;margin: 0px;padding: 0px;max-width: 100%;overflow-wrap: break-word !important;box-sizing: border-box !important;color: rgb(171, 178, 191);font-family: "Operator Mono", Consolas, Monaco, Menlo, monospace;font-size: 12px;font-style: normal;font-variant-ligatures: normal;font-variant-caps: normal;font-weight: 400;letter-spacing: normal;orphans: 2;text-align: left;text-indent: 0px;text-transform: none;widows: 2;word-spacing: 0px;-webkit-text-stroke-width: 0px;text-decoration-thickness: initial;text-decoration-style: initial;text-decoration-color: initial;" /> target: "node",<br style="white-space:pre-wrap;margin: 0px;padding: 0px;max-width: 100%;overflow-wrap: break-word !important;box-sizing: border-box !important;color: rgb(171, 178, 191);font-family: "Operator Mono", Consolas, Monaco, Menlo, monospace;font-size: 12px;font-style: normal;font-variant-ligatures: normal;font-variant-caps: normal;font-weight: 400;letter-spacing: normal;orphans: 2;text-align: left;text-indent: 0px;text-transform: none;widows: 2;word-spacing: 0px;-webkit-text-stroke-width: 0px;text-decoration-thickness: initial;text-decoration-style: initial;text-decoration-color: initial;" /> entry: "./server.js",<br style="white-space:pre-wrap;margin: 0px;padding: 0px;max-width: 100%;overflow-wrap: break-word !important;box-sizing: border-box !important;color: rgb(171, 178, 191);font-family: "Operator Mono", Consolas, Monaco, Menlo, monospace;font-size: 12px;font-style: normal;font-variant-ligatures: normal;font-variant-caps: normal;font-weight: 400;letter-spacing: normal;orphans: 2;text-align: left;text-indent: 0px;text-transform: none;widows: 2;word-spacing: 0px;-webkit-text-stroke-width: 0px;text-decoration-thickness: initial;text-decoration-style: initial;text-decoration-color: initial;" /> resolve: {<br style="white-space:pre-wrap;margin: 0px;padding: 0px;max-width: 100%;overflow-wrap: break-word !important;box-sizing: border-box !important;color: rgb(171, 178, 191);font-family: "Operator Mono", Consolas, Monaco, Menlo, monospace;font-size: 12px;font-style: normal;font-variant-ligatures: normal;font-variant-caps: normal;font-weight: 400;letter-spacing: normal;orphans: 2;text-align: left;text-indent: 0px;text-transform: none;widows: 2;word-spacing: 0px;-webkit-text-stroke-width: 0px;text-decoration-thickness: initial;text-decoration-style: initial;text-decoration-color: initial;" /> extensions: [".jsx", ".js", ".tsx", ".ts"],<br style="white-space:pre-wrap;margin: 0px;padding: 0px;max-width: 100%;overflow-wrap: break-word !important;box-sizing: border-box !important;color: rgb(171, 178, 191);font-family: "Operator Mono", Consolas, Monaco, Menlo, monospace;font-size: 12px;font-style: normal;font-variant-ligatures: normal;font-variant-caps: normal;font-weight: 400;letter-spacing: normal;orphans: 2;text-align: left;text-indent: 0px;text-transform: none;widows: 2;word-spacing: 0px;-webkit-text-stroke-width: 0px;text-decoration-thickness: initial;text-decoration-style: initial;text-decoration-color: initial;" /> },<br style="white-space:pre-wrap;margin: 0px;padding: 0px;max-width: 100%;overflow-wrap: break-word !important;box-sizing: border-box !important;color: rgb(171, 178, 191);font-family: "Operator Mono", Consolas, Monaco, Menlo, monospace;font-size: 12px;font-style: normal;font-variant-ligatures: normal;font-variant-caps: normal;font-weight: 400;letter-spacing: normal;orphans: 2;text-align: left;text-indent: 0px;text-transform: none;widows: 2;word-spacing: 0px;-webkit-text-stroke-width: 0px;text-decoration-thickness: initial;text-decoration-style: initial;text-decoration-color: initial;" /> module: {<br style="white-space:pre-wrap;margin: 0px;padding: 0px;max-width: 100%;overflow-wrap: break-word !important;box-sizing: border-box !important;color: rgb(171, 178, 191);font-family: "Operator Mono", Consolas, Monaco, Menlo, monospace;font-size: 12px;font-style: normal;font-variant-ligatures: normal;font-variant-caps: normal;font-weight: 400;letter-spacing: normal;orphans: 2;text-align: left;text-indent: 0px;text-transform: none;widows: 2;word-spacing: 0px;-webkit-text-stroke-width: 0px;text-decoration-thickness: initial;text-decoration-style: initial;text-decoration-color: initial;" /> rules: [<br style="white-space:pre-wrap;margin: 0px;padding: 0px;max-width: 100%;overflow-wrap: break-word !important;box-sizing: border-box !important;color: rgb(171, 178, 191);font-family: "Operator Mono", Consolas, Monaco, Menlo, monospace;font-size: 12px;font-style: normal;font-variant-ligatures: normal;font-variant-caps: normal;font-weight: 400;letter-spacing: normal;orphans: 2;text-align: left;text-indent: 0px;text-transform: none;widows: 2;word-spacing: 0px;-webkit-text-stroke-width: 0px;text-decoration-thickness: initial;text-decoration-style: initial;text-decoration-color: initial;" /> {<br style="white-space:pre-wrap;margin: 0px;padding: 0px;max-width: 100%;overflow-wrap: break-word !important;box-sizing: border-box !important;color: rgb(171, 178, 191);font-family: "Operator Mono", Consolas, Monaco, Menlo, monospace;font-size: 12px;font-style: normal;font-variant-ligatures: normal;font-variant-caps: normal;font-weight: 400;letter-spacing: normal;orphans: 2;text-align: left;text-indent: 0px;text-transform: none;widows: 2;word-spacing: 0px;-webkit-text-stroke-width: 0px;text-decoration-thickness: initial;text-decoration-style: initial;text-decoration-color: initial;" /> test: /\.jsx?$/,<br style="white-space:pre-wrap;margin: 0px;padding: 0px;max-width: 100%;overflow-wrap: break-word !important;box-sizing: border-box !important;color: rgb(171, 178, 191);font-family: "Operator Mono", Consolas, Monaco, Menlo, monospace;font-size: 12px;font-style: normal;font-variant-ligatures: normal;font-variant-caps: normal;font-weight: 400;letter-spacing: normal;orphans: 2;text-align: left;text-indent: 0px;text-transform: none;widows: 2;word-spacing: 0px;-webkit-text-stroke-width: 0px;text-decoration-thickness: initial;text-decoration-style: initial;text-decoration-color: initial;" /> loader: "babel-loader",<br style="white-space:pre-wrap;margin: 0px;padding: 0px;max-width: 100%;overflow-wrap: break-word !important;box-sizing: border-box !important;color: rgb(171, 178, 191);font-family: "Operator Mono", Consolas, Monaco, Menlo, monospace;font-size: 12px;font-style: normal;font-variant-ligatures: normal;font-variant-caps: normal;font-weight: 400;letter-spacing: normal;orphans: 2;text-align: left;text-indent: 0px;text-transform: none;widows: 2;word-spacing: 0px;-webkit-text-stroke-width: 0px;text-decoration-thickness: initial;text-decoration-style: initial;text-decoration-color: initial;" /> exclude: /node_modules/,<br style="white-space:pre-wrap;margin: 0px;padding: 0px;max-width: 100%;overflow-wrap: break-word !important;box-sizing: border-box !important;color: rgb(171, 178, 191);font-family: "Operator Mono", Consolas, Monaco, Menlo, monospace;font-size: 12px;font-style: normal;font-variant-ligatures: normal;font-variant-caps: normal;font-weight: 400;letter-spacing: normal;orphans: 2;text-align: left;text-indent: 0px;text-transform: none;widows: 2;word-spacing: 0px;-webkit-text-stroke-width: 0px;text-decoration-thickness: initial;text-decoration-style: initial;text-decoration-color: initial;" /> options: {<br style="white-space:pre-wrap;margin: 0px;padding: 0px;max-width: 100%;overflow-wrap: break-word !important;box-sizing: border-box !important;color: rgb(171, 178, 191);font-family: "Operator Mono", Consolas, Monaco, Menlo, monospace;font-size: 12px;font-style: normal;font-variant-ligatures: normal;font-variant-caps: normal;font-weight: 400;letter-spacing: normal;orphans: 2;text-align: left;text-indent: 0px;text-transform: none;widows: 2;word-spacing: 0px;-webkit-text-stroke-width: 0px;text-decoration-thickness: initial;text-decoration-style: initial;text-decoration-color: initial;" /> presets: ["@babel/preset-react", "@babel/preset-env"],<br style="white-space:pre-wrap;margin: 0px;padding: 0px;max-width: 100%;overflow-wrap: break-word !important;box-sizing: border-box !important;color: rgb(171, 178, 191);font-family: "Operator Mono", Consolas, Monaco, Menlo, monospace;font-size: 12px;font-style: normal;font-variant-ligatures: normal;font-variant-caps: normal;font-weight: 400;letter-spacing: normal;orphans: 2;text-align: left;text-indent: 0px;text-transform: none;widows: 2;word-spacing: 0px;-webkit-text-stroke-width: 0px;text-decoration-thickness: initial;text-decoration-style: initial;text-decoration-color: initial;" /> plugins: [<br style="white-space:pre-wrap;margin: 0px;padding: 0px;max-width: 100%;overflow-wrap: break-word !important;box-sizing: border-box !important;color: rgb(171, 178, 191);font-family: "Operator Mono", Consolas, Monaco, Menlo, monospace;font-size: 12px;font-style: normal;font-variant-ligatures: normal;font-variant-caps: normal;font-weight: 400;letter-spacing: normal;orphans: 2;text-align: left;text-indent: 0px;text-transform: none;widows: 2;word-spacing: 0px;-webkit-text-stroke-width: 0px;text-decoration-thickness: initial;text-decoration-style: initial;text-decoration-color: initial;" /> [<br style="white-space:pre-wrap;margin: 0px;padding: 0px;max-width: 100%;overflow-wrap: break-word !important;box-sizing: border-box !important;color: rgb(171, 178, 191);font-family: "Operator Mono", Consolas, Monaco, Menlo, monospace;font-size: 12px;font-style: normal;font-variant-ligatures: normal;font-variant-caps: normal;font-weight: 400;letter-spacing: normal;orphans: 2;text-align: left;text-indent: 0px;text-transform: none;widows: 2;word-spacing: 0px;-webkit-text-stroke-width: 0px;text-decoration-thickness: initial;text-decoration-style: initial;text-decoration-color: initial;" /> "@babel/plugin-transform-runtime",<br style="white-space:pre-wrap;margin: 0px;padding: 0px;max-width: 100%;overflow-wrap: break-word !important;box-sizing: border-box !important;color: rgb(171, 178, 191);font-family: "Operator Mono", Consolas, Monaco, Menlo, monospace;font-size: 12px;font-style: normal;font-variant-ligatures: normal;font-variant-caps: normal;font-weight: 400;letter-spacing: normal;orphans: 2;text-align: left;text-indent: 0px;text-transform: none;widows: 2;word-spacing: 0px;-webkit-text-stroke-width: 0px;text-decoration-thickness: initial;text-decoration-style: initial;text-decoration-color: initial;" /> {<br style="white-space:pre-wrap;margin: 0px;padding: 0px;max-width: 100%;overflow-wrap: break-word !important;box-sizing: border-box !important;color: rgb(171, 178, 191);font-family: "Operator Mono", Consolas, Monaco, Menlo, monospace;font-size: 12px;font-style: normal;font-variant-ligatures: normal;font-variant-caps: normal;font-weight: 400;letter-spacing: normal;orphans: 2;text-align: left;text-indent: 0px;text-transform: none;widows: 2;word-spacing: 0px;-webkit-text-stroke-width: 0px;text-decoration-thickness: initial;text-decoration-style: initial;text-decoration-color: initial;" /> absoluteRuntime: false,<br style="white-space:pre-wrap;margin: 0px;padding: 0px;max-width: 100%;overflow-wrap: break-word !important;box-sizing: border-box !important;color: rgb(171, 178, 191);font-family: "Operator Mono", Consolas, Monaco, Menlo, monospace;font-size: 12px;font-style: normal;font-variant-ligatures: normal;font-variant-caps: normal;font-weight: 400;letter-spacing: normal;orphans: 2;text-align: left;text-indent: 0px;text-transform: none;widows: 2;word-spacing: 0px;-webkit-text-stroke-width: 0px;text-decoration-thickness: initial;text-decoration-style: initial;text-decoration-color: initial;" /> corejs: false,<br style="white-space:pre-wrap;margin: 0px;padding: 0px;max-width: 100%;overflow-wrap: break-word !important;box-sizing: border-box !important;color: rgb(171, 178, 191);font-family: "Operator Mono", Consolas, Monaco, Menlo, monospace;font-size: 12px;font-style: normal;font-variant-ligatures: normal;font-variant-caps: normal;font-weight: 400;letter-spacing: normal;orphans: 2;text-align: left;text-indent: 0px;text-transform: none;widows: 2;word-spacing: 0px;-webkit-text-stroke-width: 0px;text-decoration-thickness: initial;text-decoration-style: initial;text-decoration-color: initial;" /> helpers: true,<br style="white-space:pre-wrap;margin: 0px;padding: 0px;max-width: 100%;overflow-wrap: break-word !important;box-sizing: border-box !important;color: rgb(171, 178, 191);font-family: "Operator Mono", Consolas, Monaco, Menlo, monospace;font-size: 12px;font-style: normal;font-variant-ligatures: normal;font-variant-caps: normal;font-weight: 400;letter-spacing: normal;orphans: 2;text-align: left;text-indent: 0px;text-transform: none;widows: 2;word-spacing: 0px;-webkit-text-stroke-width: 0px;text-decoration-thickness: initial;text-decoration-style: initial;text-decoration-color: initial;" /> regenerator: true,<br style="white-space:pre-wrap;margin: 0px;padding: 0px;max-width: 100%;overflow-wrap: break-word !important;box-sizing: border-box !important;color: rgb(171, 178, 191);font-family: "Operator Mono", Consolas, Monaco, Menlo, monospace;font-size: 12px;font-style: normal;font-variant-ligatures: normal;font-variant-caps: normal;font-weight: 400;letter-spacing: normal;orphans: 2;text-align: left;text-indent: 0px;text-transform: none;widows: 2;word-spacing: 0px;-webkit-text-stroke-width: 0px;text-decoration-thickness: initial;text-decoration-style: initial;text-decoration-color: initial;" /> version: "7.0.0-beta.0",<br style="white-space:pre-wrap;margin: 0px;padding: 0px;max-width: 100%;overflow-wrap: break-word !important;box-sizing: border-box !important;color: rgb(171, 178, 191);font-family: "Operator Mono", Consolas, Monaco, Menlo, monospace;font-size: 12px;font-style: normal;font-variant-ligatures: normal;font-variant-caps: normal;font-weight: 400;letter-spacing: normal;orphans: 2;text-align: left;text-indent: 0px;text-transform: none;widows: 2;word-spacing: 0px;-webkit-text-stroke-width: 0px;text-decoration-thickness: initial;text-decoration-style: initial;text-decoration-color: initial;" /> },<br style="white-space:pre-wrap;margin: 0px;padding: 0px;max-width: 100%;overflow-wrap: break-word !important;box-sizing: border-box !important;color: rgb(171, 178, 191);font-family: "Operator Mono", Consolas, Monaco, Menlo, monospace;font-size: 12px;font-style: normal;font-variant-ligatures: normal;font-variant-caps: normal;font-weight: 400;letter-spacing: normal;orphans: 2;text-align: left;text-indent: 0px;text-transform: none;widows: 2;word-spacing: 0px;-webkit-text-stroke-width: 0px;text-decoration-thickness: initial;text-decoration-style: initial;text-decoration-color: initial;" /> ],<br style="white-space:pre-wrap;margin: 0px;padding: 0px;max-width: 100%;overflow-wrap: break-word !important;box-sizing: border-box !important;color: rgb(171, 178, 191);font-family: "Operator Mono", Consolas, Monaco, Menlo, monospace;font-size: 12px;font-style: normal;font-variant-ligatures: normal;font-variant-caps: normal;font-weight: 400;letter-spacing: normal;orphans: 2;text-align: left;text-indent: 0px;text-transform: none;widows: 2;word-spacing: 0px;-webkit-text-stroke-width: 0px;text-decoration-thickness: initial;text-decoration-style: initial;text-decoration-color: initial;" /> ],<br style="white-space:pre-wrap;margin: 0px;padding: 0px;max-width: 100%;overflow-wrap: break-word !important;box-sizing: border-box !important;color: rgb(171, 178, 191);font-family: "Operator Mono", Consolas, Monaco, Menlo, monospace;font-size: 12px;font-style: normal;font-variant-ligatures: normal;font-variant-caps: normal;font-weight: 400;letter-spacing: normal;orphans: 2;text-align: left;text-indent: 0px;text-transform: none;widows: 2;word-spacing: 0px;-webkit-text-stroke-width: 0px;text-decoration-thickness: initial;text-decoration-style: initial;text-decoration-color: initial;" /> },<br style="white-space:pre-wrap;margin: 0px;padding: 0px;max-width: 100%;overflow-wrap: break-word !important;box-sizing: border-box !important;color: rgb(171, 178, 191);font-family: "Operator Mono", Consolas, Monaco, Menlo, monospace;font-size: 12px;font-style: normal;font-variant-ligatures: normal;font-variant-caps: normal;font-weight: 400;letter-spacing: normal;orphans: 2;text-align: left;text-indent: 0px;text-transform: none;widows: 2;word-spacing: 0px;-webkit-text-stroke-width: 0px;text-decoration-thickness: initial;text-decoration-style: initial;text-decoration-color: initial;" /> },<br style="white-space:pre-wrap;margin: 0px;padding: 0px;max-width: 100%;overflow-wrap: break-word !important;box-sizing: border-box !important;color: rgb(171, 178, 191);font-family: "Operator Mono", Consolas, Monaco, Menlo, monospace;font-size: 12px;font-style: normal;font-variant-ligatures: normal;font-variant-caps: normal;font-weight: 400;letter-spacing: normal;orphans: 2;text-align: left;text-indent: 0px;text-transform: none;widows: 2;word-spacing: 0px;-webkit-text-stroke-width: 0px;text-decoration-thickness: initial;text-decoration-style: initial;text-decoration-color: initial;" /> ],<br style="white-space:pre-wrap;margin: 0px;padding: 0px;max-width: 100%;overflow-wrap: break-word !important;box-sizing: border-box !important;color: rgb(171, 178, 191);font-family: "Operator Mono", Consolas, Monaco, Menlo, monospace;font-size: 12px;font-style: normal;font-variant-ligatures: normal;font-variant-caps: normal;font-weight: 400;letter-spacing: normal;orphans: 2;text-align: left;text-indent: 0px;text-transform: none;widows: 2;word-spacing: 0px;-webkit-text-stroke-width: 0px;text-decoration-thickness: initial;text-decoration-style: initial;text-decoration-color: initial;" /> },<br style="white-space:pre-wrap;margin: 0px;padding: 0px;max-width: 100%;overflow-wrap: break-word !important;box-sizing: border-box !important;color: rgb(171, 178, 191);font-family: "Operator Mono", Consolas, Monaco, Menlo, monospace;font-size: 12px;font-style: normal;font-variant-ligatures: normal;font-variant-caps: normal;font-weight: 400;letter-spacing: normal;orphans: 2;text-align: left;text-indent: 0px;text-transform: none;widows: 2;word-spacing: 0px;-webkit-text-stroke-width: 0px;text-decoration-thickness: initial;text-decoration-style: initial;text-decoration-color: initial;" /> output: {<br style="white-space:pre-wrap;margin: 0px;padding: 0px;max-width: 100%;overflow-wrap: break-word !important;box-sizing: border-box !important;color: rgb(171, 178, 191);font-family: "Operator Mono", Consolas, Monaco, Menlo, monospace;font-size: 12px;font-style: normal;font-variant-ligatures: normal;font-variant-caps: normal;font-weight: 400;letter-spacing: normal;orphans: 2;text-align: left;text-indent: 0px;text-transform: none;widows: 2;word-spacing: 0px;-webkit-text-stroke-width: 0px;text-decoration-thickness: initial;text-decoration-style: initial;text-decoration-color: initial;" /> filename: "bundle.js",<br style="white-space:pre-wrap;margin: 0px;padding: 0px;max-width: 100%;overflow-wrap: break-word !important;box-sizing: border-box !important;color: rgb(171, 178, 191);font-family: "Operator Mono", Consolas, Monaco, Menlo, monospace;font-size: 12px;font-style: normal;font-variant-ligatures: normal;font-variant-caps: normal;font-weight: 400;letter-spacing: normal;orphans: 2;text-align: left;text-indent: 0px;text-transform: none;widows: 2;word-spacing: 0px;-webkit-text-stroke-width: 0px;text-decoration-thickness: initial;text-decoration-style: initial;text-decoration-color: initial;" /> path: path.resolve(__dirname, "build"),<br style="white-space:pre-wrap;margin: 0px;padding: 0px;max-width: 100%;overflow-wrap: break-word !important;box-sizing: border-box !important;color: rgb(171, 178, 191);font-family: "Operator Mono", Consolas, Monaco, Menlo, monospace;font-size: 12px;font-style: normal;font-variant-ligatures: normal;font-variant-caps: normal;font-weight: 400;letter-spacing: normal;orphans: 2;text-align: left;text-indent: 0px;text-transform: none;widows: 2;word-spacing: 0px;-webkit-text-stroke-width: 0px;text-decoration-thickness: initial;text-decoration-style: initial;text-decoration-color: initial;" /> },<br style="white-space:pre-wrap;margin: 0px;padding: 0px;max-width: 100%;overflow-wrap: break-word !important;box-sizing: border-box !important;color: rgb(171, 178, 191);font-family: "Operator Mono", Consolas, Monaco, Menlo, monospace;font-size: 12px;font-style: normal;font-variant-ligatures: normal;font-variant-caps: normal;font-weight: 400;letter-spacing: normal;orphans: 2;text-align: left;text-indent: 0px;text-transform: none;widows: 2;word-spacing: 0px;-webkit-text-stroke-width: 0px;text-decoration-thickness: initial;text-decoration-style: initial;text-decoration-color: initial;" /> externals: [nodeExternals()],<br style="white-space:pre-wrap;margin: 0px;padding: 0px;max-width: 100%;overflow-wrap: break-word !important;box-sizing: border-box !important;color: rgb(171, 178, 191);font-family: "Operator Mono", Consolas, Monaco, Menlo, monospace;font-size: 12px;font-style: normal;font-variant-ligatures: normal;font-variant-caps: normal;font-weight: 400;letter-spacing: normal;orphans: 2;text-align: left;text-indent: 0px;text-transform: none;widows: 2;word-spacing: 0px;-webkit-text-stroke-width: 0px;text-decoration-thickness: initial;text-decoration-style: initial;text-decoration-color: initial;" />};
在webpack构建完成后,可在Node环境运行build/bundle.js,访问页面后查看网页源代码,可以看到,React组件中的内容已经完整地包含在服务端返回到html里面。我们成功迈出了服务端渲染第一步。此时,我们也有必要再深入了解renderToString 到底做了什么,提前踩坑!
renderToString
除了将React组件转换成html字符串外,renderToString还有做了下面这些:
1. 会执行传入的React组件的代码,但是其只执行到React生命周期初始化过程的render及之前,即下面红框的部分,其余大部分生命周期函数在服务端都不执行;这也是服务端渲染的坑点之一。
2.renderToString 生成的产物中会包含一些额外生成特殊标记,代码体积会有所增大,其中属性data-reactroot是服务端渲染的标志,便于后续客户端通过hydrate复用HTML节点。在React16前后其产物也有差距:在React 16 之前,服务端渲染采用的是基于字符串校验和(string checksum)的 HTML 节点复用方式, 会额外生成生成data-reactid、data-react-checksum等属性;React 16 改用单节点校验来复用(服务端返回的)HTML 节点,不再生成data-reactid、data-react-checksum等体积占用大户,只在空白节点间多了 这样的标记。
renderToString react16前<br style="white-space:pre-wrap;margin: 0px;padding: 0px;max-width: 100%;overflow-wrap: break-word !important;box-sizing: border-box !important;color: rgb(171, 178, 191);font-family: "Operator Mono", Consolas, Monaco, Menlo, monospace;font-size: 12px;font-style: normal;font-variant-ligatures: normal;font-variant-caps: normal;font-weight: 400;letter-spacing: normal;orphans: 2;text-align: left;text-indent: 0px;text-transform: none;widows: 2;word-spacing: 0px;-webkit-text-stroke-width: 0px;text-decoration-thickness: initial;text-decoration-style: initial;text-decoration-color: initial;" /><br style="white-space:pre-wrap;margin: 0px;padding: 0px;max-width: 100%;overflow-wrap: break-word !important;box-sizing: border-box !important;color: rgb(171, 178, 191);font-family: "Operator Mono", Consolas, Monaco, Menlo, monospace;font-size: 12px;font-style: normal;font-variant-ligatures: normal;font-variant-caps: normal;font-weight: 400;letter-spacing: normal;orphans: 2;text-align: left;text-indent: 0px;text-transform: none;widows: 2;word-spacing: 0px;-webkit-text-stroke-width: 0px;text-decoration-thickness: initial;text-decoration-style: initial;text-decoration-color: initial;" /> Welcome to React SSR! <br style="white-space:pre-wrap;margin: 0px;padding: 0px;max-width: 100%;overflow-wrap: break-word !important;box-sizing: border-box !important;color: rgb(171, 178, 191);font-family: "Operator Mono", Consolas, Monaco, Menlo, monospace;font-size: 12px;font-style: normal;font-variant-ligatures: normal;font-variant-caps: normal;font-weight: 400;letter-spacing: normal;orphans: 2;text-align: left;text-indent: 0px;text-transform: none;widows: 2;word-spacing: 0px;-webkit-text-stroke-width: 0px;text-decoration-thickness: initial;text-decoration-style: initial;text-decoration-color: initial;" /> Hello There! <br style="white-space:pre-wrap;margin: 0px;padding: 0px;max-width: 100%;overflow-wrap: break-word !important;box-sizing: border-box !important;color: rgb(171, 178, 191);font-family: "Operator Mono", Consolas, Monaco, Menlo, monospace;font-size: 12px;font-style: normal;font-variant-ligatures: normal;font-variant-caps: normal;font-weight: 400;letter-spacing: normal;orphans: 2;text-align: left;text-indent: 0px;text-transform: none;widows: 2;word-spacing: 0px;-webkit-text-stroke-width: 0px;text-decoration-thickness: initial;text-decoration-style: initial;text-decoration-color: initial;" /><br style="white-space:pre-wrap;margin: 0px;padding: 0px;max-width: 100%;overflow-wrap: break-word !important;box-sizing: border-box !important;color: rgb(171, 178, 191);font-family: "Operator Mono", Consolas, Monaco, Menlo, monospace;font-size: 12px;font-style: normal;font-variant-ligatures: normal;font-variant-caps: normal;font-weight: 400;letter-spacing: normal;orphans: 2;text-align: left;text-indent: 0px;text-transform: none;widows: 2;word-spacing: 0px;-webkit-text-stroke-width: 0px;text-decoration-thickness: initial;text-decoration-style: initial;text-decoration-color: initial;" /><br style="white-space:pre-wrap;margin: 0px;padding: 0px;max-width: 100%;overflow-wrap: break-word !important;box-sizing: border-box !important;color: rgb(171, 178, 191);font-family: "Operator Mono", Consolas, Monaco, Menlo, monospace;font-size: 12px;font-style: normal;font-variant-ligatures: normal;font-variant-caps: normal;font-weight: 400;letter-spacing: normal;orphans: 2;text-align: left;text-indent: 0px;text-transform: none;widows: 2;word-spacing: 0px;-webkit-text-stroke-width: 0px;text-decoration-thickness: initial;text-decoration-style: initial;text-decoration-color: initial;" />// renderToString react16<br style="white-space:pre-wrap;margin: 0px;padding: 0px;max-width: 100%;overflow-wrap: break-word !important;box-sizing: border-box !important;color: rgb(171, 178, 191);font-family: "Operator Mono", Consolas, Monaco, Menlo, monospace;font-size: 12px;font-style: normal;font-variant-ligatures: normal;font-variant-caps: normal;font-weight: 400;letter-spacing: normal;orphans: 2;text-align: left;text-indent: 0px;text-transform: none;widows: 2;word-spacing: 0px;-webkit-text-stroke-width: 0px;text-decoration-thickness: initial;text-decoration-style: initial;text-decoration-color: initial;" />Welcome to React SSR! Hello There!
3.会被故意忽略掉的on开头的的属性,也就忽略掉了react代码中事件处理,这是也是坑点之一。服务端返回的html里没有处理事件点击,需要靠后续客户端js执行绑定事件。
function shouldIgnoreAttribute(<br /> name: string,<br /> propertyInfo: PropertyInfo | null,<br /> isCustomComponentTag: boolean,<br />): boolean {<br /> if (propertyInfo !== null) {<br /> return propertyInfo.type === RESERVED;<br /> }<br /> if (isCustomComponentTag) {<br /> return false;<br /> }<br /> if (<br /> name.length > 2 &&<br /> (name[0] === 'o' || name[0] === 'O') &&<br /> (name[1] === 'n' || name[1] === 'N')<br /> ) {<br /> return true;<br /> }<br /> return false;<br />}<br />
上面的例子我们可以看到React的代码里有点击事件,但点击后没有反应。需要靠后续客户端js执行绑定事件。如何实现?这就需要同构了。
2.3 实现基础的同构
前文已经大概讲了同构的概念,那为什么需要同构?之前的服务端代码在处理点击事件时故意忽略掉了这类属性,在服务端执行的生命周期也是不完整的,此时的页面是不具备交互能力的。同构,正是解决这些问题的关键,React代码在服务器上执行一遍之后,浏览器再去加载JS后又运行了一遍React代码,完成事件绑定和完整生命周期的执行,从而才能成为完全可交互页面。
react-dom:hydrate
实现同构的另一个核心API是React-dom下的hydrate,该方法能在客户端初次渲染的时候去复用服务端返回的原本已经存在的 DOM 节点,于渲染过程中为其附加交互行为(事件监听等),而不是重新创建 DOM 节点。需要注意是,服务端返回的 HTML 与客户端渲染结果不一致时,出于性能考虑,hydrate可以弥补文本内容的差异,但并不能保证修补属性的差异,而是将错就错;只在development模式下对这些不一致的问题报 Warning,因此必须重视 SSR HydrationWarning,要当 Error 逐个解决。
那具体实现同构?
上面这里我们提供了一个基本的架构图,可以看到,服务端运行React生成html代码我们已经基本实现,目前需要做的就是生产出客户端执行的index.js,那么这个index.js我们如何生产出来呢?
具体实践
首先新建客户端代码client.js,引入React组件,通过ReactDom.hydrate处理挂载到Dom节点, hydrate是实现复用的关键。
// client.js<br style="white-space:pre-wrap;margin: 0px;padding: 0px;max-width: 100%;overflow-wrap: break-word !important;box-sizing: border-box !important;color: rgb(171, 178, 191);font-family: "Operator Mono", Consolas, Monaco, Menlo, monospace;font-size: 12px;font-style: normal;font-variant-ligatures: normal;font-variant-caps: normal;font-weight: 400;letter-spacing: normal;orphans: 2;text-align: left;text-indent: 0px;text-transform: none;widows: 2;word-spacing: 0px;-webkit-text-stroke-width: 0px;text-decoration-thickness: initial;text-decoration-style: initial;text-decoration-color: initial;" />import React from "react";<br style="white-space:pre-wrap;margin: 0px;padding: 0px;max-width: 100%;overflow-wrap: break-word !important;box-sizing: border-box !important;color: rgb(171, 178, 191);font-family: "Operator Mono", Consolas, Monaco, Menlo, monospace;font-size: 12px;font-style: normal;font-variant-ligatures: normal;font-variant-caps: normal;font-weight: 400;letter-spacing: normal;orphans: 2;text-align: left;text-indent: 0px;text-transform: none;widows: 2;word-spacing: 0px;-webkit-text-stroke-width: 0px;text-decoration-thickness: initial;text-decoration-style: initial;text-decoration-color: initial;" />import ReactDom from "react-dom";<br style="white-space:pre-wrap;margin: 0px;padding: 0px;max-width: 100%;overflow-wrap: break-word !important;box-sizing: border-box !important;color: rgb(171, 178, 191);font-family: "Operator Mono", Consolas, Monaco, Menlo, monospace;font-size: 12px;font-style: normal;font-variant-ligatures: normal;font-variant-caps: normal;font-weight: 400;letter-spacing: normal;orphans: 2;text-align: left;text-indent: 0px;text-transform: none;widows: 2;word-spacing: 0px;-webkit-text-stroke-width: 0px;text-decoration-thickness: initial;text-decoration-style: initial;text-decoration-color: initial;" />import Home from "./containers/Home";<br style="white-space:pre-wrap;margin: 0px;padding: 0px;max-width: 100%;overflow-wrap: break-word !important;box-sizing: border-box !important;color: rgb(171, 178, 191);font-family: "Operator Mono", Consolas, Monaco, Menlo, monospace;font-size: 12px;font-style: normal;font-variant-ligatures: normal;font-variant-caps: normal;font-weight: 400;letter-spacing: normal;orphans: 2;text-align: left;text-indent: 0px;text-transform: none;widows: 2;word-spacing: 0px;-webkit-text-stroke-width: 0px;text-decoration-thickness: initial;text-decoration-style: initial;text-decoration-color: initial;" /><br style="white-space:pre-wrap;margin: 0px;padding: 0px;max-width: 100%;overflow-wrap: break-word !important;box-sizing: border-box !important;color: rgb(171, 178, 191);font-family: "Operator Mono", Consolas, Monaco, Menlo, monospace;font-size: 12px;font-style: normal;font-variant-ligatures: normal;font-variant-caps: normal;font-weight: 400;letter-spacing: normal;orphans: 2;text-align: left;text-indent: 0px;text-transform: none;widows: 2;word-spacing: 0px;-webkit-text-stroke-width: 0px;text-decoration-thickness: initial;text-decoration-style: initial;text-decoration-color: initial;" />const App = () => {<br style="white-space:pre-wrap;margin: 0px;padding: 0px;max-width: 100%;overflow-wrap: break-word !important;box-sizing: border-box !important;color: rgb(171, 178, 191);font-family: "Operator Mono", Consolas, Monaco, Menlo, monospace;font-size: 12px;font-style: normal;font-variant-ligatures: normal;font-variant-caps: normal;font-weight: 400;letter-spacing: normal;orphans: 2;text-align: left;text-indent: 0px;text-transform: none;widows: 2;word-spacing: 0px;-webkit-text-stroke-width: 0px;text-decoration-thickness: initial;text-decoration-style: initial;text-decoration-color: initial;" /> return ;<br style="white-space:pre-wrap;margin: 0px;padding: 0px;max-width: 100%;overflow-wrap: break-word !important;box-sizing: border-box !important;color: rgb(171, 178, 191);font-family: "Operator Mono", Consolas, Monaco, Menlo, monospace;font-size: 12px;font-style: normal;font-variant-ligatures: normal;font-variant-caps: normal;font-weight: 400;letter-spacing: normal;orphans: 2;text-align: left;text-indent: 0px;text-transform: none;widows: 2;word-spacing: 0px;-webkit-text-stroke-width: 0px;text-decoration-thickness: initial;text-decoration-style: initial;text-decoration-color: initial;" />};<br style="white-space:pre-wrap;margin: 0px;padding: 0px;max-width: 100%;overflow-wrap: break-word !important;box-sizing: border-box !important;color: rgb(171, 178, 191);font-family: "Operator Mono", Consolas, Monaco, Menlo, monospace;font-size: 12px;font-style: normal;font-variant-ligatures: normal;font-variant-caps: normal;font-weight: 400;letter-spacing: normal;orphans: 2;text-align: left;text-indent: 0px;text-transform: none;widows: 2;word-spacing: 0px;-webkit-text-stroke-width: 0px;text-decoration-thickness: initial;text-decoration-style: initial;text-decoration-color: initial;" /><br style="white-space:pre-wrap;margin: 0px;padding: 0px;max-width: 100%;overflow-wrap: break-word !important;box-sizing: border-box !important;color: rgb(171, 178, 191);font-family: "Operator Mono", Consolas, Monaco, Menlo, monospace;font-size: 12px;font-style: normal;font-variant-ligatures: normal;font-variant-caps: normal;font-weight: 400;letter-spacing: normal;orphans: 2;text-align: left;text-indent: 0px;text-transform: none;widows: 2;word-spacing: 0px;-webkit-text-stroke-width: 0px;text-decoration-thickness: initial;text-decoration-style: initial;text-decoration-color: initial;" />ReactDom.hydrate(, document.getElementById("root"));
客户端代码也需要webpack打包处理,新建webpack.client.js具体配置如下,需要注意打包输出在public目录下,后续的静态资源服务也起在了这个目录下。
// webpack.client.js<br style="white-space:pre-wrap;margin: 0px;padding: 0px;max-width: 100%;overflow-wrap: break-word !important;box-sizing: border-box !important;color: rgb(171, 178, 191);font-family: "Operator Mono", Consolas, Monaco, Menlo, monospace;font-size: 12px;font-style: normal;font-variant-ligatures: normal;font-variant-caps: normal;font-weight: 400;letter-spacing: normal;orphans: 2;text-align: left;text-indent: 0px;text-transform: none;widows: 2;word-spacing: 0px;-webkit-text-stroke-width: 0px;text-decoration-thickness: initial;text-decoration-style: initial;text-decoration-color: initial;" />const path = require("path");<br style="white-space:pre-wrap;margin: 0px;padding: 0px;max-width: 100%;overflow-wrap: break-word !important;box-sizing: border-box !important;color: rgb(171, 178, 191);font-family: "Operator Mono", Consolas, Monaco, Menlo, monospace;font-size: 12px;font-style: normal;font-variant-ligatures: normal;font-variant-caps: normal;font-weight: 400;letter-spacing: normal;orphans: 2;text-align: left;text-indent: 0px;text-transform: none;widows: 2;word-spacing: 0px;-webkit-text-stroke-width: 0px;text-decoration-thickness: initial;text-decoration-style: initial;text-decoration-color: initial;" />const resolve = (dir) => path.resolve(__dirname, "./src", dir);<br style="white-space:pre-wrap;margin: 0px;padding: 0px;max-width: 100%;overflow-wrap: break-word !important;box-sizing: border-box !important;color: rgb(171, 178, 191);font-family: "Operator Mono", Consolas, Monaco, Menlo, monospace;font-size: 12px;font-style: normal;font-variant-ligatures: normal;font-variant-caps: normal;font-weight: 400;letter-spacing: normal;orphans: 2;text-align: left;text-indent: 0px;text-transform: none;widows: 2;word-spacing: 0px;-webkit-text-stroke-width: 0px;text-decoration-thickness: initial;text-decoration-style: initial;text-decoration-color: initial;" />module.exports = {<br style="white-space:pre-wrap;margin: 0px;padding: 0px;max-width: 100%;overflow-wrap: break-word !important;box-sizing: border-box !important;color: rgb(171, 178, 191);font-family: "Operator Mono", Consolas, Monaco, Menlo, monospace;font-size: 12px;font-style: normal;font-variant-ligatures: normal;font-variant-caps: normal;font-weight: 400;letter-spacing: normal;orphans: 2;text-align: left;text-indent: 0px;text-transform: none;widows: 2;word-spacing: 0px;-webkit-text-stroke-width: 0px;text-decoration-thickness: initial;text-decoration-style: initial;text-decoration-color: initial;" /> mode: "development",<br style="white-space:pre-wrap;margin: 0px;padding: 0px;max-width: 100%;overflow-wrap: break-word !important;box-sizing: border-box !important;color: rgb(171, 178, 191);font-family: "Operator Mono", Consolas, Monaco, Menlo, monospace;font-size: 12px;font-style: normal;font-variant-ligatures: normal;font-variant-caps: normal;font-weight: 400;letter-spacing: normal;orphans: 2;text-align: left;text-indent: 0px;text-transform: none;widows: 2;word-spacing: 0px;-webkit-text-stroke-width: 0px;text-decoration-thickness: initial;text-decoration-style: initial;text-decoration-color: initial;" /> entry: "./client.js",<br style="white-space:pre-wrap;margin: 0px;padding: 0px;max-width: 100%;overflow-wrap: break-word !important;box-sizing: border-box !important;color: rgb(171, 178, 191);font-family: "Operator Mono", Consolas, Monaco, Menlo, monospace;font-size: 12px;font-style: normal;font-variant-ligatures: normal;font-variant-caps: normal;font-weight: 400;letter-spacing: normal;orphans: 2;text-align: left;text-indent: 0px;text-transform: none;widows: 2;word-spacing: 0px;-webkit-text-stroke-width: 0px;text-decoration-thickness: initial;text-decoration-style: initial;text-decoration-color: initial;" /> output: {<br style="white-space:pre-wrap;margin: 0px;padding: 0px;max-width: 100%;overflow-wrap: break-word !important;box-sizing: border-box !important;color: rgb(171, 178, 191);font-family: "Operator Mono", Consolas, Monaco, Menlo, monospace;font-size: 12px;font-style: normal;font-variant-ligatures: normal;font-variant-caps: normal;font-weight: 400;letter-spacing: normal;orphans: 2;text-align: left;text-indent: 0px;text-transform: none;widows: 2;word-spacing: 0px;-webkit-text-stroke-width: 0px;text-decoration-thickness: initial;text-decoration-style: initial;text-decoration-color: initial;" /> filename: "index.js",<br style="white-space:pre-wrap;margin: 0px;padding: 0px;max-width: 100%;overflow-wrap: break-word !important;box-sizing: border-box !important;color: rgb(171, 178, 191);font-family: "Operator Mono", Consolas, Monaco, Menlo, monospace;font-size: 12px;font-style: normal;font-variant-ligatures: normal;font-variant-caps: normal;font-weight: 400;letter-spacing: normal;orphans: 2;text-align: left;text-indent: 0px;text-transform: none;widows: 2;word-spacing: 0px;-webkit-text-stroke-width: 0px;text-decoration-thickness: initial;text-decoration-style: initial;text-decoration-color: initial;" /> path: path.resolve(__dirname, "public"),<br style="white-space:pre-wrap;margin: 0px;padding: 0px;max-width: 100%;overflow-wrap: break-word !important;box-sizing: border-box !important;color: rgb(171, 178, 191);font-family: "Operator Mono", Consolas, Monaco, Menlo, monospace;font-size: 12px;font-style: normal;font-variant-ligatures: normal;font-variant-caps: normal;font-weight: 400;letter-spacing: normal;orphans: 2;text-align: left;text-indent: 0px;text-transform: none;widows: 2;word-spacing: 0px;-webkit-text-stroke-width: 0px;text-decoration-thickness: initial;text-decoration-style: initial;text-decoration-color: initial;" /> },<br style="white-space:pre-wrap;margin: 0px;padding: 0px;max-width: 100%;overflow-wrap: break-word !important;box-sizing: border-box !important;color: rgb(171, 178, 191);font-family: "Operator Mono", Consolas, Monaco, Menlo, monospace;font-size: 12px;font-style: normal;font-variant-ligatures: normal;font-variant-caps: normal;font-weight: 400;letter-spacing: normal;orphans: 2;text-align: left;text-indent: 0px;text-transform: none;widows: 2;word-spacing: 0px;-webkit-text-stroke-width: 0px;text-decoration-thickness: initial;text-decoration-style: initial;text-decoration-color: initial;" /> module: {<br style="white-space:pre-wrap;margin: 0px;padding: 0px;max-width: 100%;overflow-wrap: break-word !important;box-sizing: border-box !important;color: rgb(171, 178, 191);font-family: "Operator Mono", Consolas, Monaco, Menlo, monospace;font-size: 12px;font-style: normal;font-variant-ligatures: normal;font-variant-caps: normal;font-weight: 400;letter-spacing: n 查看全部
这⼀次彻底弄懂:React 服务端渲染
本文字数:21279字
预计阅读时间:54分钟
1、前言
在前端项目需要首屏渲染速度优化或SEO的场景下,大家或多或少都听过到过服务端渲染( SSR ),但大多数人对服务端渲染具体实现和底层原理还是比较陌生的。本文基于公司官网开发时做了服务端渲染改造基础上,系统理解和梳理这套体系的模式和逻辑,并写了一些笔记和Demo(文后链接)便于深入理解。这次我们来以React为例,把服务端渲染彻底讲弄明白。本文主要有以下内容:
1.1 什么是服务端渲染?
服务端渲染, SSR (Server-side Rendering) ,顾名思义,就是在浏览器发起页面请求后由服务端完成页面的HTML结构拼接,返回给浏览器解析后能直接构建出有内容的页面。
用 node 实现一个简单的 SSR
我们使用Koa框架来创建node服务:
// demo1<br />var Koa = require("koa");<br />var app = new Koa();<br /><br />// 对于任何请求,app将调用该函数处理请求:<br />app.use(async (ctx) => {<br /> // 将HTML字符串直接返回 <br /> ctx.body = `<br /> <br /> <br /> ssr<br /> <br /> <br /> <br /> hello server<br /> <p>word<br /> <br /> <br /> `;<br />});<br />//监听<br />app.listen(3001, () => {<br /> console.log("listen on 3001 port!");<br />});<br /></p>
启动服务后访问页面,查看网页源代码是这样:
npx create-react-app my-app<br />
上面的例子就是一个简单的服务端渲染,其服务侧直接输出了有内容的HTML,浏览器解析之后就能渲染出页面。与服务端渲染对应的是客户端渲染 ,CSR(Client Side Rendering),通俗的讲就是由客户端完成页面的渲染。其大致渲染流程是这样:在浏览器请求页面时,服务端先返回一个无具体内容的HTML,浏览器还需要再加载并执行JS,动态地将内容和数据渲染到页面中,才能完成页面具体内容的显示。目前主流的React ,Vue, Angular 等SPA页面未经特殊处理均采用客户端渲染。最常见脚手架create-react-app 生成的项目就是客户端渲染:
上面采用客户端渲染的HTML页面中中无内容,需在浏览器端加载并执行bundle.js后才能构建出有内容页面。
1.2 为什么用服务端渲染?1.2.1 服务端渲染的优势
相比于客户端渲染,服务端渲染有什么优势?我们可以从下图对比一下这两种不同的渲染模式。
首屏时间更短
采用客户端渲染的页面,要进行JS文件拉取和JS代码执行,动态创建 DOM 结构,客户端逻辑越重,初始化需要执行的 JS 越多,首屏性能就越慢;客户端渲染前置的第三方类库/框架、polyfill 等都会在一定程度上拖慢首屏性能。Code splitting、lazy-load等优化措施能够缓解一部分,但优化空间相对有限。相比而言,服务端渲染的页面直接拉取HTMl就能显示内容,更短的首屏时间创造更多的可能性。
利于SEO
在别人使用搜索引擎搜索相关的内容时,你的网页排行能靠得更前,这样你的流量就有越高,这就是SEO的意义所在。那为什么服务端渲染更利于爬虫爬你的页面呢?因为对于很多搜索引擎爬虫(非google)HTML返回是什么内容就爬什么内容,而不会动态执行JS代码内容。对客户端渲染的页面来说,简直无能为力,因为返回的HTML是一个空壳。而服务端渲染返回的HTML是有内容的。
SSR的出现,就是为了解决这些CSR的弊端。
1.2.2 权衡使用服务端渲染
并不是所有的WEB应用都必须使用SSR,这需要开发者来权衡,因为服务端渲染会带来以下问题:
代码复杂度增加。为了实现服务端渲染,应用代码中需要兼容服务端和客户端两种运行情况,部分代码只能在客户端运行,需要对其进行特殊处理,才能在服务器渲染应用程序中运行。
需要更多的服务器资源。由于服务器增加了渲染HTML的需求,使得原本只需要输出静态资源文件的nodejs服务,新增了数据获取的IO和渲染HTML的CPU占用,如果流量突然暴增,有可能导致服务器宕机,因此需要使用响应的缓存策略和准备相应的服务器负载。
涉及构建设置和部署的更多要求。与可以部署在任何静态文件服务器上的完全静态单页面应用程序 (SPA) 不同,服务器渲染应用程序,需要处于 Node.js server 运行环境。
因此,在使用服务端渲染SSR之前,需要考虑投入产出比:是否真的需要SEO,是否需要将首屏时间提升到极致。如果都没有,使用SSR反而小题大做了。
1.3 服务端渲染的发展史
其实服务端渲染并不是什么新奇的概念,前后端分层之前很长的一段时间里都是以服务端渲染为主(JSP、PHP),那时后端一把梭哈,在服务端生成完整的 HTML 页面。但那时的服务端渲染和现在还是有本质的区别,存在比较多的弊端,每一个请求都要动态生成HTML,存在大量的重复,服务器机器成本也相对比较高,前后端代码完全掺杂在一起,开发维护难。
随着业务不断发展变化,后端要写的JS逻辑也越发复杂,而且JS有很多潜在的坑使后端越发觉得这是块烫手山芋,于是逐渐出现了前后端分层。伴随AJAX的兴起,浏览器可以做到了不再重现请求页面就可更新局部视图。还可以利用客户端免费的计算资源,后端侧逐渐演变成了提供数据支持。jquery的兴起,良好的客户端兼容性使JS不再受困于各种版本浏览器兼容问题,一统了前端天下。
此后伴随node的兴起,前后端分离越演越烈。前端能摆脱后端的依赖单独起服务,三大框架vue,react,angular也迅势崛起,以操作数据就能更新视图,前端开发人员逐渐摆脱了与烦人的Dom操作打交道,能够专心的关注业务和数据逻辑。前端同时探索出了功能插件,UI库,组件等多种代码复用方案,形成了繁荣的前端生态。
但是三大框架采用客户端渲染模式,随着代码逻辑的加重,首屏时间成了一个很大的问题,同时开发人员也发现SEO也出了问题,大多搜索引擎根本不会去执行JS代码。但是也不可能再回头走老路,于是前端又探索出了一套服务端渲染的框架来解决掉这些问题。此时的服务端渲染是建立在成熟的组组件,模块生态之上,基于Node.js的同构方案成为最佳实践。
2、React服务端渲染的原理
2.1基本思路
React服务端渲染流程
React服务端渲染的基本思路,简单理解就是将组件或页面通过服务器生成html字符串,再发送到浏览器,最后将静态标记"混合"为客户端上完全交互的应用程序。因为要考虑React在服务端的运行情况,故相比之前讲的多了在浏览器端绑定状态与事件的过程。
我们可以结合下面的流程图来一览完整的 React服务端渲染的全貌:当浏览器去请求一个页面,前端服务器端接收到请求并执行 React组件代码,此时React代码中可能包含向后端服务器发起请求,待请求完成返回的数据后,前端服务器组装好有内容的HTML里返给浏览器,浏览器解析HTML后已具备展示内容,但页面并不具备交互能力。
下一阶段,在返回的HTMl中还有script链接,浏览器再拉取JS并执行其包含的React 代码,其能在浏览器端执行完整的生命周期,并通过相关API实现复用此前返回 HTML节点并添加事件的绑定,此时页面才就具备完全交互能力。总的来说,react服务端渲染包含有两个过程:服务端渲染 + 客户端 hydrate 渲染。服务端渲染在服务端渲染出了首屏内容;客户端 hydrate 渲染复用服务端返回的节点,进行一次类似于 render 的 hydrate 渲染过程,把交互事件绑上去(此时页面可交互),并接管页面。
服务端处理后返回的
客户端“浸泡”还原后的
核心思想(同构)
从上面的流程中可以看到,客户端和服务端都要执行React代码完成渲染,那是不是就要写两份代码,供双端使用? 当然不需要,也完全不合理。所谓同构,就是让一份React代码,既可以在服务端中执行,也可以在客户端中执行。
SSR技术栈
我们这里简单理了一下服务端渲染涉及到的技术栈:
知道了服务端渲染、同构的大概思路之后,下面从头开始,一步一步完成具体实践,深入理解其原理。
2.2 服务端如何渲染React组件?
按照之前流程的大概思路,我们首先需要将React组件在服务端转换成HTML字符串,那怎么做呢?React 提供的面向服务端的API(react-dom/server),提供了相关方法能够将 React 组件渲染成静态的(HTML)标签。下面我们简单了解下react-dom/server。
react-dom/server
react-dom/server有renderToString、renderToStaticMarkup,renderToNodeStream、renderToStaticNodeStream四个方法能够将 React 组件渲染成静态的(HTML)标签,前两者能在客户端和服务端运行,后两者只能在服务端运行。
renderToStaticMarkup VS renderToString:renderToString 方法会在 React 内部创建的额外 DOM 属性,例如 data-reactroot, 在相邻文本节点之间生成,这些属性是客户端执行hydrate复用节点的关键所在,data-reactroot属性是服务端渲染的标志之一。如果你希望把 React 当作静态页面生成器来使用,renderToStaticMarkup方法会非常有用,因为去除额外的属性可以节省一些字节。
// Home.jsx<br style="white-space:pre-wrap;margin: 0px;padding: 0px;max-width: 100%;overflow-wrap: break-word !important;box-sizing: border-box !important;color: rgb(171, 178, 191);font-family: "Operator Mono", Consolas, Monaco, Menlo, monospace;font-size: 12px;font-style: normal;font-variant-ligatures: normal;font-variant-caps: normal;font-weight: 400;letter-spacing: normal;orphans: 2;text-align: left;text-indent: 0px;text-transform: none;widows: 2;word-spacing: 0px;-webkit-text-stroke-width: 0px;text-decoration-thickness: initial;text-decoration-style: initial;text-decoration-color: initial;" />import React from "react";<br style="white-space:pre-wrap;margin: 0px;padding: 0px;max-width: 100%;overflow-wrap: break-word !important;box-sizing: border-box !important;color: rgb(171, 178, 191);font-family: "Operator Mono", Consolas, Monaco, Menlo, monospace;font-size: 12px;font-style: normal;font-variant-ligatures: normal;font-variant-caps: normal;font-weight: 400;letter-spacing: normal;orphans: 2;text-align: left;text-indent: 0px;text-transform: none;widows: 2;word-spacing: 0px;-webkit-text-stroke-width: 0px;text-decoration-thickness: initial;text-decoration-style: initial;text-decoration-color: initial;" />const Home = () => {<br style="white-space:pre-wrap;margin: 0px;padding: 0px;max-width: 100%;overflow-wrap: break-word !important;box-sizing: border-box !important;color: rgb(171, 178, 191);font-family: "Operator Mono", Consolas, Monaco, Menlo, monospace;font-size: 12px;font-style: normal;font-variant-ligatures: normal;font-variant-caps: normal;font-weight: 400;letter-spacing: normal;orphans: 2;text-align: left;text-indent: 0px;text-transform: none;widows: 2;word-spacing: 0px;-webkit-text-stroke-width: 0px;text-decoration-thickness: initial;text-decoration-style: initial;text-decoration-color: initial;" /> return (<br style="white-space:pre-wrap;margin: 0px;padding: 0px;max-width: 100%;overflow-wrap: break-word !important;box-sizing: border-box !important;color: rgb(171, 178, 191);font-family: "Operator Mono", Consolas, Monaco, Menlo, monospace;font-size: 12px;font-style: normal;font-variant-ligatures: normal;font-variant-caps: normal;font-weight: 400;letter-spacing: normal;orphans: 2;text-align: left;text-indent: 0px;text-transform: none;widows: 2;word-spacing: 0px;-webkit-text-stroke-width: 0px;text-decoration-thickness: initial;text-decoration-style: initial;text-decoration-color: initial;" /> <br style="white-space:pre-wrap;margin: 0px;padding: 0px;max-width: 100%;overflow-wrap: break-word !important;box-sizing: border-box !important;color: rgb(171, 178, 191);font-family: "Operator Mono", Consolas, Monaco, Menlo, monospace;font-size: 12px;font-style: normal;font-variant-ligatures: normal;font-variant-caps: normal;font-weight: 400;letter-spacing: normal;orphans: 2;text-align: left;text-indent: 0px;text-transform: none;widows: 2;word-spacing: 0px;-webkit-text-stroke-width: 0px;text-decoration-thickness: initial;text-decoration-style: initial;text-decoration-color: initial;" /> console.log("hello")}>This is Home Page<br style="white-space:pre-wrap;margin: 0px;padding: 0px;max-width: 100%;overflow-wrap: break-word !important;box-sizing: border-box !important;color: rgb(171, 178, 191);font-family: "Operator Mono", Consolas, Monaco, Menlo, monospace;font-size: 12px;font-style: normal;font-variant-ligatures: normal;font-variant-caps: normal;font-weight: 400;letter-spacing: normal;orphans: 2;text-align: left;text-indent: 0px;text-transform: none;widows: 2;word-spacing: 0px;-webkit-text-stroke-width: 0px;text-decoration-thickness: initial;text-decoration-style: initial;text-decoration-color: initial;" /> <p>Home is the page ..... more discribe<br style="white-space:pre-wrap;margin: 0px;padding: 0px;max-width: 100%;overflow-wrap: break-word !important;box-sizing: border-box !important;color: rgb(171, 178, 191);font-family: "Operator Mono", Consolas, Monaco, Menlo, monospace;font-size: 12px;font-style: normal;font-variant-ligatures: normal;font-variant-caps: normal;font-weight: 400;letter-spacing: normal;orphans: 2;text-align: left;text-indent: 0px;text-transform: none;widows: 2;word-spacing: 0px;-webkit-text-stroke-width: 0px;text-decoration-thickness: initial;text-decoration-style: initial;text-decoration-color: initial;" /> <br style="white-space:pre-wrap;margin: 0px;padding: 0px;max-width: 100%;overflow-wrap: break-word !important;box-sizing: border-box !important;color: rgb(171, 178, 191);font-family: "Operator Mono", Consolas, Monaco, Menlo, monospace;font-size: 12px;font-style: normal;font-variant-ligatures: normal;font-variant-caps: normal;font-weight: 400;letter-spacing: normal;orphans: 2;text-align: left;text-indent: 0px;text-transform: none;widows: 2;word-spacing: 0px;-webkit-text-stroke-width: 0px;text-decoration-thickness: initial;text-decoration-style: initial;text-decoration-color: initial;" /> );<br style="white-space:pre-wrap;margin: 0px;padding: 0px;max-width: 100%;overflow-wrap: break-word !important;box-sizing: border-box !important;color: rgb(171, 178, 191);font-family: "Operator Mono", Consolas, Monaco, Menlo, monospace;font-size: 12px;font-style: normal;font-variant-ligatures: normal;font-variant-caps: normal;font-weight: 400;letter-spacing: normal;orphans: 2;text-align: left;text-indent: 0px;text-transform: none;widows: 2;word-spacing: 0px;-webkit-text-stroke-width: 0px;text-decoration-thickness: initial;text-decoration-style: initial;text-decoration-color: initial;" />};<br style="white-space:pre-wrap;margin: 0px;padding: 0px;max-width: 100%;overflow-wrap: break-word !important;box-sizing: border-box !important;color: rgb(171, 178, 191);font-family: "Operator Mono", Consolas, Monaco, Menlo, monospace;font-size: 12px;font-style: normal;font-variant-ligatures: normal;font-variant-caps: normal;font-weight: 400;letter-spacing: normal;orphans: 2;text-align: left;text-indent: 0px;text-transform: none;widows: 2;word-spacing: 0px;-webkit-text-stroke-width: 0px;text-decoration-thickness: initial;text-decoration-style: initial;text-decoration-color: initial;" />export default Home;</p>
我们使用React-dom/server下提供的renderToString方法,在服务端将其转换为html字符串:
// server.js<br />import Koa from "koa";<br />import React from "react";<br />import { renderToString } from "react-dom/server";<br />import Home from "./containers/Home";<br /><br />const app = new Koa();<br />app.use(async (ctx) => {<br /> // 核心api renderToString 将react组件转化成html字符串<br /> const content = renderToString();<br /> ctx.body = `<br /> <br /> <br /> ssr<br /> <br /> <br /> ${content}<br /> <br /> <br /> `;<br />});<br />app.listen(3002, () => {<br /> console.log("listen:3002");<br />});<br />
可以看到上面代码里有ES6的import 和jsx语法,不能直接运行在node环境,需要借助webpack打包, 构建目标是commonjs。新建webpack.server.js具体配置如下:
// webpack.server.js<br style="white-space:pre-wrap;margin: 0px;padding: 0px;max-width: 100%;overflow-wrap: break-word !important;box-sizing: border-box !important;color: rgb(171, 178, 191);font-family: "Operator Mono", Consolas, Monaco, Menlo, monospace;font-size: 12px;font-style: normal;font-variant-ligatures: normal;font-variant-caps: normal;font-weight: 400;letter-spacing: normal;orphans: 2;text-align: left;text-indent: 0px;text-transform: none;widows: 2;word-spacing: 0px;-webkit-text-stroke-width: 0px;text-decoration-thickness: initial;text-decoration-style: initial;text-decoration-color: initial;" />const path = require("path");<br style="white-space:pre-wrap;margin: 0px;padding: 0px;max-width: 100%;overflow-wrap: break-word !important;box-sizing: border-box !important;color: rgb(171, 178, 191);font-family: "Operator Mono", Consolas, Monaco, Menlo, monospace;font-size: 12px;font-style: normal;font-variant-ligatures: normal;font-variant-caps: normal;font-weight: 400;letter-spacing: normal;orphans: 2;text-align: left;text-indent: 0px;text-transform: none;widows: 2;word-spacing: 0px;-webkit-text-stroke-width: 0px;text-decoration-thickness: initial;text-decoration-style: initial;text-decoration-color: initial;" />const nodeExternals = require("webpack-node-externals");<br style="white-space:pre-wrap;margin: 0px;padding: 0px;max-width: 100%;overflow-wrap: break-word !important;box-sizing: border-box !important;color: rgb(171, 178, 191);font-family: "Operator Mono", Consolas, Monaco, Menlo, monospace;font-size: 12px;font-style: normal;font-variant-ligatures: normal;font-variant-caps: normal;font-weight: 400;letter-spacing: normal;orphans: 2;text-align: left;text-indent: 0px;text-transform: none;widows: 2;word-spacing: 0px;-webkit-text-stroke-width: 0px;text-decoration-thickness: initial;text-decoration-style: initial;text-decoration-color: initial;" />module.exports = {<br style="white-space:pre-wrap;margin: 0px;padding: 0px;max-width: 100%;overflow-wrap: break-word !important;box-sizing: border-box !important;color: rgb(171, 178, 191);font-family: "Operator Mono", Consolas, Monaco, Menlo, monospace;font-size: 12px;font-style: normal;font-variant-ligatures: normal;font-variant-caps: normal;font-weight: 400;letter-spacing: normal;orphans: 2;text-align: left;text-indent: 0px;text-transform: none;widows: 2;word-spacing: 0px;-webkit-text-stroke-width: 0px;text-decoration-thickness: initial;text-decoration-style: initial;text-decoration-color: initial;" /> mode: "development",<br style="white-space:pre-wrap;margin: 0px;padding: 0px;max-width: 100%;overflow-wrap: break-word !important;box-sizing: border-box !important;color: rgb(171, 178, 191);font-family: "Operator Mono", Consolas, Monaco, Menlo, monospace;font-size: 12px;font-style: normal;font-variant-ligatures: normal;font-variant-caps: normal;font-weight: 400;letter-spacing: normal;orphans: 2;text-align: left;text-indent: 0px;text-transform: none;widows: 2;word-spacing: 0px;-webkit-text-stroke-width: 0px;text-decoration-thickness: initial;text-decoration-style: initial;text-decoration-color: initial;" /> target: "node",<br style="white-space:pre-wrap;margin: 0px;padding: 0px;max-width: 100%;overflow-wrap: break-word !important;box-sizing: border-box !important;color: rgb(171, 178, 191);font-family: "Operator Mono", Consolas, Monaco, Menlo, monospace;font-size: 12px;font-style: normal;font-variant-ligatures: normal;font-variant-caps: normal;font-weight: 400;letter-spacing: normal;orphans: 2;text-align: left;text-indent: 0px;text-transform: none;widows: 2;word-spacing: 0px;-webkit-text-stroke-width: 0px;text-decoration-thickness: initial;text-decoration-style: initial;text-decoration-color: initial;" /> entry: "./server.js",<br style="white-space:pre-wrap;margin: 0px;padding: 0px;max-width: 100%;overflow-wrap: break-word !important;box-sizing: border-box !important;color: rgb(171, 178, 191);font-family: "Operator Mono", Consolas, Monaco, Menlo, monospace;font-size: 12px;font-style: normal;font-variant-ligatures: normal;font-variant-caps: normal;font-weight: 400;letter-spacing: normal;orphans: 2;text-align: left;text-indent: 0px;text-transform: none;widows: 2;word-spacing: 0px;-webkit-text-stroke-width: 0px;text-decoration-thickness: initial;text-decoration-style: initial;text-decoration-color: initial;" /> resolve: {<br style="white-space:pre-wrap;margin: 0px;padding: 0px;max-width: 100%;overflow-wrap: break-word !important;box-sizing: border-box !important;color: rgb(171, 178, 191);font-family: "Operator Mono", Consolas, Monaco, Menlo, monospace;font-size: 12px;font-style: normal;font-variant-ligatures: normal;font-variant-caps: normal;font-weight: 400;letter-spacing: normal;orphans: 2;text-align: left;text-indent: 0px;text-transform: none;widows: 2;word-spacing: 0px;-webkit-text-stroke-width: 0px;text-decoration-thickness: initial;text-decoration-style: initial;text-decoration-color: initial;" /> extensions: [".jsx", ".js", ".tsx", ".ts"],<br style="white-space:pre-wrap;margin: 0px;padding: 0px;max-width: 100%;overflow-wrap: break-word !important;box-sizing: border-box !important;color: rgb(171, 178, 191);font-family: "Operator Mono", Consolas, Monaco, Menlo, monospace;font-size: 12px;font-style: normal;font-variant-ligatures: normal;font-variant-caps: normal;font-weight: 400;letter-spacing: normal;orphans: 2;text-align: left;text-indent: 0px;text-transform: none;widows: 2;word-spacing: 0px;-webkit-text-stroke-width: 0px;text-decoration-thickness: initial;text-decoration-style: initial;text-decoration-color: initial;" /> },<br style="white-space:pre-wrap;margin: 0px;padding: 0px;max-width: 100%;overflow-wrap: break-word !important;box-sizing: border-box !important;color: rgb(171, 178, 191);font-family: "Operator Mono", Consolas, Monaco, Menlo, monospace;font-size: 12px;font-style: normal;font-variant-ligatures: normal;font-variant-caps: normal;font-weight: 400;letter-spacing: normal;orphans: 2;text-align: left;text-indent: 0px;text-transform: none;widows: 2;word-spacing: 0px;-webkit-text-stroke-width: 0px;text-decoration-thickness: initial;text-decoration-style: initial;text-decoration-color: initial;" /> module: {<br style="white-space:pre-wrap;margin: 0px;padding: 0px;max-width: 100%;overflow-wrap: break-word !important;box-sizing: border-box !important;color: rgb(171, 178, 191);font-family: "Operator Mono", Consolas, Monaco, Menlo, monospace;font-size: 12px;font-style: normal;font-variant-ligatures: normal;font-variant-caps: normal;font-weight: 400;letter-spacing: normal;orphans: 2;text-align: left;text-indent: 0px;text-transform: none;widows: 2;word-spacing: 0px;-webkit-text-stroke-width: 0px;text-decoration-thickness: initial;text-decoration-style: initial;text-decoration-color: initial;" /> rules: [<br style="white-space:pre-wrap;margin: 0px;padding: 0px;max-width: 100%;overflow-wrap: break-word !important;box-sizing: border-box !important;color: rgb(171, 178, 191);font-family: "Operator Mono", Consolas, Monaco, Menlo, monospace;font-size: 12px;font-style: normal;font-variant-ligatures: normal;font-variant-caps: normal;font-weight: 400;letter-spacing: normal;orphans: 2;text-align: left;text-indent: 0px;text-transform: none;widows: 2;word-spacing: 0px;-webkit-text-stroke-width: 0px;text-decoration-thickness: initial;text-decoration-style: initial;text-decoration-color: initial;" /> {<br style="white-space:pre-wrap;margin: 0px;padding: 0px;max-width: 100%;overflow-wrap: break-word !important;box-sizing: border-box !important;color: rgb(171, 178, 191);font-family: "Operator Mono", Consolas, Monaco, Menlo, monospace;font-size: 12px;font-style: normal;font-variant-ligatures: normal;font-variant-caps: normal;font-weight: 400;letter-spacing: normal;orphans: 2;text-align: left;text-indent: 0px;text-transform: none;widows: 2;word-spacing: 0px;-webkit-text-stroke-width: 0px;text-decoration-thickness: initial;text-decoration-style: initial;text-decoration-color: initial;" /> test: /\.jsx?$/,<br style="white-space:pre-wrap;margin: 0px;padding: 0px;max-width: 100%;overflow-wrap: break-word !important;box-sizing: border-box !important;color: rgb(171, 178, 191);font-family: "Operator Mono", Consolas, Monaco, Menlo, monospace;font-size: 12px;font-style: normal;font-variant-ligatures: normal;font-variant-caps: normal;font-weight: 400;letter-spacing: normal;orphans: 2;text-align: left;text-indent: 0px;text-transform: none;widows: 2;word-spacing: 0px;-webkit-text-stroke-width: 0px;text-decoration-thickness: initial;text-decoration-style: initial;text-decoration-color: initial;" /> loader: "babel-loader",<br style="white-space:pre-wrap;margin: 0px;padding: 0px;max-width: 100%;overflow-wrap: break-word !important;box-sizing: border-box !important;color: rgb(171, 178, 191);font-family: "Operator Mono", Consolas, Monaco, Menlo, monospace;font-size: 12px;font-style: normal;font-variant-ligatures: normal;font-variant-caps: normal;font-weight: 400;letter-spacing: normal;orphans: 2;text-align: left;text-indent: 0px;text-transform: none;widows: 2;word-spacing: 0px;-webkit-text-stroke-width: 0px;text-decoration-thickness: initial;text-decoration-style: initial;text-decoration-color: initial;" /> exclude: /node_modules/,<br style="white-space:pre-wrap;margin: 0px;padding: 0px;max-width: 100%;overflow-wrap: break-word !important;box-sizing: border-box !important;color: rgb(171, 178, 191);font-family: "Operator Mono", Consolas, Monaco, Menlo, monospace;font-size: 12px;font-style: normal;font-variant-ligatures: normal;font-variant-caps: normal;font-weight: 400;letter-spacing: normal;orphans: 2;text-align: left;text-indent: 0px;text-transform: none;widows: 2;word-spacing: 0px;-webkit-text-stroke-width: 0px;text-decoration-thickness: initial;text-decoration-style: initial;text-decoration-color: initial;" /> options: {<br style="white-space:pre-wrap;margin: 0px;padding: 0px;max-width: 100%;overflow-wrap: break-word !important;box-sizing: border-box !important;color: rgb(171, 178, 191);font-family: "Operator Mono", Consolas, Monaco, Menlo, monospace;font-size: 12px;font-style: normal;font-variant-ligatures: normal;font-variant-caps: normal;font-weight: 400;letter-spacing: normal;orphans: 2;text-align: left;text-indent: 0px;text-transform: none;widows: 2;word-spacing: 0px;-webkit-text-stroke-width: 0px;text-decoration-thickness: initial;text-decoration-style: initial;text-decoration-color: initial;" /> presets: ["@babel/preset-react", "@babel/preset-env"],<br style="white-space:pre-wrap;margin: 0px;padding: 0px;max-width: 100%;overflow-wrap: break-word !important;box-sizing: border-box !important;color: rgb(171, 178, 191);font-family: "Operator Mono", Consolas, Monaco, Menlo, monospace;font-size: 12px;font-style: normal;font-variant-ligatures: normal;font-variant-caps: normal;font-weight: 400;letter-spacing: normal;orphans: 2;text-align: left;text-indent: 0px;text-transform: none;widows: 2;word-spacing: 0px;-webkit-text-stroke-width: 0px;text-decoration-thickness: initial;text-decoration-style: initial;text-decoration-color: initial;" /> plugins: [<br style="white-space:pre-wrap;margin: 0px;padding: 0px;max-width: 100%;overflow-wrap: break-word !important;box-sizing: border-box !important;color: rgb(171, 178, 191);font-family: "Operator Mono", Consolas, Monaco, Menlo, monospace;font-size: 12px;font-style: normal;font-variant-ligatures: normal;font-variant-caps: normal;font-weight: 400;letter-spacing: normal;orphans: 2;text-align: left;text-indent: 0px;text-transform: none;widows: 2;word-spacing: 0px;-webkit-text-stroke-width: 0px;text-decoration-thickness: initial;text-decoration-style: initial;text-decoration-color: initial;" /> [<br style="white-space:pre-wrap;margin: 0px;padding: 0px;max-width: 100%;overflow-wrap: break-word !important;box-sizing: border-box !important;color: rgb(171, 178, 191);font-family: "Operator Mono", Consolas, Monaco, Menlo, monospace;font-size: 12px;font-style: normal;font-variant-ligatures: normal;font-variant-caps: normal;font-weight: 400;letter-spacing: normal;orphans: 2;text-align: left;text-indent: 0px;text-transform: none;widows: 2;word-spacing: 0px;-webkit-text-stroke-width: 0px;text-decoration-thickness: initial;text-decoration-style: initial;text-decoration-color: initial;" /> "@babel/plugin-transform-runtime",<br style="white-space:pre-wrap;margin: 0px;padding: 0px;max-width: 100%;overflow-wrap: break-word !important;box-sizing: border-box !important;color: rgb(171, 178, 191);font-family: "Operator Mono", Consolas, Monaco, Menlo, monospace;font-size: 12px;font-style: normal;font-variant-ligatures: normal;font-variant-caps: normal;font-weight: 400;letter-spacing: normal;orphans: 2;text-align: left;text-indent: 0px;text-transform: none;widows: 2;word-spacing: 0px;-webkit-text-stroke-width: 0px;text-decoration-thickness: initial;text-decoration-style: initial;text-decoration-color: initial;" /> {<br style="white-space:pre-wrap;margin: 0px;padding: 0px;max-width: 100%;overflow-wrap: break-word !important;box-sizing: border-box !important;color: rgb(171, 178, 191);font-family: "Operator Mono", Consolas, Monaco, Menlo, monospace;font-size: 12px;font-style: normal;font-variant-ligatures: normal;font-variant-caps: normal;font-weight: 400;letter-spacing: normal;orphans: 2;text-align: left;text-indent: 0px;text-transform: none;widows: 2;word-spacing: 0px;-webkit-text-stroke-width: 0px;text-decoration-thickness: initial;text-decoration-style: initial;text-decoration-color: initial;" /> absoluteRuntime: false,<br style="white-space:pre-wrap;margin: 0px;padding: 0px;max-width: 100%;overflow-wrap: break-word !important;box-sizing: border-box !important;color: rgb(171, 178, 191);font-family: "Operator Mono", Consolas, Monaco, Menlo, monospace;font-size: 12px;font-style: normal;font-variant-ligatures: normal;font-variant-caps: normal;font-weight: 400;letter-spacing: normal;orphans: 2;text-align: left;text-indent: 0px;text-transform: none;widows: 2;word-spacing: 0px;-webkit-text-stroke-width: 0px;text-decoration-thickness: initial;text-decoration-style: initial;text-decoration-color: initial;" /> corejs: false,<br style="white-space:pre-wrap;margin: 0px;padding: 0px;max-width: 100%;overflow-wrap: break-word !important;box-sizing: border-box !important;color: rgb(171, 178, 191);font-family: "Operator Mono", Consolas, Monaco, Menlo, monospace;font-size: 12px;font-style: normal;font-variant-ligatures: normal;font-variant-caps: normal;font-weight: 400;letter-spacing: normal;orphans: 2;text-align: left;text-indent: 0px;text-transform: none;widows: 2;word-spacing: 0px;-webkit-text-stroke-width: 0px;text-decoration-thickness: initial;text-decoration-style: initial;text-decoration-color: initial;" /> helpers: true,<br style="white-space:pre-wrap;margin: 0px;padding: 0px;max-width: 100%;overflow-wrap: break-word !important;box-sizing: border-box !important;color: rgb(171, 178, 191);font-family: "Operator Mono", Consolas, Monaco, Menlo, monospace;font-size: 12px;font-style: normal;font-variant-ligatures: normal;font-variant-caps: normal;font-weight: 400;letter-spacing: normal;orphans: 2;text-align: left;text-indent: 0px;text-transform: none;widows: 2;word-spacing: 0px;-webkit-text-stroke-width: 0px;text-decoration-thickness: initial;text-decoration-style: initial;text-decoration-color: initial;" /> regenerator: true,<br style="white-space:pre-wrap;margin: 0px;padding: 0px;max-width: 100%;overflow-wrap: break-word !important;box-sizing: border-box !important;color: rgb(171, 178, 191);font-family: "Operator Mono", Consolas, Monaco, Menlo, monospace;font-size: 12px;font-style: normal;font-variant-ligatures: normal;font-variant-caps: normal;font-weight: 400;letter-spacing: normal;orphans: 2;text-align: left;text-indent: 0px;text-transform: none;widows: 2;word-spacing: 0px;-webkit-text-stroke-width: 0px;text-decoration-thickness: initial;text-decoration-style: initial;text-decoration-color: initial;" /> version: "7.0.0-beta.0",<br style="white-space:pre-wrap;margin: 0px;padding: 0px;max-width: 100%;overflow-wrap: break-word !important;box-sizing: border-box !important;color: rgb(171, 178, 191);font-family: "Operator Mono", Consolas, Monaco, Menlo, monospace;font-size: 12px;font-style: normal;font-variant-ligatures: normal;font-variant-caps: normal;font-weight: 400;letter-spacing: normal;orphans: 2;text-align: left;text-indent: 0px;text-transform: none;widows: 2;word-spacing: 0px;-webkit-text-stroke-width: 0px;text-decoration-thickness: initial;text-decoration-style: initial;text-decoration-color: initial;" /> },<br style="white-space:pre-wrap;margin: 0px;padding: 0px;max-width: 100%;overflow-wrap: break-word !important;box-sizing: border-box !important;color: rgb(171, 178, 191);font-family: "Operator Mono", Consolas, Monaco, Menlo, monospace;font-size: 12px;font-style: normal;font-variant-ligatures: normal;font-variant-caps: normal;font-weight: 400;letter-spacing: normal;orphans: 2;text-align: left;text-indent: 0px;text-transform: none;widows: 2;word-spacing: 0px;-webkit-text-stroke-width: 0px;text-decoration-thickness: initial;text-decoration-style: initial;text-decoration-color: initial;" /> ],<br style="white-space:pre-wrap;margin: 0px;padding: 0px;max-width: 100%;overflow-wrap: break-word !important;box-sizing: border-box !important;color: rgb(171, 178, 191);font-family: "Operator Mono", Consolas, Monaco, Menlo, monospace;font-size: 12px;font-style: normal;font-variant-ligatures: normal;font-variant-caps: normal;font-weight: 400;letter-spacing: normal;orphans: 2;text-align: left;text-indent: 0px;text-transform: none;widows: 2;word-spacing: 0px;-webkit-text-stroke-width: 0px;text-decoration-thickness: initial;text-decoration-style: initial;text-decoration-color: initial;" /> ],<br style="white-space:pre-wrap;margin: 0px;padding: 0px;max-width: 100%;overflow-wrap: break-word !important;box-sizing: border-box !important;color: rgb(171, 178, 191);font-family: "Operator Mono", Consolas, Monaco, Menlo, monospace;font-size: 12px;font-style: normal;font-variant-ligatures: normal;font-variant-caps: normal;font-weight: 400;letter-spacing: normal;orphans: 2;text-align: left;text-indent: 0px;text-transform: none;widows: 2;word-spacing: 0px;-webkit-text-stroke-width: 0px;text-decoration-thickness: initial;text-decoration-style: initial;text-decoration-color: initial;" /> },<br style="white-space:pre-wrap;margin: 0px;padding: 0px;max-width: 100%;overflow-wrap: break-word !important;box-sizing: border-box !important;color: rgb(171, 178, 191);font-family: "Operator Mono", Consolas, Monaco, Menlo, monospace;font-size: 12px;font-style: normal;font-variant-ligatures: normal;font-variant-caps: normal;font-weight: 400;letter-spacing: normal;orphans: 2;text-align: left;text-indent: 0px;text-transform: none;widows: 2;word-spacing: 0px;-webkit-text-stroke-width: 0px;text-decoration-thickness: initial;text-decoration-style: initial;text-decoration-color: initial;" /> },<br style="white-space:pre-wrap;margin: 0px;padding: 0px;max-width: 100%;overflow-wrap: break-word !important;box-sizing: border-box !important;color: rgb(171, 178, 191);font-family: "Operator Mono", Consolas, Monaco, Menlo, monospace;font-size: 12px;font-style: normal;font-variant-ligatures: normal;font-variant-caps: normal;font-weight: 400;letter-spacing: normal;orphans: 2;text-align: left;text-indent: 0px;text-transform: none;widows: 2;word-spacing: 0px;-webkit-text-stroke-width: 0px;text-decoration-thickness: initial;text-decoration-style: initial;text-decoration-color: initial;" /> ],<br style="white-space:pre-wrap;margin: 0px;padding: 0px;max-width: 100%;overflow-wrap: break-word !important;box-sizing: border-box !important;color: rgb(171, 178, 191);font-family: "Operator Mono", Consolas, Monaco, Menlo, monospace;font-size: 12px;font-style: normal;font-variant-ligatures: normal;font-variant-caps: normal;font-weight: 400;letter-spacing: normal;orphans: 2;text-align: left;text-indent: 0px;text-transform: none;widows: 2;word-spacing: 0px;-webkit-text-stroke-width: 0px;text-decoration-thickness: initial;text-decoration-style: initial;text-decoration-color: initial;" /> },<br style="white-space:pre-wrap;margin: 0px;padding: 0px;max-width: 100%;overflow-wrap: break-word !important;box-sizing: border-box !important;color: rgb(171, 178, 191);font-family: "Operator Mono", Consolas, Monaco, Menlo, monospace;font-size: 12px;font-style: normal;font-variant-ligatures: normal;font-variant-caps: normal;font-weight: 400;letter-spacing: normal;orphans: 2;text-align: left;text-indent: 0px;text-transform: none;widows: 2;word-spacing: 0px;-webkit-text-stroke-width: 0px;text-decoration-thickness: initial;text-decoration-style: initial;text-decoration-color: initial;" /> output: {<br style="white-space:pre-wrap;margin: 0px;padding: 0px;max-width: 100%;overflow-wrap: break-word !important;box-sizing: border-box !important;color: rgb(171, 178, 191);font-family: "Operator Mono", Consolas, Monaco, Menlo, monospace;font-size: 12px;font-style: normal;font-variant-ligatures: normal;font-variant-caps: normal;font-weight: 400;letter-spacing: normal;orphans: 2;text-align: left;text-indent: 0px;text-transform: none;widows: 2;word-spacing: 0px;-webkit-text-stroke-width: 0px;text-decoration-thickness: initial;text-decoration-style: initial;text-decoration-color: initial;" /> filename: "bundle.js",<br style="white-space:pre-wrap;margin: 0px;padding: 0px;max-width: 100%;overflow-wrap: break-word !important;box-sizing: border-box !important;color: rgb(171, 178, 191);font-family: "Operator Mono", Consolas, Monaco, Menlo, monospace;font-size: 12px;font-style: normal;font-variant-ligatures: normal;font-variant-caps: normal;font-weight: 400;letter-spacing: normal;orphans: 2;text-align: left;text-indent: 0px;text-transform: none;widows: 2;word-spacing: 0px;-webkit-text-stroke-width: 0px;text-decoration-thickness: initial;text-decoration-style: initial;text-decoration-color: initial;" /> path: path.resolve(__dirname, "build"),<br style="white-space:pre-wrap;margin: 0px;padding: 0px;max-width: 100%;overflow-wrap: break-word !important;box-sizing: border-box !important;color: rgb(171, 178, 191);font-family: "Operator Mono", Consolas, Monaco, Menlo, monospace;font-size: 12px;font-style: normal;font-variant-ligatures: normal;font-variant-caps: normal;font-weight: 400;letter-spacing: normal;orphans: 2;text-align: left;text-indent: 0px;text-transform: none;widows: 2;word-spacing: 0px;-webkit-text-stroke-width: 0px;text-decoration-thickness: initial;text-decoration-style: initial;text-decoration-color: initial;" /> },<br style="white-space:pre-wrap;margin: 0px;padding: 0px;max-width: 100%;overflow-wrap: break-word !important;box-sizing: border-box !important;color: rgb(171, 178, 191);font-family: "Operator Mono", Consolas, Monaco, Menlo, monospace;font-size: 12px;font-style: normal;font-variant-ligatures: normal;font-variant-caps: normal;font-weight: 400;letter-spacing: normal;orphans: 2;text-align: left;text-indent: 0px;text-transform: none;widows: 2;word-spacing: 0px;-webkit-text-stroke-width: 0px;text-decoration-thickness: initial;text-decoration-style: initial;text-decoration-color: initial;" /> externals: [nodeExternals()],<br style="white-space:pre-wrap;margin: 0px;padding: 0px;max-width: 100%;overflow-wrap: break-word !important;box-sizing: border-box !important;color: rgb(171, 178, 191);font-family: "Operator Mono", Consolas, Monaco, Menlo, monospace;font-size: 12px;font-style: normal;font-variant-ligatures: normal;font-variant-caps: normal;font-weight: 400;letter-spacing: normal;orphans: 2;text-align: left;text-indent: 0px;text-transform: none;widows: 2;word-spacing: 0px;-webkit-text-stroke-width: 0px;text-decoration-thickness: initial;text-decoration-style: initial;text-decoration-color: initial;" />};
在webpack构建完成后,可在Node环境运行build/bundle.js,访问页面后查看网页源代码,可以看到,React组件中的内容已经完整地包含在服务端返回到html里面。我们成功迈出了服务端渲染第一步。此时,我们也有必要再深入了解renderToString 到底做了什么,提前踩坑!
renderToString
除了将React组件转换成html字符串外,renderToString还有做了下面这些:
1. 会执行传入的React组件的代码,但是其只执行到React生命周期初始化过程的render及之前,即下面红框的部分,其余大部分生命周期函数在服务端都不执行;这也是服务端渲染的坑点之一。
2.renderToString 生成的产物中会包含一些额外生成特殊标记,代码体积会有所增大,其中属性data-reactroot是服务端渲染的标志,便于后续客户端通过hydrate复用HTML节点。在React16前后其产物也有差距:在React 16 之前,服务端渲染采用的是基于字符串校验和(string checksum)的 HTML 节点复用方式, 会额外生成生成data-reactid、data-react-checksum等属性;React 16 改用单节点校验来复用(服务端返回的)HTML 节点,不再生成data-reactid、data-react-checksum等体积占用大户,只在空白节点间多了 这样的标记。
renderToString react16前<br style="white-space:pre-wrap;margin: 0px;padding: 0px;max-width: 100%;overflow-wrap: break-word !important;box-sizing: border-box !important;color: rgb(171, 178, 191);font-family: "Operator Mono", Consolas, Monaco, Menlo, monospace;font-size: 12px;font-style: normal;font-variant-ligatures: normal;font-variant-caps: normal;font-weight: 400;letter-spacing: normal;orphans: 2;text-align: left;text-indent: 0px;text-transform: none;widows: 2;word-spacing: 0px;-webkit-text-stroke-width: 0px;text-decoration-thickness: initial;text-decoration-style: initial;text-decoration-color: initial;" /><br style="white-space:pre-wrap;margin: 0px;padding: 0px;max-width: 100%;overflow-wrap: break-word !important;box-sizing: border-box !important;color: rgb(171, 178, 191);font-family: "Operator Mono", Consolas, Monaco, Menlo, monospace;font-size: 12px;font-style: normal;font-variant-ligatures: normal;font-variant-caps: normal;font-weight: 400;letter-spacing: normal;orphans: 2;text-align: left;text-indent: 0px;text-transform: none;widows: 2;word-spacing: 0px;-webkit-text-stroke-width: 0px;text-decoration-thickness: initial;text-decoration-style: initial;text-decoration-color: initial;" /> Welcome to React SSR! <br style="white-space:pre-wrap;margin: 0px;padding: 0px;max-width: 100%;overflow-wrap: break-word !important;box-sizing: border-box !important;color: rgb(171, 178, 191);font-family: "Operator Mono", Consolas, Monaco, Menlo, monospace;font-size: 12px;font-style: normal;font-variant-ligatures: normal;font-variant-caps: normal;font-weight: 400;letter-spacing: normal;orphans: 2;text-align: left;text-indent: 0px;text-transform: none;widows: 2;word-spacing: 0px;-webkit-text-stroke-width: 0px;text-decoration-thickness: initial;text-decoration-style: initial;text-decoration-color: initial;" /> Hello There! <br style="white-space:pre-wrap;margin: 0px;padding: 0px;max-width: 100%;overflow-wrap: break-word !important;box-sizing: border-box !important;color: rgb(171, 178, 191);font-family: "Operator Mono", Consolas, Monaco, Menlo, monospace;font-size: 12px;font-style: normal;font-variant-ligatures: normal;font-variant-caps: normal;font-weight: 400;letter-spacing: normal;orphans: 2;text-align: left;text-indent: 0px;text-transform: none;widows: 2;word-spacing: 0px;-webkit-text-stroke-width: 0px;text-decoration-thickness: initial;text-decoration-style: initial;text-decoration-color: initial;" /><br style="white-space:pre-wrap;margin: 0px;padding: 0px;max-width: 100%;overflow-wrap: break-word !important;box-sizing: border-box !important;color: rgb(171, 178, 191);font-family: "Operator Mono", Consolas, Monaco, Menlo, monospace;font-size: 12px;font-style: normal;font-variant-ligatures: normal;font-variant-caps: normal;font-weight: 400;letter-spacing: normal;orphans: 2;text-align: left;text-indent: 0px;text-transform: none;widows: 2;word-spacing: 0px;-webkit-text-stroke-width: 0px;text-decoration-thickness: initial;text-decoration-style: initial;text-decoration-color: initial;" /><br style="white-space:pre-wrap;margin: 0px;padding: 0px;max-width: 100%;overflow-wrap: break-word !important;box-sizing: border-box !important;color: rgb(171, 178, 191);font-family: "Operator Mono", Consolas, Monaco, Menlo, monospace;font-size: 12px;font-style: normal;font-variant-ligatures: normal;font-variant-caps: normal;font-weight: 400;letter-spacing: normal;orphans: 2;text-align: left;text-indent: 0px;text-transform: none;widows: 2;word-spacing: 0px;-webkit-text-stroke-width: 0px;text-decoration-thickness: initial;text-decoration-style: initial;text-decoration-color: initial;" />// renderToString react16<br style="white-space:pre-wrap;margin: 0px;padding: 0px;max-width: 100%;overflow-wrap: break-word !important;box-sizing: border-box !important;color: rgb(171, 178, 191);font-family: "Operator Mono", Consolas, Monaco, Menlo, monospace;font-size: 12px;font-style: normal;font-variant-ligatures: normal;font-variant-caps: normal;font-weight: 400;letter-spacing: normal;orphans: 2;text-align: left;text-indent: 0px;text-transform: none;widows: 2;word-spacing: 0px;-webkit-text-stroke-width: 0px;text-decoration-thickness: initial;text-decoration-style: initial;text-decoration-color: initial;" />Welcome to React SSR! Hello There!
3.会被故意忽略掉的on开头的的属性,也就忽略掉了react代码中事件处理,这是也是坑点之一。服务端返回的html里没有处理事件点击,需要靠后续客户端js执行绑定事件。
function shouldIgnoreAttribute(<br /> name: string,<br /> propertyInfo: PropertyInfo | null,<br /> isCustomComponentTag: boolean,<br />): boolean {<br /> if (propertyInfo !== null) {<br /> return propertyInfo.type === RESERVED;<br /> }<br /> if (isCustomComponentTag) {<br /> return false;<br /> }<br /> if (<br /> name.length > 2 &&<br /> (name[0] === 'o' || name[0] === 'O') &&<br /> (name[1] === 'n' || name[1] === 'N')<br /> ) {<br /> return true;<br /> }<br /> return false;<br />}<br />
上面的例子我们可以看到React的代码里有点击事件,但点击后没有反应。需要靠后续客户端js执行绑定事件。如何实现?这就需要同构了。
2.3 实现基础的同构
前文已经大概讲了同构的概念,那为什么需要同构?之前的服务端代码在处理点击事件时故意忽略掉了这类属性,在服务端执行的生命周期也是不完整的,此时的页面是不具备交互能力的。同构,正是解决这些问题的关键,React代码在服务器上执行一遍之后,浏览器再去加载JS后又运行了一遍React代码,完成事件绑定和完整生命周期的执行,从而才能成为完全可交互页面。
react-dom:hydrate
实现同构的另一个核心API是React-dom下的hydrate,该方法能在客户端初次渲染的时候去复用服务端返回的原本已经存在的 DOM 节点,于渲染过程中为其附加交互行为(事件监听等),而不是重新创建 DOM 节点。需要注意是,服务端返回的 HTML 与客户端渲染结果不一致时,出于性能考虑,hydrate可以弥补文本内容的差异,但并不能保证修补属性的差异,而是将错就错;只在development模式下对这些不一致的问题报 Warning,因此必须重视 SSR HydrationWarning,要当 Error 逐个解决。
那具体实现同构?
上面这里我们提供了一个基本的架构图,可以看到,服务端运行React生成html代码我们已经基本实现,目前需要做的就是生产出客户端执行的index.js,那么这个index.js我们如何生产出来呢?
具体实践
首先新建客户端代码client.js,引入React组件,通过ReactDom.hydrate处理挂载到Dom节点, hydrate是实现复用的关键。
// client.js<br style="white-space:pre-wrap;margin: 0px;padding: 0px;max-width: 100%;overflow-wrap: break-word !important;box-sizing: border-box !important;color: rgb(171, 178, 191);font-family: "Operator Mono", Consolas, Monaco, Menlo, monospace;font-size: 12px;font-style: normal;font-variant-ligatures: normal;font-variant-caps: normal;font-weight: 400;letter-spacing: normal;orphans: 2;text-align: left;text-indent: 0px;text-transform: none;widows: 2;word-spacing: 0px;-webkit-text-stroke-width: 0px;text-decoration-thickness: initial;text-decoration-style: initial;text-decoration-color: initial;" />import React from "react";<br style="white-space:pre-wrap;margin: 0px;padding: 0px;max-width: 100%;overflow-wrap: break-word !important;box-sizing: border-box !important;color: rgb(171, 178, 191);font-family: "Operator Mono", Consolas, Monaco, Menlo, monospace;font-size: 12px;font-style: normal;font-variant-ligatures: normal;font-variant-caps: normal;font-weight: 400;letter-spacing: normal;orphans: 2;text-align: left;text-indent: 0px;text-transform: none;widows: 2;word-spacing: 0px;-webkit-text-stroke-width: 0px;text-decoration-thickness: initial;text-decoration-style: initial;text-decoration-color: initial;" />import ReactDom from "react-dom";<br style="white-space:pre-wrap;margin: 0px;padding: 0px;max-width: 100%;overflow-wrap: break-word !important;box-sizing: border-box !important;color: rgb(171, 178, 191);font-family: "Operator Mono", Consolas, Monaco, Menlo, monospace;font-size: 12px;font-style: normal;font-variant-ligatures: normal;font-variant-caps: normal;font-weight: 400;letter-spacing: normal;orphans: 2;text-align: left;text-indent: 0px;text-transform: none;widows: 2;word-spacing: 0px;-webkit-text-stroke-width: 0px;text-decoration-thickness: initial;text-decoration-style: initial;text-decoration-color: initial;" />import Home from "./containers/Home";<br style="white-space:pre-wrap;margin: 0px;padding: 0px;max-width: 100%;overflow-wrap: break-word !important;box-sizing: border-box !important;color: rgb(171, 178, 191);font-family: "Operator Mono", Consolas, Monaco, Menlo, monospace;font-size: 12px;font-style: normal;font-variant-ligatures: normal;font-variant-caps: normal;font-weight: 400;letter-spacing: normal;orphans: 2;text-align: left;text-indent: 0px;text-transform: none;widows: 2;word-spacing: 0px;-webkit-text-stroke-width: 0px;text-decoration-thickness: initial;text-decoration-style: initial;text-decoration-color: initial;" /><br style="white-space:pre-wrap;margin: 0px;padding: 0px;max-width: 100%;overflow-wrap: break-word !important;box-sizing: border-box !important;color: rgb(171, 178, 191);font-family: "Operator Mono", Consolas, Monaco, Menlo, monospace;font-size: 12px;font-style: normal;font-variant-ligatures: normal;font-variant-caps: normal;font-weight: 400;letter-spacing: normal;orphans: 2;text-align: left;text-indent: 0px;text-transform: none;widows: 2;word-spacing: 0px;-webkit-text-stroke-width: 0px;text-decoration-thickness: initial;text-decoration-style: initial;text-decoration-color: initial;" />const App = () => {<br style="white-space:pre-wrap;margin: 0px;padding: 0px;max-width: 100%;overflow-wrap: break-word !important;box-sizing: border-box !important;color: rgb(171, 178, 191);font-family: "Operator Mono", Consolas, Monaco, Menlo, monospace;font-size: 12px;font-style: normal;font-variant-ligatures: normal;font-variant-caps: normal;font-weight: 400;letter-spacing: normal;orphans: 2;text-align: left;text-indent: 0px;text-transform: none;widows: 2;word-spacing: 0px;-webkit-text-stroke-width: 0px;text-decoration-thickness: initial;text-decoration-style: initial;text-decoration-color: initial;" /> return ;<br style="white-space:pre-wrap;margin: 0px;padding: 0px;max-width: 100%;overflow-wrap: break-word !important;box-sizing: border-box !important;color: rgb(171, 178, 191);font-family: "Operator Mono", Consolas, Monaco, Menlo, monospace;font-size: 12px;font-style: normal;font-variant-ligatures: normal;font-variant-caps: normal;font-weight: 400;letter-spacing: normal;orphans: 2;text-align: left;text-indent: 0px;text-transform: none;widows: 2;word-spacing: 0px;-webkit-text-stroke-width: 0px;text-decoration-thickness: initial;text-decoration-style: initial;text-decoration-color: initial;" />};<br style="white-space:pre-wrap;margin: 0px;padding: 0px;max-width: 100%;overflow-wrap: break-word !important;box-sizing: border-box !important;color: rgb(171, 178, 191);font-family: "Operator Mono", Consolas, Monaco, Menlo, monospace;font-size: 12px;font-style: normal;font-variant-ligatures: normal;font-variant-caps: normal;font-weight: 400;letter-spacing: normal;orphans: 2;text-align: left;text-indent: 0px;text-transform: none;widows: 2;word-spacing: 0px;-webkit-text-stroke-width: 0px;text-decoration-thickness: initial;text-decoration-style: initial;text-decoration-color: initial;" /><br style="white-space:pre-wrap;margin: 0px;padding: 0px;max-width: 100%;overflow-wrap: break-word !important;box-sizing: border-box !important;color: rgb(171, 178, 191);font-family: "Operator Mono", Consolas, Monaco, Menlo, monospace;font-size: 12px;font-style: normal;font-variant-ligatures: normal;font-variant-caps: normal;font-weight: 400;letter-spacing: normal;orphans: 2;text-align: left;text-indent: 0px;text-transform: none;widows: 2;word-spacing: 0px;-webkit-text-stroke-width: 0px;text-decoration-thickness: initial;text-decoration-style: initial;text-decoration-color: initial;" />ReactDom.hydrate(, document.getElementById("root"));
客户端代码也需要webpack打包处理,新建webpack.client.js具体配置如下,需要注意打包输出在public目录下,后续的静态资源服务也起在了这个目录下。
// webpack.client.js<br style="white-space:pre-wrap;margin: 0px;padding: 0px;max-width: 100%;overflow-wrap: break-word !important;box-sizing: border-box !important;color: rgb(171, 178, 191);font-family: "Operator Mono", Consolas, Monaco, Menlo, monospace;font-size: 12px;font-style: normal;font-variant-ligatures: normal;font-variant-caps: normal;font-weight: 400;letter-spacing: normal;orphans: 2;text-align: left;text-indent: 0px;text-transform: none;widows: 2;word-spacing: 0px;-webkit-text-stroke-width: 0px;text-decoration-thickness: initial;text-decoration-style: initial;text-decoration-color: initial;" />const path = require("path");<br style="white-space:pre-wrap;margin: 0px;padding: 0px;max-width: 100%;overflow-wrap: break-word !important;box-sizing: border-box !important;color: rgb(171, 178, 191);font-family: "Operator Mono", Consolas, Monaco, Menlo, monospace;font-size: 12px;font-style: normal;font-variant-ligatures: normal;font-variant-caps: normal;font-weight: 400;letter-spacing: normal;orphans: 2;text-align: left;text-indent: 0px;text-transform: none;widows: 2;word-spacing: 0px;-webkit-text-stroke-width: 0px;text-decoration-thickness: initial;text-decoration-style: initial;text-decoration-color: initial;" />const resolve = (dir) => path.resolve(__dirname, "./src", dir);<br style="white-space:pre-wrap;margin: 0px;padding: 0px;max-width: 100%;overflow-wrap: break-word !important;box-sizing: border-box !important;color: rgb(171, 178, 191);font-family: "Operator Mono", Consolas, Monaco, Menlo, monospace;font-size: 12px;font-style: normal;font-variant-ligatures: normal;font-variant-caps: normal;font-weight: 400;letter-spacing: normal;orphans: 2;text-align: left;text-indent: 0px;text-transform: none;widows: 2;word-spacing: 0px;-webkit-text-stroke-width: 0px;text-decoration-thickness: initial;text-decoration-style: initial;text-decoration-color: initial;" />module.exports = {<br style="white-space:pre-wrap;margin: 0px;padding: 0px;max-width: 100%;overflow-wrap: break-word !important;box-sizing: border-box !important;color: rgb(171, 178, 191);font-family: "Operator Mono", Consolas, Monaco, Menlo, monospace;font-size: 12px;font-style: normal;font-variant-ligatures: normal;font-variant-caps: normal;font-weight: 400;letter-spacing: normal;orphans: 2;text-align: left;text-indent: 0px;text-transform: none;widows: 2;word-spacing: 0px;-webkit-text-stroke-width: 0px;text-decoration-thickness: initial;text-decoration-style: initial;text-decoration-color: initial;" /> mode: "development",<br style="white-space:pre-wrap;margin: 0px;padding: 0px;max-width: 100%;overflow-wrap: break-word !important;box-sizing: border-box !important;color: rgb(171, 178, 191);font-family: "Operator Mono", Consolas, Monaco, Menlo, monospace;font-size: 12px;font-style: normal;font-variant-ligatures: normal;font-variant-caps: normal;font-weight: 400;letter-spacing: normal;orphans: 2;text-align: left;text-indent: 0px;text-transform: none;widows: 2;word-spacing: 0px;-webkit-text-stroke-width: 0px;text-decoration-thickness: initial;text-decoration-style: initial;text-decoration-color: initial;" /> entry: "./client.js",<br style="white-space:pre-wrap;margin: 0px;padding: 0px;max-width: 100%;overflow-wrap: break-word !important;box-sizing: border-box !important;color: rgb(171, 178, 191);font-family: "Operator Mono", Consolas, Monaco, Menlo, monospace;font-size: 12px;font-style: normal;font-variant-ligatures: normal;font-variant-caps: normal;font-weight: 400;letter-spacing: normal;orphans: 2;text-align: left;text-indent: 0px;text-transform: none;widows: 2;word-spacing: 0px;-webkit-text-stroke-width: 0px;text-decoration-thickness: initial;text-decoration-style: initial;text-decoration-color: initial;" /> output: {<br style="white-space:pre-wrap;margin: 0px;padding: 0px;max-width: 100%;overflow-wrap: break-word !important;box-sizing: border-box !important;color: rgb(171, 178, 191);font-family: "Operator Mono", Consolas, Monaco, Menlo, monospace;font-size: 12px;font-style: normal;font-variant-ligatures: normal;font-variant-caps: normal;font-weight: 400;letter-spacing: normal;orphans: 2;text-align: left;text-indent: 0px;text-transform: none;widows: 2;word-spacing: 0px;-webkit-text-stroke-width: 0px;text-decoration-thickness: initial;text-decoration-style: initial;text-decoration-color: initial;" /> filename: "index.js",<br style="white-space:pre-wrap;margin: 0px;padding: 0px;max-width: 100%;overflow-wrap: break-word !important;box-sizing: border-box !important;color: rgb(171, 178, 191);font-family: "Operator Mono", Consolas, Monaco, Menlo, monospace;font-size: 12px;font-style: normal;font-variant-ligatures: normal;font-variant-caps: normal;font-weight: 400;letter-spacing: normal;orphans: 2;text-align: left;text-indent: 0px;text-transform: none;widows: 2;word-spacing: 0px;-webkit-text-stroke-width: 0px;text-decoration-thickness: initial;text-decoration-style: initial;text-decoration-color: initial;" /> path: path.resolve(__dirname, "public"),<br style="white-space:pre-wrap;margin: 0px;padding: 0px;max-width: 100%;overflow-wrap: break-word !important;box-sizing: border-box !important;color: rgb(171, 178, 191);font-family: "Operator Mono", Consolas, Monaco, Menlo, monospace;font-size: 12px;font-style: normal;font-variant-ligatures: normal;font-variant-caps: normal;font-weight: 400;letter-spacing: normal;orphans: 2;text-align: left;text-indent: 0px;text-transform: none;widows: 2;word-spacing: 0px;-webkit-text-stroke-width: 0px;text-decoration-thickness: initial;text-decoration-style: initial;text-decoration-color: initial;" /> },<br style="white-space:pre-wrap;margin: 0px;padding: 0px;max-width: 100%;overflow-wrap: break-word !important;box-sizing: border-box !important;color: rgb(171, 178, 191);font-family: "Operator Mono", Consolas, Monaco, Menlo, monospace;font-size: 12px;font-style: normal;font-variant-ligatures: normal;font-variant-caps: normal;font-weight: 400;letter-spacing: normal;orphans: 2;text-align: left;text-indent: 0px;text-transform: none;widows: 2;word-spacing: 0px;-webkit-text-stroke-width: 0px;text-decoration-thickness: initial;text-decoration-style: initial;text-decoration-color: initial;" /> module: {<br style="white-space:pre-wrap;margin: 0px;padding: 0px;max-width: 100%;overflow-wrap: break-word !important;box-sizing: border-box !important;color: rgb(171, 178, 191);font-family: "Operator Mono", Consolas, Monaco, Menlo, monospace;font-size: 12px;font-style: normal;font-variant-ligatures: normal;font-variant-caps: normal;font-weight: 400;letter-spacing: n
nodejs抓取动态网页 全面深入理解预渲染技术体系
网站优化 • 优采云 发表了文章 • 0 个评论 • 85 次浏览 • 2022-06-29 22:40
在我们使用现代前端框架,比如Vue、React、Angular开发完毕前端项目之后,会发现这些页面输出的全是js,很不利于搜索引擎去爬取。在已经完成了单页应用(SPA)项目之后,如果要进行SEO优化的改造,这时候就可以使用预渲染技术体系。
下面将从适用场景、概念介绍、如何使用、底层原理几方面全面介绍预渲染技术的各项特性。适用场景在谈使用场景之前,首先需要明白以下几点:现代前端框架比如 Vue 在构建完成之后,页面加载的其实是一堆 js,再由 js 动态生成DOM。当我们访问页面,右键“显示网页源代码”的时候,看不到文字等内容百度、搜狗等爬虫在抓取页面的时候,不会执行页面的 js 源代码(谷歌爬虫可以执行“同步” js 来构建页面,因此 Vue 等框架开发的单页应用可以在谷歌搜索引擎中很好的被收录,这点我们不展开讨论)如果想要让百度、搜狗等收录索引我们的网站,就必须像静态 HTML 那样,让网页在右键查看源代码的时候,显示的是文字、图片等内容在这样的场景下,我们可以使用预渲染来解决此类问题。概念介绍
预渲染概念简单来讲是这样的:在项目构建阶段,我们会模拟访问项目的页面URL,这时候页面上的 js 将会执行并且形成真正的 HTML 片段;此时我们保存这个 HTML 文件到服务器硬盘上,下次不管是用户还是爬虫访问的时候,就直接返回这个物理文件,这样就可以有效解决 SEO 无法收录的问题。大体流程如下图:
可以看出,“预渲染”同“服务端渲染”最大的区别是,前者是在构建期间执行,后者在用户访问期间实时运行;前者在构建完成之后就不再需要 node服务,后者需要使用 node 作为运行时。预渲染也有它不适用的地方。正因为在构建阶段我们需要指明“需要构建的页面URL”,因此对于那些携带动态参数的页面(比如资料详情页),不适用于用预渲染去构建。这种场景下只能使用SSR。反之,一切静态官网、带数据的门户网站,只要是URL固定的,不管其中有没有动态数据,都可以使用预渲染。这里你可能会问一个问题:预渲染技术能否将 ajax 请求的内容也填充到页面上?答案是肯定的。虽然你 ajax 并非“同步执行”的 js,我们无法获知异步请求完成的时机。但通过控制监测页面上某个特定元素是否存在等手段,我们可以变相获知到数据返回的时机,从而进行预渲染。就可以达到“填充 ajax 数据”的效果(这可是谷歌爬虫也无法达到的效果哦)。如何使用预渲染技术有很多种实现方式。最常用的是使用 webpack 的一个插件: prerender-spa-plugin()。但是这个插件有很多局限性,最大的局限性在于必须结合 webpack 来使用,不够灵活,不易调试。也无法通过编程的方式使用。
比如我们的首页有动态的数据(非动态URL。是通过ajax获取的动态数据。)因此我们在使用了预渲染生成了静态首页之后,需要每间隔10分钟或者5分钟重新生成一个新的静态页,来更新数据。这就需要能够通过编程的方式调用渲染指令。在这样的情况下我基于这个插件的原理重新实现了一个包:@waitkafuka/spa-prerender(),可以通过 nodejs 通过编程的方式使用。
同时它剥离了 webpack 的依赖,剥离了对SPA页面的限制。只要有一个静态目录就可以工作。使用的方式非常简单,以 Vue 为例,在我们正常构建生成了 dist 目录之后,只需要编写以下脚本:
const SpaRenderer = require('@waitkafuka/spa-prerender');const path = require('path');<br />const options = {staticDir: path.join(__dirname, 'dist'),basePath: 'base',//可选,当项目有basePath的时候设置。同router中的base和publicPath。确保staticDir/basePath/index.html存在 routes: ['/','/exam', ],puppeteerOptions: {headless: true,maxConcurrentRoutes: 0,renderAfterDocumentEvent: 'render-event',skipThirdPartyRequests: true }};const spaRenderer = new SpaRenderer(options)spaRenderer.render().then(() => {console.log('预渲染完毕。');});
具体的参数解析可以查看 @waitkafuka/spa-prerender。底层原理在底层实现上,主要利用了 express 来驱动静态页面;然后利用 puppeteer 无头浏览器来模拟用户访问所需要预渲染的地址;在访问完成之后,保存页面HTML到文件夹中。
流程如下:
更为详细的流程介绍如下(此部分枯燥乏味,非专业人士可以跳过。):
阶段1:创建渲染器实例
spa-prerender index.js:
1.创建puppeteer实例 @prerenderer/renderer-puppeteer/es6/renderer.js
2.创建server实例@prerenderer/prerenderer/es6/server.js
3.创建renderer实例,将1 2步的puppeteer和server注入this @@prerenderer/prerenderer/es6/index.js
阶段2:渲染器实例初始化:spa-prerender index.js:
1.server初始化 (设置路由:静态资源利用*.*映射到staticDir上,其他请求全部映射到index.html上。设置静态资源和index.html路径,modifyServer也在这个阶段。server 启动)@prerenderer/prerenderer/es6/server.js
2.puppeteer初始化(判断平台是否linux,如果是Linux需要设置一些启动参数;启动puppeteer)@prerenderer/renderer-puppeteer/es6/renderer.js
阶段3:开始访问路由并获取html
1.spa-prerender index.js->@prerenderer/prerenderer/es6/index.js -> @prerenderer/renderer-puppeteer/es6/renderer.js
2.开启一个限流器,每次最多渲染 n 条路由,避免内存崩溃
3.puppeteer开启一个新标签,判断是否有inject,如果有,注入到window上
4.拼接端口、设置viewport,拼接router,形成url,发起页面的请求
5.判断options中是否设置了renderAfterDocumentEvent,如果有,给页面添加一个事件监听器,当触发事件的时候,将__PRERENDER_STATUS属性设置为true
6.访问页面,等待加载完成(如何确定页面加载完成, waituntil: 'networkidle0'//在500ms内没有网络请求,这个设置可以通过puppeteerOptions.navigationOptions.waituntil修改)
等待捕捉,分为三种等待时机:
1.等待固定时间,renderAfterTime(利用settimeout结合promise实现)
2.等待抛出某个事件:renderAfterDocumentEvent,该事件需要事先在页面写好抛出的时机
3.等待某个元素出现:renderAfterElementExists
阶段4:保存html
spa-prerender index.js 遍历结果,拼接文件夹路径并保存html。
实践过程中的常见问题
1. 如果一个项目有10个页面,其中首页需要SEO,于是使用了预渲染,另外9个页面仍然是由js渲染。那么在访问其他9个页面的时候,刷新页面,会先显示首页的内容一闪而过。这种问题如何解决?
产生这种情况的原因在于:在单页应用中,实际上只有一个物理页面,那就是 index.html。我们访问的所有页面实际都是 index.html,先进入 index.html 然后再执行 js 构建 dom。那么此时如果我们首页是已经预渲染好的,那么就会有内容,在 js 构建出对应路由的内容之前,就会先出现首页的内容。
spa-prerender 考虑到了这种问题。在预渲染的过程中,会首先保留原来“纯净”的index.html,并重命名为“index-spa.html”。
而后,在 nginx 配置中,利用 try_files 指令的优先级配置特点,让用户在刷新的情况下,如果有对应物理文件则访问物理文件(预渲染生成的文件),如果没有对应物理文件则降级访问 index-spa.html,就可以解决上述问题。nginx 配置指令如下:
location /{ alias /Users/zks/code/xkw/xop/dist/; try_files $uri $uri/ /index-spa.html; }
此时预渲染生成的文件将被优先返回($uri),如果未匹配,才会交由 index-spa.html 处理。
2. 如果项目打包有前缀怎么办?
如果项目有publicPath,那么在 dist 目录下会多一层根目录。此时需要在预渲染配置中添加 basePath 的选项。此时 express 会从 dist/basePath 目录中去寻找 index.html。
配置如下:
const options = { staticDir: path.join(__dirname, 'dist'), basePath: 'base',//当项目有basePath的时候设置。同router中的base和publicPath。确保staticDir/basePath/index.html存在 routes: ['/','/exam', ], ... }
3. 如何控制渲染器开始进行HTML保存的时机?
我们可以通过 options 中三个参数来控制:
3.1.renderAfterTime:等待固定时间之后(从页面开始发起访问算起)
3.2.renderAfterDocumentEvent:等待抛出某个事件,该事件需要事先在页面定义好触发的时机,比如在 Vue 的 mounted 函数中定义:
new Vue({ router,render: h => h(App), mounted () { //在mounted之后触发custom-render-event // 预渲染器在收到这个事件之后将开始进行页面的保存工作 document.dispatchEvent(new Event('custom-render-event')) }}).$mount('#app')
3.3.renderAfterElementExists:等待某个元素出现。我们可以在异步 ajax 返回之后,增加某个元素。当渲染器检测到此元素出现之后进行页面保存,此时保存的页面就包含了 ajax 返回的数据。
4. 首页预渲染生成的 DOM 元素,会不会被 js 复用?还是删除重新构建?
仿照SSR的思路,我们可以通过在根节点上设置 data-server-rander="true",这样在客户端 js 会知道这个是已经渲染完成的 DOM,不会粗暴去替换它。而是执行一个“注水”的过程(也就是hydration)。可以充分复用预渲染生成的 DOM 元素。
点击下方卡片可以关注 查看全部
nodejs抓取动态网页 全面深入理解预渲染技术体系
在我们使用现代前端框架,比如Vue、React、Angular开发完毕前端项目之后,会发现这些页面输出的全是js,很不利于搜索引擎去爬取。在已经完成了单页应用(SPA)项目之后,如果要进行SEO优化的改造,这时候就可以使用预渲染技术体系。
下面将从适用场景、概念介绍、如何使用、底层原理几方面全面介绍预渲染技术的各项特性。适用场景在谈使用场景之前,首先需要明白以下几点:现代前端框架比如 Vue 在构建完成之后,页面加载的其实是一堆 js,再由 js 动态生成DOM。当我们访问页面,右键“显示网页源代码”的时候,看不到文字等内容百度、搜狗等爬虫在抓取页面的时候,不会执行页面的 js 源代码(谷歌爬虫可以执行“同步” js 来构建页面,因此 Vue 等框架开发的单页应用可以在谷歌搜索引擎中很好的被收录,这点我们不展开讨论)如果想要让百度、搜狗等收录索引我们的网站,就必须像静态 HTML 那样,让网页在右键查看源代码的时候,显示的是文字、图片等内容在这样的场景下,我们可以使用预渲染来解决此类问题。概念介绍
预渲染概念简单来讲是这样的:在项目构建阶段,我们会模拟访问项目的页面URL,这时候页面上的 js 将会执行并且形成真正的 HTML 片段;此时我们保存这个 HTML 文件到服务器硬盘上,下次不管是用户还是爬虫访问的时候,就直接返回这个物理文件,这样就可以有效解决 SEO 无法收录的问题。大体流程如下图:
可以看出,“预渲染”同“服务端渲染”最大的区别是,前者是在构建期间执行,后者在用户访问期间实时运行;前者在构建完成之后就不再需要 node服务,后者需要使用 node 作为运行时。预渲染也有它不适用的地方。正因为在构建阶段我们需要指明“需要构建的页面URL”,因此对于那些携带动态参数的页面(比如资料详情页),不适用于用预渲染去构建。这种场景下只能使用SSR。反之,一切静态官网、带数据的门户网站,只要是URL固定的,不管其中有没有动态数据,都可以使用预渲染。这里你可能会问一个问题:预渲染技术能否将 ajax 请求的内容也填充到页面上?答案是肯定的。虽然你 ajax 并非“同步执行”的 js,我们无法获知异步请求完成的时机。但通过控制监测页面上某个特定元素是否存在等手段,我们可以变相获知到数据返回的时机,从而进行预渲染。就可以达到“填充 ajax 数据”的效果(这可是谷歌爬虫也无法达到的效果哦)。如何使用预渲染技术有很多种实现方式。最常用的是使用 webpack 的一个插件: prerender-spa-plugin()。但是这个插件有很多局限性,最大的局限性在于必须结合 webpack 来使用,不够灵活,不易调试。也无法通过编程的方式使用。
比如我们的首页有动态的数据(非动态URL。是通过ajax获取的动态数据。)因此我们在使用了预渲染生成了静态首页之后,需要每间隔10分钟或者5分钟重新生成一个新的静态页,来更新数据。这就需要能够通过编程的方式调用渲染指令。在这样的情况下我基于这个插件的原理重新实现了一个包:@waitkafuka/spa-prerender(),可以通过 nodejs 通过编程的方式使用。
同时它剥离了 webpack 的依赖,剥离了对SPA页面的限制。只要有一个静态目录就可以工作。使用的方式非常简单,以 Vue 为例,在我们正常构建生成了 dist 目录之后,只需要编写以下脚本:
const SpaRenderer = require('@waitkafuka/spa-prerender');const path = require('path');<br />const options = {staticDir: path.join(__dirname, 'dist'),basePath: 'base',//可选,当项目有basePath的时候设置。同router中的base和publicPath。确保staticDir/basePath/index.html存在 routes: ['/','/exam', ],puppeteerOptions: {headless: true,maxConcurrentRoutes: 0,renderAfterDocumentEvent: 'render-event',skipThirdPartyRequests: true }};const spaRenderer = new SpaRenderer(options)spaRenderer.render().then(() => {console.log('预渲染完毕。');});
具体的参数解析可以查看 @waitkafuka/spa-prerender。底层原理在底层实现上,主要利用了 express 来驱动静态页面;然后利用 puppeteer 无头浏览器来模拟用户访问所需要预渲染的地址;在访问完成之后,保存页面HTML到文件夹中。
流程如下:
更为详细的流程介绍如下(此部分枯燥乏味,非专业人士可以跳过。):
阶段1:创建渲染器实例
spa-prerender index.js:
1.创建puppeteer实例 @prerenderer/renderer-puppeteer/es6/renderer.js
2.创建server实例@prerenderer/prerenderer/es6/server.js
3.创建renderer实例,将1 2步的puppeteer和server注入this @@prerenderer/prerenderer/es6/index.js
阶段2:渲染器实例初始化:spa-prerender index.js:
1.server初始化 (设置路由:静态资源利用*.*映射到staticDir上,其他请求全部映射到index.html上。设置静态资源和index.html路径,modifyServer也在这个阶段。server 启动)@prerenderer/prerenderer/es6/server.js
2.puppeteer初始化(判断平台是否linux,如果是Linux需要设置一些启动参数;启动puppeteer)@prerenderer/renderer-puppeteer/es6/renderer.js
阶段3:开始访问路由并获取html
1.spa-prerender index.js->@prerenderer/prerenderer/es6/index.js -> @prerenderer/renderer-puppeteer/es6/renderer.js
2.开启一个限流器,每次最多渲染 n 条路由,避免内存崩溃
3.puppeteer开启一个新标签,判断是否有inject,如果有,注入到window上
4.拼接端口、设置viewport,拼接router,形成url,发起页面的请求
5.判断options中是否设置了renderAfterDocumentEvent,如果有,给页面添加一个事件监听器,当触发事件的时候,将__PRERENDER_STATUS属性设置为true
6.访问页面,等待加载完成(如何确定页面加载完成, waituntil: 'networkidle0'//在500ms内没有网络请求,这个设置可以通过puppeteerOptions.navigationOptions.waituntil修改)
等待捕捉,分为三种等待时机:
1.等待固定时间,renderAfterTime(利用settimeout结合promise实现)
2.等待抛出某个事件:renderAfterDocumentEvent,该事件需要事先在页面写好抛出的时机
3.等待某个元素出现:renderAfterElementExists
阶段4:保存html
spa-prerender index.js 遍历结果,拼接文件夹路径并保存html。
实践过程中的常见问题
1. 如果一个项目有10个页面,其中首页需要SEO,于是使用了预渲染,另外9个页面仍然是由js渲染。那么在访问其他9个页面的时候,刷新页面,会先显示首页的内容一闪而过。这种问题如何解决?
产生这种情况的原因在于:在单页应用中,实际上只有一个物理页面,那就是 index.html。我们访问的所有页面实际都是 index.html,先进入 index.html 然后再执行 js 构建 dom。那么此时如果我们首页是已经预渲染好的,那么就会有内容,在 js 构建出对应路由的内容之前,就会先出现首页的内容。
spa-prerender 考虑到了这种问题。在预渲染的过程中,会首先保留原来“纯净”的index.html,并重命名为“index-spa.html”。
而后,在 nginx 配置中,利用 try_files 指令的优先级配置特点,让用户在刷新的情况下,如果有对应物理文件则访问物理文件(预渲染生成的文件),如果没有对应物理文件则降级访问 index-spa.html,就可以解决上述问题。nginx 配置指令如下:
location /{ alias /Users/zks/code/xkw/xop/dist/; try_files $uri $uri/ /index-spa.html; }
此时预渲染生成的文件将被优先返回($uri),如果未匹配,才会交由 index-spa.html 处理。
2. 如果项目打包有前缀怎么办?
如果项目有publicPath,那么在 dist 目录下会多一层根目录。此时需要在预渲染配置中添加 basePath 的选项。此时 express 会从 dist/basePath 目录中去寻找 index.html。
配置如下:
const options = { staticDir: path.join(__dirname, 'dist'), basePath: 'base',//当项目有basePath的时候设置。同router中的base和publicPath。确保staticDir/basePath/index.html存在 routes: ['/','/exam', ], ... }
3. 如何控制渲染器开始进行HTML保存的时机?
我们可以通过 options 中三个参数来控制:
3.1.renderAfterTime:等待固定时间之后(从页面开始发起访问算起)
3.2.renderAfterDocumentEvent:等待抛出某个事件,该事件需要事先在页面定义好触发的时机,比如在 Vue 的 mounted 函数中定义:
new Vue({ router,render: h => h(App), mounted () { //在mounted之后触发custom-render-event // 预渲染器在收到这个事件之后将开始进行页面的保存工作 document.dispatchEvent(new Event('custom-render-event')) }}).$mount('#app')
3.3.renderAfterElementExists:等待某个元素出现。我们可以在异步 ajax 返回之后,增加某个元素。当渲染器检测到此元素出现之后进行页面保存,此时保存的页面就包含了 ajax 返回的数据。
4. 首页预渲染生成的 DOM 元素,会不会被 js 复用?还是删除重新构建?
仿照SSR的思路,我们可以通过在根节点上设置 data-server-rander="true",这样在客户端 js 会知道这个是已经渲染完成的 DOM,不会粗暴去替换它。而是执行一个“注水”的过程(也就是hydration)。可以充分复用预渲染生成的 DOM 元素。
点击下方卡片可以关注
nodejs抓取动态网页 分享12个GitHub骚操作!
网站优化 • 优采云 发表了文章 • 0 个评论 • 169 次浏览 • 2022-06-28 21:59
原文:
#1 在 GitHub 上编辑代码
我要先说一个很多人都知道的事儿。
当你使用 GitHub看一些文件时(任何的文本文件或者仓库),能看到一个顶部右侧有一个小铅笔图标。点击即可编辑文档。完成后,按照提示点击「Propose file change」,GitHub 会为你 fork 这个仓库并创建一个 pull request。
很帅吧,不需要 fork / pull / 改变 locally / push / 创建 PR,只需点击一下,GitHub 就为你创建了一个分支。
这对于修改一些排版错误或者防恶意篡改是很有帮助的。
#2 粘贴图像
对于 issue 和 comment,你还可以直接粘贴图片,当你粘贴时图片会被上传至云端,然后以 MarkDown 格式显示。
非常简洁。
#3 格式化代码
如果你想写一个 code block,你可以在开始处写三个反引号,然后 GitHub 会试图猜出你在写什么语言。
但是如果你发布如 Vue、Typescript、JSX 这样的语言,你可以明确写出来,以获取正确的高亮。
下图第一行使用了```jsx:
片段呈现:
(这可以扩展到 gist,顺便一提,如果你给了 gist 定义成 .jsx 扩展名,那么你会得到 JSX 的高亮)
#4 使用魔术词在 PR 中关闭 issue
比如你在创建一个 pull request 去修复 issue #234。那你可在 PR 输入「fixes #234」,就可以自动合并 PR 并关闭这个 issue,是不是很酷。
(提交信息里可以使用 fix/fixes/fixed , close/closes/closed 或者 resolve/resolves/resolved等关键词)
#5 链接到 comment
你甚至想链接到一个特定的评论,但无法做到?我在这里告诉你,点击名字旁边的日期/时间就万事大吉。
#6 链接到代码
既然能链接到 comment,那你想问能不能链接到代码上?可以的。
试试这个操作:在查看文件时,点击代码边上的行数。
哇喔,你看到了么?URL 随之更新。如果你按住 Shift 并单击另一个行号,URL 会再次更新,并且高亮这两个行数之间的所有代码段。
你现在可以分享这个 URL 了,但等等,这些还是当前分支,如果文件变化了呢?你需要一个永久链接。
我比较懒,但是下面这一个截图已经能够表达如何获取永久链接了(Copy Permalink):
#7 像使用命令行一样使用 GitHub URL
既然说到了 URL,那么就接着聊一下。使用 UI 浏览 GitHub 很方面也很好,不过很多时候最快的方式是使用 URL 来浏览。举个例子,如果我想跳转到正在处理的分支上,并想查看分支和 master 的差异,我可以在我的仓库名后面输入 /compare/branch-name。
这会使我到达分支的不同页面:
可以在名字后面再加上...XXX(分支名)比如我写的 mkdocs...pre-release,如下图:
这一步你可以配合键盘快捷键,Ctrl + L 或者 cmd + L,可以让光标直接移动到 URL 中(最起码 chrome 是这样)。这些加一起能提高生产力。
专业提示:用键盘移动 chrome URL 上的某一条网页记录,使用 Shift+Delete 或 Shift+fn+Delete 来删除某一条记录。(比如合并了分支之后就可以删除了)
#8 在 issue 中创建 list
你想在你的 issue中看到可多选的 list 么?
当你查看问题时,你想不想让它变成 2 of 5 这样的形式?
如果想,你可以在 issue 中使用以下句法:
- [ ] Screen width (integer) <br style="box-sizing: border-box;font-size: inherit;color: inherit;line-height: inherit;word-wrap: inherit !important;word-break: inherit !important;" />- [x] Service worker support <br style="box-sizing: border-box;font-size: inherit;color: inherit;line-height: inherit;word-wrap: inherit !important;word-break: inherit !important;" />- [x] Fetch support <br style="box-sizing: border-box;font-size: inherit;color: inherit;line-height: inherit;word-wrap: inherit !important;word-break: inherit !important;" />- [ ] CSS flexbox support <br style="box-sizing: border-box;font-size: inherit;color: inherit;line-height: inherit;word-wrap: inherit !important;word-break: inherit !important;" />- [ ] Custom elements
#9 GitHub 上的 project board
我总是用 Jira 做大项目,独立项目用 Trello,这两者我都很喜欢。
后来我知道,GitHub 也有类似的 project board:
我个人为了方便把它们都添加为 note。board 极为方便的帮助你做仓库管理。
你可以点击右上角 Add Cards 来添加东西。这里有些特殊语法方便搜索,比如: is:pr is:open,你就可以把任何公开的 PR 拖到 board 上。
更多语法可以参考search syntax。
你也可以把现存的 note 转化为 issue。
你也可以选择 issue 直接添加到 projects 。
这些意味着,从现在开始,你可以明确责任制度,每一行代码的分配都可以在 GitHub 上的 Project board 上完成,而不用去 Jira 或者 Trello 上。
不过它也有些缺点,比如功能比较少。你也可以试试 ZenHub,它有效的扩展 GitHub。
#10 GitHub WiKi
GitHub WiKi 能够帮助我们处理非结构化的页面集合,就像维基百科那样。我自己 NodeJS docs 就被我弄成 wiki 的样子。几个页面,然后自定义侧边栏。具体方法网上很多,我的页面可以供你参考一下。
建议:如果你有个特别长的单页面 README.md 文件,并且想和其他人有所区别,你可以试试这种形式。
#11 GitHub Pages(JekyII)
你可能已经知道了能使用 GitHub Pages 来托管静态网站。那本条就特别介绍一下如何使用 JekyII 来构建站点。
以最简单的方式,GitHub Pages + JekyII 将以最漂亮的主题来呈现你的 README.md,例如,你可以看一下about-github的自述文件。
在 GitHub 的 my site 中,点击 setting,打开 GitHub Pages,选择一个 JekyII 主题
就会得到一个Jekyll主题页面:
它的优点是:
注意,他需要 Ruby 在本地运行,Mac 自带,Windows 用户自行安装。
#12 把 GitHub 当 CMS 用
你的网站需要显示一些文字,但是你还不想直接放在 HTML 里面,那你可以把 GitHub 作为你储存内容的一个地方。这样,就可以让任何一个非程序员通过修改 Markdown 来修改 HTML 网页的内容。
我的方法是:在你的 GitHub 仓库中使用 markdown 文件来保存文本。在你网站的前端用一个组件来抓取这些文本并呈现在网页上。
我是玩 React 的,这里有个组件,用以抓取,解析并呈现到 HTML 上。
class Markdown extends React.Component {<br style="box-sizing: border-box;font-size: inherit;color: inherit;line-height: inherit;word-wrap: inherit !important;word-break: inherit !important;" /> constructor(props) {<br style="box-sizing: border-box;font-size: inherit;color: inherit;line-height: inherit;word-wrap: inherit !important;word-break: inherit !important;" /> super(props);class Markdown extends React.Component {<br style="box-sizing: border-box;font-size: inherit;color: inherit;line-height: inherit;word-wrap: inherit !important;word-break: inherit !important;" /> constructor(props) {<br style="box-sizing: border-box;font-size: inherit;color: inherit;line-height: inherit;word-wrap: inherit !important;word-break: inherit !important;" /> super(props);<br style="box-sizing: border-box;font-size: inherit;color: inherit;line-height: inherit;word-wrap: inherit !important;word-break: inherit !important;" /><br style="box-sizing: border-box;font-size: inherit;color: inherit;line-height: inherit;word-wrap: inherit !important;word-break: inherit !important;" /> // replace with your URL, obviously<br style="box-sizing: border-box;font-size: inherit;color: inherit;line-height: inherit;word-wrap: inherit !important;word-break: inherit !important;" /> this.baseUrl = 'https://raw.githubusercontent.com/davidgilbertson/about-github/master/text-snippets';<br style="box-sizing: border-box;font-size: inherit;color: inherit;line-height: inherit;word-wrap: inherit !important;word-break: inherit !important;" /><br style="box-sizing: border-box;font-size: inherit;color: inherit;line-height: inherit;word-wrap: inherit !important;word-break: inherit !important;" /> this.state = {<br style="box-sizing: border-box;font-size: inherit;color: inherit;line-height: inherit;word-wrap: inherit !important;word-break: inherit !important;" /> markdown: '',<br style="box-sizing: border-box;font-size: inherit;color: inherit;line-height: inherit;word-wrap: inherit !important;word-break: inherit !important;" /> };<br style="box-sizing: border-box;font-size: inherit;color: inherit;line-height: inherit;word-wrap: inherit !important;word-break: inherit !important;" /> }<br style="box-sizing: border-box;font-size: inherit;color: inherit;line-height: inherit;word-wrap: inherit !important;word-break: inherit !important;" /><br style="box-sizing: border-box;font-size: inherit;color: inherit;line-height: inherit;word-wrap: inherit !important;word-break: inherit !important;" /> componentDidMount() {<br style="box-sizing: border-box;font-size: inherit;color: inherit;line-height: inherit;word-wrap: inherit !important;word-break: inherit !important;" /> fetch(`${this.baseUrl}/${this.props.url}`)<br style="box-sizing: border-box;font-size: inherit;color: inherit;line-height: inherit;word-wrap: inherit !important;word-break: inherit !important;" /> .then(response => response.text())<br style="box-sizing: border-box;font-size: inherit;color: inherit;line-height: inherit;word-wrap: inherit !important;word-break: inherit !important;" /> .then((markdown) => {<br style="box-sizing: border-box;font-size: inherit;color: inherit;line-height: inherit;word-wrap: inherit !important;word-break: inherit !important;" /> this.setState({markdown});<br style="box-sizing: border-box;font-size: inherit;color: inherit;line-height: inherit;word-wrap: inherit !important;word-break: inherit !important;" /> });<br style="box-sizing: border-box;font-size: inherit;color: inherit;line-height: inherit;word-wrap: inherit !important;word-break: inherit !important;" /> }<br style="box-sizing: border-box;font-size: inherit;color: inherit;line-height: inherit;word-wrap: inherit !important;word-break: inherit !important;" /><br style="box-sizing: border-box;font-size: inherit;color: inherit;line-height: inherit;word-wrap: inherit !important;word-break: inherit !important;" /> render() {<br style="box-sizing: border-box;font-size: inherit;color: inherit;line-height: inherit;word-wrap: inherit !important;word-break: inherit !important;" /> return (<br style="box-sizing: border-box;font-size: inherit;color: inherit;line-height: inherit;word-wrap: inherit !important;word-break: inherit !important;" /> <br style="box-sizing: border-box;font-size: inherit;color: inherit;line-height: inherit;word-wrap: inherit !important;word-break: inherit !important;" /> );<br style="box-sizing: border-box;font-size: inherit;color: inherit;line-height: inherit;word-wrap: inherit !important;word-break: inherit !important;" /> }<br style="box-sizing: border-box;font-size: inherit;color: inherit;line-height: inherit;word-wrap: inherit !important;word-break: inherit !important;" />}
(/text-snippets这个文件夹是储存我的 markdown)
下面这段代码是上面组件的示例:
const Page = () => (<br style="box-sizing: border-box;font-size: inherit;color: inherit;line-height: inherit;word-wrap: inherit !important;word-break: inherit !important;" /> <br style="box-sizing: border-box;font-size: inherit;color: inherit;line-height: inherit;word-wrap: inherit !important;word-break: inherit !important;" /> <br style="box-sizing: border-box;font-size: inherit;color: inherit;line-height: inherit;word-wrap: inherit !important;word-break: inherit !important;" /> <br style="box-sizing: border-box;font-size: inherit;color: inherit;line-height: inherit;word-wrap: inherit !important;word-break: inherit !important;" /> <br style="box-sizing: border-box;font-size: inherit;color: inherit;line-height: inherit;word-wrap: inherit !important;word-break: inherit !important;" /><br style="box-sizing: border-box;font-size: inherit;color: inherit;line-height: inherit;word-wrap: inherit !important;word-break: inherit !important;" /> <br style="box-sizing: border-box;font-size: inherit;color: inherit;line-height: inherit;word-wrap: inherit !important;word-break: inherit !important;" /> A very important disclaimer:<br style="box-sizing: border-box;font-size: inherit;color: inherit;line-height: inherit;word-wrap: inherit !important;word-break: inherit !important;" /><br style="box-sizing: border-box;font-size: inherit;color: inherit;line-height: inherit;word-wrap: inherit !important;word-break: inherit !important;" /> <br style="box-sizing: border-box;font-size: inherit;color: inherit;line-height: inherit;word-wrap: inherit !important;word-break: inherit !important;" /> <br style="box-sizing: border-box;font-size: inherit;color: inherit;line-height: inherit;word-wrap: inherit !important;word-break: inherit !important;" /> <br style="box-sizing: border-box;font-size: inherit;color: inherit;line-height: inherit;word-wrap: inherit !important;word-break: inherit !important;" />);
所以现在 GitHub 也是你的 CMS,无论你想要样大小的文字都可以。
推荐一个 GitHub 工具
Octotree Chrome extension
它可以让你在看任何仓库时,获得一个左边的树状图。 查看全部
nodejs抓取动态网页 分享12个GitHub骚操作!
原文:
#1 在 GitHub 上编辑代码
我要先说一个很多人都知道的事儿。
当你使用 GitHub看一些文件时(任何的文本文件或者仓库),能看到一个顶部右侧有一个小铅笔图标。点击即可编辑文档。完成后,按照提示点击「Propose file change」,GitHub 会为你 fork 这个仓库并创建一个 pull request。
很帅吧,不需要 fork / pull / 改变 locally / push / 创建 PR,只需点击一下,GitHub 就为你创建了一个分支。
这对于修改一些排版错误或者防恶意篡改是很有帮助的。
#2 粘贴图像
对于 issue 和 comment,你还可以直接粘贴图片,当你粘贴时图片会被上传至云端,然后以 MarkDown 格式显示。
非常简洁。
#3 格式化代码
如果你想写一个 code block,你可以在开始处写三个反引号,然后 GitHub 会试图猜出你在写什么语言。
但是如果你发布如 Vue、Typescript、JSX 这样的语言,你可以明确写出来,以获取正确的高亮。
下图第一行使用了```jsx:
片段呈现:
(这可以扩展到 gist,顺便一提,如果你给了 gist 定义成 .jsx 扩展名,那么你会得到 JSX 的高亮)
#4 使用魔术词在 PR 中关闭 issue
比如你在创建一个 pull request 去修复 issue #234。那你可在 PR 输入「fixes #234」,就可以自动合并 PR 并关闭这个 issue,是不是很酷。
(提交信息里可以使用 fix/fixes/fixed , close/closes/closed 或者 resolve/resolves/resolved等关键词)
#5 链接到 comment
你甚至想链接到一个特定的评论,但无法做到?我在这里告诉你,点击名字旁边的日期/时间就万事大吉。
#6 链接到代码
既然能链接到 comment,那你想问能不能链接到代码上?可以的。
试试这个操作:在查看文件时,点击代码边上的行数。
哇喔,你看到了么?URL 随之更新。如果你按住 Shift 并单击另一个行号,URL 会再次更新,并且高亮这两个行数之间的所有代码段。
你现在可以分享这个 URL 了,但等等,这些还是当前分支,如果文件变化了呢?你需要一个永久链接。
我比较懒,但是下面这一个截图已经能够表达如何获取永久链接了(Copy Permalink):
#7 像使用命令行一样使用 GitHub URL
既然说到了 URL,那么就接着聊一下。使用 UI 浏览 GitHub 很方面也很好,不过很多时候最快的方式是使用 URL 来浏览。举个例子,如果我想跳转到正在处理的分支上,并想查看分支和 master 的差异,我可以在我的仓库名后面输入 /compare/branch-name。
这会使我到达分支的不同页面:
可以在名字后面再加上...XXX(分支名)比如我写的 mkdocs...pre-release,如下图:
这一步你可以配合键盘快捷键,Ctrl + L 或者 cmd + L,可以让光标直接移动到 URL 中(最起码 chrome 是这样)。这些加一起能提高生产力。
专业提示:用键盘移动 chrome URL 上的某一条网页记录,使用 Shift+Delete 或 Shift+fn+Delete 来删除某一条记录。(比如合并了分支之后就可以删除了)
#8 在 issue 中创建 list
你想在你的 issue中看到可多选的 list 么?
当你查看问题时,你想不想让它变成 2 of 5 这样的形式?
如果想,你可以在 issue 中使用以下句法:
- [ ] Screen width (integer) <br style="box-sizing: border-box;font-size: inherit;color: inherit;line-height: inherit;word-wrap: inherit !important;word-break: inherit !important;" />- [x] Service worker support <br style="box-sizing: border-box;font-size: inherit;color: inherit;line-height: inherit;word-wrap: inherit !important;word-break: inherit !important;" />- [x] Fetch support <br style="box-sizing: border-box;font-size: inherit;color: inherit;line-height: inherit;word-wrap: inherit !important;word-break: inherit !important;" />- [ ] CSS flexbox support <br style="box-sizing: border-box;font-size: inherit;color: inherit;line-height: inherit;word-wrap: inherit !important;word-break: inherit !important;" />- [ ] Custom elements
#9 GitHub 上的 project board
我总是用 Jira 做大项目,独立项目用 Trello,这两者我都很喜欢。
后来我知道,GitHub 也有类似的 project board:
我个人为了方便把它们都添加为 note。board 极为方便的帮助你做仓库管理。
你可以点击右上角 Add Cards 来添加东西。这里有些特殊语法方便搜索,比如: is:pr is:open,你就可以把任何公开的 PR 拖到 board 上。
更多语法可以参考search syntax。
你也可以把现存的 note 转化为 issue。
你也可以选择 issue 直接添加到 projects 。
这些意味着,从现在开始,你可以明确责任制度,每一行代码的分配都可以在 GitHub 上的 Project board 上完成,而不用去 Jira 或者 Trello 上。
不过它也有些缺点,比如功能比较少。你也可以试试 ZenHub,它有效的扩展 GitHub。
#10 GitHub WiKi
GitHub WiKi 能够帮助我们处理非结构化的页面集合,就像维基百科那样。我自己 NodeJS docs 就被我弄成 wiki 的样子。几个页面,然后自定义侧边栏。具体方法网上很多,我的页面可以供你参考一下。
建议:如果你有个特别长的单页面 README.md 文件,并且想和其他人有所区别,你可以试试这种形式。
#11 GitHub Pages(JekyII)
你可能已经知道了能使用 GitHub Pages 来托管静态网站。那本条就特别介绍一下如何使用 JekyII 来构建站点。
以最简单的方式,GitHub Pages + JekyII 将以最漂亮的主题来呈现你的 README.md,例如,你可以看一下about-github的自述文件。
在 GitHub 的 my site 中,点击 setting,打开 GitHub Pages,选择一个 JekyII 主题
就会得到一个Jekyll主题页面:
它的优点是:
注意,他需要 Ruby 在本地运行,Mac 自带,Windows 用户自行安装。
#12 把 GitHub 当 CMS 用
你的网站需要显示一些文字,但是你还不想直接放在 HTML 里面,那你可以把 GitHub 作为你储存内容的一个地方。这样,就可以让任何一个非程序员通过修改 Markdown 来修改 HTML 网页的内容。
我的方法是:在你的 GitHub 仓库中使用 markdown 文件来保存文本。在你网站的前端用一个组件来抓取这些文本并呈现在网页上。
我是玩 React 的,这里有个组件,用以抓取,解析并呈现到 HTML 上。
class Markdown extends React.Component {<br style="box-sizing: border-box;font-size: inherit;color: inherit;line-height: inherit;word-wrap: inherit !important;word-break: inherit !important;" /> constructor(props) {<br style="box-sizing: border-box;font-size: inherit;color: inherit;line-height: inherit;word-wrap: inherit !important;word-break: inherit !important;" /> super(props);class Markdown extends React.Component {<br style="box-sizing: border-box;font-size: inherit;color: inherit;line-height: inherit;word-wrap: inherit !important;word-break: inherit !important;" /> constructor(props) {<br style="box-sizing: border-box;font-size: inherit;color: inherit;line-height: inherit;word-wrap: inherit !important;word-break: inherit !important;" /> super(props);<br style="box-sizing: border-box;font-size: inherit;color: inherit;line-height: inherit;word-wrap: inherit !important;word-break: inherit !important;" /><br style="box-sizing: border-box;font-size: inherit;color: inherit;line-height: inherit;word-wrap: inherit !important;word-break: inherit !important;" /> // replace with your URL, obviously<br style="box-sizing: border-box;font-size: inherit;color: inherit;line-height: inherit;word-wrap: inherit !important;word-break: inherit !important;" /> this.baseUrl = 'https://raw.githubusercontent.com/davidgilbertson/about-github/master/text-snippets';<br style="box-sizing: border-box;font-size: inherit;color: inherit;line-height: inherit;word-wrap: inherit !important;word-break: inherit !important;" /><br style="box-sizing: border-box;font-size: inherit;color: inherit;line-height: inherit;word-wrap: inherit !important;word-break: inherit !important;" /> this.state = {<br style="box-sizing: border-box;font-size: inherit;color: inherit;line-height: inherit;word-wrap: inherit !important;word-break: inherit !important;" /> markdown: '',<br style="box-sizing: border-box;font-size: inherit;color: inherit;line-height: inherit;word-wrap: inherit !important;word-break: inherit !important;" /> };<br style="box-sizing: border-box;font-size: inherit;color: inherit;line-height: inherit;word-wrap: inherit !important;word-break: inherit !important;" /> }<br style="box-sizing: border-box;font-size: inherit;color: inherit;line-height: inherit;word-wrap: inherit !important;word-break: inherit !important;" /><br style="box-sizing: border-box;font-size: inherit;color: inherit;line-height: inherit;word-wrap: inherit !important;word-break: inherit !important;" /> componentDidMount() {<br style="box-sizing: border-box;font-size: inherit;color: inherit;line-height: inherit;word-wrap: inherit !important;word-break: inherit !important;" /> fetch(`${this.baseUrl}/${this.props.url}`)<br style="box-sizing: border-box;font-size: inherit;color: inherit;line-height: inherit;word-wrap: inherit !important;word-break: inherit !important;" /> .then(response => response.text())<br style="box-sizing: border-box;font-size: inherit;color: inherit;line-height: inherit;word-wrap: inherit !important;word-break: inherit !important;" /> .then((markdown) => {<br style="box-sizing: border-box;font-size: inherit;color: inherit;line-height: inherit;word-wrap: inherit !important;word-break: inherit !important;" /> this.setState({markdown});<br style="box-sizing: border-box;font-size: inherit;color: inherit;line-height: inherit;word-wrap: inherit !important;word-break: inherit !important;" /> });<br style="box-sizing: border-box;font-size: inherit;color: inherit;line-height: inherit;word-wrap: inherit !important;word-break: inherit !important;" /> }<br style="box-sizing: border-box;font-size: inherit;color: inherit;line-height: inherit;word-wrap: inherit !important;word-break: inherit !important;" /><br style="box-sizing: border-box;font-size: inherit;color: inherit;line-height: inherit;word-wrap: inherit !important;word-break: inherit !important;" /> render() {<br style="box-sizing: border-box;font-size: inherit;color: inherit;line-height: inherit;word-wrap: inherit !important;word-break: inherit !important;" /> return (<br style="box-sizing: border-box;font-size: inherit;color: inherit;line-height: inherit;word-wrap: inherit !important;word-break: inherit !important;" /> <br style="box-sizing: border-box;font-size: inherit;color: inherit;line-height: inherit;word-wrap: inherit !important;word-break: inherit !important;" /> );<br style="box-sizing: border-box;font-size: inherit;color: inherit;line-height: inherit;word-wrap: inherit !important;word-break: inherit !important;" /> }<br style="box-sizing: border-box;font-size: inherit;color: inherit;line-height: inherit;word-wrap: inherit !important;word-break: inherit !important;" />}
(/text-snippets这个文件夹是储存我的 markdown)
下面这段代码是上面组件的示例:
const Page = () => (<br style="box-sizing: border-box;font-size: inherit;color: inherit;line-height: inherit;word-wrap: inherit !important;word-break: inherit !important;" /> <br style="box-sizing: border-box;font-size: inherit;color: inherit;line-height: inherit;word-wrap: inherit !important;word-break: inherit !important;" /> <br style="box-sizing: border-box;font-size: inherit;color: inherit;line-height: inherit;word-wrap: inherit !important;word-break: inherit !important;" /> <br style="box-sizing: border-box;font-size: inherit;color: inherit;line-height: inherit;word-wrap: inherit !important;word-break: inherit !important;" /> <br style="box-sizing: border-box;font-size: inherit;color: inherit;line-height: inherit;word-wrap: inherit !important;word-break: inherit !important;" /><br style="box-sizing: border-box;font-size: inherit;color: inherit;line-height: inherit;word-wrap: inherit !important;word-break: inherit !important;" /> <br style="box-sizing: border-box;font-size: inherit;color: inherit;line-height: inherit;word-wrap: inherit !important;word-break: inherit !important;" /> A very important disclaimer:<br style="box-sizing: border-box;font-size: inherit;color: inherit;line-height: inherit;word-wrap: inherit !important;word-break: inherit !important;" /><br style="box-sizing: border-box;font-size: inherit;color: inherit;line-height: inherit;word-wrap: inherit !important;word-break: inherit !important;" /> <br style="box-sizing: border-box;font-size: inherit;color: inherit;line-height: inherit;word-wrap: inherit !important;word-break: inherit !important;" /> <br style="box-sizing: border-box;font-size: inherit;color: inherit;line-height: inherit;word-wrap: inherit !important;word-break: inherit !important;" /> <br style="box-sizing: border-box;font-size: inherit;color: inherit;line-height: inherit;word-wrap: inherit !important;word-break: inherit !important;" />);
所以现在 GitHub 也是你的 CMS,无论你想要样大小的文字都可以。
推荐一个 GitHub 工具
Octotree Chrome extension
它可以让你在看任何仓库时,获得一个左边的树状图。
nodejs抓取动态网页 全面深入理解预渲染技术体系
网站优化 • 优采云 发表了文章 • 0 个评论 • 85 次浏览 • 2022-06-24 05:08
在我们使用现代前端框架,比如Vue、React、Angular开发完毕前端项目之后,会发现这些页面输出的全是js,很不利于搜索引擎去爬取。在已经完成了单页应用(SPA)项目之后,如果要进行SEO优化的改造,这时候就可以使用预渲染技术体系。
下面将从适用场景、概念介绍、如何使用、底层原理几方面全面介绍预渲染技术的各项特性。适用场景在谈使用场景之前,首先需要明白以下几点:现代前端框架比如 Vue 在构建完成之后,页面加载的其实是一堆 js,再由 js 动态生成DOM。当我们访问页面,右键“显示网页源代码”的时候,看不到文字等内容百度、搜狗等爬虫在抓取页面的时候,不会执行页面的 js 源代码(谷歌爬虫可以执行“同步” js 来构建页面,因此 Vue 等框架开发的单页应用可以在谷歌搜索引擎中很好的被收录,这点我们不展开讨论)如果想要让百度、搜狗等收录索引我们的网站,就必须像静态 HTML 那样,让网页在右键查看源代码的时候,显示的是文字、图片等内容在这样的场景下,我们可以使用预渲染来解决此类问题。概念介绍
预渲染概念简单来讲是这样的:在项目构建阶段,我们会模拟访问项目的页面URL,这时候页面上的 js 将会执行并且形成真正的 HTML 片段;此时我们保存这个 HTML 文件到服务器硬盘上,下次不管是用户还是爬虫访问的时候,就直接返回这个物理文件,这样就可以有效解决 SEO 无法收录的问题。大体流程如下图:
可以看出,“预渲染”同“服务端渲染”最大的区别是,前者是在构建期间执行,后者在用户访问期间实时运行;前者在构建完成之后就不再需要 node服务,后者需要使用 node 作为运行时。预渲染也有它不适用的地方。正因为在构建阶段我们需要指明“需要构建的页面URL”,因此对于那些携带动态参数的页面(比如资料详情页),不适用于用预渲染去构建。这种场景下只能使用SSR。反之,一切静态官网、带数据的门户网站,只要是URL固定的,不管其中有没有动态数据,都可以使用预渲染。这里你可能会问一个问题:预渲染技术能否将 ajax 请求的内容也填充到页面上?答案是肯定的。虽然你 ajax 并非“同步执行”的 js,我们无法获知异步请求完成的时机。但通过控制监测页面上某个特定元素是否存在等手段,我们可以变相获知到数据返回的时机,从而进行预渲染。就可以达到“填充 ajax 数据”的效果(这可是谷歌爬虫也无法达到的效果哦)。如何使用预渲染技术有很多种实现方式。最常用的是使用 webpack 的一个插件: prerender-spa-plugin()。但是这个插件有很多局限性,最大的局限性在于必须结合 webpack 来使用,不够灵活,不易调试。也无法通过编程的方式使用。
比如我们的首页有动态的数据(非动态URL。是通过ajax获取的动态数据。)因此我们在使用了预渲染生成了静态首页之后,需要每间隔10分钟或者5分钟重新生成一个新的静态页,来更新数据。这就需要能够通过编程的方式调用渲染指令。在这样的情况下我基于这个插件的原理重新实现了一个包:@waitkafuka/spa-prerender(),可以通过 nodejs 通过编程的方式使用。
同时它剥离了 webpack 的依赖,剥离了对SPA页面的限制。只要有一个静态目录就可以工作。使用的方式非常简单,以 Vue 为例,在我们正常构建生成了 dist 目录之后,只需要编写以下脚本:
const SpaRenderer = require('@waitkafuka/spa-prerender');const path = require('path');<br />const options = {staticDir: path.join(__dirname, 'dist'),basePath: 'base',//可选,当项目有basePath的时候设置。同router中的base和publicPath。确保staticDir/basePath/index.html存在 routes: ['/','/exam', ],puppeteerOptions: {headless: true,maxConcurrentRoutes: 0,renderAfterDocumentEvent: 'render-event',skipThirdPartyRequests: true }};const spaRenderer = new SpaRenderer(options)spaRenderer.render().then(() => {console.log('预渲染完毕。');});
具体的参数解析可以查看 @waitkafuka/spa-prerender。底层原理在底层实现上,主要利用了 express 来驱动静态页面;然后利用 puppeteer 无头浏览器来模拟用户访问所需要预渲染的地址;在访问完成之后,保存页面HTML到文件夹中。
流程如下:
更为详细的流程介绍如下(此部分枯燥乏味,非专业人士可以跳过。):
阶段1:创建渲染器实例
spa-prerender index.js:
1.创建puppeteer实例 @prerenderer/renderer-puppeteer/es6/renderer.js
2.创建server实例@prerenderer/prerenderer/es6/server.js
3.创建renderer实例,将1 2步的puppeteer和server注入this @@prerenderer/prerenderer/es6/index.js
阶段2:渲染器实例初始化:spa-prerender index.js:
1.server初始化 (设置路由:静态资源利用*.*映射到staticDir上,其他请求全部映射到index.html上。设置静态资源和index.html路径,modifyServer也在这个阶段。server 启动)@prerenderer/prerenderer/es6/server.js
2.puppeteer初始化(判断平台是否linux,如果是Linux需要设置一些启动参数;启动puppeteer)@prerenderer/renderer-puppeteer/es6/renderer.js
阶段3:开始访问路由并获取html
1.spa-prerender index.js->@prerenderer/prerenderer/es6/index.js -> @prerenderer/renderer-puppeteer/es6/renderer.js
2.开启一个限流器,每次最多渲染 n 条路由,避免内存崩溃
3.puppeteer开启一个新标签,判断是否有inject,如果有,注入到window上
4.拼接端口、设置viewport,拼接router,形成url,发起页面的请求
5.判断options中是否设置了renderAfterDocumentEvent,如果有,给页面添加一个事件监听器,当触发事件的时候,将__PRERENDER_STATUS属性设置为true
6.访问页面,等待加载完成(如何确定页面加载完成, waituntil: 'networkidle0'//在500ms内没有网络请求,这个设置可以通过puppeteerOptions.navigationOptions.waituntil修改)
等待捕捉,分为三种等待时机:
1.等待固定时间,renderAfterTime(利用settimeout结合promise实现)
2.等待抛出某个事件:renderAfterDocumentEvent,该事件需要事先在页面写好抛出的时机
3.等待某个元素出现:renderAfterElementExists
阶段4:保存html
spa-prerender index.js 遍历结果,拼接文件夹路径并保存html。
实践过程中的常见问题
1. 如果一个项目有10个页面,其中首页需要SEO,于是使用了预渲染,另外9个页面仍然是由js渲染。那么在访问其他9个页面的时候,刷新页面,会先显示首页的内容一闪而过。这种问题如何解决?
产生这种情况的原因在于:在单页应用中,实际上只有一个物理页面,那就是 index.html。我们访问的所有页面实际都是 index.html,先进入 index.html 然后再执行 js 构建 dom。那么此时如果我们首页是已经预渲染好的,那么就会有内容,在 js 构建出对应路由的内容之前,就会先出现首页的内容。
spa-prerender 考虑到了这种问题。在预渲染的过程中,会首先保留原来“纯净”的index.html,并重命名为“index-spa.html”。
而后,在 nginx 配置中,利用 try_files 指令的优先级配置特点,让用户在刷新的情况下,如果有对应物理文件则访问物理文件(预渲染生成的文件),如果没有对应物理文件则降级访问 index-spa.html,就可以解决上述问题。nginx 配置指令如下:
location /{ alias /Users/zks/code/xkw/xop/dist/; try_files $uri $uri/ /index-spa.html; }
此时预渲染生成的文件将被优先返回($uri),如果未匹配,才会交由 index-spa.html 处理。
2. 如果项目打包有前缀怎么办?
如果项目有publicPath,那么在 dist 目录下会多一层根目录。此时需要在预渲染配置中添加 basePath 的选项。此时 express 会从 dist/basePath 目录中去寻找 index.html。
配置如下:
const options = { staticDir: path.join(__dirname, 'dist'), basePath: 'base',//当项目有basePath的时候设置。同router中的base和publicPath。确保staticDir/basePath/index.html存在 routes: ['/','/exam', ], ... }
3. 如何控制渲染器开始进行HTML保存的时机?
我们可以通过 options 中三个参数来控制:
3.1.renderAfterTime:等待固定时间之后(从页面开始发起访问算起)
3.2.renderAfterDocumentEvent:等待抛出某个事件,该事件需要事先在页面定义好触发的时机,比如在 Vue 的 mounted 函数中定义:
new Vue({ router,render: h => h(App), mounted () { //在mounted之后触发custom-render-event // 预渲染器在收到这个事件之后将开始进行页面的保存工作 document.dispatchEvent(new Event('custom-render-event')) }}).$mount('#app')
3.3.renderAfterElementExists:等待某个元素出现。我们可以在异步 ajax 返回之后,增加某个元素。当渲染器检测到此元素出现之后进行页面保存,此时保存的页面就包含了 ajax 返回的数据。
4. 首页预渲染生成的 DOM 元素,会不会被 js 复用?还是删除重新构建?
仿照SSR的思路,我们可以通过在根节点上设置 data-server-rander="true",这样在客户端 js 会知道这个是已经渲染完成的 DOM,不会粗暴去替换它。而是执行一个“注水”的过程(也就是hydration)。可以充分复用预渲染生成的 DOM 元素。
点击下方卡片可以关注 查看全部
nodejs抓取动态网页 全面深入理解预渲染技术体系
在我们使用现代前端框架,比如Vue、React、Angular开发完毕前端项目之后,会发现这些页面输出的全是js,很不利于搜索引擎去爬取。在已经完成了单页应用(SPA)项目之后,如果要进行SEO优化的改造,这时候就可以使用预渲染技术体系。
下面将从适用场景、概念介绍、如何使用、底层原理几方面全面介绍预渲染技术的各项特性。适用场景在谈使用场景之前,首先需要明白以下几点:现代前端框架比如 Vue 在构建完成之后,页面加载的其实是一堆 js,再由 js 动态生成DOM。当我们访问页面,右键“显示网页源代码”的时候,看不到文字等内容百度、搜狗等爬虫在抓取页面的时候,不会执行页面的 js 源代码(谷歌爬虫可以执行“同步” js 来构建页面,因此 Vue 等框架开发的单页应用可以在谷歌搜索引擎中很好的被收录,这点我们不展开讨论)如果想要让百度、搜狗等收录索引我们的网站,就必须像静态 HTML 那样,让网页在右键查看源代码的时候,显示的是文字、图片等内容在这样的场景下,我们可以使用预渲染来解决此类问题。概念介绍
预渲染概念简单来讲是这样的:在项目构建阶段,我们会模拟访问项目的页面URL,这时候页面上的 js 将会执行并且形成真正的 HTML 片段;此时我们保存这个 HTML 文件到服务器硬盘上,下次不管是用户还是爬虫访问的时候,就直接返回这个物理文件,这样就可以有效解决 SEO 无法收录的问题。大体流程如下图:
可以看出,“预渲染”同“服务端渲染”最大的区别是,前者是在构建期间执行,后者在用户访问期间实时运行;前者在构建完成之后就不再需要 node服务,后者需要使用 node 作为运行时。预渲染也有它不适用的地方。正因为在构建阶段我们需要指明“需要构建的页面URL”,因此对于那些携带动态参数的页面(比如资料详情页),不适用于用预渲染去构建。这种场景下只能使用SSR。反之,一切静态官网、带数据的门户网站,只要是URL固定的,不管其中有没有动态数据,都可以使用预渲染。这里你可能会问一个问题:预渲染技术能否将 ajax 请求的内容也填充到页面上?答案是肯定的。虽然你 ajax 并非“同步执行”的 js,我们无法获知异步请求完成的时机。但通过控制监测页面上某个特定元素是否存在等手段,我们可以变相获知到数据返回的时机,从而进行预渲染。就可以达到“填充 ajax 数据”的效果(这可是谷歌爬虫也无法达到的效果哦)。如何使用预渲染技术有很多种实现方式。最常用的是使用 webpack 的一个插件: prerender-spa-plugin()。但是这个插件有很多局限性,最大的局限性在于必须结合 webpack 来使用,不够灵活,不易调试。也无法通过编程的方式使用。
比如我们的首页有动态的数据(非动态URL。是通过ajax获取的动态数据。)因此我们在使用了预渲染生成了静态首页之后,需要每间隔10分钟或者5分钟重新生成一个新的静态页,来更新数据。这就需要能够通过编程的方式调用渲染指令。在这样的情况下我基于这个插件的原理重新实现了一个包:@waitkafuka/spa-prerender(),可以通过 nodejs 通过编程的方式使用。
同时它剥离了 webpack 的依赖,剥离了对SPA页面的限制。只要有一个静态目录就可以工作。使用的方式非常简单,以 Vue 为例,在我们正常构建生成了 dist 目录之后,只需要编写以下脚本:
const SpaRenderer = require('@waitkafuka/spa-prerender');const path = require('path');<br />const options = {staticDir: path.join(__dirname, 'dist'),basePath: 'base',//可选,当项目有basePath的时候设置。同router中的base和publicPath。确保staticDir/basePath/index.html存在 routes: ['/','/exam', ],puppeteerOptions: {headless: true,maxConcurrentRoutes: 0,renderAfterDocumentEvent: 'render-event',skipThirdPartyRequests: true }};const spaRenderer = new SpaRenderer(options)spaRenderer.render().then(() => {console.log('预渲染完毕。');});
具体的参数解析可以查看 @waitkafuka/spa-prerender。底层原理在底层实现上,主要利用了 express 来驱动静态页面;然后利用 puppeteer 无头浏览器来模拟用户访问所需要预渲染的地址;在访问完成之后,保存页面HTML到文件夹中。
流程如下:
更为详细的流程介绍如下(此部分枯燥乏味,非专业人士可以跳过。):
阶段1:创建渲染器实例
spa-prerender index.js:
1.创建puppeteer实例 @prerenderer/renderer-puppeteer/es6/renderer.js
2.创建server实例@prerenderer/prerenderer/es6/server.js
3.创建renderer实例,将1 2步的puppeteer和server注入this @@prerenderer/prerenderer/es6/index.js
阶段2:渲染器实例初始化:spa-prerender index.js:
1.server初始化 (设置路由:静态资源利用*.*映射到staticDir上,其他请求全部映射到index.html上。设置静态资源和index.html路径,modifyServer也在这个阶段。server 启动)@prerenderer/prerenderer/es6/server.js
2.puppeteer初始化(判断平台是否linux,如果是Linux需要设置一些启动参数;启动puppeteer)@prerenderer/renderer-puppeteer/es6/renderer.js
阶段3:开始访问路由并获取html
1.spa-prerender index.js->@prerenderer/prerenderer/es6/index.js -> @prerenderer/renderer-puppeteer/es6/renderer.js
2.开启一个限流器,每次最多渲染 n 条路由,避免内存崩溃
3.puppeteer开启一个新标签,判断是否有inject,如果有,注入到window上
4.拼接端口、设置viewport,拼接router,形成url,发起页面的请求
5.判断options中是否设置了renderAfterDocumentEvent,如果有,给页面添加一个事件监听器,当触发事件的时候,将__PRERENDER_STATUS属性设置为true
6.访问页面,等待加载完成(如何确定页面加载完成, waituntil: 'networkidle0'//在500ms内没有网络请求,这个设置可以通过puppeteerOptions.navigationOptions.waituntil修改)
等待捕捉,分为三种等待时机:
1.等待固定时间,renderAfterTime(利用settimeout结合promise实现)
2.等待抛出某个事件:renderAfterDocumentEvent,该事件需要事先在页面写好抛出的时机
3.等待某个元素出现:renderAfterElementExists
阶段4:保存html
spa-prerender index.js 遍历结果,拼接文件夹路径并保存html。
实践过程中的常见问题
1. 如果一个项目有10个页面,其中首页需要SEO,于是使用了预渲染,另外9个页面仍然是由js渲染。那么在访问其他9个页面的时候,刷新页面,会先显示首页的内容一闪而过。这种问题如何解决?
产生这种情况的原因在于:在单页应用中,实际上只有一个物理页面,那就是 index.html。我们访问的所有页面实际都是 index.html,先进入 index.html 然后再执行 js 构建 dom。那么此时如果我们首页是已经预渲染好的,那么就会有内容,在 js 构建出对应路由的内容之前,就会先出现首页的内容。
spa-prerender 考虑到了这种问题。在预渲染的过程中,会首先保留原来“纯净”的index.html,并重命名为“index-spa.html”。
而后,在 nginx 配置中,利用 try_files 指令的优先级配置特点,让用户在刷新的情况下,如果有对应物理文件则访问物理文件(预渲染生成的文件),如果没有对应物理文件则降级访问 index-spa.html,就可以解决上述问题。nginx 配置指令如下:
location /{ alias /Users/zks/code/xkw/xop/dist/; try_files $uri $uri/ /index-spa.html; }
此时预渲染生成的文件将被优先返回($uri),如果未匹配,才会交由 index-spa.html 处理。
2. 如果项目打包有前缀怎么办?
如果项目有publicPath,那么在 dist 目录下会多一层根目录。此时需要在预渲染配置中添加 basePath 的选项。此时 express 会从 dist/basePath 目录中去寻找 index.html。
配置如下:
const options = { staticDir: path.join(__dirname, 'dist'), basePath: 'base',//当项目有basePath的时候设置。同router中的base和publicPath。确保staticDir/basePath/index.html存在 routes: ['/','/exam', ], ... }
3. 如何控制渲染器开始进行HTML保存的时机?
我们可以通过 options 中三个参数来控制:
3.1.renderAfterTime:等待固定时间之后(从页面开始发起访问算起)
3.2.renderAfterDocumentEvent:等待抛出某个事件,该事件需要事先在页面定义好触发的时机,比如在 Vue 的 mounted 函数中定义:
new Vue({ router,render: h => h(App), mounted () { //在mounted之后触发custom-render-event // 预渲染器在收到这个事件之后将开始进行页面的保存工作 document.dispatchEvent(new Event('custom-render-event')) }}).$mount('#app')
3.3.renderAfterElementExists:等待某个元素出现。我们可以在异步 ajax 返回之后,增加某个元素。当渲染器检测到此元素出现之后进行页面保存,此时保存的页面就包含了 ajax 返回的数据。
4. 首页预渲染生成的 DOM 元素,会不会被 js 复用?还是删除重新构建?
仿照SSR的思路,我们可以通过在根节点上设置 data-server-rander="true",这样在客户端 js 会知道这个是已经渲染完成的 DOM,不会粗暴去替换它。而是执行一个“注水”的过程(也就是hydration)。可以充分复用预渲染生成的 DOM 元素。
点击下方卡片可以关注
nodejs抓取动态网页 分享12个GitHub骚操作!
网站优化 • 优采云 发表了文章 • 0 个评论 • 212 次浏览 • 2022-06-24 00:29
原文:
#1 在 GitHub 上编辑代码
我要先说一个很多人都知道的事儿。
当你使用 GitHub看一些文件时(任何的文本文件或者仓库),能看到一个顶部右侧有一个小铅笔图标。点击即可编辑文档。完成后,按照提示点击「Propose file change」,GitHub 会为你 fork 这个仓库并创建一个 pull request。
很帅吧,不需要 fork / pull / 改变 locally / push / 创建 PR,只需点击一下,GitHub 就为你创建了一个分支。
这对于修改一些排版错误或者防恶意篡改是很有帮助的。
#2 粘贴图像
对于 issue 和 comment,你还可以直接粘贴图片,当你粘贴时图片会被上传至云端,然后以 MarkDown 格式显示。
非常简洁。
#3 格式化代码
如果你想写一个 code block,你可以在开始处写三个反引号,然后 GitHub 会试图猜出你在写什么语言。
但是如果你发布如 Vue、Typescript、JSX 这样的语言,你可以明确写出来,以获取正确的高亮。
下图第一行使用了```jsx:
片段呈现:
(这可以扩展到 gist,顺便一提,如果你给了 gist 定义成 .jsx 扩展名,那么你会得到 JSX 的高亮)
#4 使用魔术词在 PR 中关闭 issue
比如你在创建一个 pull request 去修复 issue #234。那你可在 PR 输入「fixes #234」,就可以自动合并 PR 并关闭这个 issue,是不是很酷。
(提交信息里可以使用 fix/fixes/fixed , close/closes/closed 或者 resolve/resolves/resolved等关键词)
#5 链接到 comment
你甚至想链接到一个特定的评论,但无法做到?我在这里告诉你,点击名字旁边的日期/时间就万事大吉。
#6 链接到代码
既然能链接到 comment,那你想问能不能链接到代码上?可以的。
试试这个操作:在查看文件时,点击代码边上的行数。
哇喔,你看到了么?URL 随之更新。如果你按住 Shift 并单击另一个行号,URL 会再次更新,并且高亮这两个行数之间的所有代码段。
你现在可以分享这个 URL 了,但等等,这些还是当前分支,如果文件变化了呢?你需要一个永久链接。
我比较懒,但是下面这一个截图已经能够表达如何获取永久链接了(Copy Permalink):
#7 像使用命令行一样使用 GitHub URL
既然说到了 URL,那么就接着聊一下。使用 UI 浏览 GitHub 很方面也很好,不过很多时候最快的方式是使用 URL 来浏览。举个例子,如果我想跳转到正在处理的分支上,并想查看分支和 master 的差异,我可以在我的仓库名后面输入 /compare/branch-name。
这会使我到达分支的不同页面:
可以在名字后面再加上...XXX(分支名)比如我写的 mkdocs...pre-release,如下图:
这一步你可以配合键盘快捷键,Ctrl + L 或者 cmd + L,可以让光标直接移动到 URL 中(最起码 chrome 是这样)。这些加一起能提高生产力。
专业提示:用键盘移动 chrome URL 上的某一条网页记录,使用 Shift+Delete 或 Shift+fn+Delete 来删除某一条记录。(比如合并了分支之后就可以删除了)
#8 在 issue 中创建 list
你想在你的 issue中看到可多选的 list 么?
当你查看问题时,你想不想让它变成 2 of 5 这样的形式?
如果想,你可以在 issue 中使用以下句法:
- [ ] Screen width (integer) <br style="box-sizing: border-box;font-size: inherit;color: inherit;line-height: inherit;word-wrap: inherit !important;word-break: inherit !important;" />- [x] Service worker support <br style="box-sizing: border-box;font-size: inherit;color: inherit;line-height: inherit;word-wrap: inherit !important;word-break: inherit !important;" />- [x] Fetch support <br style="box-sizing: border-box;font-size: inherit;color: inherit;line-height: inherit;word-wrap: inherit !important;word-break: inherit !important;" />- [ ] CSS flexbox support <br style="box-sizing: border-box;font-size: inherit;color: inherit;line-height: inherit;word-wrap: inherit !important;word-break: inherit !important;" />- [ ] Custom elements
#9 GitHub 上的 project board
我总是用 Jira 做大项目,独立项目用 Trello,这两者我都很喜欢。
后来我知道,GitHub 也有类似的 project board:
我个人为了方便把它们都添加为 note。board 极为方便的帮助你做仓库管理。
你可以点击右上角 Add Cards 来添加东西。这里有些特殊语法方便搜索,比如: is:pr is:open,你就可以把任何公开的 PR 拖到 board 上。
更多语法可以参考search syntax。
你也可以把现存的 note 转化为 issue。
你也可以选择 issue 直接添加到 projects 。
这些意味着,从现在开始,你可以明确责任制度,每一行代码的分配都可以在 GitHub 上的 Project board 上完成,而不用去 Jira 或者 Trello 上。
不过它也有些缺点,比如功能比较少。你也可以试试 ZenHub,它有效的扩展 GitHub。
#10 GitHub WiKi
GitHub WiKi 能够帮助我们处理非结构化的页面集合,就像维基百科那样。我自己 NodeJS docs 就被我弄成 wiki 的样子。几个页面,然后自定义侧边栏。具体方法网上很多,我的页面可以供你参考一下。
建议:如果你有个特别长的单页面 README.md 文件,并且想和其他人有所区别,你可以试试这种形式。
#11 GitHub Pages(JekyII)
你可能已经知道了能使用 GitHub Pages 来托管静态网站。那本条就特别介绍一下如何使用 JekyII 来构建站点。
以最简单的方式,GitHub Pages + JekyII 将以最漂亮的主题来呈现你的 README.md,例如,你可以看一下about-github的自述文件。
在 GitHub 的 my site 中,点击 setting,打开 GitHub Pages,选择一个 JekyII 主题
就会得到一个Jekyll主题页面:
它的优点是:
注意,他需要 Ruby 在本地运行,Mac 自带,Windows 用户自行安装。
#12 把 GitHub 当 CMS 用
你的网站需要显示一些文字,但是你还不想直接放在 HTML 里面,那你可以把 GitHub 作为你储存内容的一个地方。这样,就可以让任何一个非程序员通过修改 Markdown 来修改 HTML 网页的内容。
我的方法是:在你的 GitHub 仓库中使用 markdown 文件来保存文本。在你网站的前端用一个组件来抓取这些文本并呈现在网页上。
我是玩 React 的,这里有个组件,用以抓取,解析并呈现到 HTML 上。
class Markdown extends React.Component {<br style="box-sizing: border-box;font-size: inherit;color: inherit;line-height: inherit;word-wrap: inherit !important;word-break: inherit !important;" /> constructor(props) {<br style="box-sizing: border-box;font-size: inherit;color: inherit;line-height: inherit;word-wrap: inherit !important;word-break: inherit !important;" /> super(props);class Markdown extends React.Component {<br style="box-sizing: border-box;font-size: inherit;color: inherit;line-height: inherit;word-wrap: inherit !important;word-break: inherit !important;" /> constructor(props) {<br style="box-sizing: border-box;font-size: inherit;color: inherit;line-height: inherit;word-wrap: inherit !important;word-break: inherit !important;" /> super(props);<br style="box-sizing: border-box;font-size: inherit;color: inherit;line-height: inherit;word-wrap: inherit !important;word-break: inherit !important;" /><br style="box-sizing: border-box;font-size: inherit;color: inherit;line-height: inherit;word-wrap: inherit !important;word-break: inherit !important;" /> // replace with your URL, obviously<br style="box-sizing: border-box;font-size: inherit;color: inherit;line-height: inherit;word-wrap: inherit !important;word-break: inherit !important;" /> this.baseUrl = 'https://raw.githubusercontent.com/davidgilbertson/about-github/master/text-snippets';<br style="box-sizing: border-box;font-size: inherit;color: inherit;line-height: inherit;word-wrap: inherit !important;word-break: inherit !important;" /><br style="box-sizing: border-box;font-size: inherit;color: inherit;line-height: inherit;word-wrap: inherit !important;word-break: inherit !important;" /> this.state = {<br style="box-sizing: border-box;font-size: inherit;color: inherit;line-height: inherit;word-wrap: inherit !important;word-break: inherit !important;" /> markdown: '',<br style="box-sizing: border-box;font-size: inherit;color: inherit;line-height: inherit;word-wrap: inherit !important;word-break: inherit !important;" /> };<br style="box-sizing: border-box;font-size: inherit;color: inherit;line-height: inherit;word-wrap: inherit !important;word-break: inherit !important;" /> }<br style="box-sizing: border-box;font-size: inherit;color: inherit;line-height: inherit;word-wrap: inherit !important;word-break: inherit !important;" /><br style="box-sizing: border-box;font-size: inherit;color: inherit;line-height: inherit;word-wrap: inherit !important;word-break: inherit !important;" /> componentDidMount() {<br style="box-sizing: border-box;font-size: inherit;color: inherit;line-height: inherit;word-wrap: inherit !important;word-break: inherit !important;" /> fetch(`${this.baseUrl}/${this.props.url}`)<br style="box-sizing: border-box;font-size: inherit;color: inherit;line-height: inherit;word-wrap: inherit !important;word-break: inherit !important;" /> .then(response => response.text())<br style="box-sizing: border-box;font-size: inherit;color: inherit;line-height: inherit;word-wrap: inherit !important;word-break: inherit !important;" /> .then((markdown) => {<br style="box-sizing: border-box;font-size: inherit;color: inherit;line-height: inherit;word-wrap: inherit !important;word-break: inherit !important;" /> this.setState({markdown});<br style="box-sizing: border-box;font-size: inherit;color: inherit;line-height: inherit;word-wrap: inherit !important;word-break: inherit !important;" /> });<br style="box-sizing: border-box;font-size: inherit;color: inherit;line-height: inherit;word-wrap: inherit !important;word-break: inherit !important;" /> }<br style="box-sizing: border-box;font-size: inherit;color: inherit;line-height: inherit;word-wrap: inherit !important;word-break: inherit !important;" /><br style="box-sizing: border-box;font-size: inherit;color: inherit;line-height: inherit;word-wrap: inherit !important;word-break: inherit !important;" /> render() {<br style="box-sizing: border-box;font-size: inherit;color: inherit;line-height: inherit;word-wrap: inherit !important;word-break: inherit !important;" /> return (<br style="box-sizing: border-box;font-size: inherit;color: inherit;line-height: inherit;word-wrap: inherit !important;word-break: inherit !important;" /> <br style="box-sizing: border-box;font-size: inherit;color: inherit;line-height: inherit;word-wrap: inherit !important;word-break: inherit !important;" /> );<br style="box-sizing: border-box;font-size: inherit;color: inherit;line-height: inherit;word-wrap: inherit !important;word-break: inherit !important;" /> }<br style="box-sizing: border-box;font-size: inherit;color: inherit;line-height: inherit;word-wrap: inherit !important;word-break: inherit !important;" />}
(/text-snippets这个文件夹是储存我的 markdown)
下面这段代码是上面组件的示例:
const Page = () => (<br style="box-sizing: border-box;font-size: inherit;color: inherit;line-height: inherit;word-wrap: inherit !important;word-break: inherit !important;" /> <br style="box-sizing: border-box;font-size: inherit;color: inherit;line-height: inherit;word-wrap: inherit !important;word-break: inherit !important;" /> <br style="box-sizing: border-box;font-size: inherit;color: inherit;line-height: inherit;word-wrap: inherit !important;word-break: inherit !important;" /> <br style="box-sizing: border-box;font-size: inherit;color: inherit;line-height: inherit;word-wrap: inherit !important;word-break: inherit !important;" /> <br style="box-sizing: border-box;font-size: inherit;color: inherit;line-height: inherit;word-wrap: inherit !important;word-break: inherit !important;" /><br style="box-sizing: border-box;font-size: inherit;color: inherit;line-height: inherit;word-wrap: inherit !important;word-break: inherit !important;" /> <br style="box-sizing: border-box;font-size: inherit;color: inherit;line-height: inherit;word-wrap: inherit !important;word-break: inherit !important;" /> A very important disclaimer:<br style="box-sizing: border-box;font-size: inherit;color: inherit;line-height: inherit;word-wrap: inherit !important;word-break: inherit !important;" /><br style="box-sizing: border-box;font-size: inherit;color: inherit;line-height: inherit;word-wrap: inherit !important;word-break: inherit !important;" /> <br style="box-sizing: border-box;font-size: inherit;color: inherit;line-height: inherit;word-wrap: inherit !important;word-break: inherit !important;" /> <br style="box-sizing: border-box;font-size: inherit;color: inherit;line-height: inherit;word-wrap: inherit !important;word-break: inherit !important;" /> <br style="box-sizing: border-box;font-size: inherit;color: inherit;line-height: inherit;word-wrap: inherit !important;word-break: inherit !important;" />);
所以现在 GitHub 也是你的 CMS,无论你想要样大小的文字都可以。
推荐一个 GitHub 工具
Octotree Chrome extension
它可以让你在看任何仓库时,获得一个左边的树状图。
查看全部
nodejs抓取动态网页 分享12个GitHub骚操作!
原文:
#1 在 GitHub 上编辑代码
我要先说一个很多人都知道的事儿。
当你使用 GitHub看一些文件时(任何的文本文件或者仓库),能看到一个顶部右侧有一个小铅笔图标。点击即可编辑文档。完成后,按照提示点击「Propose file change」,GitHub 会为你 fork 这个仓库并创建一个 pull request。
很帅吧,不需要 fork / pull / 改变 locally / push / 创建 PR,只需点击一下,GitHub 就为你创建了一个分支。
这对于修改一些排版错误或者防恶意篡改是很有帮助的。
#2 粘贴图像
对于 issue 和 comment,你还可以直接粘贴图片,当你粘贴时图片会被上传至云端,然后以 MarkDown 格式显示。
非常简洁。
#3 格式化代码
如果你想写一个 code block,你可以在开始处写三个反引号,然后 GitHub 会试图猜出你在写什么语言。
但是如果你发布如 Vue、Typescript、JSX 这样的语言,你可以明确写出来,以获取正确的高亮。
下图第一行使用了```jsx:
片段呈现:
(这可以扩展到 gist,顺便一提,如果你给了 gist 定义成 .jsx 扩展名,那么你会得到 JSX 的高亮)
#4 使用魔术词在 PR 中关闭 issue
比如你在创建一个 pull request 去修复 issue #234。那你可在 PR 输入「fixes #234」,就可以自动合并 PR 并关闭这个 issue,是不是很酷。
(提交信息里可以使用 fix/fixes/fixed , close/closes/closed 或者 resolve/resolves/resolved等关键词)
#5 链接到 comment
你甚至想链接到一个特定的评论,但无法做到?我在这里告诉你,点击名字旁边的日期/时间就万事大吉。
#6 链接到代码
既然能链接到 comment,那你想问能不能链接到代码上?可以的。
试试这个操作:在查看文件时,点击代码边上的行数。
哇喔,你看到了么?URL 随之更新。如果你按住 Shift 并单击另一个行号,URL 会再次更新,并且高亮这两个行数之间的所有代码段。
你现在可以分享这个 URL 了,但等等,这些还是当前分支,如果文件变化了呢?你需要一个永久链接。
我比较懒,但是下面这一个截图已经能够表达如何获取永久链接了(Copy Permalink):
#7 像使用命令行一样使用 GitHub URL
既然说到了 URL,那么就接着聊一下。使用 UI 浏览 GitHub 很方面也很好,不过很多时候最快的方式是使用 URL 来浏览。举个例子,如果我想跳转到正在处理的分支上,并想查看分支和 master 的差异,我可以在我的仓库名后面输入 /compare/branch-name。
这会使我到达分支的不同页面:
可以在名字后面再加上...XXX(分支名)比如我写的 mkdocs...pre-release,如下图:
这一步你可以配合键盘快捷键,Ctrl + L 或者 cmd + L,可以让光标直接移动到 URL 中(最起码 chrome 是这样)。这些加一起能提高生产力。
专业提示:用键盘移动 chrome URL 上的某一条网页记录,使用 Shift+Delete 或 Shift+fn+Delete 来删除某一条记录。(比如合并了分支之后就可以删除了)
#8 在 issue 中创建 list
你想在你的 issue中看到可多选的 list 么?
当你查看问题时,你想不想让它变成 2 of 5 这样的形式?
如果想,你可以在 issue 中使用以下句法:
- [ ] Screen width (integer) <br style="box-sizing: border-box;font-size: inherit;color: inherit;line-height: inherit;word-wrap: inherit !important;word-break: inherit !important;" />- [x] Service worker support <br style="box-sizing: border-box;font-size: inherit;color: inherit;line-height: inherit;word-wrap: inherit !important;word-break: inherit !important;" />- [x] Fetch support <br style="box-sizing: border-box;font-size: inherit;color: inherit;line-height: inherit;word-wrap: inherit !important;word-break: inherit !important;" />- [ ] CSS flexbox support <br style="box-sizing: border-box;font-size: inherit;color: inherit;line-height: inherit;word-wrap: inherit !important;word-break: inherit !important;" />- [ ] Custom elements
#9 GitHub 上的 project board
我总是用 Jira 做大项目,独立项目用 Trello,这两者我都很喜欢。
后来我知道,GitHub 也有类似的 project board:
我个人为了方便把它们都添加为 note。board 极为方便的帮助你做仓库管理。
你可以点击右上角 Add Cards 来添加东西。这里有些特殊语法方便搜索,比如: is:pr is:open,你就可以把任何公开的 PR 拖到 board 上。
更多语法可以参考search syntax。
你也可以把现存的 note 转化为 issue。
你也可以选择 issue 直接添加到 projects 。
这些意味着,从现在开始,你可以明确责任制度,每一行代码的分配都可以在 GitHub 上的 Project board 上完成,而不用去 Jira 或者 Trello 上。
不过它也有些缺点,比如功能比较少。你也可以试试 ZenHub,它有效的扩展 GitHub。
#10 GitHub WiKi
GitHub WiKi 能够帮助我们处理非结构化的页面集合,就像维基百科那样。我自己 NodeJS docs 就被我弄成 wiki 的样子。几个页面,然后自定义侧边栏。具体方法网上很多,我的页面可以供你参考一下。
建议:如果你有个特别长的单页面 README.md 文件,并且想和其他人有所区别,你可以试试这种形式。
#11 GitHub Pages(JekyII)
你可能已经知道了能使用 GitHub Pages 来托管静态网站。那本条就特别介绍一下如何使用 JekyII 来构建站点。
以最简单的方式,GitHub Pages + JekyII 将以最漂亮的主题来呈现你的 README.md,例如,你可以看一下about-github的自述文件。
在 GitHub 的 my site 中,点击 setting,打开 GitHub Pages,选择一个 JekyII 主题
就会得到一个Jekyll主题页面:
它的优点是:
注意,他需要 Ruby 在本地运行,Mac 自带,Windows 用户自行安装。
#12 把 GitHub 当 CMS 用
你的网站需要显示一些文字,但是你还不想直接放在 HTML 里面,那你可以把 GitHub 作为你储存内容的一个地方。这样,就可以让任何一个非程序员通过修改 Markdown 来修改 HTML 网页的内容。
我的方法是:在你的 GitHub 仓库中使用 markdown 文件来保存文本。在你网站的前端用一个组件来抓取这些文本并呈现在网页上。
我是玩 React 的,这里有个组件,用以抓取,解析并呈现到 HTML 上。
class Markdown extends React.Component {<br style="box-sizing: border-box;font-size: inherit;color: inherit;line-height: inherit;word-wrap: inherit !important;word-break: inherit !important;" /> constructor(props) {<br style="box-sizing: border-box;font-size: inherit;color: inherit;line-height: inherit;word-wrap: inherit !important;word-break: inherit !important;" /> super(props);class Markdown extends React.Component {<br style="box-sizing: border-box;font-size: inherit;color: inherit;line-height: inherit;word-wrap: inherit !important;word-break: inherit !important;" /> constructor(props) {<br style="box-sizing: border-box;font-size: inherit;color: inherit;line-height: inherit;word-wrap: inherit !important;word-break: inherit !important;" /> super(props);<br style="box-sizing: border-box;font-size: inherit;color: inherit;line-height: inherit;word-wrap: inherit !important;word-break: inherit !important;" /><br style="box-sizing: border-box;font-size: inherit;color: inherit;line-height: inherit;word-wrap: inherit !important;word-break: inherit !important;" /> // replace with your URL, obviously<br style="box-sizing: border-box;font-size: inherit;color: inherit;line-height: inherit;word-wrap: inherit !important;word-break: inherit !important;" /> this.baseUrl = 'https://raw.githubusercontent.com/davidgilbertson/about-github/master/text-snippets';<br style="box-sizing: border-box;font-size: inherit;color: inherit;line-height: inherit;word-wrap: inherit !important;word-break: inherit !important;" /><br style="box-sizing: border-box;font-size: inherit;color: inherit;line-height: inherit;word-wrap: inherit !important;word-break: inherit !important;" /> this.state = {<br style="box-sizing: border-box;font-size: inherit;color: inherit;line-height: inherit;word-wrap: inherit !important;word-break: inherit !important;" /> markdown: '',<br style="box-sizing: border-box;font-size: inherit;color: inherit;line-height: inherit;word-wrap: inherit !important;word-break: inherit !important;" /> };<br style="box-sizing: border-box;font-size: inherit;color: inherit;line-height: inherit;word-wrap: inherit !important;word-break: inherit !important;" /> }<br style="box-sizing: border-box;font-size: inherit;color: inherit;line-height: inherit;word-wrap: inherit !important;word-break: inherit !important;" /><br style="box-sizing: border-box;font-size: inherit;color: inherit;line-height: inherit;word-wrap: inherit !important;word-break: inherit !important;" /> componentDidMount() {<br style="box-sizing: border-box;font-size: inherit;color: inherit;line-height: inherit;word-wrap: inherit !important;word-break: inherit !important;" /> fetch(`${this.baseUrl}/${this.props.url}`)<br style="box-sizing: border-box;font-size: inherit;color: inherit;line-height: inherit;word-wrap: inherit !important;word-break: inherit !important;" /> .then(response => response.text())<br style="box-sizing: border-box;font-size: inherit;color: inherit;line-height: inherit;word-wrap: inherit !important;word-break: inherit !important;" /> .then((markdown) => {<br style="box-sizing: border-box;font-size: inherit;color: inherit;line-height: inherit;word-wrap: inherit !important;word-break: inherit !important;" /> this.setState({markdown});<br style="box-sizing: border-box;font-size: inherit;color: inherit;line-height: inherit;word-wrap: inherit !important;word-break: inherit !important;" /> });<br style="box-sizing: border-box;font-size: inherit;color: inherit;line-height: inherit;word-wrap: inherit !important;word-break: inherit !important;" /> }<br style="box-sizing: border-box;font-size: inherit;color: inherit;line-height: inherit;word-wrap: inherit !important;word-break: inherit !important;" /><br style="box-sizing: border-box;font-size: inherit;color: inherit;line-height: inherit;word-wrap: inherit !important;word-break: inherit !important;" /> render() {<br style="box-sizing: border-box;font-size: inherit;color: inherit;line-height: inherit;word-wrap: inherit !important;word-break: inherit !important;" /> return (<br style="box-sizing: border-box;font-size: inherit;color: inherit;line-height: inherit;word-wrap: inherit !important;word-break: inherit !important;" /> <br style="box-sizing: border-box;font-size: inherit;color: inherit;line-height: inherit;word-wrap: inherit !important;word-break: inherit !important;" /> );<br style="box-sizing: border-box;font-size: inherit;color: inherit;line-height: inherit;word-wrap: inherit !important;word-break: inherit !important;" /> }<br style="box-sizing: border-box;font-size: inherit;color: inherit;line-height: inherit;word-wrap: inherit !important;word-break: inherit !important;" />}
(/text-snippets这个文件夹是储存我的 markdown)
下面这段代码是上面组件的示例:
const Page = () => (<br style="box-sizing: border-box;font-size: inherit;color: inherit;line-height: inherit;word-wrap: inherit !important;word-break: inherit !important;" /> <br style="box-sizing: border-box;font-size: inherit;color: inherit;line-height: inherit;word-wrap: inherit !important;word-break: inherit !important;" /> <br style="box-sizing: border-box;font-size: inherit;color: inherit;line-height: inherit;word-wrap: inherit !important;word-break: inherit !important;" /> <br style="box-sizing: border-box;font-size: inherit;color: inherit;line-height: inherit;word-wrap: inherit !important;word-break: inherit !important;" /> <br style="box-sizing: border-box;font-size: inherit;color: inherit;line-height: inherit;word-wrap: inherit !important;word-break: inherit !important;" /><br style="box-sizing: border-box;font-size: inherit;color: inherit;line-height: inherit;word-wrap: inherit !important;word-break: inherit !important;" /> <br style="box-sizing: border-box;font-size: inherit;color: inherit;line-height: inherit;word-wrap: inherit !important;word-break: inherit !important;" /> A very important disclaimer:<br style="box-sizing: border-box;font-size: inherit;color: inherit;line-height: inherit;word-wrap: inherit !important;word-break: inherit !important;" /><br style="box-sizing: border-box;font-size: inherit;color: inherit;line-height: inherit;word-wrap: inherit !important;word-break: inherit !important;" /> <br style="box-sizing: border-box;font-size: inherit;color: inherit;line-height: inherit;word-wrap: inherit !important;word-break: inherit !important;" /> <br style="box-sizing: border-box;font-size: inherit;color: inherit;line-height: inherit;word-wrap: inherit !important;word-break: inherit !important;" /> <br style="box-sizing: border-box;font-size: inherit;color: inherit;line-height: inherit;word-wrap: inherit !important;word-break: inherit !important;" />);
所以现在 GitHub 也是你的 CMS,无论你想要样大小的文字都可以。
推荐一个 GitHub 工具
Octotree Chrome extension
它可以让你在看任何仓库时,获得一个左边的树状图。
nodejs抓取动态网页 全面深入理解预渲染技术体系
网站优化 • 优采云 发表了文章 • 0 个评论 • 83 次浏览 • 2022-06-23 22:44
在我们使用现代前端框架,比如Vue、React、Angular开发完毕前端项目之后,会发现这些页面输出的全是js,很不利于搜索引擎去爬取。在已经完成了单页应用(SPA)项目之后,如果要进行SEO优化的改造,这时候就可以使用预渲染技术体系。
下面将从适用场景、概念介绍、如何使用、底层原理几方面全面介绍预渲染技术的各项特性。适用场景在谈使用场景之前,首先需要明白以下几点:现代前端框架比如 Vue 在构建完成之后,页面加载的其实是一堆 js,再由 js 动态生成DOM。当我们访问页面,右键“显示网页源代码”的时候,看不到文字等内容百度、搜狗等爬虫在抓取页面的时候,不会执行页面的 js 源代码(谷歌爬虫可以执行“同步” js 来构建页面,因此 Vue 等框架开发的单页应用可以在谷歌搜索引擎中很好的被收录,这点我们不展开讨论)如果想要让百度、搜狗等收录索引我们的网站,就必须像静态 HTML 那样,让网页在右键查看源代码的时候,显示的是文字、图片等内容在这样的场景下,我们可以使用预渲染来解决此类问题。概念介绍
预渲染概念简单来讲是这样的:在项目构建阶段,我们会模拟访问项目的页面URL,这时候页面上的 js 将会执行并且形成真正的 HTML 片段;此时我们保存这个 HTML 文件到服务器硬盘上,下次不管是用户还是爬虫访问的时候,就直接返回这个物理文件,这样就可以有效解决 SEO 无法收录的问题。大体流程如下图:
可以看出,“预渲染”同“服务端渲染”最大的区别是,前者是在构建期间执行,后者在用户访问期间实时运行;前者在构建完成之后就不再需要 node服务,后者需要使用 node 作为运行时。预渲染也有它不适用的地方。正因为在构建阶段我们需要指明“需要构建的页面URL”,因此对于那些携带动态参数的页面(比如资料详情页),不适用于用预渲染去构建。这种场景下只能使用SSR。反之,一切静态官网、带数据的门户网站,只要是URL固定的,不管其中有没有动态数据,都可以使用预渲染。这里你可能会问一个问题:预渲染技术能否将 ajax 请求的内容也填充到页面上?答案是肯定的。虽然你 ajax 并非“同步执行”的 js,我们无法获知异步请求完成的时机。但通过控制监测页面上某个特定元素是否存在等手段,我们可以变相获知到数据返回的时机,从而进行预渲染。就可以达到“填充 ajax 数据”的效果(这可是谷歌爬虫也无法达到的效果哦)。如何使用预渲染技术有很多种实现方式。最常用的是使用 webpack 的一个插件: prerender-spa-plugin()。但是这个插件有很多局限性,最大的局限性在于必须结合 webpack 来使用,不够灵活,不易调试。也无法通过编程的方式使用。
比如我们的首页有动态的数据(非动态URL。是通过ajax获取的动态数据。)因此我们在使用了预渲染生成了静态首页之后,需要每间隔10分钟或者5分钟重新生成一个新的静态页,来更新数据。这就需要能够通过编程的方式调用渲染指令。在这样的情况下我基于这个插件的原理重新实现了一个包:@waitkafuka/spa-prerender(),可以通过 nodejs 通过编程的方式使用。
同时它剥离了 webpack 的依赖,剥离了对SPA页面的限制。只要有一个静态目录就可以工作。使用的方式非常简单,以 Vue 为例,在我们正常构建生成了 dist 目录之后,只需要编写以下脚本:
const SpaRenderer = require('@waitkafuka/spa-prerender');const path = require('path');<br />const options = {staticDir: path.join(__dirname, 'dist'),basePath: 'base',//可选,当项目有basePath的时候设置。同router中的base和publicPath。确保staticDir/basePath/index.html存在 routes: ['/','/exam', ],puppeteerOptions: {headless: true,maxConcurrentRoutes: 0,renderAfterDocumentEvent: 'render-event',skipThirdPartyRequests: true }};const spaRenderer = new SpaRenderer(options)spaRenderer.render().then(() => {console.log('预渲染完毕。');});
具体的参数解析可以查看 @waitkafuka/spa-prerender。底层原理在底层实现上,主要利用了 express 来驱动静态页面;然后利用 puppeteer 无头浏览器来模拟用户访问所需要预渲染的地址;在访问完成之后,保存页面HTML到文件夹中。
流程如下:
更为详细的流程介绍如下(此部分枯燥乏味,非专业人士可以跳过。):
阶段1:创建渲染器实例
spa-prerender index.js:
1.创建puppeteer实例 @prerenderer/renderer-puppeteer/es6/renderer.js
2.创建server实例@prerenderer/prerenderer/es6/server.js
3.创建renderer实例,将1 2步的puppeteer和server注入this @@prerenderer/prerenderer/es6/index.js
阶段2:渲染器实例初始化:spa-prerender index.js:
1.server初始化 (设置路由:静态资源利用*.*映射到staticDir上,其他请求全部映射到index.html上。设置静态资源和index.html路径,modifyServer也在这个阶段。server 启动)@prerenderer/prerenderer/es6/server.js
2.puppeteer初始化(判断平台是否linux,如果是Linux需要设置一些启动参数;启动puppeteer)@prerenderer/renderer-puppeteer/es6/renderer.js
阶段3:开始访问路由并获取html
1.spa-prerender index.js->@prerenderer/prerenderer/es6/index.js -> @prerenderer/renderer-puppeteer/es6/renderer.js
2.开启一个限流器,每次最多渲染 n 条路由,避免内存崩溃
3.puppeteer开启一个新标签,判断是否有inject,如果有,注入到window上
4.拼接端口、设置viewport,拼接router,形成url,发起页面的请求
5.判断options中是否设置了renderAfterDocumentEvent,如果有,给页面添加一个事件监听器,当触发事件的时候,将__PRERENDER_STATUS属性设置为true
6.访问页面,等待加载完成(如何确定页面加载完成, waituntil: 'networkidle0'//在500ms内没有网络请求,这个设置可以通过puppeteerOptions.navigationOptions.waituntil修改)
等待捕捉,分为三种等待时机:
1.等待固定时间,renderAfterTime(利用settimeout结合promise实现)
2.等待抛出某个事件:renderAfterDocumentEvent,该事件需要事先在页面写好抛出的时机
3.等待某个元素出现:renderAfterElementExists
阶段4:保存html
spa-prerender index.js 遍历结果,拼接文件夹路径并保存html。
实践过程中的常见问题
1. 如果一个项目有10个页面,其中首页需要SEO,于是使用了预渲染,另外9个页面仍然是由js渲染。那么在访问其他9个页面的时候,刷新页面,会先显示首页的内容一闪而过。这种问题如何解决?
产生这种情况的原因在于:在单页应用中,实际上只有一个物理页面,那就是 index.html。我们访问的所有页面实际都是 index.html,先进入 index.html 然后再执行 js 构建 dom。那么此时如果我们首页是已经预渲染好的,那么就会有内容,在 js 构建出对应路由的内容之前,就会先出现首页的内容。
spa-prerender 考虑到了这种问题。在预渲染的过程中,会首先保留原来“纯净”的index.html,并重命名为“index-spa.html”。
而后,在 nginx 配置中,利用 try_files 指令的优先级配置特点,让用户在刷新的情况下,如果有对应物理文件则访问物理文件(预渲染生成的文件),如果没有对应物理文件则降级访问 index-spa.html,就可以解决上述问题。nginx 配置指令如下:
location /{ alias /Users/zks/code/xkw/xop/dist/; try_files $uri $uri/ /index-spa.html; }
此时预渲染生成的文件将被优先返回($uri),如果未匹配,才会交由 index-spa.html 处理。
2. 如果项目打包有前缀怎么办?
如果项目有publicPath,那么在 dist 目录下会多一层根目录。此时需要在预渲染配置中添加 basePath 的选项。此时 express 会从 dist/basePath 目录中去寻找 index.html。
配置如下:
const options = { staticDir: path.join(__dirname, 'dist'), basePath: 'base',//当项目有basePath的时候设置。同router中的base和publicPath。确保staticDir/basePath/index.html存在 routes: ['/','/exam', ], ... }
3. 如何控制渲染器开始进行HTML保存的时机?
我们可以通过 options 中三个参数来控制:
3.1.renderAfterTime:等待固定时间之后(从页面开始发起访问算起)
3.2.renderAfterDocumentEvent:等待抛出某个事件,该事件需要事先在页面定义好触发的时机,比如在 Vue 的 mounted 函数中定义:
new Vue({ router,render: h => h(App), mounted () { //在mounted之后触发custom-render-event // 预渲染器在收到这个事件之后将开始进行页面的保存工作 document.dispatchEvent(new Event('custom-render-event')) }}).$mount('#app')
3.3.renderAfterElementExists:等待某个元素出现。我们可以在异步 ajax 返回之后,增加某个元素。当渲染器检测到此元素出现之后进行页面保存,此时保存的页面就包含了 ajax 返回的数据。
4. 首页预渲染生成的 DOM 元素,会不会被 js 复用?还是删除重新构建?
仿照SSR的思路,我们可以通过在根节点上设置 data-server-rander="true",这样在客户端 js 会知道这个是已经渲染完成的 DOM,不会粗暴去替换它。而是执行一个“注水”的过程(也就是hydration)。可以充分复用预渲染生成的 DOM 元素。
点击下方卡片可以关注 查看全部
nodejs抓取动态网页 全面深入理解预渲染技术体系
在我们使用现代前端框架,比如Vue、React、Angular开发完毕前端项目之后,会发现这些页面输出的全是js,很不利于搜索引擎去爬取。在已经完成了单页应用(SPA)项目之后,如果要进行SEO优化的改造,这时候就可以使用预渲染技术体系。
下面将从适用场景、概念介绍、如何使用、底层原理几方面全面介绍预渲染技术的各项特性。适用场景在谈使用场景之前,首先需要明白以下几点:现代前端框架比如 Vue 在构建完成之后,页面加载的其实是一堆 js,再由 js 动态生成DOM。当我们访问页面,右键“显示网页源代码”的时候,看不到文字等内容百度、搜狗等爬虫在抓取页面的时候,不会执行页面的 js 源代码(谷歌爬虫可以执行“同步” js 来构建页面,因此 Vue 等框架开发的单页应用可以在谷歌搜索引擎中很好的被收录,这点我们不展开讨论)如果想要让百度、搜狗等收录索引我们的网站,就必须像静态 HTML 那样,让网页在右键查看源代码的时候,显示的是文字、图片等内容在这样的场景下,我们可以使用预渲染来解决此类问题。概念介绍
预渲染概念简单来讲是这样的:在项目构建阶段,我们会模拟访问项目的页面URL,这时候页面上的 js 将会执行并且形成真正的 HTML 片段;此时我们保存这个 HTML 文件到服务器硬盘上,下次不管是用户还是爬虫访问的时候,就直接返回这个物理文件,这样就可以有效解决 SEO 无法收录的问题。大体流程如下图:
可以看出,“预渲染”同“服务端渲染”最大的区别是,前者是在构建期间执行,后者在用户访问期间实时运行;前者在构建完成之后就不再需要 node服务,后者需要使用 node 作为运行时。预渲染也有它不适用的地方。正因为在构建阶段我们需要指明“需要构建的页面URL”,因此对于那些携带动态参数的页面(比如资料详情页),不适用于用预渲染去构建。这种场景下只能使用SSR。反之,一切静态官网、带数据的门户网站,只要是URL固定的,不管其中有没有动态数据,都可以使用预渲染。这里你可能会问一个问题:预渲染技术能否将 ajax 请求的内容也填充到页面上?答案是肯定的。虽然你 ajax 并非“同步执行”的 js,我们无法获知异步请求完成的时机。但通过控制监测页面上某个特定元素是否存在等手段,我们可以变相获知到数据返回的时机,从而进行预渲染。就可以达到“填充 ajax 数据”的效果(这可是谷歌爬虫也无法达到的效果哦)。如何使用预渲染技术有很多种实现方式。最常用的是使用 webpack 的一个插件: prerender-spa-plugin()。但是这个插件有很多局限性,最大的局限性在于必须结合 webpack 来使用,不够灵活,不易调试。也无法通过编程的方式使用。
比如我们的首页有动态的数据(非动态URL。是通过ajax获取的动态数据。)因此我们在使用了预渲染生成了静态首页之后,需要每间隔10分钟或者5分钟重新生成一个新的静态页,来更新数据。这就需要能够通过编程的方式调用渲染指令。在这样的情况下我基于这个插件的原理重新实现了一个包:@waitkafuka/spa-prerender(),可以通过 nodejs 通过编程的方式使用。
同时它剥离了 webpack 的依赖,剥离了对SPA页面的限制。只要有一个静态目录就可以工作。使用的方式非常简单,以 Vue 为例,在我们正常构建生成了 dist 目录之后,只需要编写以下脚本:
const SpaRenderer = require('@waitkafuka/spa-prerender');const path = require('path');<br />const options = {staticDir: path.join(__dirname, 'dist'),basePath: 'base',//可选,当项目有basePath的时候设置。同router中的base和publicPath。确保staticDir/basePath/index.html存在 routes: ['/','/exam', ],puppeteerOptions: {headless: true,maxConcurrentRoutes: 0,renderAfterDocumentEvent: 'render-event',skipThirdPartyRequests: true }};const spaRenderer = new SpaRenderer(options)spaRenderer.render().then(() => {console.log('预渲染完毕。');});
具体的参数解析可以查看 @waitkafuka/spa-prerender。底层原理在底层实现上,主要利用了 express 来驱动静态页面;然后利用 puppeteer 无头浏览器来模拟用户访问所需要预渲染的地址;在访问完成之后,保存页面HTML到文件夹中。
流程如下:
更为详细的流程介绍如下(此部分枯燥乏味,非专业人士可以跳过。):
阶段1:创建渲染器实例
spa-prerender index.js:
1.创建puppeteer实例 @prerenderer/renderer-puppeteer/es6/renderer.js
2.创建server实例@prerenderer/prerenderer/es6/server.js
3.创建renderer实例,将1 2步的puppeteer和server注入this @@prerenderer/prerenderer/es6/index.js
阶段2:渲染器实例初始化:spa-prerender index.js:
1.server初始化 (设置路由:静态资源利用*.*映射到staticDir上,其他请求全部映射到index.html上。设置静态资源和index.html路径,modifyServer也在这个阶段。server 启动)@prerenderer/prerenderer/es6/server.js
2.puppeteer初始化(判断平台是否linux,如果是Linux需要设置一些启动参数;启动puppeteer)@prerenderer/renderer-puppeteer/es6/renderer.js
阶段3:开始访问路由并获取html
1.spa-prerender index.js->@prerenderer/prerenderer/es6/index.js -> @prerenderer/renderer-puppeteer/es6/renderer.js
2.开启一个限流器,每次最多渲染 n 条路由,避免内存崩溃
3.puppeteer开启一个新标签,判断是否有inject,如果有,注入到window上
4.拼接端口、设置viewport,拼接router,形成url,发起页面的请求
5.判断options中是否设置了renderAfterDocumentEvent,如果有,给页面添加一个事件监听器,当触发事件的时候,将__PRERENDER_STATUS属性设置为true
6.访问页面,等待加载完成(如何确定页面加载完成, waituntil: 'networkidle0'//在500ms内没有网络请求,这个设置可以通过puppeteerOptions.navigationOptions.waituntil修改)
等待捕捉,分为三种等待时机:
1.等待固定时间,renderAfterTime(利用settimeout结合promise实现)
2.等待抛出某个事件:renderAfterDocumentEvent,该事件需要事先在页面写好抛出的时机
3.等待某个元素出现:renderAfterElementExists
阶段4:保存html
spa-prerender index.js 遍历结果,拼接文件夹路径并保存html。
实践过程中的常见问题
1. 如果一个项目有10个页面,其中首页需要SEO,于是使用了预渲染,另外9个页面仍然是由js渲染。那么在访问其他9个页面的时候,刷新页面,会先显示首页的内容一闪而过。这种问题如何解决?
产生这种情况的原因在于:在单页应用中,实际上只有一个物理页面,那就是 index.html。我们访问的所有页面实际都是 index.html,先进入 index.html 然后再执行 js 构建 dom。那么此时如果我们首页是已经预渲染好的,那么就会有内容,在 js 构建出对应路由的内容之前,就会先出现首页的内容。
spa-prerender 考虑到了这种问题。在预渲染的过程中,会首先保留原来“纯净”的index.html,并重命名为“index-spa.html”。
而后,在 nginx 配置中,利用 try_files 指令的优先级配置特点,让用户在刷新的情况下,如果有对应物理文件则访问物理文件(预渲染生成的文件),如果没有对应物理文件则降级访问 index-spa.html,就可以解决上述问题。nginx 配置指令如下:
location /{ alias /Users/zks/code/xkw/xop/dist/; try_files $uri $uri/ /index-spa.html; }
此时预渲染生成的文件将被优先返回($uri),如果未匹配,才会交由 index-spa.html 处理。
2. 如果项目打包有前缀怎么办?
如果项目有publicPath,那么在 dist 目录下会多一层根目录。此时需要在预渲染配置中添加 basePath 的选项。此时 express 会从 dist/basePath 目录中去寻找 index.html。
配置如下:
const options = { staticDir: path.join(__dirname, 'dist'), basePath: 'base',//当项目有basePath的时候设置。同router中的base和publicPath。确保staticDir/basePath/index.html存在 routes: ['/','/exam', ], ... }
3. 如何控制渲染器开始进行HTML保存的时机?
我们可以通过 options 中三个参数来控制:
3.1.renderAfterTime:等待固定时间之后(从页面开始发起访问算起)
3.2.renderAfterDocumentEvent:等待抛出某个事件,该事件需要事先在页面定义好触发的时机,比如在 Vue 的 mounted 函数中定义:
new Vue({ router,render: h => h(App), mounted () { //在mounted之后触发custom-render-event // 预渲染器在收到这个事件之后将开始进行页面的保存工作 document.dispatchEvent(new Event('custom-render-event')) }}).$mount('#app')
3.3.renderAfterElementExists:等待某个元素出现。我们可以在异步 ajax 返回之后,增加某个元素。当渲染器检测到此元素出现之后进行页面保存,此时保存的页面就包含了 ajax 返回的数据。
4. 首页预渲染生成的 DOM 元素,会不会被 js 复用?还是删除重新构建?
仿照SSR的思路,我们可以通过在根节点上设置 data-server-rander="true",这样在客户端 js 会知道这个是已经渲染完成的 DOM,不会粗暴去替换它。而是执行一个“注水”的过程(也就是hydration)。可以充分复用预渲染生成的 DOM 元素。
点击下方卡片可以关注
nodejs抓取动态网页 全面深入理解预渲染技术体系
网站优化 • 优采云 发表了文章 • 0 个评论 • 69 次浏览 • 2022-06-22 00:04
在我们使用现代前端框架,比如Vue、React、Angular开发完毕前端项目之后,会发现这些页面输出的全是js,很不利于搜索引擎去爬取。在已经完成了单页应用(SPA)项目之后,如果要进行SEO优化的改造,这时候就可以使用预渲染技术体系。
下面将从适用场景、概念介绍、如何使用、底层原理几方面全面介绍预渲染技术的各项特性。适用场景在谈使用场景之前,首先需要明白以下几点:现代前端框架比如 Vue 在构建完成之后,页面加载的其实是一堆 js,再由 js 动态生成DOM。当我们访问页面,右键“显示网页源代码”的时候,看不到文字等内容百度、搜狗等爬虫在抓取页面的时候,不会执行页面的 js 源代码(谷歌爬虫可以执行“同步” js 来构建页面,因此 Vue 等框架开发的单页应用可以在谷歌搜索引擎中很好的被收录,这点我们不展开讨论)如果想要让百度、搜狗等收录索引我们的网站,就必须像静态 HTML 那样,让网页在右键查看源代码的时候,显示的是文字、图片等内容在这样的场景下,我们可以使用预渲染来解决此类问题。概念介绍
预渲染概念简单来讲是这样的:在项目构建阶段,我们会模拟访问项目的页面URL,这时候页面上的 js 将会执行并且形成真正的 HTML 片段;此时我们保存这个 HTML 文件到服务器硬盘上,下次不管是用户还是爬虫访问的时候,就直接返回这个物理文件,这样就可以有效解决 SEO 无法收录的问题。大体流程如下图:
可以看出,“预渲染”同“服务端渲染”最大的区别是,前者是在构建期间执行,后者在用户访问期间实时运行;前者在构建完成之后就不再需要 node服务,后者需要使用 node 作为运行时。预渲染也有它不适用的地方。正因为在构建阶段我们需要指明“需要构建的页面URL”,因此对于那些携带动态参数的页面(比如资料详情页),不适用于用预渲染去构建。这种场景下只能使用SSR。反之,一切静态官网、带数据的门户网站,只要是URL固定的,不管其中有没有动态数据,都可以使用预渲染。这里你可能会问一个问题:预渲染技术能否将 ajax 请求的内容也填充到页面上?答案是肯定的。虽然你 ajax 并非“同步执行”的 js,我们无法获知异步请求完成的时机。但通过控制监测页面上某个特定元素是否存在等手段,我们可以变相获知到数据返回的时机,从而进行预渲染。就可以达到“填充 ajax 数据”的效果(这可是谷歌爬虫也无法达到的效果哦)。如何使用预渲染技术有很多种实现方式。最常用的是使用 webpack 的一个插件: prerender-spa-plugin()。但是这个插件有很多局限性,最大的局限性在于必须结合 webpack 来使用,不够灵活,不易调试。也无法通过编程的方式使用。
比如我们的首页有动态的数据(非动态URL。是通过ajax获取的动态数据。)因此我们在使用了预渲染生成了静态首页之后,需要每间隔10分钟或者5分钟重新生成一个新的静态页,来更新数据。这就需要能够通过编程的方式调用渲染指令。在这样的情况下我基于这个插件的原理重新实现了一个包:@waitkafuka/spa-prerender(),可以通过 nodejs 通过编程的方式使用。
同时它剥离了 webpack 的依赖,剥离了对SPA页面的限制。只要有一个静态目录就可以工作。使用的方式非常简单,以 Vue 为例,在我们正常构建生成了 dist 目录之后,只需要编写以下脚本:
const SpaRenderer = require('@waitkafuka/spa-prerender');const path = require('path');<br />const options = {staticDir: path.join(__dirname, 'dist'),basePath: 'base',//可选,当项目有basePath的时候设置。同router中的base和publicPath。确保staticDir/basePath/index.html存在 routes: ['/','/exam', ],puppeteerOptions: {headless: true,maxConcurrentRoutes: 0,renderAfterDocumentEvent: 'render-event',skipThirdPartyRequests: true }};const spaRenderer = new SpaRenderer(options)spaRenderer.render().then(() => {console.log('预渲染完毕。');});
具体的参数解析可以查看 @waitkafuka/spa-prerender。底层原理在底层实现上,主要利用了 express 来驱动静态页面;然后利用 puppeteer 无头浏览器来模拟用户访问所需要预渲染的地址;在访问完成之后,保存页面HTML到文件夹中。
流程如下:
更为详细的流程介绍如下(此部分枯燥乏味,非专业人士可以跳过。):
阶段1:创建渲染器实例
spa-prerender index.js:
1.创建puppeteer实例 @prerenderer/renderer-puppeteer/es6/renderer.js
2.创建server实例@prerenderer/prerenderer/es6/server.js
3.创建renderer实例,将1 2步的puppeteer和server注入this @@prerenderer/prerenderer/es6/index.js
阶段2:渲染器实例初始化:spa-prerender index.js:
1.server初始化 (设置路由:静态资源利用*.*映射到staticDir上,其他请求全部映射到index.html上。设置静态资源和index.html路径,modifyServer也在这个阶段。server 启动)@prerenderer/prerenderer/es6/server.js
2.puppeteer初始化(判断平台是否linux,如果是Linux需要设置一些启动参数;启动puppeteer)@prerenderer/renderer-puppeteer/es6/renderer.js
阶段3:开始访问路由并获取html
1.spa-prerender index.js->@prerenderer/prerenderer/es6/index.js -> @prerenderer/renderer-puppeteer/es6/renderer.js
2.开启一个限流器,每次最多渲染 n 条路由,避免内存崩溃
3.puppeteer开启一个新标签,判断是否有inject,如果有,注入到window上
4.拼接端口、设置viewport,拼接router,形成url,发起页面的请求
5.判断options中是否设置了renderAfterDocumentEvent,如果有,给页面添加一个事件监听器,当触发事件的时候,将__PRERENDER_STATUS属性设置为true
6.访问页面,等待加载完成(如何确定页面加载完成, waituntil: 'networkidle0'//在500ms内没有网络请求,这个设置可以通过puppeteerOptions.navigationOptions.waituntil修改)
等待捕捉,分为三种等待时机:
1.等待固定时间,renderAfterTime(利用settimeout结合promise实现)
2.等待抛出某个事件:renderAfterDocumentEvent,该事件需要事先在页面写好抛出的时机
3.等待某个元素出现:renderAfterElementExists
阶段4:保存html
spa-prerender index.js 遍历结果,拼接文件夹路径并保存html。
实践过程中的常见问题
1. 如果一个项目有10个页面,其中首页需要SEO,于是使用了预渲染,另外9个页面仍然是由js渲染。那么在访问其他9个页面的时候,刷新页面,会先显示首页的内容一闪而过。这种问题如何解决?
产生这种情况的原因在于:在单页应用中,实际上只有一个物理页面,那就是 index.html。我们访问的所有页面实际都是 index.html,先进入 index.html 然后再执行 js 构建 dom。那么此时如果我们首页是已经预渲染好的,那么就会有内容,在 js 构建出对应路由的内容之前,就会先出现首页的内容。
spa-prerender 考虑到了这种问题。在预渲染的过程中,会首先保留原来“纯净”的index.html,并重命名为“index-spa.html”。
而后,在 nginx 配置中,利用 try_files 指令的优先级配置特点,让用户在刷新的情况下,如果有对应物理文件则访问物理文件(预渲染生成的文件),如果没有对应物理文件则降级访问 index-spa.html,就可以解决上述问题。nginx 配置指令如下:
location /{ alias /Users/zks/code/xkw/xop/dist/; try_files $uri $uri/ /index-spa.html; }
此时预渲染生成的文件将被优先返回($uri),如果未匹配,才会交由 index-spa.html 处理。
2. 如果项目打包有前缀怎么办?
如果项目有publicPath,那么在 dist 目录下会多一层根目录。此时需要在预渲染配置中添加 basePath 的选项。此时 express 会从 dist/basePath 目录中去寻找 index.html。
配置如下:
const options = { staticDir: path.join(__dirname, 'dist'), basePath: 'base',//当项目有basePath的时候设置。同router中的base和publicPath。确保staticDir/basePath/index.html存在 routes: ['/','/exam', ], ... }
3. 如何控制渲染器开始进行HTML保存的时机?
我们可以通过 options 中三个参数来控制:
3.1.renderAfterTime:等待固定时间之后(从页面开始发起访问算起)
3.2.renderAfterDocumentEvent:等待抛出某个事件,该事件需要事先在页面定义好触发的时机,比如在 Vue 的 mounted 函数中定义:
new Vue({ router,render: h => h(App), mounted () { //在mounted之后触发custom-render-event // 预渲染器在收到这个事件之后将开始进行页面的保存工作 document.dispatchEvent(new Event('custom-render-event')) }}).$mount('#app')
3.3.renderAfterElementExists:等待某个元素出现。我们可以在异步 ajax 返回之后,增加某个元素。当渲染器检测到此元素出现之后进行页面保存,此时保存的页面就包含了 ajax 返回的数据。
4. 首页预渲染生成的 DOM 元素,会不会被 js 复用?还是删除重新构建?
仿照SSR的思路,我们可以通过在根节点上设置 data-server-rander="true",这样在客户端 js 会知道这个是已经渲染完成的 DOM,不会粗暴去替换它。而是执行一个“注水”的过程(也就是hydration)。可以充分复用预渲染生成的 DOM 元素。
点击下方卡片可以关注 查看全部
nodejs抓取动态网页 全面深入理解预渲染技术体系
在我们使用现代前端框架,比如Vue、React、Angular开发完毕前端项目之后,会发现这些页面输出的全是js,很不利于搜索引擎去爬取。在已经完成了单页应用(SPA)项目之后,如果要进行SEO优化的改造,这时候就可以使用预渲染技术体系。
下面将从适用场景、概念介绍、如何使用、底层原理几方面全面介绍预渲染技术的各项特性。适用场景在谈使用场景之前,首先需要明白以下几点:现代前端框架比如 Vue 在构建完成之后,页面加载的其实是一堆 js,再由 js 动态生成DOM。当我们访问页面,右键“显示网页源代码”的时候,看不到文字等内容百度、搜狗等爬虫在抓取页面的时候,不会执行页面的 js 源代码(谷歌爬虫可以执行“同步” js 来构建页面,因此 Vue 等框架开发的单页应用可以在谷歌搜索引擎中很好的被收录,这点我们不展开讨论)如果想要让百度、搜狗等收录索引我们的网站,就必须像静态 HTML 那样,让网页在右键查看源代码的时候,显示的是文字、图片等内容在这样的场景下,我们可以使用预渲染来解决此类问题。概念介绍
预渲染概念简单来讲是这样的:在项目构建阶段,我们会模拟访问项目的页面URL,这时候页面上的 js 将会执行并且形成真正的 HTML 片段;此时我们保存这个 HTML 文件到服务器硬盘上,下次不管是用户还是爬虫访问的时候,就直接返回这个物理文件,这样就可以有效解决 SEO 无法收录的问题。大体流程如下图:
可以看出,“预渲染”同“服务端渲染”最大的区别是,前者是在构建期间执行,后者在用户访问期间实时运行;前者在构建完成之后就不再需要 node服务,后者需要使用 node 作为运行时。预渲染也有它不适用的地方。正因为在构建阶段我们需要指明“需要构建的页面URL”,因此对于那些携带动态参数的页面(比如资料详情页),不适用于用预渲染去构建。这种场景下只能使用SSR。反之,一切静态官网、带数据的门户网站,只要是URL固定的,不管其中有没有动态数据,都可以使用预渲染。这里你可能会问一个问题:预渲染技术能否将 ajax 请求的内容也填充到页面上?答案是肯定的。虽然你 ajax 并非“同步执行”的 js,我们无法获知异步请求完成的时机。但通过控制监测页面上某个特定元素是否存在等手段,我们可以变相获知到数据返回的时机,从而进行预渲染。就可以达到“填充 ajax 数据”的效果(这可是谷歌爬虫也无法达到的效果哦)。如何使用预渲染技术有很多种实现方式。最常用的是使用 webpack 的一个插件: prerender-spa-plugin()。但是这个插件有很多局限性,最大的局限性在于必须结合 webpack 来使用,不够灵活,不易调试。也无法通过编程的方式使用。
比如我们的首页有动态的数据(非动态URL。是通过ajax获取的动态数据。)因此我们在使用了预渲染生成了静态首页之后,需要每间隔10分钟或者5分钟重新生成一个新的静态页,来更新数据。这就需要能够通过编程的方式调用渲染指令。在这样的情况下我基于这个插件的原理重新实现了一个包:@waitkafuka/spa-prerender(),可以通过 nodejs 通过编程的方式使用。
同时它剥离了 webpack 的依赖,剥离了对SPA页面的限制。只要有一个静态目录就可以工作。使用的方式非常简单,以 Vue 为例,在我们正常构建生成了 dist 目录之后,只需要编写以下脚本:
const SpaRenderer = require('@waitkafuka/spa-prerender');const path = require('path');<br />const options = {staticDir: path.join(__dirname, 'dist'),basePath: 'base',//可选,当项目有basePath的时候设置。同router中的base和publicPath。确保staticDir/basePath/index.html存在 routes: ['/','/exam', ],puppeteerOptions: {headless: true,maxConcurrentRoutes: 0,renderAfterDocumentEvent: 'render-event',skipThirdPartyRequests: true }};const spaRenderer = new SpaRenderer(options)spaRenderer.render().then(() => {console.log('预渲染完毕。');});
具体的参数解析可以查看 @waitkafuka/spa-prerender。底层原理在底层实现上,主要利用了 express 来驱动静态页面;然后利用 puppeteer 无头浏览器来模拟用户访问所需要预渲染的地址;在访问完成之后,保存页面HTML到文件夹中。
流程如下:
更为详细的流程介绍如下(此部分枯燥乏味,非专业人士可以跳过。):
阶段1:创建渲染器实例
spa-prerender index.js:
1.创建puppeteer实例 @prerenderer/renderer-puppeteer/es6/renderer.js
2.创建server实例@prerenderer/prerenderer/es6/server.js
3.创建renderer实例,将1 2步的puppeteer和server注入this @@prerenderer/prerenderer/es6/index.js
阶段2:渲染器实例初始化:spa-prerender index.js:
1.server初始化 (设置路由:静态资源利用*.*映射到staticDir上,其他请求全部映射到index.html上。设置静态资源和index.html路径,modifyServer也在这个阶段。server 启动)@prerenderer/prerenderer/es6/server.js
2.puppeteer初始化(判断平台是否linux,如果是Linux需要设置一些启动参数;启动puppeteer)@prerenderer/renderer-puppeteer/es6/renderer.js
阶段3:开始访问路由并获取html
1.spa-prerender index.js->@prerenderer/prerenderer/es6/index.js -> @prerenderer/renderer-puppeteer/es6/renderer.js
2.开启一个限流器,每次最多渲染 n 条路由,避免内存崩溃
3.puppeteer开启一个新标签,判断是否有inject,如果有,注入到window上
4.拼接端口、设置viewport,拼接router,形成url,发起页面的请求
5.判断options中是否设置了renderAfterDocumentEvent,如果有,给页面添加一个事件监听器,当触发事件的时候,将__PRERENDER_STATUS属性设置为true
6.访问页面,等待加载完成(如何确定页面加载完成, waituntil: 'networkidle0'//在500ms内没有网络请求,这个设置可以通过puppeteerOptions.navigationOptions.waituntil修改)
等待捕捉,分为三种等待时机:
1.等待固定时间,renderAfterTime(利用settimeout结合promise实现)
2.等待抛出某个事件:renderAfterDocumentEvent,该事件需要事先在页面写好抛出的时机
3.等待某个元素出现:renderAfterElementExists
阶段4:保存html
spa-prerender index.js 遍历结果,拼接文件夹路径并保存html。
实践过程中的常见问题
1. 如果一个项目有10个页面,其中首页需要SEO,于是使用了预渲染,另外9个页面仍然是由js渲染。那么在访问其他9个页面的时候,刷新页面,会先显示首页的内容一闪而过。这种问题如何解决?
产生这种情况的原因在于:在单页应用中,实际上只有一个物理页面,那就是 index.html。我们访问的所有页面实际都是 index.html,先进入 index.html 然后再执行 js 构建 dom。那么此时如果我们首页是已经预渲染好的,那么就会有内容,在 js 构建出对应路由的内容之前,就会先出现首页的内容。
spa-prerender 考虑到了这种问题。在预渲染的过程中,会首先保留原来“纯净”的index.html,并重命名为“index-spa.html”。
而后,在 nginx 配置中,利用 try_files 指令的优先级配置特点,让用户在刷新的情况下,如果有对应物理文件则访问物理文件(预渲染生成的文件),如果没有对应物理文件则降级访问 index-spa.html,就可以解决上述问题。nginx 配置指令如下:
location /{ alias /Users/zks/code/xkw/xop/dist/; try_files $uri $uri/ /index-spa.html; }
此时预渲染生成的文件将被优先返回($uri),如果未匹配,才会交由 index-spa.html 处理。
2. 如果项目打包有前缀怎么办?
如果项目有publicPath,那么在 dist 目录下会多一层根目录。此时需要在预渲染配置中添加 basePath 的选项。此时 express 会从 dist/basePath 目录中去寻找 index.html。
配置如下:
const options = { staticDir: path.join(__dirname, 'dist'), basePath: 'base',//当项目有basePath的时候设置。同router中的base和publicPath。确保staticDir/basePath/index.html存在 routes: ['/','/exam', ], ... }
3. 如何控制渲染器开始进行HTML保存的时机?
我们可以通过 options 中三个参数来控制:
3.1.renderAfterTime:等待固定时间之后(从页面开始发起访问算起)
3.2.renderAfterDocumentEvent:等待抛出某个事件,该事件需要事先在页面定义好触发的时机,比如在 Vue 的 mounted 函数中定义:
new Vue({ router,render: h => h(App), mounted () { //在mounted之后触发custom-render-event // 预渲染器在收到这个事件之后将开始进行页面的保存工作 document.dispatchEvent(new Event('custom-render-event')) }}).$mount('#app')
3.3.renderAfterElementExists:等待某个元素出现。我们可以在异步 ajax 返回之后,增加某个元素。当渲染器检测到此元素出现之后进行页面保存,此时保存的页面就包含了 ajax 返回的数据。
4. 首页预渲染生成的 DOM 元素,会不会被 js 复用?还是删除重新构建?
仿照SSR的思路,我们可以通过在根节点上设置 data-server-rander="true",这样在客户端 js 会知道这个是已经渲染完成的 DOM,不会粗暴去替换它。而是执行一个“注水”的过程(也就是hydration)。可以充分复用预渲染生成的 DOM 元素。
点击下方卡片可以关注
nodejs抓取动态网页 分享12个GitHub骚操作!
网站优化 • 优采云 发表了文章 • 0 个评论 • 92 次浏览 • 2022-06-21 01:18
原文:
#1 在 GitHub 上编辑代码
我要先说一个很多人都知道的事儿。
当你使用 GitHub看一些文件时(任何的文本文件或者仓库),能看到一个顶部右侧有一个小铅笔图标。点击即可编辑文档。完成后,按照提示点击「Propose file change」,GitHub 会为你 fork 这个仓库并创建一个 pull request。
很帅吧,不需要 fork / pull / 改变 locally / push / 创建 PR,只需点击一下,GitHub 就为你创建了一个分支。
这对于修改一些排版错误或者防恶意篡改是很有帮助的。
#2 粘贴图像
对于 issue 和 comment,你还可以直接粘贴图片,当你粘贴时图片会被上传至云端,然后以 MarkDown 格式显示。
非常简洁。
#3 格式化代码
如果你想写一个 code block,你可以在开始处写三个反引号,然后 GitHub 会试图猜出你在写什么语言。
但是如果你发布如 Vue、Typescript、JSX 这样的语言,你可以明确写出来,以获取正确的高亮。
下图第一行使用了```jsx:
片段呈现:
(这可以扩展到 gist,顺便一提,如果你给了 gist 定义成 .jsx 扩展名,那么你会得到 JSX 的高亮)
#4 使用魔术词在 PR 中关闭 issue
比如你在创建一个 pull request 去修复 issue #234。那你可在 PR 输入「fixes #234」,就可以自动合并 PR 并关闭这个 issue,是不是很酷。
(提交信息里可以使用 fix/fixes/fixed , close/closes/closed 或者 resolve/resolves/resolved等关键词)
#5 链接到 comment
你甚至想链接到一个特定的评论,但无法做到?我在这里告诉你,点击名字旁边的日期/时间就万事大吉。
#6 链接到代码
既然能链接到 comment,那你想问能不能链接到代码上?可以的。
试试这个操作:在查看文件时,点击代码边上的行数。
哇喔,你看到了么?URL 随之更新。如果你按住 Shift 并单击另一个行号,URL 会再次更新,并且高亮这两个行数之间的所有代码段。
你现在可以分享这个 URL 了,但等等,这些还是当前分支,如果文件变化了呢?你需要一个永久链接。
我比较懒,但是下面这一个截图已经能够表达如何获取永久链接了(Copy Permalink):
#7 像使用命令行一样使用 GitHub URL
既然说到了 URL,那么就接着聊一下。使用 UI 浏览 GitHub 很方面也很好,不过很多时候最快的方式是使用 URL 来浏览。举个例子,如果我想跳转到正在处理的分支上,并想查看分支和 master 的差异,我可以在我的仓库名后面输入 /compare/branch-name。
这会使我到达分支的不同页面:
可以在名字后面再加上...XXX(分支名)比如我写的 mkdocs...pre-release,如下图:
这一步你可以配合键盘快捷键,Ctrl + L 或者 cmd + L,可以让光标直接移动到 URL 中(最起码 chrome 是这样)。这些加一起能提高生产力。
专业提示:用键盘移动 chrome URL 上的某一条网页记录,使用 Shift+Delete 或 Shift+fn+Delete 来删除某一条记录。(比如合并了分支之后就可以删除了)
#8 在 issue 中创建 list
你想在你的 issue中看到可多选的 list 么?
当你查看问题时,你想不想让它变成 2 of 5 这样的形式?
如果想,你可以在 issue 中使用以下句法:
- [ ] Screen width (integer) <br style="box-sizing: border-box;font-size: inherit;color: inherit;line-height: inherit;word-wrap: inherit !important;word-break: inherit !important;" />- [x] Service worker support <br style="box-sizing: border-box;font-size: inherit;color: inherit;line-height: inherit;word-wrap: inherit !important;word-break: inherit !important;" />- [x] Fetch support <br style="box-sizing: border-box;font-size: inherit;color: inherit;line-height: inherit;word-wrap: inherit !important;word-break: inherit !important;" />- [ ] CSS flexbox support <br style="box-sizing: border-box;font-size: inherit;color: inherit;line-height: inherit;word-wrap: inherit !important;word-break: inherit !important;" />- [ ] Custom elements
#9 GitHub 上的 project board
我总是用 Jira 做大项目,独立项目用 Trello,这两者我都很喜欢。
后来我知道,GitHub 也有类似的 project board:
我个人为了方便把它们都添加为 note。board 极为方便的帮助你做仓库管理。
你可以点击右上角 Add Cards 来添加东西。这里有些特殊语法方便搜索,比如: is:pr is:open,你就可以把任何公开的 PR 拖到 board 上。
更多语法可以参考search syntax。
你也可以把现存的 note 转化为 issue。
你也可以选择 issue 直接添加到 projects 。
这些意味着,从现在开始,你可以明确责任制度,每一行代码的分配都可以在 GitHub 上的 Project board 上完成,而不用去 Jira 或者 Trello 上。
不过它也有些缺点,比如功能比较少。你也可以试试 ZenHub,它有效的扩展 GitHub。
#10 GitHub WiKi
GitHub WiKi 能够帮助我们处理非结构化的页面集合,就像维基百科那样。我自己 NodeJS docs 就被我弄成 wiki 的样子。几个页面,然后自定义侧边栏。具体方法网上很多,我的页面可以供你参考一下。
建议:如果你有个特别长的单页面 README.md 文件,并且想和其他人有所区别,你可以试试这种形式。
#11 GitHub Pages(JekyII)
你可能已经知道了能使用 GitHub Pages 来托管静态网站。那本条就特别介绍一下如何使用 JekyII 来构建站点。
以最简单的方式,GitHub Pages + JekyII 将以最漂亮的主题来呈现你的 README.md,例如,你可以看一下about-github的自述文件。
在 GitHub 的 my site 中,点击 setting,打开 GitHub Pages,选择一个 JekyII 主题
就会得到一个Jekyll主题页面:
它的优点是:
注意,他需要 Ruby 在本地运行,Mac 自带,Windows 用户自行安装。
#12 把 GitHub 当 CMS 用
你的网站需要显示一些文字,但是你还不想直接放在 HTML 里面,那你可以把 GitHub 作为你储存内容的一个地方。这样,就可以让任何一个非程序员通过修改 Markdown 来修改 HTML 网页的内容。
我的方法是:在你的 GitHub 仓库中使用 markdown 文件来保存文本。在你网站的前端用一个组件来抓取这些文本并呈现在网页上。
我是玩 React 的,这里有个组件,用以抓取,解析并呈现到 HTML 上。
class Markdown extends React.Component {<br style="box-sizing: border-box;font-size: inherit;color: inherit;line-height: inherit;word-wrap: inherit !important;word-break: inherit !important;" /> constructor(props) {<br style="box-sizing: border-box;font-size: inherit;color: inherit;line-height: inherit;word-wrap: inherit !important;word-break: inherit !important;" /> super(props);class Markdown extends React.Component {<br style="box-sizing: border-box;font-size: inherit;color: inherit;line-height: inherit;word-wrap: inherit !important;word-break: inherit !important;" /> constructor(props) {<br style="box-sizing: border-box;font-size: inherit;color: inherit;line-height: inherit;word-wrap: inherit !important;word-break: inherit !important;" /> super(props);<br style="box-sizing: border-box;font-size: inherit;color: inherit;line-height: inherit;word-wrap: inherit !important;word-break: inherit !important;" /><br style="box-sizing: border-box;font-size: inherit;color: inherit;line-height: inherit;word-wrap: inherit !important;word-break: inherit !important;" /> // replace with your URL, obviously<br style="box-sizing: border-box;font-size: inherit;color: inherit;line-height: inherit;word-wrap: inherit !important;word-break: inherit !important;" /> this.baseUrl = 'https://raw.githubusercontent.com/davidgilbertson/about-github/master/text-snippets';<br style="box-sizing: border-box;font-size: inherit;color: inherit;line-height: inherit;word-wrap: inherit !important;word-break: inherit !important;" /><br style="box-sizing: border-box;font-size: inherit;color: inherit;line-height: inherit;word-wrap: inherit !important;word-break: inherit !important;" /> this.state = {<br style="box-sizing: border-box;font-size: inherit;color: inherit;line-height: inherit;word-wrap: inherit !important;word-break: inherit !important;" /> markdown: '',<br style="box-sizing: border-box;font-size: inherit;color: inherit;line-height: inherit;word-wrap: inherit !important;word-break: inherit !important;" /> };<br style="box-sizing: border-box;font-size: inherit;color: inherit;line-height: inherit;word-wrap: inherit !important;word-break: inherit !important;" /> }<br style="box-sizing: border-box;font-size: inherit;color: inherit;line-height: inherit;word-wrap: inherit !important;word-break: inherit !important;" /><br style="box-sizing: border-box;font-size: inherit;color: inherit;line-height: inherit;word-wrap: inherit !important;word-break: inherit !important;" /> componentDidMount() {<br style="box-sizing: border-box;font-size: inherit;color: inherit;line-height: inherit;word-wrap: inherit !important;word-break: inherit !important;" /> fetch(`${this.baseUrl}/${this.props.url}`)<br style="box-sizing: border-box;font-size: inherit;color: inherit;line-height: inherit;word-wrap: inherit !important;word-break: inherit !important;" /> .then(response => response.text())<br style="box-sizing: border-box;font-size: inherit;color: inherit;line-height: inherit;word-wrap: inherit !important;word-break: inherit !important;" /> .then((markdown) => {<br style="box-sizing: border-box;font-size: inherit;color: inherit;line-height: inherit;word-wrap: inherit !important;word-break: inherit !important;" /> this.setState({markdown});<br style="box-sizing: border-box;font-size: inherit;color: inherit;line-height: inherit;word-wrap: inherit !important;word-break: inherit !important;" /> });<br style="box-sizing: border-box;font-size: inherit;color: inherit;line-height: inherit;word-wrap: inherit !important;word-break: inherit !important;" /> }<br style="box-sizing: border-box;font-size: inherit;color: inherit;line-height: inherit;word-wrap: inherit !important;word-break: inherit !important;" /><br style="box-sizing: border-box;font-size: inherit;color: inherit;line-height: inherit;word-wrap: inherit !important;word-break: inherit !important;" /> render() {<br style="box-sizing: border-box;font-size: inherit;color: inherit;line-height: inherit;word-wrap: inherit !important;word-break: inherit !important;" /> return (<br style="box-sizing: border-box;font-size: inherit;color: inherit;line-height: inherit;word-wrap: inherit !important;word-break: inherit !important;" /> <br style="box-sizing: border-box;font-size: inherit;color: inherit;line-height: inherit;word-wrap: inherit !important;word-break: inherit !important;" /> );<br style="box-sizing: border-box;font-size: inherit;color: inherit;line-height: inherit;word-wrap: inherit !important;word-break: inherit !important;" /> }<br style="box-sizing: border-box;font-size: inherit;color: inherit;line-height: inherit;word-wrap: inherit !important;word-break: inherit !important;" />}
(/text-snippets这个文件夹是储存我的 markdown)
下面这段代码是上面组件的示例:
const Page = () => (<br style="box-sizing: border-box;font-size: inherit;color: inherit;line-height: inherit;word-wrap: inherit !important;word-break: inherit !important;" /> <br style="box-sizing: border-box;font-size: inherit;color: inherit;line-height: inherit;word-wrap: inherit !important;word-break: inherit !important;" /> <br style="box-sizing: border-box;font-size: inherit;color: inherit;line-height: inherit;word-wrap: inherit !important;word-break: inherit !important;" /> <br style="box-sizing: border-box;font-size: inherit;color: inherit;line-height: inherit;word-wrap: inherit !important;word-break: inherit !important;" /> <br style="box-sizing: border-box;font-size: inherit;color: inherit;line-height: inherit;word-wrap: inherit !important;word-break: inherit !important;" /><br style="box-sizing: border-box;font-size: inherit;color: inherit;line-height: inherit;word-wrap: inherit !important;word-break: inherit !important;" /> <br style="box-sizing: border-box;font-size: inherit;color: inherit;line-height: inherit;word-wrap: inherit !important;word-break: inherit !important;" /> A very important disclaimer:<br style="box-sizing: border-box;font-size: inherit;color: inherit;line-height: inherit;word-wrap: inherit !important;word-break: inherit !important;" /><br style="box-sizing: border-box;font-size: inherit;color: inherit;line-height: inherit;word-wrap: inherit !important;word-break: inherit !important;" /> <br style="box-sizing: border-box;font-size: inherit;color: inherit;line-height: inherit;word-wrap: inherit !important;word-break: inherit !important;" /> <br style="box-sizing: border-box;font-size: inherit;color: inherit;line-height: inherit;word-wrap: inherit !important;word-break: inherit !important;" /> <br style="box-sizing: border-box;font-size: inherit;color: inherit;line-height: inherit;word-wrap: inherit !important;word-break: inherit !important;" />);
所以现在 GitHub 也是你的 CMS,无论你想要样大小的文字都可以。
推荐一个 GitHub 工具
Octotree Chrome extension
它可以让你在看任何仓库时,获得一个左边的树状图。
查看全部
nodejs抓取动态网页 分享12个GitHub骚操作!
原文:
#1 在 GitHub 上编辑代码
我要先说一个很多人都知道的事儿。
当你使用 GitHub看一些文件时(任何的文本文件或者仓库),能看到一个顶部右侧有一个小铅笔图标。点击即可编辑文档。完成后,按照提示点击「Propose file change」,GitHub 会为你 fork 这个仓库并创建一个 pull request。
很帅吧,不需要 fork / pull / 改变 locally / push / 创建 PR,只需点击一下,GitHub 就为你创建了一个分支。
这对于修改一些排版错误或者防恶意篡改是很有帮助的。
#2 粘贴图像
对于 issue 和 comment,你还可以直接粘贴图片,当你粘贴时图片会被上传至云端,然后以 MarkDown 格式显示。
非常简洁。
#3 格式化代码
如果你想写一个 code block,你可以在开始处写三个反引号,然后 GitHub 会试图猜出你在写什么语言。
但是如果你发布如 Vue、Typescript、JSX 这样的语言,你可以明确写出来,以获取正确的高亮。
下图第一行使用了```jsx:
片段呈现:
(这可以扩展到 gist,顺便一提,如果你给了 gist 定义成 .jsx 扩展名,那么你会得到 JSX 的高亮)
#4 使用魔术词在 PR 中关闭 issue
比如你在创建一个 pull request 去修复 issue #234。那你可在 PR 输入「fixes #234」,就可以自动合并 PR 并关闭这个 issue,是不是很酷。
(提交信息里可以使用 fix/fixes/fixed , close/closes/closed 或者 resolve/resolves/resolved等关键词)
#5 链接到 comment
你甚至想链接到一个特定的评论,但无法做到?我在这里告诉你,点击名字旁边的日期/时间就万事大吉。
#6 链接到代码
既然能链接到 comment,那你想问能不能链接到代码上?可以的。
试试这个操作:在查看文件时,点击代码边上的行数。
哇喔,你看到了么?URL 随之更新。如果你按住 Shift 并单击另一个行号,URL 会再次更新,并且高亮这两个行数之间的所有代码段。
你现在可以分享这个 URL 了,但等等,这些还是当前分支,如果文件变化了呢?你需要一个永久链接。
我比较懒,但是下面这一个截图已经能够表达如何获取永久链接了(Copy Permalink):
#7 像使用命令行一样使用 GitHub URL
既然说到了 URL,那么就接着聊一下。使用 UI 浏览 GitHub 很方面也很好,不过很多时候最快的方式是使用 URL 来浏览。举个例子,如果我想跳转到正在处理的分支上,并想查看分支和 master 的差异,我可以在我的仓库名后面输入 /compare/branch-name。
这会使我到达分支的不同页面:
可以在名字后面再加上...XXX(分支名)比如我写的 mkdocs...pre-release,如下图:
这一步你可以配合键盘快捷键,Ctrl + L 或者 cmd + L,可以让光标直接移动到 URL 中(最起码 chrome 是这样)。这些加一起能提高生产力。
专业提示:用键盘移动 chrome URL 上的某一条网页记录,使用 Shift+Delete 或 Shift+fn+Delete 来删除某一条记录。(比如合并了分支之后就可以删除了)
#8 在 issue 中创建 list
你想在你的 issue中看到可多选的 list 么?
当你查看问题时,你想不想让它变成 2 of 5 这样的形式?
如果想,你可以在 issue 中使用以下句法:
- [ ] Screen width (integer) <br style="box-sizing: border-box;font-size: inherit;color: inherit;line-height: inherit;word-wrap: inherit !important;word-break: inherit !important;" />- [x] Service worker support <br style="box-sizing: border-box;font-size: inherit;color: inherit;line-height: inherit;word-wrap: inherit !important;word-break: inherit !important;" />- [x] Fetch support <br style="box-sizing: border-box;font-size: inherit;color: inherit;line-height: inherit;word-wrap: inherit !important;word-break: inherit !important;" />- [ ] CSS flexbox support <br style="box-sizing: border-box;font-size: inherit;color: inherit;line-height: inherit;word-wrap: inherit !important;word-break: inherit !important;" />- [ ] Custom elements
#9 GitHub 上的 project board
我总是用 Jira 做大项目,独立项目用 Trello,这两者我都很喜欢。
后来我知道,GitHub 也有类似的 project board:
我个人为了方便把它们都添加为 note。board 极为方便的帮助你做仓库管理。
你可以点击右上角 Add Cards 来添加东西。这里有些特殊语法方便搜索,比如: is:pr is:open,你就可以把任何公开的 PR 拖到 board 上。
更多语法可以参考search syntax。
你也可以把现存的 note 转化为 issue。
你也可以选择 issue 直接添加到 projects 。
这些意味着,从现在开始,你可以明确责任制度,每一行代码的分配都可以在 GitHub 上的 Project board 上完成,而不用去 Jira 或者 Trello 上。
不过它也有些缺点,比如功能比较少。你也可以试试 ZenHub,它有效的扩展 GitHub。
#10 GitHub WiKi
GitHub WiKi 能够帮助我们处理非结构化的页面集合,就像维基百科那样。我自己 NodeJS docs 就被我弄成 wiki 的样子。几个页面,然后自定义侧边栏。具体方法网上很多,我的页面可以供你参考一下。
建议:如果你有个特别长的单页面 README.md 文件,并且想和其他人有所区别,你可以试试这种形式。
#11 GitHub Pages(JekyII)
你可能已经知道了能使用 GitHub Pages 来托管静态网站。那本条就特别介绍一下如何使用 JekyII 来构建站点。
以最简单的方式,GitHub Pages + JekyII 将以最漂亮的主题来呈现你的 README.md,例如,你可以看一下about-github的自述文件。
在 GitHub 的 my site 中,点击 setting,打开 GitHub Pages,选择一个 JekyII 主题
就会得到一个Jekyll主题页面:
它的优点是:
注意,他需要 Ruby 在本地运行,Mac 自带,Windows 用户自行安装。
#12 把 GitHub 当 CMS 用
你的网站需要显示一些文字,但是你还不想直接放在 HTML 里面,那你可以把 GitHub 作为你储存内容的一个地方。这样,就可以让任何一个非程序员通过修改 Markdown 来修改 HTML 网页的内容。
我的方法是:在你的 GitHub 仓库中使用 markdown 文件来保存文本。在你网站的前端用一个组件来抓取这些文本并呈现在网页上。
我是玩 React 的,这里有个组件,用以抓取,解析并呈现到 HTML 上。
class Markdown extends React.Component {<br style="box-sizing: border-box;font-size: inherit;color: inherit;line-height: inherit;word-wrap: inherit !important;word-break: inherit !important;" /> constructor(props) {<br style="box-sizing: border-box;font-size: inherit;color: inherit;line-height: inherit;word-wrap: inherit !important;word-break: inherit !important;" /> super(props);class Markdown extends React.Component {<br style="box-sizing: border-box;font-size: inherit;color: inherit;line-height: inherit;word-wrap: inherit !important;word-break: inherit !important;" /> constructor(props) {<br style="box-sizing: border-box;font-size: inherit;color: inherit;line-height: inherit;word-wrap: inherit !important;word-break: inherit !important;" /> super(props);<br style="box-sizing: border-box;font-size: inherit;color: inherit;line-height: inherit;word-wrap: inherit !important;word-break: inherit !important;" /><br style="box-sizing: border-box;font-size: inherit;color: inherit;line-height: inherit;word-wrap: inherit !important;word-break: inherit !important;" /> // replace with your URL, obviously<br style="box-sizing: border-box;font-size: inherit;color: inherit;line-height: inherit;word-wrap: inherit !important;word-break: inherit !important;" /> this.baseUrl = 'https://raw.githubusercontent.com/davidgilbertson/about-github/master/text-snippets';<br style="box-sizing: border-box;font-size: inherit;color: inherit;line-height: inherit;word-wrap: inherit !important;word-break: inherit !important;" /><br style="box-sizing: border-box;font-size: inherit;color: inherit;line-height: inherit;word-wrap: inherit !important;word-break: inherit !important;" /> this.state = {<br style="box-sizing: border-box;font-size: inherit;color: inherit;line-height: inherit;word-wrap: inherit !important;word-break: inherit !important;" /> markdown: '',<br style="box-sizing: border-box;font-size: inherit;color: inherit;line-height: inherit;word-wrap: inherit !important;word-break: inherit !important;" /> };<br style="box-sizing: border-box;font-size: inherit;color: inherit;line-height: inherit;word-wrap: inherit !important;word-break: inherit !important;" /> }<br style="box-sizing: border-box;font-size: inherit;color: inherit;line-height: inherit;word-wrap: inherit !important;word-break: inherit !important;" /><br style="box-sizing: border-box;font-size: inherit;color: inherit;line-height: inherit;word-wrap: inherit !important;word-break: inherit !important;" /> componentDidMount() {<br style="box-sizing: border-box;font-size: inherit;color: inherit;line-height: inherit;word-wrap: inherit !important;word-break: inherit !important;" /> fetch(`${this.baseUrl}/${this.props.url}`)<br style="box-sizing: border-box;font-size: inherit;color: inherit;line-height: inherit;word-wrap: inherit !important;word-break: inherit !important;" /> .then(response => response.text())<br style="box-sizing: border-box;font-size: inherit;color: inherit;line-height: inherit;word-wrap: inherit !important;word-break: inherit !important;" /> .then((markdown) => {<br style="box-sizing: border-box;font-size: inherit;color: inherit;line-height: inherit;word-wrap: inherit !important;word-break: inherit !important;" /> this.setState({markdown});<br style="box-sizing: border-box;font-size: inherit;color: inherit;line-height: inherit;word-wrap: inherit !important;word-break: inherit !important;" /> });<br style="box-sizing: border-box;font-size: inherit;color: inherit;line-height: inherit;word-wrap: inherit !important;word-break: inherit !important;" /> }<br style="box-sizing: border-box;font-size: inherit;color: inherit;line-height: inherit;word-wrap: inherit !important;word-break: inherit !important;" /><br style="box-sizing: border-box;font-size: inherit;color: inherit;line-height: inherit;word-wrap: inherit !important;word-break: inherit !important;" /> render() {<br style="box-sizing: border-box;font-size: inherit;color: inherit;line-height: inherit;word-wrap: inherit !important;word-break: inherit !important;" /> return (<br style="box-sizing: border-box;font-size: inherit;color: inherit;line-height: inherit;word-wrap: inherit !important;word-break: inherit !important;" /> <br style="box-sizing: border-box;font-size: inherit;color: inherit;line-height: inherit;word-wrap: inherit !important;word-break: inherit !important;" /> );<br style="box-sizing: border-box;font-size: inherit;color: inherit;line-height: inherit;word-wrap: inherit !important;word-break: inherit !important;" /> }<br style="box-sizing: border-box;font-size: inherit;color: inherit;line-height: inherit;word-wrap: inherit !important;word-break: inherit !important;" />}
(/text-snippets这个文件夹是储存我的 markdown)
下面这段代码是上面组件的示例:
const Page = () => (<br style="box-sizing: border-box;font-size: inherit;color: inherit;line-height: inherit;word-wrap: inherit !important;word-break: inherit !important;" /> <br style="box-sizing: border-box;font-size: inherit;color: inherit;line-height: inherit;word-wrap: inherit !important;word-break: inherit !important;" /> <br style="box-sizing: border-box;font-size: inherit;color: inherit;line-height: inherit;word-wrap: inherit !important;word-break: inherit !important;" /> <br style="box-sizing: border-box;font-size: inherit;color: inherit;line-height: inherit;word-wrap: inherit !important;word-break: inherit !important;" /> <br style="box-sizing: border-box;font-size: inherit;color: inherit;line-height: inherit;word-wrap: inherit !important;word-break: inherit !important;" /><br style="box-sizing: border-box;font-size: inherit;color: inherit;line-height: inherit;word-wrap: inherit !important;word-break: inherit !important;" /> <br style="box-sizing: border-box;font-size: inherit;color: inherit;line-height: inherit;word-wrap: inherit !important;word-break: inherit !important;" /> A very important disclaimer:<br style="box-sizing: border-box;font-size: inherit;color: inherit;line-height: inherit;word-wrap: inherit !important;word-break: inherit !important;" /><br style="box-sizing: border-box;font-size: inherit;color: inherit;line-height: inherit;word-wrap: inherit !important;word-break: inherit !important;" /> <br style="box-sizing: border-box;font-size: inherit;color: inherit;line-height: inherit;word-wrap: inherit !important;word-break: inherit !important;" /> <br style="box-sizing: border-box;font-size: inherit;color: inherit;line-height: inherit;word-wrap: inherit !important;word-break: inherit !important;" /> <br style="box-sizing: border-box;font-size: inherit;color: inherit;line-height: inherit;word-wrap: inherit !important;word-break: inherit !important;" />);
所以现在 GitHub 也是你的 CMS,无论你想要样大小的文字都可以。
推荐一个 GitHub 工具
Octotree Chrome extension
它可以让你在看任何仓库时,获得一个左边的树状图。
nodejs抓取动态网页 分享12个GitHub骚操作!
网站优化 • 优采云 发表了文章 • 0 个评论 • 72 次浏览 • 2022-06-19 21:45
原文:
#1 在 GitHub 上编辑代码
我要先说一个很多人都知道的事儿。
当你使用 GitHub看一些文件时(任何的文本文件或者仓库),能看到一个顶部右侧有一个小铅笔图标。点击即可编辑文档。完成后,按照提示点击「Propose file change」,GitHub 会为你 fork 这个仓库并创建一个 pull request。
很帅吧,不需要 fork / pull / 改变 locally / push / 创建 PR,只需点击一下,GitHub 就为你创建了一个分支。
这对于修改一些排版错误或者防恶意篡改是很有帮助的。
#2 粘贴图像
对于 issue 和 comment,你还可以直接粘贴图片,当你粘贴时图片会被上传至云端,然后以 MarkDown 格式显示。
非常简洁。
#3 格式化代码
如果你想写一个 code block,你可以在开始处写三个反引号,然后 GitHub 会试图猜出你在写什么语言。
但是如果你发布如 Vue、Typescript、JSX 这样的语言,你可以明确写出来,以获取正确的高亮。
下图第一行使用了```jsx:
片段呈现:
(这可以扩展到 gist,顺便一提,如果你给了 gist 定义成 .jsx 扩展名,那么你会得到 JSX 的高亮)
#4 使用魔术词在 PR 中关闭 issue
比如你在创建一个 pull request 去修复 issue #234。那你可在 PR 输入「fixes #234」,就可以自动合并 PR 并关闭这个 issue,是不是很酷。
(提交信息里可以使用 fix/fixes/fixed , close/closes/closed 或者 resolve/resolves/resolved等关键词)
#5 链接到 comment
你甚至想链接到一个特定的评论,但无法做到?我在这里告诉你,点击名字旁边的日期/时间就万事大吉。
#6 链接到代码
既然能链接到 comment,那你想问能不能链接到代码上?可以的。
试试这个操作:在查看文件时,点击代码边上的行数。
哇喔,你看到了么?URL 随之更新。如果你按住 Shift 并单击另一个行号,URL 会再次更新,并且高亮这两个行数之间的所有代码段。
你现在可以分享这个 URL 了,但等等,这些还是当前分支,如果文件变化了呢?你需要一个永久链接。
我比较懒,但是下面这一个截图已经能够表达如何获取永久链接了(Copy Permalink):
#7 像使用命令行一样使用 GitHub URL
既然说到了 URL,那么就接着聊一下。使用 UI 浏览 GitHub 很方面也很好,不过很多时候最快的方式是使用 URL 来浏览。举个例子,如果我想跳转到正在处理的分支上,并想查看分支和 master 的差异,我可以在我的仓库名后面输入 /compare/branch-name。
这会使我到达分支的不同页面:
可以在名字后面再加上...XXX(分支名)比如我写的 mkdocs...pre-release,如下图:
这一步你可以配合键盘快捷键,Ctrl + L 或者 cmd + L,可以让光标直接移动到 URL 中(最起码 chrome 是这样)。这些加一起能提高生产力。
专业提示:用键盘移动 chrome URL 上的某一条网页记录,使用 Shift+Delete 或 Shift+fn+Delete 来删除某一条记录。(比如合并了分支之后就可以删除了)
#8 在 issue 中创建 list
你想在你的 issue中看到可多选的 list 么?
当你查看问题时,你想不想让它变成 2 of 5 这样的形式?
如果想,你可以在 issue 中使用以下句法:
- [ ] Screen width (integer) <br style="box-sizing: border-box;font-size: inherit;color: inherit;line-height: inherit;word-wrap: inherit !important;word-break: inherit !important;" />- [x] Service worker support <br style="box-sizing: border-box;font-size: inherit;color: inherit;line-height: inherit;word-wrap: inherit !important;word-break: inherit !important;" />- [x] Fetch support <br style="box-sizing: border-box;font-size: inherit;color: inherit;line-height: inherit;word-wrap: inherit !important;word-break: inherit !important;" />- [ ] CSS flexbox support <br style="box-sizing: border-box;font-size: inherit;color: inherit;line-height: inherit;word-wrap: inherit !important;word-break: inherit !important;" />- [ ] Custom elements
#9 GitHub 上的 project board
我总是用 Jira 做大项目,独立项目用 Trello,这两者我都很喜欢。
后来我知道,GitHub 也有类似的 project board:
我个人为了方便把它们都添加为 note。board 极为方便的帮助你做仓库管理。
你可以点击右上角 Add Cards 来添加东西。这里有些特殊语法方便搜索,比如: is:pr is:open,你就可以把任何公开的 PR 拖到 board 上。
更多语法可以参考search syntax。
你也可以把现存的 note 转化为 issue。
你也可以选择 issue 直接添加到 projects 。
这些意味着,从现在开始,你可以明确责任制度,每一行代码的分配都可以在 GitHub 上的 Project board 上完成,而不用去 Jira 或者 Trello 上。
不过它也有些缺点,比如功能比较少。你也可以试试 ZenHub,它有效的扩展 GitHub。
#10 GitHub WiKi
GitHub WiKi 能够帮助我们处理非结构化的页面集合,就像维基百科那样。我自己 NodeJS docs 就被我弄成 wiki 的样子。几个页面,然后自定义侧边栏。具体方法网上很多,我的页面可以供你参考一下。
建议:如果你有个特别长的单页面 README.md 文件,并且想和其他人有所区别,你可以试试这种形式。
#11 GitHub Pages(JekyII)
你可能已经知道了能使用 GitHub Pages 来托管静态网站。那本条就特别介绍一下如何使用 JekyII 来构建站点。
以最简单的方式,GitHub Pages + JekyII 将以最漂亮的主题来呈现你的 README.md,例如,你可以看一下about-github的自述文件。
在 GitHub 的 my site 中,点击 setting,打开 GitHub Pages,选择一个 JekyII 主题
就会得到一个Jekyll主题页面:
它的优点是:
注意,他需要 Ruby 在本地运行,Mac 自带,Windows 用户自行安装。
#12 把 GitHub 当 CMS 用
你的网站需要显示一些文字,但是你还不想直接放在 HTML 里面,那你可以把 GitHub 作为你储存内容的一个地方。这样,就可以让任何一个非程序员通过修改 Markdown 来修改 HTML 网页的内容。
我的方法是:在你的 GitHub 仓库中使用 markdown 文件来保存文本。在你网站的前端用一个组件来抓取这些文本并呈现在网页上。
我是玩 React 的,这里有个组件,用以抓取,解析并呈现到 HTML 上。
class Markdown extends React.Component {<br style="box-sizing: border-box;font-size: inherit;color: inherit;line-height: inherit;word-wrap: inherit !important;word-break: inherit !important;" /> constructor(props) {<br style="box-sizing: border-box;font-size: inherit;color: inherit;line-height: inherit;word-wrap: inherit !important;word-break: inherit !important;" /> super(props);class Markdown extends React.Component {<br style="box-sizing: border-box;font-size: inherit;color: inherit;line-height: inherit;word-wrap: inherit !important;word-break: inherit !important;" /> constructor(props) {<br style="box-sizing: border-box;font-size: inherit;color: inherit;line-height: inherit;word-wrap: inherit !important;word-break: inherit !important;" /> super(props);<br style="box-sizing: border-box;font-size: inherit;color: inherit;line-height: inherit;word-wrap: inherit !important;word-break: inherit !important;" /><br style="box-sizing: border-box;font-size: inherit;color: inherit;line-height: inherit;word-wrap: inherit !important;word-break: inherit !important;" /> // replace with your URL, obviously<br style="box-sizing: border-box;font-size: inherit;color: inherit;line-height: inherit;word-wrap: inherit !important;word-break: inherit !important;" /> this.baseUrl = 'https://raw.githubusercontent.com/davidgilbertson/about-github/master/text-snippets';<br style="box-sizing: border-box;font-size: inherit;color: inherit;line-height: inherit;word-wrap: inherit !important;word-break: inherit !important;" /><br style="box-sizing: border-box;font-size: inherit;color: inherit;line-height: inherit;word-wrap: inherit !important;word-break: inherit !important;" /> this.state = {<br style="box-sizing: border-box;font-size: inherit;color: inherit;line-height: inherit;word-wrap: inherit !important;word-break: inherit !important;" /> markdown: '',<br style="box-sizing: border-box;font-size: inherit;color: inherit;line-height: inherit;word-wrap: inherit !important;word-break: inherit !important;" /> };<br style="box-sizing: border-box;font-size: inherit;color: inherit;line-height: inherit;word-wrap: inherit !important;word-break: inherit !important;" /> }<br style="box-sizing: border-box;font-size: inherit;color: inherit;line-height: inherit;word-wrap: inherit !important;word-break: inherit !important;" /><br style="box-sizing: border-box;font-size: inherit;color: inherit;line-height: inherit;word-wrap: inherit !important;word-break: inherit !important;" /> componentDidMount() {<br style="box-sizing: border-box;font-size: inherit;color: inherit;line-height: inherit;word-wrap: inherit !important;word-break: inherit !important;" /> fetch(`${this.baseUrl}/${this.props.url}`)<br style="box-sizing: border-box;font-size: inherit;color: inherit;line-height: inherit;word-wrap: inherit !important;word-break: inherit !important;" /> .then(response => response.text())<br style="box-sizing: border-box;font-size: inherit;color: inherit;line-height: inherit;word-wrap: inherit !important;word-break: inherit !important;" /> .then((markdown) => {<br style="box-sizing: border-box;font-size: inherit;color: inherit;line-height: inherit;word-wrap: inherit !important;word-break: inherit !important;" /> this.setState({markdown});<br style="box-sizing: border-box;font-size: inherit;color: inherit;line-height: inherit;word-wrap: inherit !important;word-break: inherit !important;" /> });<br style="box-sizing: border-box;font-size: inherit;color: inherit;line-height: inherit;word-wrap: inherit !important;word-break: inherit !important;" /> }<br style="box-sizing: border-box;font-size: inherit;color: inherit;line-height: inherit;word-wrap: inherit !important;word-break: inherit !important;" /><br style="box-sizing: border-box;font-size: inherit;color: inherit;line-height: inherit;word-wrap: inherit !important;word-break: inherit !important;" /> render() {<br style="box-sizing: border-box;font-size: inherit;color: inherit;line-height: inherit;word-wrap: inherit !important;word-break: inherit !important;" /> return (<br style="box-sizing: border-box;font-size: inherit;color: inherit;line-height: inherit;word-wrap: inherit !important;word-break: inherit !important;" /> <br style="box-sizing: border-box;font-size: inherit;color: inherit;line-height: inherit;word-wrap: inherit !important;word-break: inherit !important;" /> );<br style="box-sizing: border-box;font-size: inherit;color: inherit;line-height: inherit;word-wrap: inherit !important;word-break: inherit !important;" /> }<br style="box-sizing: border-box;font-size: inherit;color: inherit;line-height: inherit;word-wrap: inherit !important;word-break: inherit !important;" />}
(/text-snippets这个文件夹是储存我的 markdown)
下面这段代码是上面组件的示例:
const Page = () => (<br style="box-sizing: border-box;font-size: inherit;color: inherit;line-height: inherit;word-wrap: inherit !important;word-break: inherit !important;" /> <br style="box-sizing: border-box;font-size: inherit;color: inherit;line-height: inherit;word-wrap: inherit !important;word-break: inherit !important;" /> <br style="box-sizing: border-box;font-size: inherit;color: inherit;line-height: inherit;word-wrap: inherit !important;word-break: inherit !important;" /> <br style="box-sizing: border-box;font-size: inherit;color: inherit;line-height: inherit;word-wrap: inherit !important;word-break: inherit !important;" /> <br style="box-sizing: border-box;font-size: inherit;color: inherit;line-height: inherit;word-wrap: inherit !important;word-break: inherit !important;" /><br style="box-sizing: border-box;font-size: inherit;color: inherit;line-height: inherit;word-wrap: inherit !important;word-break: inherit !important;" /> <br style="box-sizing: border-box;font-size: inherit;color: inherit;line-height: inherit;word-wrap: inherit !important;word-break: inherit !important;" /> A very important disclaimer:<br style="box-sizing: border-box;font-size: inherit;color: inherit;line-height: inherit;word-wrap: inherit !important;word-break: inherit !important;" /><br style="box-sizing: border-box;font-size: inherit;color: inherit;line-height: inherit;word-wrap: inherit !important;word-break: inherit !important;" /> <br style="box-sizing: border-box;font-size: inherit;color: inherit;line-height: inherit;word-wrap: inherit !important;word-break: inherit !important;" /> <br style="box-sizing: border-box;font-size: inherit;color: inherit;line-height: inherit;word-wrap: inherit !important;word-break: inherit !important;" /> <br style="box-sizing: border-box;font-size: inherit;color: inherit;line-height: inherit;word-wrap: inherit !important;word-break: inherit !important;" />);
所以现在 GitHub 也是你的 CMS,无论你想要样大小的文字都可以。
推荐一个 GitHub 工具
Octotree Chrome extension
它可以让你在看任何仓库时,获得一个左边的树状图。
查看全部
nodejs抓取动态网页 分享12个GitHub骚操作!
原文:
#1 在 GitHub 上编辑代码
我要先说一个很多人都知道的事儿。
当你使用 GitHub看一些文件时(任何的文本文件或者仓库),能看到一个顶部右侧有一个小铅笔图标。点击即可编辑文档。完成后,按照提示点击「Propose file change」,GitHub 会为你 fork 这个仓库并创建一个 pull request。
很帅吧,不需要 fork / pull / 改变 locally / push / 创建 PR,只需点击一下,GitHub 就为你创建了一个分支。
这对于修改一些排版错误或者防恶意篡改是很有帮助的。
#2 粘贴图像
对于 issue 和 comment,你还可以直接粘贴图片,当你粘贴时图片会被上传至云端,然后以 MarkDown 格式显示。
非常简洁。
#3 格式化代码
如果你想写一个 code block,你可以在开始处写三个反引号,然后 GitHub 会试图猜出你在写什么语言。
但是如果你发布如 Vue、Typescript、JSX 这样的语言,你可以明确写出来,以获取正确的高亮。
下图第一行使用了```jsx:
片段呈现:
(这可以扩展到 gist,顺便一提,如果你给了 gist 定义成 .jsx 扩展名,那么你会得到 JSX 的高亮)
#4 使用魔术词在 PR 中关闭 issue
比如你在创建一个 pull request 去修复 issue #234。那你可在 PR 输入「fixes #234」,就可以自动合并 PR 并关闭这个 issue,是不是很酷。
(提交信息里可以使用 fix/fixes/fixed , close/closes/closed 或者 resolve/resolves/resolved等关键词)
#5 链接到 comment
你甚至想链接到一个特定的评论,但无法做到?我在这里告诉你,点击名字旁边的日期/时间就万事大吉。
#6 链接到代码
既然能链接到 comment,那你想问能不能链接到代码上?可以的。
试试这个操作:在查看文件时,点击代码边上的行数。
哇喔,你看到了么?URL 随之更新。如果你按住 Shift 并单击另一个行号,URL 会再次更新,并且高亮这两个行数之间的所有代码段。
你现在可以分享这个 URL 了,但等等,这些还是当前分支,如果文件变化了呢?你需要一个永久链接。
我比较懒,但是下面这一个截图已经能够表达如何获取永久链接了(Copy Permalink):
#7 像使用命令行一样使用 GitHub URL
既然说到了 URL,那么就接着聊一下。使用 UI 浏览 GitHub 很方面也很好,不过很多时候最快的方式是使用 URL 来浏览。举个例子,如果我想跳转到正在处理的分支上,并想查看分支和 master 的差异,我可以在我的仓库名后面输入 /compare/branch-name。
这会使我到达分支的不同页面:
可以在名字后面再加上...XXX(分支名)比如我写的 mkdocs...pre-release,如下图:
这一步你可以配合键盘快捷键,Ctrl + L 或者 cmd + L,可以让光标直接移动到 URL 中(最起码 chrome 是这样)。这些加一起能提高生产力。
专业提示:用键盘移动 chrome URL 上的某一条网页记录,使用 Shift+Delete 或 Shift+fn+Delete 来删除某一条记录。(比如合并了分支之后就可以删除了)
#8 在 issue 中创建 list
你想在你的 issue中看到可多选的 list 么?
当你查看问题时,你想不想让它变成 2 of 5 这样的形式?
如果想,你可以在 issue 中使用以下句法:
- [ ] Screen width (integer) <br style="box-sizing: border-box;font-size: inherit;color: inherit;line-height: inherit;word-wrap: inherit !important;word-break: inherit !important;" />- [x] Service worker support <br style="box-sizing: border-box;font-size: inherit;color: inherit;line-height: inherit;word-wrap: inherit !important;word-break: inherit !important;" />- [x] Fetch support <br style="box-sizing: border-box;font-size: inherit;color: inherit;line-height: inherit;word-wrap: inherit !important;word-break: inherit !important;" />- [ ] CSS flexbox support <br style="box-sizing: border-box;font-size: inherit;color: inherit;line-height: inherit;word-wrap: inherit !important;word-break: inherit !important;" />- [ ] Custom elements
#9 GitHub 上的 project board
我总是用 Jira 做大项目,独立项目用 Trello,这两者我都很喜欢。
后来我知道,GitHub 也有类似的 project board:
我个人为了方便把它们都添加为 note。board 极为方便的帮助你做仓库管理。
你可以点击右上角 Add Cards 来添加东西。这里有些特殊语法方便搜索,比如: is:pr is:open,你就可以把任何公开的 PR 拖到 board 上。
更多语法可以参考search syntax。
你也可以把现存的 note 转化为 issue。
你也可以选择 issue 直接添加到 projects 。
这些意味着,从现在开始,你可以明确责任制度,每一行代码的分配都可以在 GitHub 上的 Project board 上完成,而不用去 Jira 或者 Trello 上。
不过它也有些缺点,比如功能比较少。你也可以试试 ZenHub,它有效的扩展 GitHub。
#10 GitHub WiKi
GitHub WiKi 能够帮助我们处理非结构化的页面集合,就像维基百科那样。我自己 NodeJS docs 就被我弄成 wiki 的样子。几个页面,然后自定义侧边栏。具体方法网上很多,我的页面可以供你参考一下。
建议:如果你有个特别长的单页面 README.md 文件,并且想和其他人有所区别,你可以试试这种形式。
#11 GitHub Pages(JekyII)
你可能已经知道了能使用 GitHub Pages 来托管静态网站。那本条就特别介绍一下如何使用 JekyII 来构建站点。
以最简单的方式,GitHub Pages + JekyII 将以最漂亮的主题来呈现你的 README.md,例如,你可以看一下about-github的自述文件。
在 GitHub 的 my site 中,点击 setting,打开 GitHub Pages,选择一个 JekyII 主题
就会得到一个Jekyll主题页面:
它的优点是:
注意,他需要 Ruby 在本地运行,Mac 自带,Windows 用户自行安装。
#12 把 GitHub 当 CMS 用
你的网站需要显示一些文字,但是你还不想直接放在 HTML 里面,那你可以把 GitHub 作为你储存内容的一个地方。这样,就可以让任何一个非程序员通过修改 Markdown 来修改 HTML 网页的内容。
我的方法是:在你的 GitHub 仓库中使用 markdown 文件来保存文本。在你网站的前端用一个组件来抓取这些文本并呈现在网页上。
我是玩 React 的,这里有个组件,用以抓取,解析并呈现到 HTML 上。
class Markdown extends React.Component {<br style="box-sizing: border-box;font-size: inherit;color: inherit;line-height: inherit;word-wrap: inherit !important;word-break: inherit !important;" /> constructor(props) {<br style="box-sizing: border-box;font-size: inherit;color: inherit;line-height: inherit;word-wrap: inherit !important;word-break: inherit !important;" /> super(props);class Markdown extends React.Component {<br style="box-sizing: border-box;font-size: inherit;color: inherit;line-height: inherit;word-wrap: inherit !important;word-break: inherit !important;" /> constructor(props) {<br style="box-sizing: border-box;font-size: inherit;color: inherit;line-height: inherit;word-wrap: inherit !important;word-break: inherit !important;" /> super(props);<br style="box-sizing: border-box;font-size: inherit;color: inherit;line-height: inherit;word-wrap: inherit !important;word-break: inherit !important;" /><br style="box-sizing: border-box;font-size: inherit;color: inherit;line-height: inherit;word-wrap: inherit !important;word-break: inherit !important;" /> // replace with your URL, obviously<br style="box-sizing: border-box;font-size: inherit;color: inherit;line-height: inherit;word-wrap: inherit !important;word-break: inherit !important;" /> this.baseUrl = 'https://raw.githubusercontent.com/davidgilbertson/about-github/master/text-snippets';<br style="box-sizing: border-box;font-size: inherit;color: inherit;line-height: inherit;word-wrap: inherit !important;word-break: inherit !important;" /><br style="box-sizing: border-box;font-size: inherit;color: inherit;line-height: inherit;word-wrap: inherit !important;word-break: inherit !important;" /> this.state = {<br style="box-sizing: border-box;font-size: inherit;color: inherit;line-height: inherit;word-wrap: inherit !important;word-break: inherit !important;" /> markdown: '',<br style="box-sizing: border-box;font-size: inherit;color: inherit;line-height: inherit;word-wrap: inherit !important;word-break: inherit !important;" /> };<br style="box-sizing: border-box;font-size: inherit;color: inherit;line-height: inherit;word-wrap: inherit !important;word-break: inherit !important;" /> }<br style="box-sizing: border-box;font-size: inherit;color: inherit;line-height: inherit;word-wrap: inherit !important;word-break: inherit !important;" /><br style="box-sizing: border-box;font-size: inherit;color: inherit;line-height: inherit;word-wrap: inherit !important;word-break: inherit !important;" /> componentDidMount() {<br style="box-sizing: border-box;font-size: inherit;color: inherit;line-height: inherit;word-wrap: inherit !important;word-break: inherit !important;" /> fetch(`${this.baseUrl}/${this.props.url}`)<br style="box-sizing: border-box;font-size: inherit;color: inherit;line-height: inherit;word-wrap: inherit !important;word-break: inherit !important;" /> .then(response => response.text())<br style="box-sizing: border-box;font-size: inherit;color: inherit;line-height: inherit;word-wrap: inherit !important;word-break: inherit !important;" /> .then((markdown) => {<br style="box-sizing: border-box;font-size: inherit;color: inherit;line-height: inherit;word-wrap: inherit !important;word-break: inherit !important;" /> this.setState({markdown});<br style="box-sizing: border-box;font-size: inherit;color: inherit;line-height: inherit;word-wrap: inherit !important;word-break: inherit !important;" /> });<br style="box-sizing: border-box;font-size: inherit;color: inherit;line-height: inherit;word-wrap: inherit !important;word-break: inherit !important;" /> }<br style="box-sizing: border-box;font-size: inherit;color: inherit;line-height: inherit;word-wrap: inherit !important;word-break: inherit !important;" /><br style="box-sizing: border-box;font-size: inherit;color: inherit;line-height: inherit;word-wrap: inherit !important;word-break: inherit !important;" /> render() {<br style="box-sizing: border-box;font-size: inherit;color: inherit;line-height: inherit;word-wrap: inherit !important;word-break: inherit !important;" /> return (<br style="box-sizing: border-box;font-size: inherit;color: inherit;line-height: inherit;word-wrap: inherit !important;word-break: inherit !important;" /> <br style="box-sizing: border-box;font-size: inherit;color: inherit;line-height: inherit;word-wrap: inherit !important;word-break: inherit !important;" /> );<br style="box-sizing: border-box;font-size: inherit;color: inherit;line-height: inherit;word-wrap: inherit !important;word-break: inherit !important;" /> }<br style="box-sizing: border-box;font-size: inherit;color: inherit;line-height: inherit;word-wrap: inherit !important;word-break: inherit !important;" />}
(/text-snippets这个文件夹是储存我的 markdown)
下面这段代码是上面组件的示例:
const Page = () => (<br style="box-sizing: border-box;font-size: inherit;color: inherit;line-height: inherit;word-wrap: inherit !important;word-break: inherit !important;" /> <br style="box-sizing: border-box;font-size: inherit;color: inherit;line-height: inherit;word-wrap: inherit !important;word-break: inherit !important;" /> <br style="box-sizing: border-box;font-size: inherit;color: inherit;line-height: inherit;word-wrap: inherit !important;word-break: inherit !important;" /> <br style="box-sizing: border-box;font-size: inherit;color: inherit;line-height: inherit;word-wrap: inherit !important;word-break: inherit !important;" /> <br style="box-sizing: border-box;font-size: inherit;color: inherit;line-height: inherit;word-wrap: inherit !important;word-break: inherit !important;" /><br style="box-sizing: border-box;font-size: inherit;color: inherit;line-height: inherit;word-wrap: inherit !important;word-break: inherit !important;" /> <br style="box-sizing: border-box;font-size: inherit;color: inherit;line-height: inherit;word-wrap: inherit !important;word-break: inherit !important;" /> A very important disclaimer:<br style="box-sizing: border-box;font-size: inherit;color: inherit;line-height: inherit;word-wrap: inherit !important;word-break: inherit !important;" /><br style="box-sizing: border-box;font-size: inherit;color: inherit;line-height: inherit;word-wrap: inherit !important;word-break: inherit !important;" /> <br style="box-sizing: border-box;font-size: inherit;color: inherit;line-height: inherit;word-wrap: inherit !important;word-break: inherit !important;" /> <br style="box-sizing: border-box;font-size: inherit;color: inherit;line-height: inherit;word-wrap: inherit !important;word-break: inherit !important;" /> <br style="box-sizing: border-box;font-size: inherit;color: inherit;line-height: inherit;word-wrap: inherit !important;word-break: inherit !important;" />);
所以现在 GitHub 也是你的 CMS,无论你想要样大小的文字都可以。
推荐一个 GitHub 工具
Octotree Chrome extension
它可以让你在看任何仓库时,获得一个左边的树状图。
nodejs抓取动态网页 全面深入理解预渲染技术体系
网站优化 • 优采云 发表了文章 • 0 个评论 • 80 次浏览 • 2022-06-18 06:36
在我们使用现代前端框架,比如Vue、React、Angular开发完毕前端项目之后,会发现这些页面输出的全是js,很不利于搜索引擎去爬取。在已经完成了单页应用(SPA)项目之后,如果要进行SEO优化的改造,这时候就可以使用预渲染技术体系。
下面将从适用场景、概念介绍、如何使用、底层原理几方面全面介绍预渲染技术的各项特性。适用场景在谈使用场景之前,首先需要明白以下几点:现代前端框架比如 Vue 在构建完成之后,页面加载的其实是一堆 js,再由 js 动态生成DOM。当我们访问页面,右键“显示网页源代码”的时候,看不到文字等内容百度、搜狗等爬虫在抓取页面的时候,不会执行页面的 js 源代码(谷歌爬虫可以执行“同步” js 来构建页面,因此 Vue 等框架开发的单页应用可以在谷歌搜索引擎中很好的被收录,这点我们不展开讨论)如果想要让百度、搜狗等收录索引我们的网站,就必须像静态 HTML 那样,让网页在右键查看源代码的时候,显示的是文字、图片等内容在这样的场景下,我们可以使用预渲染来解决此类问题。概念介绍
预渲染概念简单来讲是这样的:在项目构建阶段,我们会模拟访问项目的页面URL,这时候页面上的 js 将会执行并且形成真正的 HTML 片段;此时我们保存这个 HTML 文件到服务器硬盘上,下次不管是用户还是爬虫访问的时候,就直接返回这个物理文件,这样就可以有效解决 SEO 无法收录的问题。大体流程如下图:
可以看出,“预渲染”同“服务端渲染”最大的区别是,前者是在构建期间执行,后者在用户访问期间实时运行;前者在构建完成之后就不再需要 node服务,后者需要使用 node 作为运行时。预渲染也有它不适用的地方。正因为在构建阶段我们需要指明“需要构建的页面URL”,因此对于那些携带动态参数的页面(比如资料详情页),不适用于用预渲染去构建。这种场景下只能使用SSR。反之,一切静态官网、带数据的门户网站,只要是URL固定的,不管其中有没有动态数据,都可以使用预渲染。这里你可能会问一个问题:预渲染技术能否将 ajax 请求的内容也填充到页面上?答案是肯定的。虽然你 ajax 并非“同步执行”的 js,我们无法获知异步请求完成的时机。但通过控制监测页面上某个特定元素是否存在等手段,我们可以变相获知到数据返回的时机,从而进行预渲染。就可以达到“填充 ajax 数据”的效果(这可是谷歌爬虫也无法达到的效果哦)。如何使用预渲染技术有很多种实现方式。最常用的是使用 webpack 的一个插件: prerender-spa-plugin()。但是这个插件有很多局限性,最大的局限性在于必须结合 webpack 来使用,不够灵活,不易调试。也无法通过编程的方式使用。
比如我们的首页有动态的数据(非动态URL。是通过ajax获取的动态数据。)因此我们在使用了预渲染生成了静态首页之后,需要每间隔10分钟或者5分钟重新生成一个新的静态页,来更新数据。这就需要能够通过编程的方式调用渲染指令。在这样的情况下我基于这个插件的原理重新实现了一个包:@waitkafuka/spa-prerender(),可以通过 nodejs 通过编程的方式使用。
同时它剥离了 webpack 的依赖,剥离了对SPA页面的限制。只要有一个静态目录就可以工作。使用的方式非常简单,以 Vue 为例,在我们正常构建生成了 dist 目录之后,只需要编写以下脚本:
const SpaRenderer = require('@waitkafuka/spa-prerender');const path = require('path');<br />const options = {staticDir: path.join(__dirname, 'dist'),basePath: 'base',//可选,当项目有basePath的时候设置。同router中的base和publicPath。确保staticDir/basePath/index.html存在 routes: ['/','/exam', ],puppeteerOptions: {headless: true,maxConcurrentRoutes: 0,renderAfterDocumentEvent: 'render-event',skipThirdPartyRequests: true }};const spaRenderer = new SpaRenderer(options)spaRenderer.render().then(() => {console.log('预渲染完毕。');});
具体的参数解析可以查看 @waitkafuka/spa-prerender。底层原理在底层实现上,主要利用了 express 来驱动静态页面;然后利用 puppeteer 无头浏览器来模拟用户访问所需要预渲染的地址;在访问完成之后,保存页面HTML到文件夹中。
流程如下:
更为详细的流程介绍如下(此部分枯燥乏味,非专业人士可以跳过。):
阶段1:创建渲染器实例
spa-prerender index.js:
1.创建puppeteer实例 @prerenderer/renderer-puppeteer/es6/renderer.js
2.创建server实例@prerenderer/prerenderer/es6/server.js
3.创建renderer实例,将1 2步的puppeteer和server注入this @@prerenderer/prerenderer/es6/index.js
阶段2:渲染器实例初始化:spa-prerender index.js:
1.server初始化 (设置路由:静态资源利用*.*映射到staticDir上,其他请求全部映射到index.html上。设置静态资源和index.html路径,modifyServer也在这个阶段。server 启动)@prerenderer/prerenderer/es6/server.js
2.puppeteer初始化(判断平台是否linux,如果是Linux需要设置一些启动参数;启动puppeteer)@prerenderer/renderer-puppeteer/es6/renderer.js
阶段3:开始访问路由并获取html
1.spa-prerender index.js->@prerenderer/prerenderer/es6/index.js -> @prerenderer/renderer-puppeteer/es6/renderer.js
2.开启一个限流器,每次最多渲染 n 条路由,避免内存崩溃
3.puppeteer开启一个新标签,判断是否有inject,如果有,注入到window上
4.拼接端口、设置viewport,拼接router,形成url,发起页面的请求
5.判断options中是否设置了renderAfterDocumentEvent,如果有,给页面添加一个事件监听器,当触发事件的时候,将__PRERENDER_STATUS属性设置为true
6.访问页面,等待加载完成(如何确定页面加载完成, waituntil: 'networkidle0'//在500ms内没有网络请求,这个设置可以通过puppeteerOptions.navigationOptions.waituntil修改)
等待捕捉,分为三种等待时机:
1.等待固定时间,renderAfterTime(利用settimeout结合promise实现)
2.等待抛出某个事件:renderAfterDocumentEvent,该事件需要事先在页面写好抛出的时机
3.等待某个元素出现:renderAfterElementExists
阶段4:保存html
spa-prerender index.js 遍历结果,拼接文件夹路径并保存html。
实践过程中的常见问题
1. 如果一个项目有10个页面,其中首页需要SEO,于是使用了预渲染,另外9个页面仍然是由js渲染。那么在访问其他9个页面的时候,刷新页面,会先显示首页的内容一闪而过。这种问题如何解决?
产生这种情况的原因在于:在单页应用中,实际上只有一个物理页面,那就是 index.html。我们访问的所有页面实际都是 index.html,先进入 index.html 然后再执行 js 构建 dom。那么此时如果我们首页是已经预渲染好的,那么就会有内容,在 js 构建出对应路由的内容之前,就会先出现首页的内容。
spa-prerender 考虑到了这种问题。在预渲染的过程中,会首先保留原来“纯净”的index.html,并重命名为“index-spa.html”。
而后,在 nginx 配置中,利用 try_files 指令的优先级配置特点,让用户在刷新的情况下,如果有对应物理文件则访问物理文件(预渲染生成的文件),如果没有对应物理文件则降级访问 index-spa.html,就可以解决上述问题。nginx 配置指令如下:
location /{ alias /Users/zks/code/xkw/xop/dist/; try_files $uri $uri/ /index-spa.html; }
此时预渲染生成的文件将被优先返回($uri),如果未匹配,才会交由 index-spa.html 处理。
2. 如果项目打包有前缀怎么办?
如果项目有publicPath,那么在 dist 目录下会多一层根目录。此时需要在预渲染配置中添加 basePath 的选项。此时 express 会从 dist/basePath 目录中去寻找 index.html。
配置如下:
const options = { staticDir: path.join(__dirname, 'dist'), basePath: 'base',//当项目有basePath的时候设置。同router中的base和publicPath。确保staticDir/basePath/index.html存在 routes: ['/','/exam', ], ... }
3. 如何控制渲染器开始进行HTML保存的时机?
我们可以通过 options 中三个参数来控制:
3.1.renderAfterTime:等待固定时间之后(从页面开始发起访问算起)
3.2.renderAfterDocumentEvent:等待抛出某个事件,该事件需要事先在页面定义好触发的时机,比如在 Vue 的 mounted 函数中定义:
new Vue({ router,render: h => h(App), mounted () { //在mounted之后触发custom-render-event // 预渲染器在收到这个事件之后将开始进行页面的保存工作 document.dispatchEvent(new Event('custom-render-event')) }}).$mount('#app')
3.3.renderAfterElementExists:等待某个元素出现。我们可以在异步 ajax 返回之后,增加某个元素。当渲染器检测到此元素出现之后进行页面保存,此时保存的页面就包含了 ajax 返回的数据。
4. 首页预渲染生成的 DOM 元素,会不会被 js 复用?还是删除重新构建?
仿照SSR的思路,我们可以通过在根节点上设置 data-server-rander="true",这样在客户端 js 会知道这个是已经渲染完成的 DOM,不会粗暴去替换它。而是执行一个“注水”的过程(也就是hydration)。可以充分复用预渲染生成的 DOM 元素。
点击下方卡片可以关注 查看全部
nodejs抓取动态网页 全面深入理解预渲染技术体系
在我们使用现代前端框架,比如Vue、React、Angular开发完毕前端项目之后,会发现这些页面输出的全是js,很不利于搜索引擎去爬取。在已经完成了单页应用(SPA)项目之后,如果要进行SEO优化的改造,这时候就可以使用预渲染技术体系。
下面将从适用场景、概念介绍、如何使用、底层原理几方面全面介绍预渲染技术的各项特性。适用场景在谈使用场景之前,首先需要明白以下几点:现代前端框架比如 Vue 在构建完成之后,页面加载的其实是一堆 js,再由 js 动态生成DOM。当我们访问页面,右键“显示网页源代码”的时候,看不到文字等内容百度、搜狗等爬虫在抓取页面的时候,不会执行页面的 js 源代码(谷歌爬虫可以执行“同步” js 来构建页面,因此 Vue 等框架开发的单页应用可以在谷歌搜索引擎中很好的被收录,这点我们不展开讨论)如果想要让百度、搜狗等收录索引我们的网站,就必须像静态 HTML 那样,让网页在右键查看源代码的时候,显示的是文字、图片等内容在这样的场景下,我们可以使用预渲染来解决此类问题。概念介绍
预渲染概念简单来讲是这样的:在项目构建阶段,我们会模拟访问项目的页面URL,这时候页面上的 js 将会执行并且形成真正的 HTML 片段;此时我们保存这个 HTML 文件到服务器硬盘上,下次不管是用户还是爬虫访问的时候,就直接返回这个物理文件,这样就可以有效解决 SEO 无法收录的问题。大体流程如下图:
可以看出,“预渲染”同“服务端渲染”最大的区别是,前者是在构建期间执行,后者在用户访问期间实时运行;前者在构建完成之后就不再需要 node服务,后者需要使用 node 作为运行时。预渲染也有它不适用的地方。正因为在构建阶段我们需要指明“需要构建的页面URL”,因此对于那些携带动态参数的页面(比如资料详情页),不适用于用预渲染去构建。这种场景下只能使用SSR。反之,一切静态官网、带数据的门户网站,只要是URL固定的,不管其中有没有动态数据,都可以使用预渲染。这里你可能会问一个问题:预渲染技术能否将 ajax 请求的内容也填充到页面上?答案是肯定的。虽然你 ajax 并非“同步执行”的 js,我们无法获知异步请求完成的时机。但通过控制监测页面上某个特定元素是否存在等手段,我们可以变相获知到数据返回的时机,从而进行预渲染。就可以达到“填充 ajax 数据”的效果(这可是谷歌爬虫也无法达到的效果哦)。如何使用预渲染技术有很多种实现方式。最常用的是使用 webpack 的一个插件: prerender-spa-plugin()。但是这个插件有很多局限性,最大的局限性在于必须结合 webpack 来使用,不够灵活,不易调试。也无法通过编程的方式使用。
比如我们的首页有动态的数据(非动态URL。是通过ajax获取的动态数据。)因此我们在使用了预渲染生成了静态首页之后,需要每间隔10分钟或者5分钟重新生成一个新的静态页,来更新数据。这就需要能够通过编程的方式调用渲染指令。在这样的情况下我基于这个插件的原理重新实现了一个包:@waitkafuka/spa-prerender(),可以通过 nodejs 通过编程的方式使用。
同时它剥离了 webpack 的依赖,剥离了对SPA页面的限制。只要有一个静态目录就可以工作。使用的方式非常简单,以 Vue 为例,在我们正常构建生成了 dist 目录之后,只需要编写以下脚本:
const SpaRenderer = require('@waitkafuka/spa-prerender');const path = require('path');<br />const options = {staticDir: path.join(__dirname, 'dist'),basePath: 'base',//可选,当项目有basePath的时候设置。同router中的base和publicPath。确保staticDir/basePath/index.html存在 routes: ['/','/exam', ],puppeteerOptions: {headless: true,maxConcurrentRoutes: 0,renderAfterDocumentEvent: 'render-event',skipThirdPartyRequests: true }};const spaRenderer = new SpaRenderer(options)spaRenderer.render().then(() => {console.log('预渲染完毕。');});
具体的参数解析可以查看 @waitkafuka/spa-prerender。底层原理在底层实现上,主要利用了 express 来驱动静态页面;然后利用 puppeteer 无头浏览器来模拟用户访问所需要预渲染的地址;在访问完成之后,保存页面HTML到文件夹中。
流程如下:
更为详细的流程介绍如下(此部分枯燥乏味,非专业人士可以跳过。):
阶段1:创建渲染器实例
spa-prerender index.js:
1.创建puppeteer实例 @prerenderer/renderer-puppeteer/es6/renderer.js
2.创建server实例@prerenderer/prerenderer/es6/server.js
3.创建renderer实例,将1 2步的puppeteer和server注入this @@prerenderer/prerenderer/es6/index.js
阶段2:渲染器实例初始化:spa-prerender index.js:
1.server初始化 (设置路由:静态资源利用*.*映射到staticDir上,其他请求全部映射到index.html上。设置静态资源和index.html路径,modifyServer也在这个阶段。server 启动)@prerenderer/prerenderer/es6/server.js
2.puppeteer初始化(判断平台是否linux,如果是Linux需要设置一些启动参数;启动puppeteer)@prerenderer/renderer-puppeteer/es6/renderer.js
阶段3:开始访问路由并获取html
1.spa-prerender index.js->@prerenderer/prerenderer/es6/index.js -> @prerenderer/renderer-puppeteer/es6/renderer.js
2.开启一个限流器,每次最多渲染 n 条路由,避免内存崩溃
3.puppeteer开启一个新标签,判断是否有inject,如果有,注入到window上
4.拼接端口、设置viewport,拼接router,形成url,发起页面的请求
5.判断options中是否设置了renderAfterDocumentEvent,如果有,给页面添加一个事件监听器,当触发事件的时候,将__PRERENDER_STATUS属性设置为true
6.访问页面,等待加载完成(如何确定页面加载完成, waituntil: 'networkidle0'//在500ms内没有网络请求,这个设置可以通过puppeteerOptions.navigationOptions.waituntil修改)
等待捕捉,分为三种等待时机:
1.等待固定时间,renderAfterTime(利用settimeout结合promise实现)
2.等待抛出某个事件:renderAfterDocumentEvent,该事件需要事先在页面写好抛出的时机
3.等待某个元素出现:renderAfterElementExists
阶段4:保存html
spa-prerender index.js 遍历结果,拼接文件夹路径并保存html。
实践过程中的常见问题
1. 如果一个项目有10个页面,其中首页需要SEO,于是使用了预渲染,另外9个页面仍然是由js渲染。那么在访问其他9个页面的时候,刷新页面,会先显示首页的内容一闪而过。这种问题如何解决?
产生这种情况的原因在于:在单页应用中,实际上只有一个物理页面,那就是 index.html。我们访问的所有页面实际都是 index.html,先进入 index.html 然后再执行 js 构建 dom。那么此时如果我们首页是已经预渲染好的,那么就会有内容,在 js 构建出对应路由的内容之前,就会先出现首页的内容。
spa-prerender 考虑到了这种问题。在预渲染的过程中,会首先保留原来“纯净”的index.html,并重命名为“index-spa.html”。
而后,在 nginx 配置中,利用 try_files 指令的优先级配置特点,让用户在刷新的情况下,如果有对应物理文件则访问物理文件(预渲染生成的文件),如果没有对应物理文件则降级访问 index-spa.html,就可以解决上述问题。nginx 配置指令如下:
location /{ alias /Users/zks/code/xkw/xop/dist/; try_files $uri $uri/ /index-spa.html; }
此时预渲染生成的文件将被优先返回($uri),如果未匹配,才会交由 index-spa.html 处理。
2. 如果项目打包有前缀怎么办?
如果项目有publicPath,那么在 dist 目录下会多一层根目录。此时需要在预渲染配置中添加 basePath 的选项。此时 express 会从 dist/basePath 目录中去寻找 index.html。
配置如下:
const options = { staticDir: path.join(__dirname, 'dist'), basePath: 'base',//当项目有basePath的时候设置。同router中的base和publicPath。确保staticDir/basePath/index.html存在 routes: ['/','/exam', ], ... }
3. 如何控制渲染器开始进行HTML保存的时机?
我们可以通过 options 中三个参数来控制:
3.1.renderAfterTime:等待固定时间之后(从页面开始发起访问算起)
3.2.renderAfterDocumentEvent:等待抛出某个事件,该事件需要事先在页面定义好触发的时机,比如在 Vue 的 mounted 函数中定义:
new Vue({ router,render: h => h(App), mounted () { //在mounted之后触发custom-render-event // 预渲染器在收到这个事件之后将开始进行页面的保存工作 document.dispatchEvent(new Event('custom-render-event')) }}).$mount('#app')
3.3.renderAfterElementExists:等待某个元素出现。我们可以在异步 ajax 返回之后,增加某个元素。当渲染器检测到此元素出现之后进行页面保存,此时保存的页面就包含了 ajax 返回的数据。
4. 首页预渲染生成的 DOM 元素,会不会被 js 复用?还是删除重新构建?
仿照SSR的思路,我们可以通过在根节点上设置 data-server-rander="true",这样在客户端 js 会知道这个是已经渲染完成的 DOM,不会粗暴去替换它。而是执行一个“注水”的过程(也就是hydration)。可以充分复用预渲染生成的 DOM 元素。
点击下方卡片可以关注
nodejs抓取动态网页 全面深入理解预渲染技术体系
网站优化 • 优采云 发表了文章 • 0 个评论 • 121 次浏览 • 2022-06-13 09:01
在我们使用现代前端框架,比如Vue、React、Angular开发完毕前端项目之后,会发现这些页面输出的全是js,很不利于搜索引擎去爬取。在已经完成了单页应用(SPA)项目之后,如果要进行SEO优化的改造,这时候就可以使用预渲染技术体系。
下面将从适用场景、概念介绍、如何使用、底层原理几方面全面介绍预渲染技术的各项特性。适用场景在谈使用场景之前,首先需要明白以下几点:现代前端框架比如 Vue 在构建完成之后,页面加载的其实是一堆 js,再由 js 动态生成DOM。当我们访问页面,右键“显示网页源代码”的时候,看不到文字等内容百度、搜狗等爬虫在抓取页面的时候,不会执行页面的 js 源代码(谷歌爬虫可以执行“同步” js 来构建页面,因此 Vue 等框架开发的单页应用可以在谷歌搜索引擎中很好的被收录,这点我们不展开讨论)如果想要让百度、搜狗等收录索引我们的网站,就必须像静态 HTML 那样,让网页在右键查看源代码的时候,显示的是文字、图片等内容在这样的场景下,我们可以使用预渲染来解决此类问题。概念介绍
预渲染概念简单来讲是这样的:在项目构建阶段,我们会模拟访问项目的页面URL,这时候页面上的 js 将会执行并且形成真正的 HTML 片段;此时我们保存这个 HTML 文件到服务器硬盘上,下次不管是用户还是爬虫访问的时候,就直接返回这个物理文件,这样就可以有效解决 SEO 无法收录的问题。大体流程如下图:
可以看出,“预渲染”同“服务端渲染”最大的区别是,前者是在构建期间执行,后者在用户访问期间实时运行;前者在构建完成之后就不再需要 node服务,后者需要使用 node 作为运行时。预渲染也有它不适用的地方。正因为在构建阶段我们需要指明“需要构建的页面URL”,因此对于那些携带动态参数的页面(比如资料详情页),不适用于用预渲染去构建。这种场景下只能使用SSR。反之,一切静态官网、带数据的门户网站,只要是URL固定的,不管其中有没有动态数据,都可以使用预渲染。这里你可能会问一个问题:预渲染技术能否将 ajax 请求的内容也填充到页面上?答案是肯定的。虽然你 ajax 并非“同步执行”的 js,我们无法获知异步请求完成的时机。但通过控制监测页面上某个特定元素是否存在等手段,我们可以变相获知到数据返回的时机,从而进行预渲染。就可以达到“填充 ajax 数据”的效果(这可是谷歌爬虫也无法达到的效果哦)。如何使用预渲染技术有很多种实现方式。最常用的是使用 webpack 的一个插件: prerender-spa-plugin()。但是这个插件有很多局限性,最大的局限性在于必须结合 webpack 来使用,不够灵活,不易调试。也无法通过编程的方式使用。
比如我们的首页有动态的数据(非动态URL。是通过ajax获取的动态数据。)因此我们在使用了预渲染生成了静态首页之后,需要每间隔10分钟或者5分钟重新生成一个新的静态页,来更新数据。这就需要能够通过编程的方式调用渲染指令。在这样的情况下我基于这个插件的原理重新实现了一个包:@waitkafuka/spa-prerender(),可以通过 nodejs 通过编程的方式使用。
同时它剥离了 webpack 的依赖,剥离了对SPA页面的限制。只要有一个静态目录就可以工作。使用的方式非常简单,以 Vue 为例,在我们正常构建生成了 dist 目录之后,只需要编写以下脚本:
const SpaRenderer = require('@waitkafuka/spa-prerender');const path = require('path');<br />const options = {staticDir: path.join(__dirname, 'dist'),basePath: 'base',//可选,当项目有basePath的时候设置。同router中的base和publicPath。确保staticDir/basePath/index.html存在 routes: ['/','/exam', ],puppeteerOptions: {headless: true,maxConcurrentRoutes: 0,renderAfterDocumentEvent: 'render-event',skipThirdPartyRequests: true }};const spaRenderer = new SpaRenderer(options)spaRenderer.render().then(() => {console.log('预渲染完毕。');});
具体的参数解析可以查看 @waitkafuka/spa-prerender。底层原理在底层实现上,主要利用了 express 来驱动静态页面;然后利用 puppeteer 无头浏览器来模拟用户访问所需要预渲染的地址;在访问完成之后,保存页面HTML到文件夹中。
流程如下:
更为详细的流程介绍如下(此部分枯燥乏味,非专业人士可以跳过。):
阶段1:创建渲染器实例
spa-prerender index.js:
1.创建puppeteer实例 @prerenderer/renderer-puppeteer/es6/renderer.js
2.创建server实例@prerenderer/prerenderer/es6/server.js
3.创建renderer实例,将1 2步的puppeteer和server注入this @@prerenderer/prerenderer/es6/index.js
阶段2:渲染器实例初始化:spa-prerender index.js:
1.server初始化 (设置路由:静态资源利用*.*映射到staticDir上,其他请求全部映射到index.html上。设置静态资源和index.html路径,modifyServer也在这个阶段。server 启动)@prerenderer/prerenderer/es6/server.js
2.puppeteer初始化(判断平台是否linux,如果是Linux需要设置一些启动参数;启动puppeteer)@prerenderer/renderer-puppeteer/es6/renderer.js
阶段3:开始访问路由并获取html
1.spa-prerender index.js->@prerenderer/prerenderer/es6/index.js -> @prerenderer/renderer-puppeteer/es6/renderer.js
2.开启一个限流器,每次最多渲染 n 条路由,避免内存崩溃
3.puppeteer开启一个新标签,判断是否有inject,如果有,注入到window上
4.拼接端口、设置viewport,拼接router,形成url,发起页面的请求
5.判断options中是否设置了renderAfterDocumentEvent,如果有,给页面添加一个事件监听器,当触发事件的时候,将__PRERENDER_STATUS属性设置为true
6.访问页面,等待加载完成(如何确定页面加载完成, waituntil: 'networkidle0'//在500ms内没有网络请求,这个设置可以通过puppeteerOptions.navigationOptions.waituntil修改)
等待捕捉,分为三种等待时机:
1.等待固定时间,renderAfterTime(利用settimeout结合promise实现)
2.等待抛出某个事件:renderAfterDocumentEvent,该事件需要事先在页面写好抛出的时机
3.等待某个元素出现:renderAfterElementExists
阶段4:保存html
spa-prerender index.js 遍历结果,拼接文件夹路径并保存html。
实践过程中的常见问题
1. 如果一个项目有10个页面,其中首页需要SEO,于是使用了预渲染,另外9个页面仍然是由js渲染。那么在访问其他9个页面的时候,刷新页面,会先显示首页的内容一闪而过。这种问题如何解决?
产生这种情况的原因在于:在单页应用中,实际上只有一个物理页面,那就是 index.html。我们访问的所有页面实际都是 index.html,先进入 index.html 然后再执行 js 构建 dom。那么此时如果我们首页是已经预渲染好的,那么就会有内容,在 js 构建出对应路由的内容之前,就会先出现首页的内容。
spa-prerender 考虑到了这种问题。在预渲染的过程中,会首先保留原来“纯净”的index.html,并重命名为“index-spa.html”。
而后,在 nginx 配置中,利用 try_files 指令的优先级配置特点,让用户在刷新的情况下,如果有对应物理文件则访问物理文件(预渲染生成的文件),如果没有对应物理文件则降级访问 index-spa.html,就可以解决上述问题。nginx 配置指令如下:
location /{ alias /Users/zks/code/xkw/xop/dist/; try_files $uri $uri/ /index-spa.html; }
此时预渲染生成的文件将被优先返回($uri),如果未匹配,才会交由 index-spa.html 处理。
2. 如果项目打包有前缀怎么办?
如果项目有publicPath,那么在 dist 目录下会多一层根目录。此时需要在预渲染配置中添加 basePath 的选项。此时 express 会从 dist/basePath 目录中去寻找 index.html。
配置如下:
const options = { staticDir: path.join(__dirname, 'dist'), basePath: 'base',//当项目有basePath的时候设置。同router中的base和publicPath。确保staticDir/basePath/index.html存在 routes: ['/','/exam', ], ... }
3. 如何控制渲染器开始进行HTML保存的时机?
我们可以通过 options 中三个参数来控制:
3.1.renderAfterTime:等待固定时间之后(从页面开始发起访问算起)
3.2.renderAfterDocumentEvent:等待抛出某个事件,该事件需要事先在页面定义好触发的时机,比如在 Vue 的 mounted 函数中定义:
new Vue({ router,render: h => h(App), mounted () { //在mounted之后触发custom-render-event // 预渲染器在收到这个事件之后将开始进行页面的保存工作 document.dispatchEvent(new Event('custom-render-event')) }}).$mount('#app')
3.3.renderAfterElementExists:等待某个元素出现。我们可以在异步 ajax 返回之后,增加某个元素。当渲染器检测到此元素出现之后进行页面保存,此时保存的页面就包含了 ajax 返回的数据。
4. 首页预渲染生成的 DOM 元素,会不会被 js 复用?还是删除重新构建?
仿照SSR的思路,我们可以通过在根节点上设置 data-server-rander="true",这样在客户端 js 会知道这个是已经渲染完成的 DOM,不会粗暴去替换它。而是执行一个“注水”的过程(也就是hydration)。可以充分复用预渲染生成的 DOM 元素。
点击下方卡片可以关注 查看全部
nodejs抓取动态网页 全面深入理解预渲染技术体系
在我们使用现代前端框架,比如Vue、React、Angular开发完毕前端项目之后,会发现这些页面输出的全是js,很不利于搜索引擎去爬取。在已经完成了单页应用(SPA)项目之后,如果要进行SEO优化的改造,这时候就可以使用预渲染技术体系。
下面将从适用场景、概念介绍、如何使用、底层原理几方面全面介绍预渲染技术的各项特性。适用场景在谈使用场景之前,首先需要明白以下几点:现代前端框架比如 Vue 在构建完成之后,页面加载的其实是一堆 js,再由 js 动态生成DOM。当我们访问页面,右键“显示网页源代码”的时候,看不到文字等内容百度、搜狗等爬虫在抓取页面的时候,不会执行页面的 js 源代码(谷歌爬虫可以执行“同步” js 来构建页面,因此 Vue 等框架开发的单页应用可以在谷歌搜索引擎中很好的被收录,这点我们不展开讨论)如果想要让百度、搜狗等收录索引我们的网站,就必须像静态 HTML 那样,让网页在右键查看源代码的时候,显示的是文字、图片等内容在这样的场景下,我们可以使用预渲染来解决此类问题。概念介绍
预渲染概念简单来讲是这样的:在项目构建阶段,我们会模拟访问项目的页面URL,这时候页面上的 js 将会执行并且形成真正的 HTML 片段;此时我们保存这个 HTML 文件到服务器硬盘上,下次不管是用户还是爬虫访问的时候,就直接返回这个物理文件,这样就可以有效解决 SEO 无法收录的问题。大体流程如下图:
可以看出,“预渲染”同“服务端渲染”最大的区别是,前者是在构建期间执行,后者在用户访问期间实时运行;前者在构建完成之后就不再需要 node服务,后者需要使用 node 作为运行时。预渲染也有它不适用的地方。正因为在构建阶段我们需要指明“需要构建的页面URL”,因此对于那些携带动态参数的页面(比如资料详情页),不适用于用预渲染去构建。这种场景下只能使用SSR。反之,一切静态官网、带数据的门户网站,只要是URL固定的,不管其中有没有动态数据,都可以使用预渲染。这里你可能会问一个问题:预渲染技术能否将 ajax 请求的内容也填充到页面上?答案是肯定的。虽然你 ajax 并非“同步执行”的 js,我们无法获知异步请求完成的时机。但通过控制监测页面上某个特定元素是否存在等手段,我们可以变相获知到数据返回的时机,从而进行预渲染。就可以达到“填充 ajax 数据”的效果(这可是谷歌爬虫也无法达到的效果哦)。如何使用预渲染技术有很多种实现方式。最常用的是使用 webpack 的一个插件: prerender-spa-plugin()。但是这个插件有很多局限性,最大的局限性在于必须结合 webpack 来使用,不够灵活,不易调试。也无法通过编程的方式使用。
比如我们的首页有动态的数据(非动态URL。是通过ajax获取的动态数据。)因此我们在使用了预渲染生成了静态首页之后,需要每间隔10分钟或者5分钟重新生成一个新的静态页,来更新数据。这就需要能够通过编程的方式调用渲染指令。在这样的情况下我基于这个插件的原理重新实现了一个包:@waitkafuka/spa-prerender(),可以通过 nodejs 通过编程的方式使用。
同时它剥离了 webpack 的依赖,剥离了对SPA页面的限制。只要有一个静态目录就可以工作。使用的方式非常简单,以 Vue 为例,在我们正常构建生成了 dist 目录之后,只需要编写以下脚本:
const SpaRenderer = require('@waitkafuka/spa-prerender');const path = require('path');<br />const options = {staticDir: path.join(__dirname, 'dist'),basePath: 'base',//可选,当项目有basePath的时候设置。同router中的base和publicPath。确保staticDir/basePath/index.html存在 routes: ['/','/exam', ],puppeteerOptions: {headless: true,maxConcurrentRoutes: 0,renderAfterDocumentEvent: 'render-event',skipThirdPartyRequests: true }};const spaRenderer = new SpaRenderer(options)spaRenderer.render().then(() => {console.log('预渲染完毕。');});
具体的参数解析可以查看 @waitkafuka/spa-prerender。底层原理在底层实现上,主要利用了 express 来驱动静态页面;然后利用 puppeteer 无头浏览器来模拟用户访问所需要预渲染的地址;在访问完成之后,保存页面HTML到文件夹中。
流程如下:
更为详细的流程介绍如下(此部分枯燥乏味,非专业人士可以跳过。):
阶段1:创建渲染器实例
spa-prerender index.js:
1.创建puppeteer实例 @prerenderer/renderer-puppeteer/es6/renderer.js
2.创建server实例@prerenderer/prerenderer/es6/server.js
3.创建renderer实例,将1 2步的puppeteer和server注入this @@prerenderer/prerenderer/es6/index.js
阶段2:渲染器实例初始化:spa-prerender index.js:
1.server初始化 (设置路由:静态资源利用*.*映射到staticDir上,其他请求全部映射到index.html上。设置静态资源和index.html路径,modifyServer也在这个阶段。server 启动)@prerenderer/prerenderer/es6/server.js
2.puppeteer初始化(判断平台是否linux,如果是Linux需要设置一些启动参数;启动puppeteer)@prerenderer/renderer-puppeteer/es6/renderer.js
阶段3:开始访问路由并获取html
1.spa-prerender index.js->@prerenderer/prerenderer/es6/index.js -> @prerenderer/renderer-puppeteer/es6/renderer.js
2.开启一个限流器,每次最多渲染 n 条路由,避免内存崩溃
3.puppeteer开启一个新标签,判断是否有inject,如果有,注入到window上
4.拼接端口、设置viewport,拼接router,形成url,发起页面的请求
5.判断options中是否设置了renderAfterDocumentEvent,如果有,给页面添加一个事件监听器,当触发事件的时候,将__PRERENDER_STATUS属性设置为true
6.访问页面,等待加载完成(如何确定页面加载完成, waituntil: 'networkidle0'//在500ms内没有网络请求,这个设置可以通过puppeteerOptions.navigationOptions.waituntil修改)
等待捕捉,分为三种等待时机:
1.等待固定时间,renderAfterTime(利用settimeout结合promise实现)
2.等待抛出某个事件:renderAfterDocumentEvent,该事件需要事先在页面写好抛出的时机
3.等待某个元素出现:renderAfterElementExists
阶段4:保存html
spa-prerender index.js 遍历结果,拼接文件夹路径并保存html。
实践过程中的常见问题
1. 如果一个项目有10个页面,其中首页需要SEO,于是使用了预渲染,另外9个页面仍然是由js渲染。那么在访问其他9个页面的时候,刷新页面,会先显示首页的内容一闪而过。这种问题如何解决?
产生这种情况的原因在于:在单页应用中,实际上只有一个物理页面,那就是 index.html。我们访问的所有页面实际都是 index.html,先进入 index.html 然后再执行 js 构建 dom。那么此时如果我们首页是已经预渲染好的,那么就会有内容,在 js 构建出对应路由的内容之前,就会先出现首页的内容。
spa-prerender 考虑到了这种问题。在预渲染的过程中,会首先保留原来“纯净”的index.html,并重命名为“index-spa.html”。
而后,在 nginx 配置中,利用 try_files 指令的优先级配置特点,让用户在刷新的情况下,如果有对应物理文件则访问物理文件(预渲染生成的文件),如果没有对应物理文件则降级访问 index-spa.html,就可以解决上述问题。nginx 配置指令如下:
location /{ alias /Users/zks/code/xkw/xop/dist/; try_files $uri $uri/ /index-spa.html; }
此时预渲染生成的文件将被优先返回($uri),如果未匹配,才会交由 index-spa.html 处理。
2. 如果项目打包有前缀怎么办?
如果项目有publicPath,那么在 dist 目录下会多一层根目录。此时需要在预渲染配置中添加 basePath 的选项。此时 express 会从 dist/basePath 目录中去寻找 index.html。
配置如下:
const options = { staticDir: path.join(__dirname, 'dist'), basePath: 'base',//当项目有basePath的时候设置。同router中的base和publicPath。确保staticDir/basePath/index.html存在 routes: ['/','/exam', ], ... }
3. 如何控制渲染器开始进行HTML保存的时机?
我们可以通过 options 中三个参数来控制:
3.1.renderAfterTime:等待固定时间之后(从页面开始发起访问算起)
3.2.renderAfterDocumentEvent:等待抛出某个事件,该事件需要事先在页面定义好触发的时机,比如在 Vue 的 mounted 函数中定义:
new Vue({ router,render: h => h(App), mounted () { //在mounted之后触发custom-render-event // 预渲染器在收到这个事件之后将开始进行页面的保存工作 document.dispatchEvent(new Event('custom-render-event')) }}).$mount('#app')
3.3.renderAfterElementExists:等待某个元素出现。我们可以在异步 ajax 返回之后,增加某个元素。当渲染器检测到此元素出现之后进行页面保存,此时保存的页面就包含了 ajax 返回的数据。
4. 首页预渲染生成的 DOM 元素,会不会被 js 复用?还是删除重新构建?
仿照SSR的思路,我们可以通过在根节点上设置 data-server-rander="true",这样在客户端 js 会知道这个是已经渲染完成的 DOM,不会粗暴去替换它。而是执行一个“注水”的过程(也就是hydration)。可以充分复用预渲染生成的 DOM 元素。
点击下方卡片可以关注
nodejs抓取动态网页(连接池技术)的异步抓取抓取
网站优化 • 优采云 发表了文章 • 0 个评论 • 63 次浏览 • 2022-06-11 09:02
nodejs抓取动态网页一直都是一个技术难点,mongodb(索引)就是一个妥妥的技术好帮手,可惜不支持抓取定制化的数据源。所以将自己在写了一段时间之后也写了一篇博客详细地解释各种nodejs的功能之间的互通互用,使得抓取动态网页变得方便起来。本文主要介绍关于异步抓取和连接池技术等。异步抓取先来看看异步抓取。
异步抓取就是说mongodb从一个请求发出到接收到返回的response实际上是从一个进程中分支走去的,程序从进程中分支走去,数据依然在内存中,这样可以更快地处理大量网页数据。我们知道,一个同步请求的过程中,请求都会被分配给线程对象中的一个实例来处理。这时候,用户输入ip地址就会被传递给线程对象对象中的一个线程上下文,由线程对象的interface方法取相应的json请求到一个内存中。
这样,api请求到被调用的这个进程中中处理完毕之后,就可以通知服务器。但是异步方式就不同了,请求被分配给了io线程,io线程处理完毕之后,再通知数据处理线程。而且根据采用了一个主从交替来实现异步流量交互的方式。这种方式好处是,内存空间放不下内存了,则提供了vm(虚拟机)让程序可以存储和运行在内存中。除了异步抓取,io线程运行时,还可以接受服务器的任务,然后异步返回,进行数据处理(通过将整个数据源放入队列)。
接受请求的主要方式是requestmethod,一般有get,post,put,delete,put-serially-process-headertext(字符/数据库),form-data(表单)。其中post(发起远程并发请求),put(解析远程并发请求的response数据),delete(删除远程并发请求的response数据),put-serially-process-header(数据源)是我们常用的方式。
但是这并不完美,因为每次请求回包的时候,只有本次请求被call到的时候,内存空间才会被用到。由于异步请求是异步的,所以一般还是用的同步方式来发起请求(requestmethod),也就是将进程分割成不同的进程,再执行不同的请求处理。不过大家可以通过主从关系映射来组合不同进程之间的请求并发,从而更好地利用内存空间。
http连接池对于一个网页抓取而言,首先需要一个requestmethod的线程对象。其次我们还需要分配不同线程对象到不同进程中执行。通过requestmethod的线程对象,我们可以建立一个用于抓取同步内容的连接池,并通过tcp连接来相互传递数据。具体如下:nodejs用到的连接池是any连接池,内部实现使用了http同步握手机制。连接池初始化:staticnodejs中很简单,只要初始化相应的函数(建立连接)即。 查看全部
nodejs抓取动态网页(连接池技术)的异步抓取抓取
nodejs抓取动态网页一直都是一个技术难点,mongodb(索引)就是一个妥妥的技术好帮手,可惜不支持抓取定制化的数据源。所以将自己在写了一段时间之后也写了一篇博客详细地解释各种nodejs的功能之间的互通互用,使得抓取动态网页变得方便起来。本文主要介绍关于异步抓取和连接池技术等。异步抓取先来看看异步抓取。
异步抓取就是说mongodb从一个请求发出到接收到返回的response实际上是从一个进程中分支走去的,程序从进程中分支走去,数据依然在内存中,这样可以更快地处理大量网页数据。我们知道,一个同步请求的过程中,请求都会被分配给线程对象中的一个实例来处理。这时候,用户输入ip地址就会被传递给线程对象对象中的一个线程上下文,由线程对象的interface方法取相应的json请求到一个内存中。
这样,api请求到被调用的这个进程中中处理完毕之后,就可以通知服务器。但是异步方式就不同了,请求被分配给了io线程,io线程处理完毕之后,再通知数据处理线程。而且根据采用了一个主从交替来实现异步流量交互的方式。这种方式好处是,内存空间放不下内存了,则提供了vm(虚拟机)让程序可以存储和运行在内存中。除了异步抓取,io线程运行时,还可以接受服务器的任务,然后异步返回,进行数据处理(通过将整个数据源放入队列)。
接受请求的主要方式是requestmethod,一般有get,post,put,delete,put-serially-process-headertext(字符/数据库),form-data(表单)。其中post(发起远程并发请求),put(解析远程并发请求的response数据),delete(删除远程并发请求的response数据),put-serially-process-header(数据源)是我们常用的方式。
但是这并不完美,因为每次请求回包的时候,只有本次请求被call到的时候,内存空间才会被用到。由于异步请求是异步的,所以一般还是用的同步方式来发起请求(requestmethod),也就是将进程分割成不同的进程,再执行不同的请求处理。不过大家可以通过主从关系映射来组合不同进程之间的请求并发,从而更好地利用内存空间。
http连接池对于一个网页抓取而言,首先需要一个requestmethod的线程对象。其次我们还需要分配不同线程对象到不同进程中执行。通过requestmethod的线程对象,我们可以建立一个用于抓取同步内容的连接池,并通过tcp连接来相互传递数据。具体如下:nodejs用到的连接池是any连接池,内部实现使用了http同步握手机制。连接池初始化:staticnodejs中很简单,只要初始化相应的函数(建立连接)即。
nodejs抓取动态网页 全面深入理解预渲染技术体系
网站优化 • 优采云 发表了文章 • 0 个评论 • 116 次浏览 • 2022-06-09 00:37
在我们使用现代前端框架,比如Vue、React、Angular开发完毕前端项目之后,会发现这些页面输出的全是js,很不利于搜索引擎去爬取。在已经完成了单页应用(SPA)项目之后,如果要进行SEO优化的改造,这时候就可以使用预渲染技术体系。
下面将从适用场景、概念介绍、如何使用、底层原理几方面全面介绍预渲染技术的各项特性。适用场景在谈使用场景之前,首先需要明白以下几点:现代前端框架比如 Vue 在构建完成之后,页面加载的其实是一堆 js,再由 js 动态生成DOM。当我们访问页面,右键“显示网页源代码”的时候,看不到文字等内容百度、搜狗等爬虫在抓取页面的时候,不会执行页面的 js 源代码(谷歌爬虫可以执行“同步” js 来构建页面,因此 Vue 等框架开发的单页应用可以在谷歌搜索引擎中很好的被收录,这点我们不展开讨论)如果想要让百度、搜狗等收录索引我们的网站,就必须像静态 HTML 那样,让网页在右键查看源代码的时候,显示的是文字、图片等内容在这样的场景下,我们可以使用预渲染来解决此类问题。概念介绍
预渲染概念简单来讲是这样的:在项目构建阶段,我们会模拟访问项目的页面URL,这时候页面上的 js 将会执行并且形成真正的 HTML 片段;此时我们保存这个 HTML 文件到服务器硬盘上,下次不管是用户还是爬虫访问的时候,就直接返回这个物理文件,这样就可以有效解决 SEO 无法收录的问题。大体流程如下图:
可以看出,“预渲染”同“服务端渲染”最大的区别是,前者是在构建期间执行,后者在用户访问期间实时运行;前者在构建完成之后就不再需要 node服务,后者需要使用 node 作为运行时。预渲染也有它不适用的地方。正因为在构建阶段我们需要指明“需要构建的页面URL”,因此对于那些携带动态参数的页面(比如资料详情页),不适用于用预渲染去构建。这种场景下只能使用SSR。反之,一切静态官网、带数据的门户网站,只要是URL固定的,不管其中有没有动态数据,都可以使用预渲染。这里你可能会问一个问题:预渲染技术能否将 ajax 请求的内容也填充到页面上?答案是肯定的。虽然你 ajax 并非“同步执行”的 js,我们无法获知异步请求完成的时机。但通过控制监测页面上某个特定元素是否存在等手段,我们可以变相获知到数据返回的时机,从而进行预渲染。就可以达到“填充 ajax 数据”的效果(这可是谷歌爬虫也无法达到的效果哦)。如何使用预渲染技术有很多种实现方式。最常用的是使用 webpack 的一个插件: prerender-spa-plugin()。但是这个插件有很多局限性,最大的局限性在于必须结合 webpack 来使用,不够灵活,不易调试。也无法通过编程的方式使用。
比如我们的首页有动态的数据(非动态URL。是通过ajax获取的动态数据。)因此我们在使用了预渲染生成了静态首页之后,需要每间隔10分钟或者5分钟重新生成一个新的静态页,来更新数据。这就需要能够通过编程的方式调用渲染指令。在这样的情况下我基于这个插件的原理重新实现了一个包:@waitkafuka/spa-prerender(),可以通过 nodejs 通过编程的方式使用。
同时它剥离了 webpack 的依赖,剥离了对SPA页面的限制。只要有一个静态目录就可以工作。使用的方式非常简单,以 Vue 为例,在我们正常构建生成了 dist 目录之后,只需要编写以下脚本:
const SpaRenderer = require('@waitkafuka/spa-prerender');const path = require('path');<br />const options = {staticDir: path.join(__dirname, 'dist'),basePath: 'base',//可选,当项目有basePath的时候设置。同router中的base和publicPath。确保staticDir/basePath/index.html存在 routes: ['/','/exam', ],puppeteerOptions: {headless: true,maxConcurrentRoutes: 0,renderAfterDocumentEvent: 'render-event',skipThirdPartyRequests: true }};const spaRenderer = new SpaRenderer(options)spaRenderer.render().then(() => {console.log('预渲染完毕。');});
具体的参数解析可以查看 @waitkafuka/spa-prerender。底层原理在底层实现上,主要利用了 express 来驱动静态页面;然后利用 puppeteer 无头浏览器来模拟用户访问所需要预渲染的地址;在访问完成之后,保存页面HTML到文件夹中。
流程如下:
更为详细的流程介绍如下(此部分枯燥乏味,非专业人士可以跳过。):
阶段1:创建渲染器实例
spa-prerender index.js:
1.创建puppeteer实例 @prerenderer/renderer-puppeteer/es6/renderer.js
2.创建server实例@prerenderer/prerenderer/es6/server.js
3.创建renderer实例,将1 2步的puppeteer和server注入this @@prerenderer/prerenderer/es6/index.js
阶段2:渲染器实例初始化:spa-prerender index.js:
1.server初始化 (设置路由:静态资源利用*.*映射到staticDir上,其他请求全部映射到index.html上。设置静态资源和index.html路径,modifyServer也在这个阶段。server 启动)@prerenderer/prerenderer/es6/server.js
2.puppeteer初始化(判断平台是否linux,如果是Linux需要设置一些启动参数;启动puppeteer)@prerenderer/renderer-puppeteer/es6/renderer.js
阶段3:开始访问路由并获取html
1.spa-prerender index.js->@prerenderer/prerenderer/es6/index.js -> @prerenderer/renderer-puppeteer/es6/renderer.js
2.开启一个限流器,每次最多渲染 n 条路由,避免内存崩溃
3.puppeteer开启一个新标签,判断是否有inject,如果有,注入到window上
4.拼接端口、设置viewport,拼接router,形成url,发起页面的请求
5.判断options中是否设置了renderAfterDocumentEvent,如果有,给页面添加一个事件监听器,当触发事件的时候,将__PRERENDER_STATUS属性设置为true
6.访问页面,等待加载完成(如何确定页面加载完成, waituntil: 'networkidle0'//在500ms内没有网络请求,这个设置可以通过puppeteerOptions.navigationOptions.waituntil修改)
等待捕捉,分为三种等待时机:
1.等待固定时间,renderAfterTime(利用settimeout结合promise实现)
2.等待抛出某个事件:renderAfterDocumentEvent,该事件需要事先在页面写好抛出的时机
3.等待某个元素出现:renderAfterElementExists
阶段4:保存html
spa-prerender index.js 遍历结果,拼接文件夹路径并保存html。
实践过程中的常见问题
1. 如果一个项目有10个页面,其中首页需要SEO,于是使用了预渲染,另外9个页面仍然是由js渲染。那么在访问其他9个页面的时候,刷新页面,会先显示首页的内容一闪而过。这种问题如何解决?
产生这种情况的原因在于:在单页应用中,实际上只有一个物理页面,那就是 index.html。我们访问的所有页面实际都是 index.html,先进入 index.html 然后再执行 js 构建 dom。那么此时如果我们首页是已经预渲染好的,那么就会有内容,在 js 构建出对应路由的内容之前,就会先出现首页的内容。
spa-prerender 考虑到了这种问题。在预渲染的过程中,会首先保留原来“纯净”的index.html,并重命名为“index-spa.html”。
而后,在 nginx 配置中,利用 try_files 指令的优先级配置特点,让用户在刷新的情况下,如果有对应物理文件则访问物理文件(预渲染生成的文件),如果没有对应物理文件则降级访问 index-spa.html,就可以解决上述问题。nginx 配置指令如下:
location /{ alias /Users/zks/code/xkw/xop/dist/; try_files $uri $uri/ /index-spa.html; }
此时预渲染生成的文件将被优先返回($uri),如果未匹配,才会交由 index-spa.html 处理。
2. 如果项目打包有前缀怎么办?
如果项目有publicPath,那么在 dist 目录下会多一层根目录。此时需要在预渲染配置中添加 basePath 的选项。此时 express 会从 dist/basePath 目录中去寻找 index.html。
配置如下:
const options = { staticDir: path.join(__dirname, 'dist'), basePath: 'base',//当项目有basePath的时候设置。同router中的base和publicPath。确保staticDir/basePath/index.html存在 routes: ['/','/exam', ], ... }
3. 如何控制渲染器开始进行HTML保存的时机?
我们可以通过 options 中三个参数来控制:
3.1.renderAfterTime:等待固定时间之后(从页面开始发起访问算起)
3.2.renderAfterDocumentEvent:等待抛出某个事件,该事件需要事先在页面定义好触发的时机,比如在 Vue 的 mounted 函数中定义:
new Vue({ router,render: h => h(App), mounted () { //在mounted之后触发custom-render-event // 预渲染器在收到这个事件之后将开始进行页面的保存工作 document.dispatchEvent(new Event('custom-render-event')) }}).$mount('#app')
3.3.renderAfterElementExists:等待某个元素出现。我们可以在异步 ajax 返回之后,增加某个元素。当渲染器检测到此元素出现之后进行页面保存,此时保存的页面就包含了 ajax 返回的数据。
4. 首页预渲染生成的 DOM 元素,会不会被 js 复用?还是删除重新构建?
仿照SSR的思路,我们可以通过在根节点上设置 data-server-rander="true",这样在客户端 js 会知道这个是已经渲染完成的 DOM,不会粗暴去替换它。而是执行一个“注水”的过程(也就是hydration)。可以充分复用预渲染生成的 DOM 元素。
点击下方卡片可以关注 查看全部
nodejs抓取动态网页 全面深入理解预渲染技术体系
在我们使用现代前端框架,比如Vue、React、Angular开发完毕前端项目之后,会发现这些页面输出的全是js,很不利于搜索引擎去爬取。在已经完成了单页应用(SPA)项目之后,如果要进行SEO优化的改造,这时候就可以使用预渲染技术体系。
下面将从适用场景、概念介绍、如何使用、底层原理几方面全面介绍预渲染技术的各项特性。适用场景在谈使用场景之前,首先需要明白以下几点:现代前端框架比如 Vue 在构建完成之后,页面加载的其实是一堆 js,再由 js 动态生成DOM。当我们访问页面,右键“显示网页源代码”的时候,看不到文字等内容百度、搜狗等爬虫在抓取页面的时候,不会执行页面的 js 源代码(谷歌爬虫可以执行“同步” js 来构建页面,因此 Vue 等框架开发的单页应用可以在谷歌搜索引擎中很好的被收录,这点我们不展开讨论)如果想要让百度、搜狗等收录索引我们的网站,就必须像静态 HTML 那样,让网页在右键查看源代码的时候,显示的是文字、图片等内容在这样的场景下,我们可以使用预渲染来解决此类问题。概念介绍
预渲染概念简单来讲是这样的:在项目构建阶段,我们会模拟访问项目的页面URL,这时候页面上的 js 将会执行并且形成真正的 HTML 片段;此时我们保存这个 HTML 文件到服务器硬盘上,下次不管是用户还是爬虫访问的时候,就直接返回这个物理文件,这样就可以有效解决 SEO 无法收录的问题。大体流程如下图:
可以看出,“预渲染”同“服务端渲染”最大的区别是,前者是在构建期间执行,后者在用户访问期间实时运行;前者在构建完成之后就不再需要 node服务,后者需要使用 node 作为运行时。预渲染也有它不适用的地方。正因为在构建阶段我们需要指明“需要构建的页面URL”,因此对于那些携带动态参数的页面(比如资料详情页),不适用于用预渲染去构建。这种场景下只能使用SSR。反之,一切静态官网、带数据的门户网站,只要是URL固定的,不管其中有没有动态数据,都可以使用预渲染。这里你可能会问一个问题:预渲染技术能否将 ajax 请求的内容也填充到页面上?答案是肯定的。虽然你 ajax 并非“同步执行”的 js,我们无法获知异步请求完成的时机。但通过控制监测页面上某个特定元素是否存在等手段,我们可以变相获知到数据返回的时机,从而进行预渲染。就可以达到“填充 ajax 数据”的效果(这可是谷歌爬虫也无法达到的效果哦)。如何使用预渲染技术有很多种实现方式。最常用的是使用 webpack 的一个插件: prerender-spa-plugin()。但是这个插件有很多局限性,最大的局限性在于必须结合 webpack 来使用,不够灵活,不易调试。也无法通过编程的方式使用。
比如我们的首页有动态的数据(非动态URL。是通过ajax获取的动态数据。)因此我们在使用了预渲染生成了静态首页之后,需要每间隔10分钟或者5分钟重新生成一个新的静态页,来更新数据。这就需要能够通过编程的方式调用渲染指令。在这样的情况下我基于这个插件的原理重新实现了一个包:@waitkafuka/spa-prerender(),可以通过 nodejs 通过编程的方式使用。
同时它剥离了 webpack 的依赖,剥离了对SPA页面的限制。只要有一个静态目录就可以工作。使用的方式非常简单,以 Vue 为例,在我们正常构建生成了 dist 目录之后,只需要编写以下脚本:
const SpaRenderer = require('@waitkafuka/spa-prerender');const path = require('path');<br />const options = {staticDir: path.join(__dirname, 'dist'),basePath: 'base',//可选,当项目有basePath的时候设置。同router中的base和publicPath。确保staticDir/basePath/index.html存在 routes: ['/','/exam', ],puppeteerOptions: {headless: true,maxConcurrentRoutes: 0,renderAfterDocumentEvent: 'render-event',skipThirdPartyRequests: true }};const spaRenderer = new SpaRenderer(options)spaRenderer.render().then(() => {console.log('预渲染完毕。');});
具体的参数解析可以查看 @waitkafuka/spa-prerender。底层原理在底层实现上,主要利用了 express 来驱动静态页面;然后利用 puppeteer 无头浏览器来模拟用户访问所需要预渲染的地址;在访问完成之后,保存页面HTML到文件夹中。
流程如下:
更为详细的流程介绍如下(此部分枯燥乏味,非专业人士可以跳过。):
阶段1:创建渲染器实例
spa-prerender index.js:
1.创建puppeteer实例 @prerenderer/renderer-puppeteer/es6/renderer.js
2.创建server实例@prerenderer/prerenderer/es6/server.js
3.创建renderer实例,将1 2步的puppeteer和server注入this @@prerenderer/prerenderer/es6/index.js
阶段2:渲染器实例初始化:spa-prerender index.js:
1.server初始化 (设置路由:静态资源利用*.*映射到staticDir上,其他请求全部映射到index.html上。设置静态资源和index.html路径,modifyServer也在这个阶段。server 启动)@prerenderer/prerenderer/es6/server.js
2.puppeteer初始化(判断平台是否linux,如果是Linux需要设置一些启动参数;启动puppeteer)@prerenderer/renderer-puppeteer/es6/renderer.js
阶段3:开始访问路由并获取html
1.spa-prerender index.js->@prerenderer/prerenderer/es6/index.js -> @prerenderer/renderer-puppeteer/es6/renderer.js
2.开启一个限流器,每次最多渲染 n 条路由,避免内存崩溃
3.puppeteer开启一个新标签,判断是否有inject,如果有,注入到window上
4.拼接端口、设置viewport,拼接router,形成url,发起页面的请求
5.判断options中是否设置了renderAfterDocumentEvent,如果有,给页面添加一个事件监听器,当触发事件的时候,将__PRERENDER_STATUS属性设置为true
6.访问页面,等待加载完成(如何确定页面加载完成, waituntil: 'networkidle0'//在500ms内没有网络请求,这个设置可以通过puppeteerOptions.navigationOptions.waituntil修改)
等待捕捉,分为三种等待时机:
1.等待固定时间,renderAfterTime(利用settimeout结合promise实现)
2.等待抛出某个事件:renderAfterDocumentEvent,该事件需要事先在页面写好抛出的时机
3.等待某个元素出现:renderAfterElementExists
阶段4:保存html
spa-prerender index.js 遍历结果,拼接文件夹路径并保存html。
实践过程中的常见问题
1. 如果一个项目有10个页面,其中首页需要SEO,于是使用了预渲染,另外9个页面仍然是由js渲染。那么在访问其他9个页面的时候,刷新页面,会先显示首页的内容一闪而过。这种问题如何解决?
产生这种情况的原因在于:在单页应用中,实际上只有一个物理页面,那就是 index.html。我们访问的所有页面实际都是 index.html,先进入 index.html 然后再执行 js 构建 dom。那么此时如果我们首页是已经预渲染好的,那么就会有内容,在 js 构建出对应路由的内容之前,就会先出现首页的内容。
spa-prerender 考虑到了这种问题。在预渲染的过程中,会首先保留原来“纯净”的index.html,并重命名为“index-spa.html”。
而后,在 nginx 配置中,利用 try_files 指令的优先级配置特点,让用户在刷新的情况下,如果有对应物理文件则访问物理文件(预渲染生成的文件),如果没有对应物理文件则降级访问 index-spa.html,就可以解决上述问题。nginx 配置指令如下:
location /{ alias /Users/zks/code/xkw/xop/dist/; try_files $uri $uri/ /index-spa.html; }
此时预渲染生成的文件将被优先返回($uri),如果未匹配,才会交由 index-spa.html 处理。
2. 如果项目打包有前缀怎么办?
如果项目有publicPath,那么在 dist 目录下会多一层根目录。此时需要在预渲染配置中添加 basePath 的选项。此时 express 会从 dist/basePath 目录中去寻找 index.html。
配置如下:
const options = { staticDir: path.join(__dirname, 'dist'), basePath: 'base',//当项目有basePath的时候设置。同router中的base和publicPath。确保staticDir/basePath/index.html存在 routes: ['/','/exam', ], ... }
3. 如何控制渲染器开始进行HTML保存的时机?
我们可以通过 options 中三个参数来控制:
3.1.renderAfterTime:等待固定时间之后(从页面开始发起访问算起)
3.2.renderAfterDocumentEvent:等待抛出某个事件,该事件需要事先在页面定义好触发的时机,比如在 Vue 的 mounted 函数中定义:
new Vue({ router,render: h => h(App), mounted () { //在mounted之后触发custom-render-event // 预渲染器在收到这个事件之后将开始进行页面的保存工作 document.dispatchEvent(new Event('custom-render-event')) }}).$mount('#app')
3.3.renderAfterElementExists:等待某个元素出现。我们可以在异步 ajax 返回之后,增加某个元素。当渲染器检测到此元素出现之后进行页面保存,此时保存的页面就包含了 ajax 返回的数据。
4. 首页预渲染生成的 DOM 元素,会不会被 js 复用?还是删除重新构建?
仿照SSR的思路,我们可以通过在根节点上设置 data-server-rander="true",这样在客户端 js 会知道这个是已经渲染完成的 DOM,不会粗暴去替换它。而是执行一个“注水”的过程(也就是hydration)。可以充分复用预渲染生成的 DOM 元素。
点击下方卡片可以关注
nodejs抓取动态网页 全面深入理解预渲染技术体系
网站优化 • 优采云 发表了文章 • 0 个评论 • 44 次浏览 • 2022-06-06 12:00
在我们使用现代前端框架,比如Vue、React、Angular开发完毕前端项目之后,会发现这些页面输出的全是js,很不利于搜索引擎去爬取。在已经完成了单页应用(SPA)项目之后,如果要进行SEO优化的改造,这时候就可以使用预渲染技术体系。
下面将从适用场景、概念介绍、如何使用、底层原理几方面全面介绍预渲染技术的各项特性。适用场景在谈使用场景之前,首先需要明白以下几点:现代前端框架比如 Vue 在构建完成之后,页面加载的其实是一堆 js,再由 js 动态生成DOM。当我们访问页面,右键“显示网页源代码”的时候,看不到文字等内容百度、搜狗等爬虫在抓取页面的时候,不会执行页面的 js 源代码(谷歌爬虫可以执行“同步” js 来构建页面,因此 Vue 等框架开发的单页应用可以在谷歌搜索引擎中很好的被收录,这点我们不展开讨论)如果想要让百度、搜狗等收录索引我们的网站,就必须像静态 HTML 那样,让网页在右键查看源代码的时候,显示的是文字、图片等内容在这样的场景下,我们可以使用预渲染来解决此类问题。概念介绍
预渲染概念简单来讲是这样的:在项目构建阶段,我们会模拟访问项目的页面URL,这时候页面上的 js 将会执行并且形成真正的 HTML 片段;此时我们保存这个 HTML 文件到服务器硬盘上,下次不管是用户还是爬虫访问的时候,就直接返回这个物理文件,这样就可以有效解决 SEO 无法收录的问题。大体流程如下图:
可以看出,“预渲染”同“服务端渲染”最大的区别是,前者是在构建期间执行,后者在用户访问期间实时运行;前者在构建完成之后就不再需要 node服务,后者需要使用 node 作为运行时。预渲染也有它不适用的地方。正因为在构建阶段我们需要指明“需要构建的页面URL”,因此对于那些携带动态参数的页面(比如资料详情页),不适用于用预渲染去构建。这种场景下只能使用SSR。反之,一切静态官网、带数据的门户网站,只要是URL固定的,不管其中有没有动态数据,都可以使用预渲染。这里你可能会问一个问题:预渲染技术能否将 ajax 请求的内容也填充到页面上?答案是肯定的。虽然你 ajax 并非“同步执行”的 js,我们无法获知异步请求完成的时机。但通过控制监测页面上某个特定元素是否存在等手段,我们可以变相获知到数据返回的时机,从而进行预渲染。就可以达到“填充 ajax 数据”的效果(这可是谷歌爬虫也无法达到的效果哦)。如何使用预渲染技术有很多种实现方式。最常用的是使用 webpack 的一个插件: prerender-spa-plugin()。但是这个插件有很多局限性,最大的局限性在于必须结合 webpack 来使用,不够灵活,不易调试。也无法通过编程的方式使用。
比如我们的首页有动态的数据(非动态URL。是通过ajax获取的动态数据。)因此我们在使用了预渲染生成了静态首页之后,需要每间隔10分钟或者5分钟重新生成一个新的静态页,来更新数据。这就需要能够通过编程的方式调用渲染指令。在这样的情况下我基于这个插件的原理重新实现了一个包:@waitkafuka/spa-prerender(),可以通过 nodejs 通过编程的方式使用。
同时它剥离了 webpack 的依赖,剥离了对SPA页面的限制。只要有一个静态目录就可以工作。使用的方式非常简单,以 Vue 为例,在我们正常构建生成了 dist 目录之后,只需要编写以下脚本:
const SpaRenderer = require('@waitkafuka/spa-prerender');const path = require('path');<br />const options = {staticDir: path.join(__dirname, 'dist'),basePath: 'base',//可选,当项目有basePath的时候设置。同router中的base和publicPath。确保staticDir/basePath/index.html存在 routes: ['/','/exam', ],puppeteerOptions: {headless: true,maxConcurrentRoutes: 0,renderAfterDocumentEvent: 'render-event',skipThirdPartyRequests: true }};const spaRenderer = new SpaRenderer(options)spaRenderer.render().then(() => {console.log('预渲染完毕。');});
具体的参数解析可以查看 @waitkafuka/spa-prerender。底层原理在底层实现上,主要利用了 express 来驱动静态页面;然后利用 puppeteer 无头浏览器来模拟用户访问所需要预渲染的地址;在访问完成之后,保存页面HTML到文件夹中。
流程如下:
更为详细的流程介绍如下(此部分枯燥乏味,非专业人士可以跳过。):
阶段1:创建渲染器实例
spa-prerender index.js:
1.创建puppeteer实例 @prerenderer/renderer-puppeteer/es6/renderer.js
2.创建server实例@prerenderer/prerenderer/es6/server.js
3.创建renderer实例,将1 2步的puppeteer和server注入this @@prerenderer/prerenderer/es6/index.js
阶段2:渲染器实例初始化:spa-prerender index.js:
1.server初始化 (设置路由:静态资源利用*.*映射到staticDir上,其他请求全部映射到index.html上。设置静态资源和index.html路径,modifyServer也在这个阶段。server 启动)@prerenderer/prerenderer/es6/server.js
2.puppeteer初始化(判断平台是否linux,如果是Linux需要设置一些启动参数;启动puppeteer)@prerenderer/renderer-puppeteer/es6/renderer.js
阶段3:开始访问路由并获取html
1.spa-prerender index.js->@prerenderer/prerenderer/es6/index.js -> @prerenderer/renderer-puppeteer/es6/renderer.js
2.开启一个限流器,每次最多渲染 n 条路由,避免内存崩溃
3.puppeteer开启一个新标签,判断是否有inject,如果有,注入到window上
4.拼接端口、设置viewport,拼接router,形成url,发起页面的请求
5.判断options中是否设置了renderAfterDocumentEvent,如果有,给页面添加一个事件监听器,当触发事件的时候,将__PRERENDER_STATUS属性设置为true
6.访问页面,等待加载完成(如何确定页面加载完成, waituntil: 'networkidle0'//在500ms内没有网络请求,这个设置可以通过puppeteerOptions.navigationOptions.waituntil修改)
等待捕捉,分为三种等待时机:
1.等待固定时间,renderAfterTime(利用settimeout结合promise实现)
2.等待抛出某个事件:renderAfterDocumentEvent,该事件需要事先在页面写好抛出的时机
3.等待某个元素出现:renderAfterElementExists
阶段4:保存html
spa-prerender index.js 遍历结果,拼接文件夹路径并保存html。
实践过程中的常见问题
1. 如果一个项目有10个页面,其中首页需要SEO,于是使用了预渲染,另外9个页面仍然是由js渲染。那么在访问其他9个页面的时候,刷新页面,会先显示首页的内容一闪而过。这种问题如何解决?
产生这种情况的原因在于:在单页应用中,实际上只有一个物理页面,那就是 index.html。我们访问的所有页面实际都是 index.html,先进入 index.html 然后再执行 js 构建 dom。那么此时如果我们首页是已经预渲染好的,那么就会有内容,在 js 构建出对应路由的内容之前,就会先出现首页的内容。
spa-prerender 考虑到了这种问题。在预渲染的过程中,会首先保留原来“纯净”的index.html,并重命名为“index-spa.html”。
而后,在 nginx 配置中,利用 try_files 指令的优先级配置特点,让用户在刷新的情况下,如果有对应物理文件则访问物理文件(预渲染生成的文件),如果没有对应物理文件则降级访问 index-spa.html,就可以解决上述问题。nginx 配置指令如下:
location /{ alias /Users/zks/code/xkw/xop/dist/; try_files $uri $uri/ /index-spa.html; }
此时预渲染生成的文件将被优先返回($uri),如果未匹配,才会交由 index-spa.html 处理。
2. 如果项目打包有前缀怎么办?
如果项目有publicPath,那么在 dist 目录下会多一层根目录。此时需要在预渲染配置中添加 basePath 的选项。此时 express 会从 dist/basePath 目录中去寻找 index.html。
配置如下:
const options = { staticDir: path.join(__dirname, 'dist'), basePath: 'base',//当项目有basePath的时候设置。同router中的base和publicPath。确保staticDir/basePath/index.html存在 routes: ['/','/exam', ], ... }
3. 如何控制渲染器开始进行HTML保存的时机?
我们可以通过 options 中三个参数来控制:
3.1.renderAfterTime:等待固定时间之后(从页面开始发起访问算起)
3.2.renderAfterDocumentEvent:等待抛出某个事件,该事件需要事先在页面定义好触发的时机,比如在 Vue 的 mounted 函数中定义:
new Vue({ router,render: h => h(App), mounted () { //在mounted之后触发custom-render-event // 预渲染器在收到这个事件之后将开始进行页面的保存工作 document.dispatchEvent(new Event('custom-render-event')) }}).$mount('#app')
3.3.renderAfterElementExists:等待某个元素出现。我们可以在异步 ajax 返回之后,增加某个元素。当渲染器检测到此元素出现之后进行页面保存,此时保存的页面就包含了 ajax 返回的数据。
4. 首页预渲染生成的 DOM 元素,会不会被 js 复用?还是删除重新构建?
仿照SSR的思路,我们可以通过在根节点上设置 data-server-rander="true",这样在客户端 js 会知道这个是已经渲染完成的 DOM,不会粗暴去替换它。而是执行一个“注水”的过程(也就是hydration)。可以充分复用预渲染生成的 DOM 元素。
点击下方卡片可以关注 查看全部
nodejs抓取动态网页 全面深入理解预渲染技术体系
在我们使用现代前端框架,比如Vue、React、Angular开发完毕前端项目之后,会发现这些页面输出的全是js,很不利于搜索引擎去爬取。在已经完成了单页应用(SPA)项目之后,如果要进行SEO优化的改造,这时候就可以使用预渲染技术体系。
下面将从适用场景、概念介绍、如何使用、底层原理几方面全面介绍预渲染技术的各项特性。适用场景在谈使用场景之前,首先需要明白以下几点:现代前端框架比如 Vue 在构建完成之后,页面加载的其实是一堆 js,再由 js 动态生成DOM。当我们访问页面,右键“显示网页源代码”的时候,看不到文字等内容百度、搜狗等爬虫在抓取页面的时候,不会执行页面的 js 源代码(谷歌爬虫可以执行“同步” js 来构建页面,因此 Vue 等框架开发的单页应用可以在谷歌搜索引擎中很好的被收录,这点我们不展开讨论)如果想要让百度、搜狗等收录索引我们的网站,就必须像静态 HTML 那样,让网页在右键查看源代码的时候,显示的是文字、图片等内容在这样的场景下,我们可以使用预渲染来解决此类问题。概念介绍
预渲染概念简单来讲是这样的:在项目构建阶段,我们会模拟访问项目的页面URL,这时候页面上的 js 将会执行并且形成真正的 HTML 片段;此时我们保存这个 HTML 文件到服务器硬盘上,下次不管是用户还是爬虫访问的时候,就直接返回这个物理文件,这样就可以有效解决 SEO 无法收录的问题。大体流程如下图:
可以看出,“预渲染”同“服务端渲染”最大的区别是,前者是在构建期间执行,后者在用户访问期间实时运行;前者在构建完成之后就不再需要 node服务,后者需要使用 node 作为运行时。预渲染也有它不适用的地方。正因为在构建阶段我们需要指明“需要构建的页面URL”,因此对于那些携带动态参数的页面(比如资料详情页),不适用于用预渲染去构建。这种场景下只能使用SSR。反之,一切静态官网、带数据的门户网站,只要是URL固定的,不管其中有没有动态数据,都可以使用预渲染。这里你可能会问一个问题:预渲染技术能否将 ajax 请求的内容也填充到页面上?答案是肯定的。虽然你 ajax 并非“同步执行”的 js,我们无法获知异步请求完成的时机。但通过控制监测页面上某个特定元素是否存在等手段,我们可以变相获知到数据返回的时机,从而进行预渲染。就可以达到“填充 ajax 数据”的效果(这可是谷歌爬虫也无法达到的效果哦)。如何使用预渲染技术有很多种实现方式。最常用的是使用 webpack 的一个插件: prerender-spa-plugin()。但是这个插件有很多局限性,最大的局限性在于必须结合 webpack 来使用,不够灵活,不易调试。也无法通过编程的方式使用。
比如我们的首页有动态的数据(非动态URL。是通过ajax获取的动态数据。)因此我们在使用了预渲染生成了静态首页之后,需要每间隔10分钟或者5分钟重新生成一个新的静态页,来更新数据。这就需要能够通过编程的方式调用渲染指令。在这样的情况下我基于这个插件的原理重新实现了一个包:@waitkafuka/spa-prerender(),可以通过 nodejs 通过编程的方式使用。
同时它剥离了 webpack 的依赖,剥离了对SPA页面的限制。只要有一个静态目录就可以工作。使用的方式非常简单,以 Vue 为例,在我们正常构建生成了 dist 目录之后,只需要编写以下脚本:
const SpaRenderer = require('@waitkafuka/spa-prerender');const path = require('path');<br />const options = {staticDir: path.join(__dirname, 'dist'),basePath: 'base',//可选,当项目有basePath的时候设置。同router中的base和publicPath。确保staticDir/basePath/index.html存在 routes: ['/','/exam', ],puppeteerOptions: {headless: true,maxConcurrentRoutes: 0,renderAfterDocumentEvent: 'render-event',skipThirdPartyRequests: true }};const spaRenderer = new SpaRenderer(options)spaRenderer.render().then(() => {console.log('预渲染完毕。');});
具体的参数解析可以查看 @waitkafuka/spa-prerender。底层原理在底层实现上,主要利用了 express 来驱动静态页面;然后利用 puppeteer 无头浏览器来模拟用户访问所需要预渲染的地址;在访问完成之后,保存页面HTML到文件夹中。
流程如下:
更为详细的流程介绍如下(此部分枯燥乏味,非专业人士可以跳过。):
阶段1:创建渲染器实例
spa-prerender index.js:
1.创建puppeteer实例 @prerenderer/renderer-puppeteer/es6/renderer.js
2.创建server实例@prerenderer/prerenderer/es6/server.js
3.创建renderer实例,将1 2步的puppeteer和server注入this @@prerenderer/prerenderer/es6/index.js
阶段2:渲染器实例初始化:spa-prerender index.js:
1.server初始化 (设置路由:静态资源利用*.*映射到staticDir上,其他请求全部映射到index.html上。设置静态资源和index.html路径,modifyServer也在这个阶段。server 启动)@prerenderer/prerenderer/es6/server.js
2.puppeteer初始化(判断平台是否linux,如果是Linux需要设置一些启动参数;启动puppeteer)@prerenderer/renderer-puppeteer/es6/renderer.js
阶段3:开始访问路由并获取html
1.spa-prerender index.js->@prerenderer/prerenderer/es6/index.js -> @prerenderer/renderer-puppeteer/es6/renderer.js
2.开启一个限流器,每次最多渲染 n 条路由,避免内存崩溃
3.puppeteer开启一个新标签,判断是否有inject,如果有,注入到window上
4.拼接端口、设置viewport,拼接router,形成url,发起页面的请求
5.判断options中是否设置了renderAfterDocumentEvent,如果有,给页面添加一个事件监听器,当触发事件的时候,将__PRERENDER_STATUS属性设置为true
6.访问页面,等待加载完成(如何确定页面加载完成, waituntil: 'networkidle0'//在500ms内没有网络请求,这个设置可以通过puppeteerOptions.navigationOptions.waituntil修改)
等待捕捉,分为三种等待时机:
1.等待固定时间,renderAfterTime(利用settimeout结合promise实现)
2.等待抛出某个事件:renderAfterDocumentEvent,该事件需要事先在页面写好抛出的时机
3.等待某个元素出现:renderAfterElementExists
阶段4:保存html
spa-prerender index.js 遍历结果,拼接文件夹路径并保存html。
实践过程中的常见问题
1. 如果一个项目有10个页面,其中首页需要SEO,于是使用了预渲染,另外9个页面仍然是由js渲染。那么在访问其他9个页面的时候,刷新页面,会先显示首页的内容一闪而过。这种问题如何解决?
产生这种情况的原因在于:在单页应用中,实际上只有一个物理页面,那就是 index.html。我们访问的所有页面实际都是 index.html,先进入 index.html 然后再执行 js 构建 dom。那么此时如果我们首页是已经预渲染好的,那么就会有内容,在 js 构建出对应路由的内容之前,就会先出现首页的内容。
spa-prerender 考虑到了这种问题。在预渲染的过程中,会首先保留原来“纯净”的index.html,并重命名为“index-spa.html”。
而后,在 nginx 配置中,利用 try_files 指令的优先级配置特点,让用户在刷新的情况下,如果有对应物理文件则访问物理文件(预渲染生成的文件),如果没有对应物理文件则降级访问 index-spa.html,就可以解决上述问题。nginx 配置指令如下:
location /{ alias /Users/zks/code/xkw/xop/dist/; try_files $uri $uri/ /index-spa.html; }
此时预渲染生成的文件将被优先返回($uri),如果未匹配,才会交由 index-spa.html 处理。
2. 如果项目打包有前缀怎么办?
如果项目有publicPath,那么在 dist 目录下会多一层根目录。此时需要在预渲染配置中添加 basePath 的选项。此时 express 会从 dist/basePath 目录中去寻找 index.html。
配置如下:
const options = { staticDir: path.join(__dirname, 'dist'), basePath: 'base',//当项目有basePath的时候设置。同router中的base和publicPath。确保staticDir/basePath/index.html存在 routes: ['/','/exam', ], ... }
3. 如何控制渲染器开始进行HTML保存的时机?
我们可以通过 options 中三个参数来控制:
3.1.renderAfterTime:等待固定时间之后(从页面开始发起访问算起)
3.2.renderAfterDocumentEvent:等待抛出某个事件,该事件需要事先在页面定义好触发的时机,比如在 Vue 的 mounted 函数中定义:
new Vue({ router,render: h => h(App), mounted () { //在mounted之后触发custom-render-event // 预渲染器在收到这个事件之后将开始进行页面的保存工作 document.dispatchEvent(new Event('custom-render-event')) }}).$mount('#app')
3.3.renderAfterElementExists:等待某个元素出现。我们可以在异步 ajax 返回之后,增加某个元素。当渲染器检测到此元素出现之后进行页面保存,此时保存的页面就包含了 ajax 返回的数据。
4. 首页预渲染生成的 DOM 元素,会不会被 js 复用?还是删除重新构建?
仿照SSR的思路,我们可以通过在根节点上设置 data-server-rander="true",这样在客户端 js 会知道这个是已经渲染完成的 DOM,不会粗暴去替换它。而是执行一个“注水”的过程(也就是hydration)。可以充分复用预渲染生成的 DOM 元素。
点击下方卡片可以关注